Key highlights
- Learn how to setup Composer PHP step-by-step to simplify dependency management and boost project efficiency.
- Understand what Composer in PHP is and why it’s essential for managing libraries and maintaining stable environments.
- Explore how to install, configure and use Composer commands effectively for seamless PHP development and package management.
- Know the minimum PHP version, setup requirements and troubleshooting tips to ensure smooth installation without configuration errors.
- Uncover how Bluehost WordPress hosting for PHP simplifies Composer setup with preinstalled tools, SSH access and superior performance.
Composer is the go-to dependency manager for PHP, powering modern PHP development with over 380,000 packages and billions of downloads worldwide. It helps developers easily install, update and manage third-party libraries within any PHP project.
Whether building a new application or maintaining an existing one, learning how to setup Composer PHP ensures efficient version control and seamless project workflows.
In this guide, you’ll learn the step-by-step process to install Composer, verify your installation and use its most useful commands. From learning what Composer does to resolving setup errors, this guide helps manage dependencies efficiently and enhance overall PHP project performance.
TL;DR
- Learn what Composer is in PHP and why it’s essential for managing dependencies in modern PHP projects.
- Check the minimum PHP version for Composer (7.2.5+) and required extensions before installation.
- Follow a step-by-step guide to install Composer in PHP, verify setup and fix common installation errors.
- Set up Composer for a new project using composer init, composer install and a structured composer.json file.
- Use essential Composer commands like composer require, composer update and autoloading to manage PHP projects efficiently.
What is composer PHP?
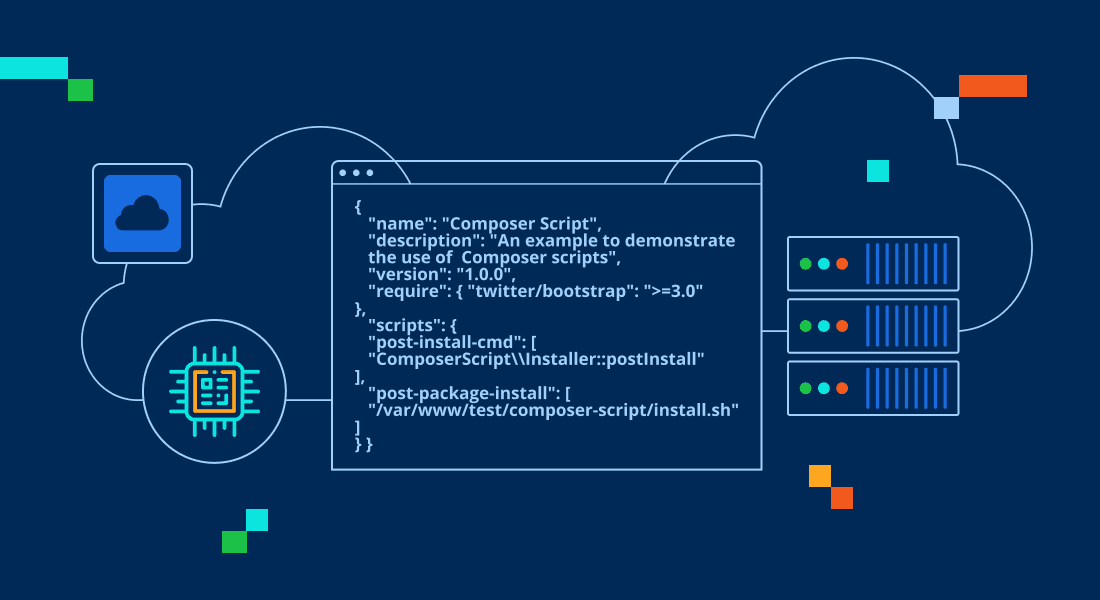
Composer in PHP is a dependency manager that automatically handles the installation, updates and versioning of libraries required in a PHP project. It functions like a package manager, preventing manual downloads and compatibility issues by managing dependencies through one centralized composer.json file.
It lets you specify the PHP packages your project requires and automatically installs them with correct versions from its extensive online repository is makes your PHP development faster, more organized and easier to maintain.
Composer helps keep dependencies consistent across local development and production by locking versions in composer.lock.
What are the minimum requirements to install composer in PHP?
To install Composer in PHP, you need at least PHP 7.2.5 or higher and a working command line interface (CLI) on your system. Composer supports all major operating systems, including Windows, macOS and Linux.
Here’s a quick checklist before running the Composer installer:
- PHP version: 7.2.5 or newer (recommended: PHP 8.0+)
- Required PHP extensions: Json, Phar, OpenSSL and mbstring
- Command line access: Use Terminal, Command Prompt or PowerShell
- Internet connection: To download packages from getcomposer.org
- Write permissions: For the project directory or global installation path (/usr/local/bin)
These requirements ensure that Composer can download dependencies, create the composer.json and composer.lock files and run essential Composer commands without errors. When PHP settings or extensions are misconfigured, Composer shows errors like “settings are incorrect” or “installer corrupt,” prompting necessary fixes.
Also read: What is PHP Web Hosting and Which Hosting Provider Should I Use?
How to install Composer PHP step by step
Installing Composer in PHP is simple if you follow the correct sequence. Here’s a step-by-step guide to help you download and install Composer correctly on any operating system.
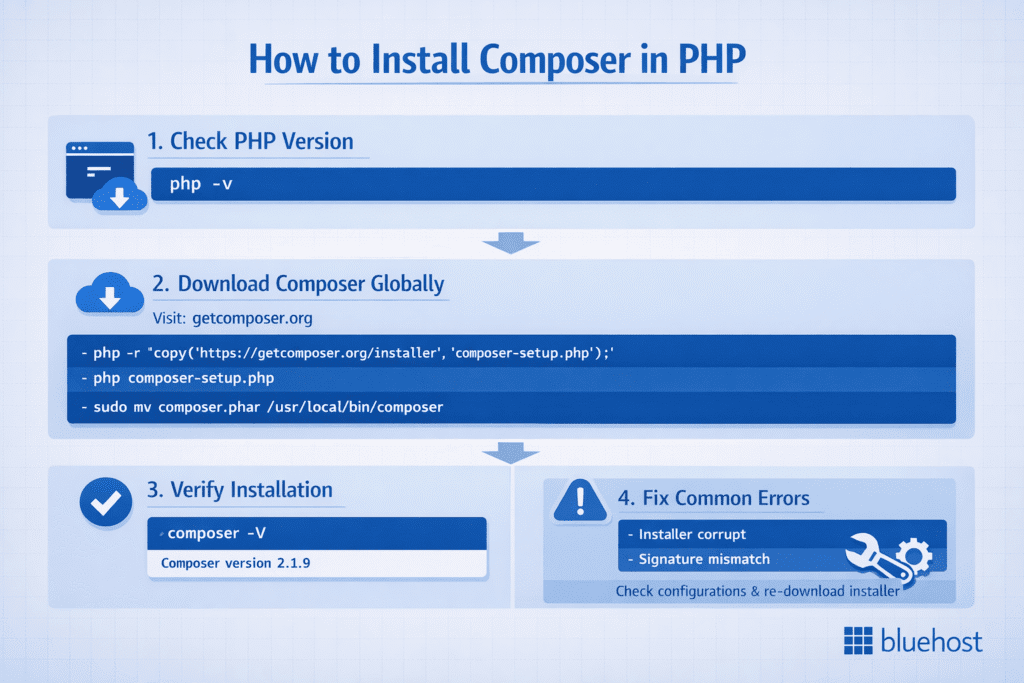
Step 1: Check your current PHP version
Before installing Composer, make sure PHP is already installed and properly configured.
Run the following command in your command line or terminal:
php -vIf your PHP version is 7.2.5 or higher, you’re ready to proceed. Otherwise, update your PHP installation to the latest stable version for smooth compatibility.
Also read: How to Update PHP Version: Manage php.ini and PHP Handlers
Step 2: Download composer globally
Visit the official Composer website at getcomposer.org and copy the installation command to install composer globally. In your terminal or command prompt, run:
php -r "copy('https://getcomposer.org/installer', 'composer-setup.php');"
php composer-setup.php
php -r "unlink('composer-setup.php');"
To make Composer accessible globally (from any directory), move it to your system path:
sudo mv composer.phar /usr/local/bin/composer This allows you to run the composer command from anywhere on your system.
Pro tip: On Windows, you can download Composer-Setup.exe from the official website to install Composer globally using a graphical installer.
Step 3: Verify installation using the composer command
Once installation is complete, verify that Composer is running correctly:
composer -V If the command displays the Composer version, your installation is successful. You can now use Composer to manage dependencies in your PHP projects.
Step 4: Fix common installation errors
If you encounter messages like the following during Composer installation:
- “The following settings are incorrect”
- “Installer corrupt”
- “Installer corrupt: Signature mismatch”
These errors usually occur due to a corrupted installer file, missing PHP extensions, or PHP configuration issues.
Bluehost provides a Composer-ready hosting environment and ensures PHP compatibility. However, Bluehost customer support cannot assist with Composer-specific commands, dependency errors, or application-level configuration.
For troubleshooting, you should:
- Verify your PHP version and required extensions
- Re-download the installer from the official Composer website
- Check the Composer installer integrity using the command below
php -r "if (hash_file('sha384', 'composer-setup.php') === '<expected-hash>') { echo 'Installer verified'; } else { echo 'Installer corrupt'; unlink('composer-setup.php'); } echo PHP_EOL;" If the installer is verified successfully, rerun the installation script. This ensures your Composer setup is clean, secure, and ready for use.
For deeper troubleshooting, refer to:
- Official Composer documentation
- Packagist package documentation
- Developer forums and community resources
Also read: PHP vs JavaScript – Key Differences & Comprehensive Comparison Guide
How to set up a composer for a new PHP project?
Once you’ve successfully installed Composer on your system, the next step is to set up Composer for your PHP project. This process ensures all dependencies, libraries and packages are managed automatically, making your PHP programming language workflow cleaner, faster and easier to maintain.
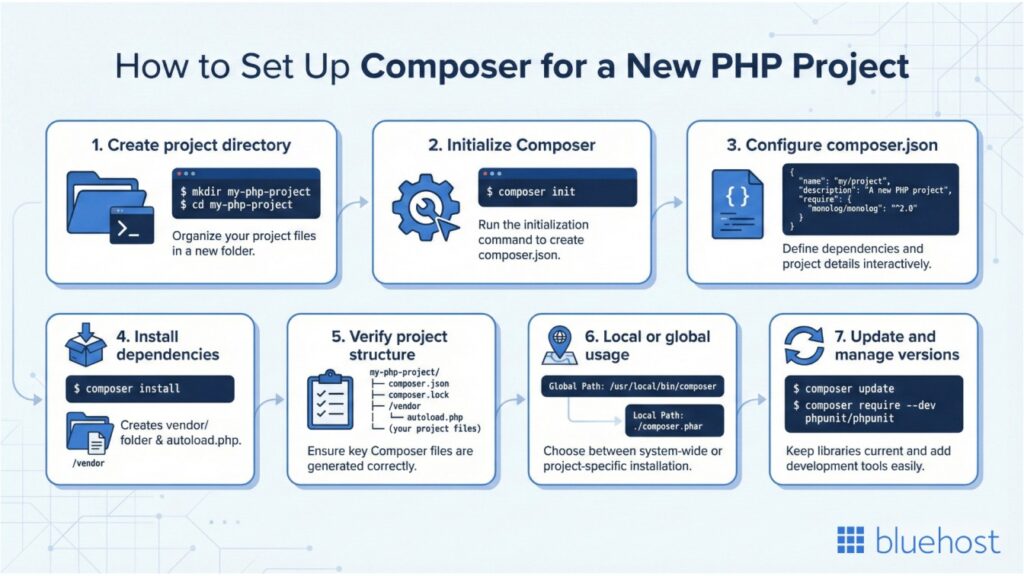
Step 1: Create a new project directory
Start by creating a specific directory for your PHP application. If your application will connect to a MySQL database, you may want to check your MySQL version to ensure compatibility before proceeding. You can use the command line or command prompt:
mkdir my-php-project
cd my-php-project
This will be your current directory where Composer stores all necessary files, including the composer.json and composer.lock files.
Note: Keeping each PHP project in its own folder ensures proper dependency management and avoids conflicts between versions.
Step 2: Initialize composer with composer init
Run the following command inside your project directory:
composer initThis starts the interactive Composer setup process that helps you create a composer.json file. You’ll be asked for details like:
- Project name
- Description (short description)
- Author
- Minimum stability
- Required PHP version
After you confirm the settings, Composer will generate a composer.json file with all your project’s configuration details.
Step 3: Configure your composer.json file
The composer.json file defines the packages, dependencies and specific versions needed for your PHP project.
Example configuration:
{
  "name": "john/php-app",
  "description": "Example PHP project setup using Composer",
  "require": {
    "monolog/monolog": "^3.0"
  }
}
You can edit this file anytime to add new packages, PHP extensions or custom scripts. When you save and run Composer, it reads this configuration to install the required dependencies automatically.
Step 4: Run composer install to setup dependencies
Once the composer.json file is ready, execute the following command to download all packages and libraries:
composer install Composer will download the latest stable version of each dependency and create a composer.lock file that records the specific versions installed. This ensures consistent environments across different systems or developers.
If any error appears (like “echo installer corrupt”), check your PHP version, settings or internet connection to ensure everything is correct.
Also read: Change PHP Display Errors Setting for Debugging and Security
Step 5: Verify installation and directory structure
After installation, your project directory should include:
- Composer.json: Project configuration
- Composer.lock: Version log
- /vendor: Installed libraries
- Vendor/autoload.php: Used to autoload PHP classes
You can include this in your PHP files like so:
require DIR . '/vendor/autoload.php'; This line lets your PHP application automatically access all installed packages, simplifying dependency management across your entire project.
Step 6: Optional – local or global installation
You can use Composer on a per-project basis (local installation) or install it globally, so it works from any directory.
For global use, make sure Composer is placed under /usr/local/bin/composer or /usr/local/bin (Linux/Mac) so you can run commands from anywhere.
Step 7: Update dependencies and manage versions
To upgrade packages or install new versions, use:
composer update For development dependencies, add the –dev flag:
composer require --dev phpunit/phpunit This keeps your setup clean and ensures you’re using the best match versions for your PHP system.
Pro tip for developers
Always verify your installation using this following script:
php composer.phar install If you see “echo installer verified”, your setup and settings are correct.
Use this following command to check your Composer version anytime:
composer -V After confirming your Composer version, it’s time to dive into practical usage and manage dependencies in PHP projects efficiently.
How to use composer in PHP projects efficiently?
Once you’ve learned how to setup Composer PHP, the next step is understanding how to use Composer in PHP projects efficiently. Composer simplifies dependency management, making it easy to install, update and organize packages in your PHP application without manual effort.
Let’s break down how you can manage dependencies using Composer commands effectively.
1. Install new packages using composer require
To add a new library or package to your PHP project, use the following command:
composer require vendor/package-name This command updates your composer.json file and installs the required dependency automatically.
If you’re following a tutorial that uses specific versions, you can specify it like this:
composer require monolog/monolog:^3.0 Pro tip: The composer require command is ideal for adding both production and development dependencies (use –dev for dev tools like PHPUnit).
2. Update existing dependencies using composer update
When a new version of your library or framework is available, simply run:
composer update This updates all your dependencies to the latest compatible versions based on your composer.json settings.
If you only want to update a specific package, use:
composer update vendor/package-name After each update, Composer automatically regenerates your composer.lock file, ensuring your project remains consistent across different environments.
3. Remove unused packages
If you’ve removed a feature or library from your code, you can delete its dependency safely using:
composer remove vendor/package-name This keeps your project clean and prevents unnecessary libraries from taking up space. If you’re experiencing performance issues or site timeouts, you may want to learn how to fix Error 524 fast.
4. Autoload classes automatically
When you install packages, Composer generates an autoload script located in /vendor/autoload.php.
Include this in your PHP file to automatically load classes and libraries:
require __DIR__ . '/vendor/autoload.php';This feature saves developers from manually including files and ensures smoother dependency management in large projects.
5. Manage project environments efficiently
Using Composer per project is the best practice for scalable PHP development.
- Keep a dedicated composer.json for each application.
- Use composer install when cloning or deploying a project to ensure consistent dependencies.
- Always check the minimum PHP version for Composer compatibility before upgrading your environment.
6. Why efficient usage matters
By using Composer in PHP effectively, you save hours of manual setup, reduce version conflicts and keep your PHP programming workflow error-free. Composer also improves collaboration, every developer gets the same package versions via composer.lock.
In short, mastering how to install Composer php, configure composer.json and use Composer PHP projects is a must-have skill for every modern PHP developer.
Now that you understand how to use Composer in PHP projects, let’s look at the most commonly used Composer commands.
What are the most useful composer commands for developers?
When learning how to setup Composer PHP, it’s essential to understand key commands that simplify and speed up dependency management. These commands help you install packages, manage the lock file, update dependencies and configure settings, all from your command line interface.
| Composer command | What it does | When to use it |
|---|---|---|
| composer install | Installs all dependencies listed in composer.json using versions locked in composer.lock | When setting up an existing project or deploying to a new server |
| composer update | Updates dependencies to the latest versions allowed by composer.json and refreshes composer.lock | When you want to upgrade packages or apply dependency updates |
| composer require vendor/package-name | Adds a new package and updates both composer.json and composer.lock | When installing a new library or framework dependency |
| composer require –dev phpunit/phpunit | Installs a development-only dependency | When adding testing or development tools |
| composer dump-autoload | Regenerates the autoload files for faster and accurate class loading | After adding new classes or modifying autoload settings |
| composer create-project vendor/project-name | Creates a new project from a predefined package or framework | When starting a new PHP project from a template |
| composer diagnose | Checks system configuration, PHP extensions and Composer setup | When troubleshooting installation or configuration issues |
| composer -V | Displays the installed Composer version | To verify installation or confirm the active Composer version |
Below are the most useful Composer commands every PHP developer should know.
1. composer install – Install all project dependencies
This is the default command to install everything listed in your composer.json file. It checks your lock file to ensure the exact versions are installed:
composer install If the lock file doesn’t exist, Composer automatically generates one after installation. This ensures consistency across all users, environments and servers.
Pro tip: Use this command when setting up an existing PHP project from a Git repository or a hosting account.
2. composer update – Update to the latest versions
The composer update command upgrades your packages to the latest version allowed by your configuration.
composer update You can update individual packages as well:
composer update vendor/package-name After running this command, Composer refreshes your composer.lock file to reflect the new package versions. Always make sure your settings are correct and your PHP version meets the required stability before updating.
3. composer require – Add new dependencies
To add Composer packages to your PHP project, use:
composer require vendor/package-name This command updates both the composer.json and composer.lock files. If you need to install a development-only package, use:
composer require --dev phpunit/phpunit Example: Developers often use this to integrate logging (monolog/monolog) or caching (symfony/cache) libraries in their applications.
4. composer dump-autoload – Refresh class autoloading
Whenever you modify or add new files, you should refresh Composer’s autoload list using:
composer dump-autoload This command regenerates the list of PHP classes for faster performance and ensures your autoload.php file is always up to date.
5. composer create-project – Create a new project from a template
You can quickly start a new PHP application using this command:
composer create-project laravel/laravel my-app This downloads the latest stable version of the package and sets up a new project directory.
6. composer setup.php install dir – Custom installation directory
Composer does not support setting a custom installation directory through installer flags. To install Composer globally in a specific directory, you must manually move the generated composer.phar file after installation.
First, run the installer:
php composer-setup.php Then move Composer to a directory included in your system PATH:
sudo mv composer.phar /usr/local/bin/composer This makes the composer command available system-wide from any directory.
7. composer diagnose – Check for configuration issues
If your installation throws errors such as “Installer corrupt” or “settings incorrect”, use:
composer diagnose This command performs a full system scan to verify settings, confirm PHP extensions are configured and ensure the Composer version matches requirements.
8. Windows users: Composer-setup.exe
If you’re using Windows, you can easily install or repair Composer using the official Composer-Setup.exe file from getcomposer.org. It automatically handles configuration, adds Composer to the system PATH and sets the default installation directory.
Bonus – Add composer to PATH manually (Linux/Mac)
If you’ve installed Composer locally and want to make it global, add it to your PATH manually:
sudo mv composer.phar /usr/local/bin/composer This step allows you to run the following line from any directory:
composer -V This displays the latest version of Composer installed on your system.
Once Composer is fully set up and verified, the next step is choosing the right hosting environment to run your PHP projects efficiently.
Why choose Bluehost for your PHP projects with composer?
At Bluehost, we make it easier for developers to work with PHP and Composer by providing a preconfigured, Composer-ready environment across all our Shared, VPS and Dedicated hosting plans. Our goal is to help you focus on building and deploying your applications, while we handle the setup, compatibility and performance behind the scenes.
1. We provide composer preinstalled on all servers
We’ve already installed Composer by default on our hosting servers, no need to download or install Composer manually. You can start using it immediately through your SSH access or command line.
For example, you can check the Composer version running on your account with this command:
/opt/cpanel/composer/bin/composer -V This ensures that you’re using the latest stable version of Composer that’s fully compatible with your PHP environment.
Tip from us: Before running any commands, always create a backup of your website. We offer CodeGuard, which automatically protects, monitors and restores your website daily.
Also read: How to Change PHP Versions on VPS and Dedicated Servers
2. Enable SSH access to run composer commands
To use Composer, you’ll need to have SSH access enabled.
- If you’re on Shared Hosting, enable SSH from your cPanel → Security → SSH Access.
- For VPS or Dedicated Hosting, you can enable SSH access through your server dashboard.
Once enabled, simply log in via SSH and move into your project directory, then run Composer commands like:
cd /home/user/public_html
/opt/cpanel/ea-php81/root/usr/bin/php /opt/cpanel/composer/bin/composer diagnose
This checks if your settings are correct and ensures that everything is configured properly on our servers.
3. We support the correct PHP versions out of the box
Our hosting servers come preloaded with the latest PHP versions, meeting the minimum PHP version for Composer. When running Composer commands, always use the full PHP binary path for best results:
/opt/cpanel/ea-php81/root/usr/bin/php /opt/cpanel/composer/bin/composer install You can change your PHP version anytime from your cPanel → MultiPHP Manager, giving you complete control over your environment.
4. (Optional) Adjust INI settings for performance
Some applications may require higher memory limits or additional PHP settings. You can easily customize this before executing your Composer commands:
/opt/cpanel/ea-php81/root/usr/bin/php -d memory_limit=512M /opt/cpanel/composer/bin/composer update By increasing the memory limit (for example, from 256M to 512M), we help you install and update large packages smoothly, without timeouts or performance issues.
5. Run composer commands effortlessly
Once SSH is enabled and PHP is configured, you can run any Composer command directly:
/opt/cpanel/composer/bin/composer require spatie/laravel-tags You can also run it as a single command line to include custom memory limits or PHP versions:
/opt/cpanel/ea-php81/root/usr/bin/php -d memory_limit=512M /opt/cpanel/composer/bin/composer require spatie/laravel-tags This installs the package or module you need in your specific directory, even if it’s not part of your global PHP installation.
6. Our support & best practices
While we provide Composer and a fully compatible PHP environment, we want to be transparent. Our support team cannot directly assist with Composer-related commands or configurations.
If you face issues such as “echo installer corrupt” or dependency errors, we recommend:
- Checking the official Composer Documentation
- Browsing available PHP packages on Packagist.org
- Visiting developer forums for detailed troubleshooting steps
We strongly recommend backing up your site before executing any installation or update command, to keep your projects secure and recoverable.
Final thoughts
Learning how to set up Composer in PHP is the foundation of efficient dependency management for modern developers. From meeting the minimum PHP version for Composer to running php composer setup and php composer install, every step ensures smoother performance and cleaner workflows. Understanding what Composer in PHP is and how to use Composer in PHP helps automate updates, manage libraries and maintain stable builds.
For developers who want full control, advanced configuration and optimized performance, our Bluehost VPS Hosting offers the perfect environment. With SSH access, flexible PHP versions and Composer preinstalled, it’s built to handle complex projects with speed and security.
Power your next PHP application confidently with Bluehost VPS Hosting, optimized for Composer-driven development. With Bluehost, you get pre-installed WordPress.
FAQs
To set up Composer in PHP, install PHP 7.2.5 or higher, download the installer from getcomposer.org, run php composer-setup.php and move composer.phar to /usr/local/bin/composer. Verify installation using composer -V to confirm Composer is ready.
To initialize Composer in PHP, open your project directory and run composer init. This interactive command creates a composer.json file. After configuration, run composer install to download dependencies and generate or use the composer.lock file for version consistency.
Yes. Composer depends on PHP, so the PHP programming language must be installed first. Without PHP, Composer cannot execute commands or parse your project’s json file. Always ensure your PHP version meets Composer’s minimum requirements before running php composer install or other setup commands.
Composer in PHP is a dependency manager that automates the installation, update and version control of PHP libraries. It uses a composer.json file to define dependencies and downloads them into the project’s vendor directory. By using Composer in PHP, developers can easily manage frameworks, libraries and packages, ensuring compatibility and stability across projects.

Write A Comment