Key highlights
- A good roofing company website leads with trust: license, insurance, reviews and a clear call to action above the fold.
- Mobile-first design is non-negotiable since most homeowners search for roofers on their phones.
- Every roofing website needs six core pages to convert visitors into quote requests.
- You can build a roofing company website without coding using Bluehost AI Website Builder’s 3-day free trial, no credit card required.
- Good roofing website design balances strong visuals with fast load times.
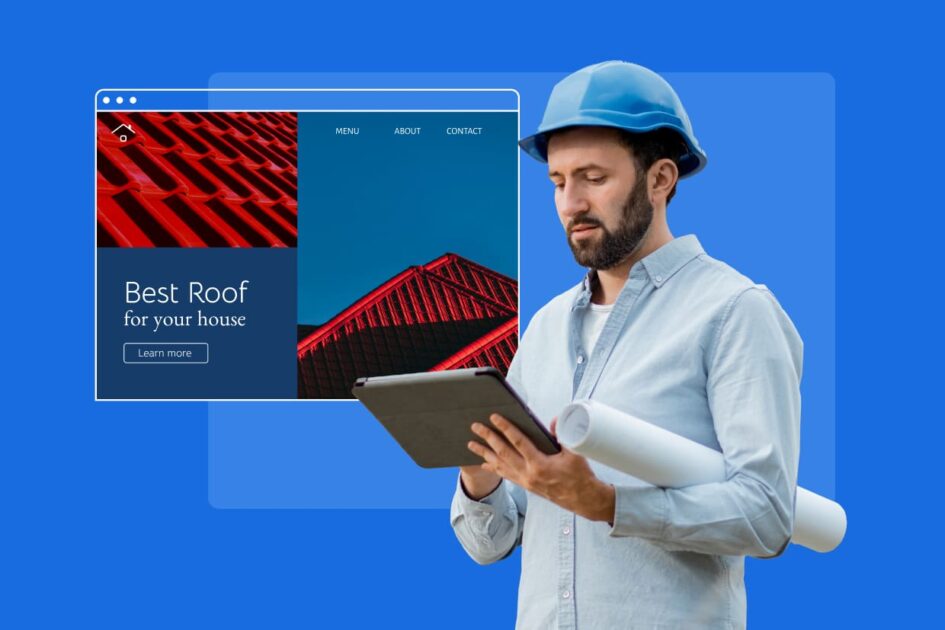
Your roofing truck is wrapped. Your reviews are solid. But when a homeowner Googles “roofer near me” at 9 PM and lands on your website, you have about three seconds before they click away.
Roofing website design is not about looking impressive. It is about looking trustworthy, loading fast and making it easy for someone to call you or request a quote. This guide walks you through everything a beginner needs: what pages to build, what good roofing web design actually looks like, the best roofing website examples to learn from and how to get your site live without hiring a developer.
What makes a good roofing company website design?
Most roofing company websites fail for the same reasons: too much clutter, no clear next step and nothing that makes a homeowner feel confident enough to call. Good roofing website design fixes all three.
Trust signals that convert visitors into leads
Roofing is a high-stakes purchase. A homeowner is handing over thousands of dollars to someone working on their biggest asset. Your website needs to make that decision feel safe before they ever pick up the phone.
The trust signals that matter most:
- State license number displayed on the homepage
- Proof of insurance (general liability and workers’ comp)
- Years in business
- Google review rating with a direct link to your profile
- Better Business Bureau or local industry association badges
- A real physical address, not just a contact form
Put these above the fold or in the site header so they are visible before a visitor scrolls.
Why mobile-first design matters for roofers?
Most people searching for a local roofer are doing it on their phone, often right after a storm or when they spot a problem. If your site loads slowly or forces them to pinch and zoom, they are gone.
Mobile-first roofing web design means:
- Your phone number is a tappable link, not just text
- Your contact form works cleanly on a small screen
- Images are compressed so they load in under three seconds
- Your navigation collapses into a simple menu instead of a cluttered bar
Google also ranks mobile-friendly sites higher in local search results. So mobile-first is not just a design preference. It directly affects whether homeowners find you.
Speed, visuals and the balance between them
Roofing websites are naturally visual. Before-and-after photos, completed project galleries and aerial shots of finished roofs all build credibility. The problem is that large, uncompressed images are one of the top reasons roofing websites load slowly.
The fix is straightforward. Compress every image before uploading. Use modern formats like WebP where your platform supports it. Avoid auto-playing videos on the homepage. And never sacrifice load speed for visual flair. A site that loads in two seconds and looks clean will outperform a slow, flashy one every time.
How to build a roofing company website with Bluehost AI Website Builder?
Building a roofing company website used to mean hiring a developer, waiting weeks and spending thousands before a single visitor landed on your page. Bluehost AI Website Builder changes that. It is an agent-powered platform that builds your site from a single prompt, in real time, through natural conversation. No coding. No design tools. No blank-page anxiety.
The model is called Build-to-Buy: you build your complete site during a 3-day free trial before paying anything. Domain and hosting come at the end, not the beginning.
Here is exactly how it works.
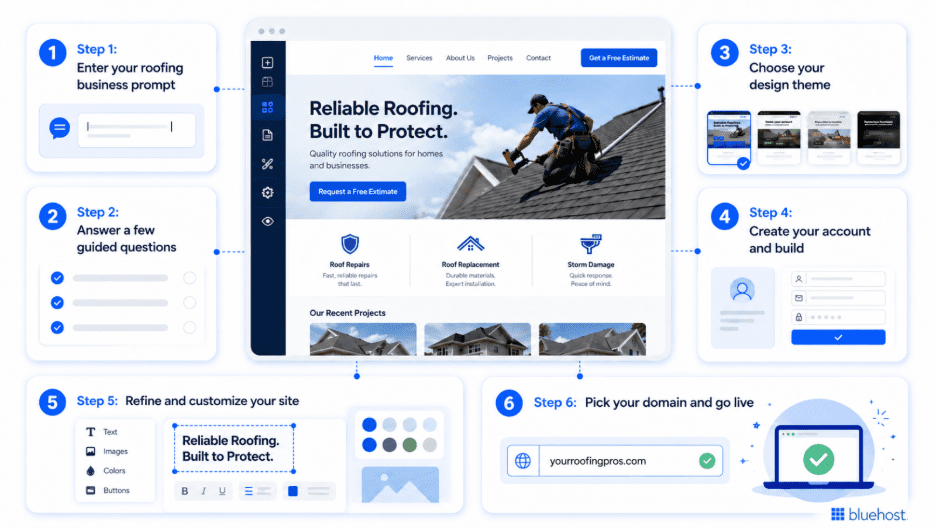
Step 1: Enter your roofing business prompt
Go to bluehost.com/ai-website-builder. You will see a prompt entry field and a Prompt Gallery with 18 real prompts across five categories including Home Services, which is the closest fit for a roofing business.
You can type your own prompt (“Build a website for my residential roofing company in Denver”) or pick a prompt from the gallery and edit it to fit your business. Each gallery card shows the actual prompt and the site it produced, so you can see exactly what you are working with before you start.
No account required at this stage. No credit card. Just your prompt.
Step 2: Answer a few guided questions
After your prompt is submitted, the conversational AI agent asks a short series of clarifying questions. These are not open-ended text fields. Each question comes with AI-generated suggested answers as clickable chips. You tap a chip or type your own answer.
For a roofing business, expect questions like:
- What would you like your business to be called? (The agent generates five name suggestions based on your prompt. You can pick one or type your own.)
- What colors or palette should we use?
- What mood do you want for the site: Modern, Classic, Bold, Rustic or Elegant?
While you answer, the right panel generates your typography in real time, pairing a title font and a body font based on your color and style choices. You do not choose fonts manually. The agent handles it.
Step 3: Choose your design theme
Once your questions are answered, three named design themes appear as selectable cards. Each theme is contextually generated based on your inputs, not pulled from a generic template library.
For a roofing company going with a bold, modern palette, you might see options like:
- Urban Shield – Clean lines and high contrast for a business that means business
- Ironclad Modern – Sharp, structured and built for credibility
- Foundry Classic – Grounded and professional with a nod to craftsmanship
Pick the one that fits your brand. The “Build my site” button activates.
Step 4: Create your account and build
Clicking “Build my site” is when you create your Bluehost account. Not before. You can sign in with Google, an existing Bluehost account or a new email. This is the only point in the entire process where an account is required.
Once you sign in, the agentic AI gets to work. Watch your site get built in the right preview panel as every page and section appears live. The build takes up to 5 minutes. In some flows, the agent first shows you a full site outline listing every page and named section, so you can review the structure before building starts.
Step 5: Refine and customize your site
When the build is complete, the agent writes a summary of everything it created. From here, you refine through conversation. Every request updates the page instantly.
You have three editing modes:
- Full-chat AI: Type requests in the main chat panel to make whole-site changes (“Make the homepage headline more direct” or “Add a storm damage repair section to the services page”)
- Inline section AI: Click the sparkle icon on any section for quick, scoped changes to just that block
- Manual direct: Use the Edit and design panel to adjust colors, fonts, radius and shadow without using any AI credits
Each AI request during the trial uses 1 credit. You get 5 credits in the free trial. If you want to start fresh, use the Regenerate option in the project name dropdown to rebuild from your original prompt without restarting the trial.
Step 6: Pick your domain and go live
When your site is ready, click “Publish” in the top bar or “Upgrade now” in the trial banner. The checkout flow opens at bluehost.com/checkout/ai-builder/publish.
The agent finds the best domain options for your roofing business based on your business description and presents three suggestions with availability and annual pricing. You can also search manually, use an existing domain or add one later.
Select your domain, review the Get Online plan and continue to checkout. Your domain is free for the first year. Yoast SEO Premium comes pre-installed so your roofing website is set up for local search from day one. And if you need help at any point after launch, 24/7 human support is included on the paid plan.
If you are still on the fence, the 3-day free trial gives you a complete, fully built roofing website to explore before you spend a dollar.
Essential pages every roofing website needs
A roofing company website is not just a digital business card. Every page has a job: answer a question, build trust or move a visitor closer to contacting you. Here are the six pages every roofing website needs to do that effectively.
Home page
Your home page is doing the most work. It is the first thing most visitors see and it needs to answer three questions instantly: who you are, what you do and where you do it.
Above the fold, you need:
- A clear headline that includes your service and location (“Roofing Company Serving Denver and the Front Range”)
- A visible phone number that is tappable on mobile
- A primary CTA: “Get a free quote” or “Call now”
- At least one trust signal: years in business, number of projects completed or your Google review rating
Below the fold, lead with your core services, a short about section and a sample of your best project photos. Keep the page focused. A cluttered home page pushes visitors to competitors.
Services page
Every roofing service you offer deserves its own clear section, and your most profitable services deserve their own dedicated pages. A single “Services” page that lists everything without detail does not help visitors and does not help your local SEO.
Break your services out clearly:
- Residential roofing
- Commercial roofing
- Roof repair
- Storm damage and insurance claims
- Roof inspection
- Gutter installation or replacement
For each service, explain what is included, what types of properties or roofs you work on and what the process looks like. Visitors who land on a specific service page are often closer to a decision. Give them enough detail to feel confident calling you.
About and credentials page
Homeowners hire roofers they trust. Your about page is where that trust gets built. Skip the generic company history paragraph and focus on the details that matter to a potential customer.
Include:
- How long you have been in business and the area you serve
- Your license number and proof of insurance
- Certifications from manufacturers like GAF, Owens Corning or CertainTeed
- A photo of you or your team (real photos outperform stock every time)
- A short statement on how you handle projects and what customers can expect
This page will not drive much direct traffic but it will close leads who found you through another page and want to verify you are legitimate before calling.
Project gallery and before-and-after photos
Nothing sells roofing work like visual proof. A project gallery shows homeowners the quality of your work before they ever speak to you.
For each project, try to include:
- A before photo and an after photo
- The type of roof and materials used
- The location (city or neighborhood, not a full address)
- A one or two sentence description of the job
Organize your gallery by project type if you have enough photos. Residential, commercial and storm damage repairs attract different visitors with different needs. A well-organized gallery also gives you a natural place to use keywords like “roofing company website design” and location terms without forcing them.
Testimonials and reviews page
Word of mouth built your roofing business. Your website should make that word of mouth visible.
A dedicated testimonials page collects your best reviews in one place and gives you somewhere to send prospects who want social proof before committing. Pull reviews from Google, Facebook and any industry platforms you use.
For each testimonial, include:
- The customer’s first name and last initial
- The city or neighborhood
- The type of work done
- A direct quote, not a paraphrase
Also embed your live Google review widget on the page if your platform supports it. Live ratings update automatically and carry more weight than static quotes because visitors know they cannot be cherry-picked.
Contact and quote request page
Your contact page is where leads convert. Keep it simple and remove every possible point of friction.
At minimum, include:
- A short quote request form: name, phone, email, type of work needed and preferred contact time
- Your phone number as a tappable link
- Your service area listed clearly
- Your business hours
- A Google Maps embed if you have a physical location or office
Avoid long forms with too many required fields. Every additional field you add reduces the number of people who complete it. Ask for what you need to follow up, nothing more.
Best roofing website examples to learn from
Looking at what works on real roofing websites is one of the fastest ways to improve your own. The best roofing websites are not the most expensive or the most elaborate. They are the ones that answer a visitor’s questions fast, prove credibility immediately and make the next step obvious. Here is what they have in common and five examples worth studying.
What the best roofing websites have in common?
After reviewing dozens of roofing company websites, a clear pattern emerges. The highest-converting sites all do the same handful of things:
- They lead with location. The hero section names the city or region served, so a visitor knows within two seconds that this company covers their area.
- They put proof above the fold. A star rating, a review count or a credibility badge appears before the visitor scrolls.
- They use real project photos. No stock images. Real before-and-after shots from actual jobs in the area.
- They make the phone number a tappable link on mobile.
- They keep navigation simple and services easy to scan.
- They end every section with a clear next step: call, get a quote or view more work.
Good roofing web design is not about visual flair. It is about removing every reason a homeowner might hesitate.
Examples worth studying
Forte Roofing (forteroofingfl.com)
Forte Roofing is a strong example of a local roofing website that performs fast after launch. The hero leads with a direct location claim and the company backs it up immediately with a 5.0 rating badge, rotating review cards and a short credibility video placed right below the fold. Services are laid out in clean, skimmable cards with real before-and-after project photos throughout. The lesson here: location specificity and proof placed early does more for conversions than any design treatment.
All County Exteriors (allcountyexteriors.com)
All County Exteriors handles multi-region coverage well by naming every county they serve right in the hero, then reinforcing it with a service-area map and project pins across their coverage zone. If your roofing business spans more than one city or county, this is the model to follow. Clarity about coverage prevents the single most common reason a visitor bounces: not knowing if you serve their area.
Phil DiBello Family Roofing
Phil DiBello Family Roofing is a strong example of consistent brand color use. Their red, white and black color scheme appears throughout the site to create a recognizable, branded look that carries from the homepage all the way to service pages. For a beginner building their first roofing website, this is the simplest design principle to apply: pick two or three colors and use them everywhere without variation.
Munz Roofing and Siding
Munz Roofing highlights important business details above the fold, including interest-free financing options, service area and years of experience, using eye-catching icons to make each point scannable. The financing callout is worth noting specifically. Many roofing jobs are unexpected expenses. A site that mentions financing early removes a significant objection before the visitor even thinks to raise it.
Guardian Roofing
Guardian Roofing’s website uses reviews and industry accolades prominently to prove trustworthiness, and includes a photo of the husband-and-wife owners to humanize the business. Real owner photos outperform headshots and team stock photos consistently in home services. They signal accountability: a real person stands behind this work.
Basic SEO tips for a roofing company website
A roofing company website that looks great but does not show up in search results is not working hard enough. You do not need to become an SEO expert to get found locally. A few fundamentals, applied consistently, will put your site in front of homeowners searching for roofers in your area.
Target local keywords on every page
Most homeowners searching for a roofer are not typing “roofing company.” They are typing “roofing company in Austin” or “roof repair Denver CO.” Those location-specific searches are where local roofing businesses win, and they are far easier to rank for than broad national terms.
Here is how to apply local keywords without overcomplicating it:
- Include your city or service area in your page title and H1 on every key page. Your homepage title might read “Residential Roofing Company in Charlotte, NC” rather than just “Home.”
- Write a unique title and meta description for each page. Do not use the same title across your services page, about page and contact page.
- Mention your service area naturally in body copy. A sentence like “We serve homeowners across Denver, Aurora and Lakewood” does more than a hidden footer list.
- Create individual service pages for your most searched services. “Roof repair in [city]” and “storm damage roofing [city]” each deserve their own page, not a paragraph on a combined services page.
- Use roofing-specific terms throughout your content: roofing contractor, residential roofing, roof replacement, roof inspection, shingle repair. These are the phrases homeowners and search engines associate with your business.
Avoid stuffing keywords into every sentence. Write for the homeowner first. Search engines reward pages that answer questions clearly and completely.
Set up and link your Google Business Profile
For a local roofing company, your Google Business Profile is often more important than your website for driving first contact. It is what appears in the map pack when someone searches “roofer near me” and it is where most homeowners check reviews before calling.
If you have not set one up yet:
- Go to business.google.com and claim or create your profile
- Use your exact business name, address and phone number, matching what appears on your website
- Select the correct primary category: “Roofing Contractor”
- Add your service area by city or zip code
- Upload at least ten real project photos
- Write a business description that includes your primary service and location
Once your profile is live, link it to your website and make sure your name, address and phone number are identical across both. Any inconsistency between your website and your Google Business Profile can hurt your local rankings.
Encourage every satisfied customer to leave a Google review. Reviews are one of the strongest local ranking signals and they directly influence whether a homeowner calls you or a competitor.
Use Yoast SEO to handle on-page basics
On-page SEO can feel overwhelming when you are starting out. Yoast SEO simplifies it by turning technical requirements into a plain-language checklist you can work through page by page.
If you build your roofing website with Bluehost AI Website Builder, Yoast SEO Premium comes pre-installed on the Get Online plan. You do not need to find, install or configure it separately. It is ready from day one.
For each page on your roofing website, Yoast SEO helps you:
- Set a focus keyword and checks whether it appears in the right places: your title, meta description, first paragraph and at least one subheading
- Write a meta description that fits within the character limit and includes your primary keyword
- Check readability: sentence length, paragraph length and use of subheadings
- Manage your page’s canonical tag to avoid duplicate content issues if you have similar service pages
- Generate an XML sitemap automatically so Google can find and index all your pages
The traffic light system Yoast uses (red, orange and green indicators) makes it easy to spot what needs fixing without any SEO background. Work through each page until the key indicators are green, then focus on building content and reviews rather than obsessing over technical details.
Good local SEO is not a one-time task. Update your Google Business Profile regularly, add new project photos, publish the occasional blog post about common roofing questions in your area and keep your service pages current. Consistent small actions over time outperform a single optimization push every year.
Lead generation features your roofing website must have
A roofing website that attracts visitors but does not capture leads is just an online brochure. These four features turn traffic into actual roofing jobs.
Click-to-call button
Most roofing leads still start with a phone call. A homeowner with a leaking roof is not filling out a form and waiting 24 hours.
Place your phone number as a tappable link in the header of every page, add a sticky click-to-call button at the bottom of the screen on mobile and include it in the footer. Test it on multiple devices before you publish. A number that displays correctly on desktop but fails to dial on mobile is one of the most common and most costly roofing website mistakes.
Quote request form
Not every visitor is ready to call. A short quote request form captures leads who prefer to send details first.
Keep it to five fields: name, phone, email, type of service needed and preferred contact time. Do not ask for roof size or project details at this stage. That comes during the follow-up call. Place the form above the fold on your homepage and on every service page, not hidden on a separate contact page.
Reviews and trust badges
Before a homeowner calls, they want proof that others have trusted you. Embed your live Google review widget on the homepage so ratings update automatically. Display your total review count alongside your average rating. Add three to five testimonials with the customer’s name, city and type of work done.
For trust badges, show what matters most: manufacturer certifications, your state license number, proof of insurance and any BBB or industry association membership. Place these near your primary CTA, not buried in the footer.
Live chat and AI front desk
Some visitors will not call and will not fill out a form, but they will ask a quick question in a chat window. Live chat captures that segment before they click away.
Keep the opening message specific: “Questions about a repair or replacement? We can help.” Set it to away mode outside business hours with an option to leave a name and number for a callback. If managing live chat feels like too much, an AI front desk agent can qualify visitors and collect contact details around the clock, so leads do not slip through on evenings and weekends.
Common roofing website mistakes to avoid
Good roofing website design is as much about what you leave out as what you put in. These are the four mistakes that consistently cost roofing businesses leads.
Overloading the services page
Listing every service you offer on a single page without detail does not help visitors and does not help your local SEO. A homeowner searching for “storm damage roof repair in Phoenix” needs a dedicated page that speaks directly to that need, not a paragraph buried in a long services list.
Break your most profitable services into individual pages. It gives visitors the detail they need to feel confident calling and gives search engines a focused page to rank for each service query.
Missing a clear call to action
Every page on your roofing website should tell the visitor exactly what to do next. If a homeowner reaches the bottom of your services page and there is no CTA, no phone number and no form, you have lost that lead.
Every page needs at least one clear next step: call now, get a free quote or view our work. Place it above the fold and repeat it at the bottom of every page.
Using stock photos instead of real project images
Visitors recognize stock photos instantly. A generic image of a roofer in a hard hat signals that you have nothing real to show, which is exactly the wrong message for a business built on trust.
Replace every stock image with a real project photo. Before-and-after shots from actual jobs in your service area do more for conversion than any design element.
Forgetting your service area
If a visitor cannot tell within seconds whether you serve their city or neighborhood, they will find a competitor who makes it obvious. Your service area should appear in your homepage headline, your page titles and your body copy on every key page.
Name the cities, counties or zip codes you cover. Do not make homeowners guess.
Final thoughts
Building a roofing company website does not have to be complicated or expensive. The fundamentals are straightforward: lead with trust, make it easy to call you, show real project photos and tell visitors exactly where you operate and what you do.
The roofing businesses that win online are not the ones with the flashiest websites. They are the ones that load fast, answer questions clearly and make the next step obvious on every single page.
If you are starting from scratch, Bluehost AI Website Builder gives you the fastest path from zero to a live, professional roofing website. The conversational AI agent builds your site from a single prompt in real time, with no coding and no design experience required. Yoast SEO Premium comes pre-installed so your site is set up for local search from day one. And the 3-day free trial means you can build and explore your complete site before spending anything, no credit card required.
Your next roofing customer is searching right now. Make sure your website is ready when they find you.
Try Bluehost AI Website Builder free for 3 days.
FAQs
A roofing company website needs six core pages: Home, Services, About, Project Gallery, Testimonials and Contact. Beyond pages, every roofing website should include a tappable phone number in the header, a quote request form above the fold, trust signals like your license number and insurance proof, real project photos and your service area mentioned clearly on every key page.
The cost varies widely depending on how you build it. Hiring a web designer typically costs anywhere from $1,500 to $10,000 or more for a custom roofing website. Using a website builder brings that cost down significantly. Bluehost AI Website Builder starts with a 3-day free trial at no cost, with the Get Online paid plan available at checkout when you are ready to publish.
Yes. Bluehost AI Website Builder is built specifically for people with no coding or design experience. You describe your roofing business in a prompt, answer a few chip-based questions about your colors and style and the agentic AI builds your complete site in real time. After the build you can refine anything through conversation or use the manual design panel to adjust colors and fonts without touching a line of code.
The best roofing website builder depends on what matters most to you. If you want the fastest path from prompt to published site with hosting, a free domain and SEO tools included, Bluehost AI Website Builder covers all of that in one place. The Build-to-Buy model means you see your complete roofing website before you pay anything, which makes it a low-risk starting point for any roofing business building their first site.
Start with three fundamentals. First, include your city and service type in your page titles and body copy on every key page. Second, claim and fully complete your Google Business Profile and make sure your business name, address and phone number match exactly what is on your website. Third, install an SEO tool like Yoast SEO to handle on-page basics: focus keywords, meta descriptions and XML sitemaps. Consistent Google reviews from satisfied customers also carry significant weight in local search rankings.
With Bluehost AI Website Builder, the agentic AI builds your starter site in real time in up to 5 minutes after you submit your prompt and answer a few questions. From there, refining your content, adding project photos and customizing your pages typically takes a few hours spread across a day or two. You can publish as soon as your site feels ready, with your domain and hosting confirmed at checkout.

Write A Comment