
Key highlights
- Understand how to migrate your cPanel email accounts safely between servers with clear example steps and instructions.
- Learn how to find and fix issues that may occur during migration to keep your email accounts working smoothly.
- Discover the best free tools and methods to copy, upload and import all the files and folders correctly.
- Explore our detailed article to get accurate information on DNS updates, backups and folder verification.
- Get our expert recommendations on safe migration practices that ensure your emails continue to work without interruption.
If you want to migrate your cPanel email accounts safely, there are three reliable ways to do it. You can use an email client with IMAP, manually move your mail folders through cPanel File Manager or FTP or transfer everything at once using the WHM Transfer Tool. Most users find the manual method the simplest because it gives full control over all the files, folders and settings involved in the migration.
Here’s a quick TL;DR:
- Three methods: IMAP migration, manual FTP/File Manager migration, WHM server-level migration
- Tools used: IMAP, FTP, WHM Transfer Tool
- Best practices: Take backups, verify DNS and test delivery after migration
Email plays a key role in keeping your business communication consistent and professional.
When you move to a new hosting provider, upgrade your server or change domains, you’ll need to migrate your cPanel email accounts carefully.
A proper cPanel email migration helps preserve all your inbox data, folders, contacts and settings across servers. It also prevents data loss, delivery errors and downtime during the transfer process.
This guide explains how to migrate cPanel email accounts safely using both manual and full cPanel transfer methods. If you’re searching for how to move cPanel email accounts or how to move email from one cPanel to another, this guide explains each procedure clearly with tested methods.
Why should you migrate your cPanel email accounts?
Migrating your cPanel email accounts is an important step when you move or upgrade your hosting. For instance, during a cPanel-to-cPanel email migration, you can ensure every file, folder and email account is transferred correctly. It ensures your messages, folders and configurations remain intact across servers.
You may need to migrate your email accounts when:
- Moving your website to a new cPanel server or hosting provider.
- Upgrading your existing hosting plan for better storage and performance.
- Consolidating multiple email accounts or domains under one central cPanel account.
Skipping this process can lead to several issues, such as:
- Lost mails or folders that were not copied during the transfer.
- Broken email configurations that prevent you from sending or receiving messages.
- Missing account data like contacts or saved drafts on the old server.
A proper cPanel email migration helps protect your files and preserve your mailbox structure. It also ensures your communication continues smoothly once your accounts are active on the new server. Before you begin the migration, make sure your cPanel email accounts are in order to prevent issues later in the process.
What should you do before migrating your cPanel email account?
Before moving your emails to the new server, complete these essential checks. These steps also apply if you need to move email account from one cPanel to another or cPanel move email to another server, depending on your hosting case.
Here’s what you should check and complete before moving your email accounts to the new cPanel server.
1. Back up all email data
Creating a backup is the first and most important step before starting migration. It ensures your files and folders are safe if something goes wrong. And for that, you need to:
- Open cPanel File Manager and locate your mail directory.
- Download all email files and folders to your computer.
- Or, use webmail (Horde or Roundcube) to export emails as .eml files.
Once downloaded, store your backup securely on your local device or cloud storage. This backup acts as a restore point if you need to recover your mailbox later.
For added protection, we at Bluehost also offer CodeGuard, which creates automated daily backups and lets you restore your data with one click. It gives you an extra safety layer before you begin your cPanel email migration.
Now that your data is secure, the next step is to confirm that all email accounts are accessible and properly configured.
2. Verify email account credentials
You’ll need your email account credentials to connect both servers correctly. Verifying them in advance helps avoid login and configuration issues later.
Make sure to:
- Verify the email address and password for each account you plan to migrate.
- Check the incoming (IMAP/POP) and outgoing (SMTP) server names.
- Note the default port numbers and authentication details used in your current setup.
If any credentials are outdated, reset them before migration. Having updated details ensures a smooth connection to your new cPanel server.
Once your login details are verified, the next step is to make sure your domain and DNS settings point to the correct server.
3. Check DNS and domain settings
Your domain’s DNS settings control how emails move between servers. Verifying them ensures messages are delivered correctly after migration. Here are the steps that you need to follow:
- Log in to your cPanel or hosting dashboard.
- Open the DNS Zone Editor to review your domain’s DNS records.
- Confirm that your domain points to the new cPanel server.
- Update MX records or nameservers if necessary.
Once verified, your domain and DNS will direct all email traffic correctly to the new hosting environment after migration. With your backups ready, credentials confirmed and DNS settings verified, you’re now ready to start migrating your cPanel email accounts to the new server.
How do you migrate cPanel email accounts?
After completing the initial setup and checks, you can now move your emails to the new server. The migration method you choose depends on your access level and how many accounts you’re transferring.
You can migrate emails using an email client like Thunderbird or move them manually through cPanel File Manager or FTP. For a complete server-level migration, you can also use the WHM Transfer Tool to transfer all accounts and settings together. Each method ensures that your data, folders and configurations remain intact throughout the process.
Method 1: Migrate cPanel email accounts using IMAP (Thunderbird or email client)
Using an email client is one of the easiest ways to migrate emails between servers. This process connects both cPanel email accounts and lets you copy mail folders directly.
Here’s how you can do it:
- Open Thunderbird (or any IMAP-supported email client) on your computer.
- Add your old cPanel email account using its full email address, password and server details.
- Next, add your new cPanel email account with the same credentials for the new server.
- Once both accounts appear in Thunderbird, open the Inbox of your old account.
- Select all emails (Ctrl + A) and copy them to the matching folder in your new account.
- Repeat this process for other folders like Sent, Drafts or Custom folders.
- Wait for the sync to complete and confirm that all emails appear correctly in your new mailbox.
This IMAP method is reliable for most users as it maintains folder structures and allows you to move specific mail data. The same IMAP method also works for Plesk to cPanel email migration, since both platforms support standard IMAP synchronization for copying emails and folders.
Overall, it’s a convenient approach when you want to move email account from one cPanel to another without downloading or uploading mail files manually. Once you’ve migrated your messages successfully, the next option offers a more direct file-based approach.
Method 2: Manually transfer emails via cPanel File Manager or FTP
The manual method is one of the most reliable ways to move your cPanel emails to another server. It uses the /mail directory from your old hosting account and uploads it to your new one. This gives you full control over the folders and files involved in the migration.
Here’s how to do it safely:
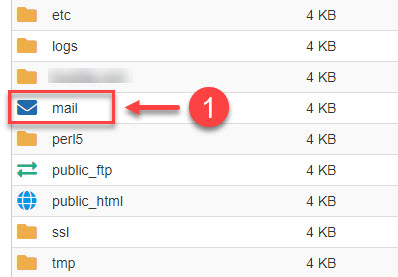
Step 1: Connect to your old cPanel server
Use FTP or cPanel File Manager to access your hosting files. From the root directory, open the mail folder, then select your domain and finally open the folder with the email account name.
Step 2: Download your email folders
Inside the email account folder, download the required mail directories. The most important ones are:
- new
- cur
- maildirsize
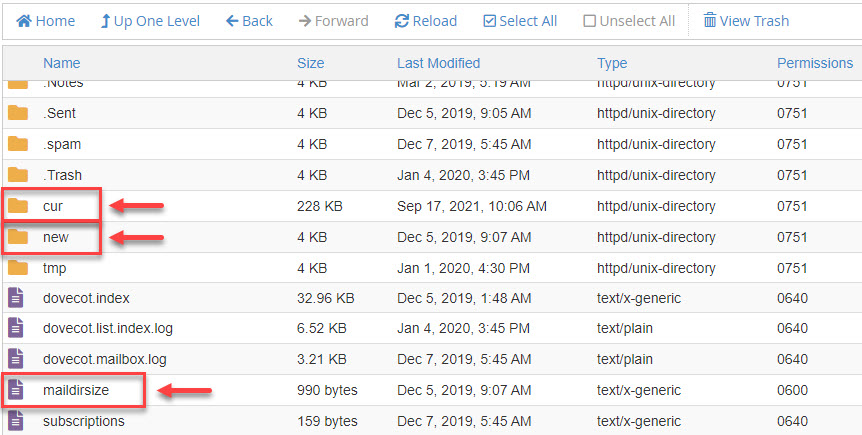
Save these folders to your local computer. These files contain your mailbox structure and message data.
Note: Some sent emails may not appear in these folders because email clients and devices sync differently (as noted on iPhone, Android and some desktops)
Step 3: Connect to your new cPanel server
Connect to your new server using FTP or open File Manager again. Go to: mail → yourdomain.ext → email-account
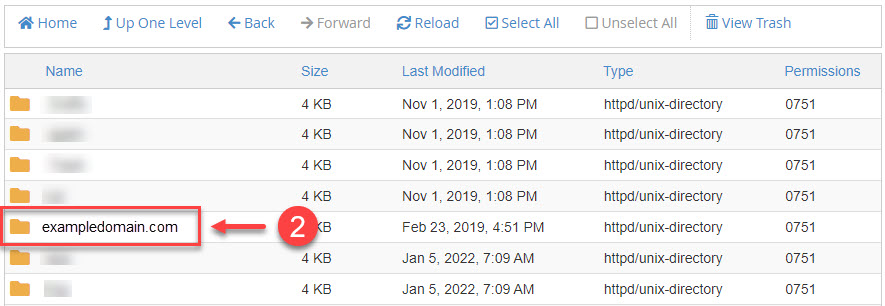
This structure appears automatically if you created the same email address in the new cPanel.
Step 4: Upload your downloaded mail folders
Upload the new, cur and maildirsize files into the matching email folder on the new server.
If your files were compressed, extract them after uploading to restore the folder structure.
Step 5: Update your DNS records
After the files are in place, update your DNS so mail starts routing to the new server.
You can change only the MX records if email is moving or update nameservers if both website and email are hosted on the new server.
DNS changes can take up to 24 hours to propagate, so some mail may still reach the old server during this time.
Step 6: Verify your new mailbox
When DNS propagation is complete, open Webmail (Roundcube or Horde) on the new cPanel server. Check your folders to confirm that emails and attachments appear correctly.
Send a test email and reply to it to make sure both sending and receiving work as expected.
This method gives you more control over your mail files but requires careful handling to prevent missing or corrupted data. If you have full administrative access to your hosting environment, the next method provides a faster and automated migration option.
Method 3: Migrate entire cPanel account via WHM Transfer Tool
For users with WHM or root access, the WHM Transfer Tool offers a complete and automated migration solution. It moves entire cPanel accounts including emails, databases, SSL certificates and settings to the new server efficiently.
For organizations moving to Microsoft 365, this process is similar to cPanel email migration to office 365, where IMAP is used to transfer mailbox data securely. Many administrators use it as a reliable cPanel email migration tool when migrating several cPanel accounts together.
To use the Transfer Tool:
- Install cPanel & WHM on the new server.
- In WHM, go to Transfers → Transfer Tool.
- Enter your old server’s IP address and authentication details.
- Choose the accounts you want to migrate, including email accounts and related configurations.
- Start the transfer and wait for the migration to complete.
- Once done, verify that IP addresses, DNS settings and email data are updated correctly on the new server.
- Test sending and receiving emails to confirm everything is working.
This method works best for hosting providers or users managing several cPanel accounts, as it transfers everything in one go with minimal downtime. After completing the migration, it’s important to check that all emails, folders and accounts are working properly on your new server.
How to know if your cPanel email migration was successful?
Once your migration is complete, take a few moments to confirm that everything is functioning as expected. Instead of focusing on the process itself, this step is about validating the results.
This further ensures that every migrated email account under cPanel-to-cPanel email migration works without missing folders or messages. Here’s how to confirm your migration was successful:
- Log in to Webmail on your new cPanel account using Roundcube or Horde.
- Open your inbox and browse through your folders to ensure all emails and attachments are visible.
- Check that your folder structure matches the layout from your old server.
- Send a test email from each migrated account to another address and confirm that the messages are delivered correctly.
- Reply to those test emails to ensure that both sending and receiving are functioning properly.
- If you use an email client like Thunderbird or Outlook, refresh the connection and verify that new messages sync without delay. You can also use tools often marketed as cPanel email to outlook migration software, which automatically manages this synchronization process.
Once you’ve confirmed that your emails, folders and attachments display correctly, your cPanel email migration is complete. For long-term reliability, keep your backup files for a few days and monitor the accounts for any delayed messages or syncing issues.
If you’re looking to keep your communication professional and secure after migration, consider upgrading to our professional email service. We at Bluehost help you create domain-based addresses, access mail across all devices and enjoy built-in spam and virus protection. Explore our email plans to simplify ongoing management and keep your business communication consistent.
At this stage, your migration is complete, but a quick check for potential issues will help keep your emails running smoothly.
What are the common cPanel email migration issues and fixes?
Even after a successful migration, you may face minor issues that affect how your email accounts function on the new server. Identifying and fixing them early helps in uninterrupted communication and stable account performance.
These troubleshooting tips also help if you’re figuring out how to move email from one cPanel to another and facing syncing or login issues during the process. Here are some of the most common cPanel email migration issues and how to fix them:
1. Missing emails or folders
If certain messages or folders are missing, it’s usually due to incomplete IMAP syncing during migration.
How to fix it:
- Refresh your email client or restart the sync process to pull all messages from the old server.
- Make sure the account is set up using IMAP (not POP), so it mirrors all mail folders correctly.
- Check your Webmail to confirm whether emails exist on the server.
2. Login errors after migration
If you can’t log in to your email account, the issue may relate to password mismatches or DNS changes that haven’t been fully propagated.
How to fix it:
- Re-enter the email password in both cPanel and your email client settings.
- Wait for DNS propagation, which can take up to 24–48 hours after migration.
- Confirm that your email client uses the correct incoming (IMAP/POP) and outgoing (SMTP) server details.
3. Old domain mail not receiving
If emails sent to your old domain aren’t being delivered, it may be caused by incorrect MX records or outdated domain settings.
How to fix it:
- Log in to cPanel → Zone Editor and review the MX records.
- Update them to point to your new cPanel server.
- Once updated, test your mail flow by sending a message to the domain and confirming receipt.
Keeping an eye on these common issues after migration helps in consistent mail delivery and server performance. To avoid these issues in the future, follow a few simple best practices. They’ll help make your cPanel email migrations safer and smoother.
Top 4 best Practices for a safe email migration
With your migration complete and accounts running on the new server, the next step is to strengthen your setup. These recommendations help each email account stay stable and error-free after cPanel-to-cPanel email migration.
1. Keep both servers active for at least 48 hours
After migration, keep your old and new servers active for about two days. This overlap ensures that any delayed or redirected emails still reach your inbox during DNS propagation. It also gives you time to verify that all accounts and folders work properly before shutting down the old server.
2. Test the migration in small batches
If you’re migrating several domains or multiple cPanel accounts, transfer them in smaller groups. Testing each batch helps you identify potential issues early and fix them without affecting all accounts at once. This approach also ensures the process runs more efficiently and reduces the chance of data conflicts.
3. Keep your backups for at least one week
Even after a successful migration, maintain your email backups for at least seven days. This gives you a safety net in case of missing data or syncing problems. Storing your backups securely ensures you can restore emails if needed later.
4. Avoid overwriting existing email folders
Before replacing or merging folders on the new server, verify that all migrated data is intact. Avoid overwriting files until you are sure that every folder and message has transferred successfully. Taking this precaution prevents accidental data loss and ensures all emails remain accessible across accounts.
By following these best practices, you can ensure your email migration process works smoothly from start to finish. With proper backups, testing and verification, your cPanel email accounts will stay secure and continue to function without disruption. These same steps are also helpful if you plan to move email from cPanel to Gmail, as Gmail’s IMAP import follows a similar procedure for syncing folders and messages.
Final thoughts
Migrating your cPanel email accounts doesn’t need to be overwhelming. By planning your transfers, keeping your backups and following the best practices, you can shift your emails, folders and accounts to a new server.
This process ensures your communication stays uninterrupted and your data remains secure as you transition to a fresh environment. After the move, keep an eye on your setup, verify that everything is working and maintain your backup files for a short period.
Moreover, if you’re planning to move your emails, choose a hosting provider like us that makes migration easy. Explore our Bluehost hosting plans today and simplify your migration journey while focusing on your business communication.
FAQs
To migrate your cPanel email to another cPanel account, use an email client like Thunderbird or the IMAP sync method. Add both your old and new email accounts to the client and copy all the files and folders from one server to the other. This completes cPanel to cPanel email migration safely.
You can move your email accounts from one server to another using cPanel File Manager or FTP. Download the /mail/ directory from your old server and upload it to your new one. Make sure the folder names and email addresses match exactly. After uploading, log in to Webmail and confirm all emails appear correctly.
You won’t lose your emails if you migrate properly. Always create a backup of your mailbox before changing hosting. Once the new cPanel setup is ready, import your old data to ensure no messages or folders are missing. Keeping both servers active for a short time helps prevent delivery issues during DNS changes.
To export emails from cPanel, open Webmail (Roundcube or Horde) and select the messages you want to back up. Then, use the Save as a file option to download them to your device. You can later import these files into another cPanel email account or server when migrating.
If you have WHM access, use the WHM Transfer Tool to move a full cPanel account, including email, databases and website files. Simply navigate to WHM → Transfers → Transfer Tool, enter your old server’s login details and follow the on-screen procedure. This method is fast, reliable and ensures all data is migrated correctly.
Yes, you can copy emails between accounts by adding both addresses to an email client. Select the emails you want to move and drag or copy them into the destination account. This process works even when the accounts are hosted on different cPanel servers or domains.
To migrate safely, always back up your data before you start. Then, choose a method that suits your case like IMAP migration, manual FTP transfer or the WHM Transfer Tool. During migration, ensure your DNS and MX records are updated correctly so that incoming emails reach the new server.
If you’re migrating multiple cPanel accounts, use WHM’s Transfer Tool. This built-in tool transfers emails, databases and configurations from the source server to the target server automatically. After migration, check that all domains and email accounts are functioning properly.
Yes. To move your domain email, back up all your mail folders from the old server, create matching email accounts on the new server and import your data. Then, update your domain’s DNS settings and MX records to point to the new host. Once DNS propagation is complete, your new hosting will handle all emails.
If you face login errors, verify your credentials and DNS settings. If some emails are missing, check whether the IMAP sync is completed. For domains not receiving mail, review and update MX records. Always keep backups to restore data in case of configuration errors.


Write A Comment