
Key highlights
- Understand how to transfer a domain from GoDaddy to Bluehost safely in this transfer domain to Bluehost guide, all by following verified steps that promote smooth transition.
- Learn the complete domain transfer process, from unlocking your domain and retrieving the authorization (EPP) code to verifying your transfer in Bluehost.
- Discover common domain transfer issues and how to resolve them by checking your DNS settings, domain privacy and registrar’s control panel.
- Find out what to expect after your transfer, including updating name servers, confirming your domain registration and managing renewals in one Bluehost account.
- Uncover how Bluehost hosting simplifies domain and hosting management with unified billing, built-in security and 24/7 expert support.
Many small business owners start with GoDaddy for domain registration but later switch to Bluehost for better reliability and hosting performance. If you’re ready to consolidate your website management, this guide is for you.
We’ll explain how to transfer your domain from GoDaddy to Bluehost step by step, covering everything from getting your EPP code to updating your DNS settings in the Bluehost control panel. By the end, you’ll know how to complete a secure domain transfer while keeping your website and email services running smoothly.
To transfer your domain from GoDaddy to Bluehost: unlock the domain, get the EPP code and enter it during purchase or domain transfer inside Bluehost.
Why transfer your domain from GoDaddy to Bluehost?
Transferring your domain name to Bluehost centralizes domain and hosting management. Moving your GoDaddy domain into your Bluehost account simplifies renewals, DNS changes and billing. A single control panel makes it easy to update your domain’s DNS settings, manage name servers and connect your site to hosting quickly.
We help ensure a smooth transition for your domain transfer. Our process follows ICANN transfer policy and standard domain transfer process steps to reduce transfer delays and downtime. When you transfer a domain to Bluehost, you get access to free features and security tools that protect your site.
Key benefits:
- One registrar, one dashboard: Access your domains and services from one streamlined dashboard.
- Feasible domain transfer options:Transfer your domain for a standard transfer fee (varies by extension), which typically includes a one-year domain renewal.
- Multiple supporting features: Easily auto-renew, create subdomains, access DNS management tools and more.
- Improved security: Additional services like domain privacy protection (WHOIS privacy) are offered (May incur extra charges, depending on the domain extension).
- Reduced risk of downtime: If your DNS is properly configured before the transfer, your website and email services typically continue functioning during the process.
- Expert support: Our dedicated customer support assist you for any domain and hosting issues.
If you want to transfer your domain from GoDaddy to Bluehost, we provide step-by-step instructions and fast support to initiate the transfer and complete it successfully.
What is the difference between transferring and pointing your GoDaddy domain?
When you’re ready to move your domain from GoDaddy to Bluehost, you have two main options: transferring the domain or simply pointing it. Understanding the difference helps you choose the right approach for your needs.
A full domain transfer means:
- Management and billing move entirely from GoDaddy to Bluehost
- You handle everything: hosting, domain renewals and billing, all from one dashboard
- The process takes 5–7 days to complete
- You get unified support for your entire website infrastructure
- Your long-term workflow becomes simpler and more streamlined
Pointing your domain is different:
- You update nameservers at GoDaddy to direct traffic to Bluehost
- Domain registration stays with GoDaddy
- Changes begin propagating shortly after you update nameservers and may take up to 24–48 hours to fully take effect.
- You maintain two separate accounts and pay two different companies
- You manage domain and hosting in different places
Most users eventually choose to transfer their domain from GoDaddy to consolidate everything in one place. This reduces administrative complexity, eliminates billing confusion and gives you complete control over your digital assets from a single, intuitive dashboard.
What’s on the domain transfer checklist before you begin?
Before you start the domain transfer process, take a few minutes to prepare your GoDaddy account and verify your domain’s details. Following these steps ensures a smooth transition when you transfer your domain to Bluehost.
- Update your domain contact details: Make sure the contact info in the RDDS database (previously WHOIS) is accurate, as this is where domain ownership verification emails are sent. Keep in mind that updating the registrant details can trigger a 60-day transfer lock. If you’re planning to transfer the domain, check with your current registrar before making any changes.
- Change your nameservers: Nameservers point your domain to your hosting server. If your website is already set up on Bluehost, update the nameservers now to reduce downtime. DNS changes usually can’t be made while a transfer is underway, so it’s best to do this beforehand.
- Unlock the domain: Your domain must be unlocked to allow a transfer. You can check the lock status in the RDDS/WHOIS record. Some registrars let you unlock it yourself, while others may need to do it on your behalf.
- Get the EPP/Auth code: Request your EPP code (also called Auth Code or Authorization Key) from your current registrar. This code acts like a password and is required to approve the transfer. For .uk domains, you’ll need to update the IPS tag instead of using an EPP code.
- Check the domain expiration date: Domain transfers can take up to 7 days. If the domain expires during this period, it could become locked again and cause the transfer to fail.
- Confirm the domain isn’t in redemption: If the domain has expired, ensure it’s still within the grace period. Domains that have been expired for more than 30 days usually enter redemption and must be renewed before they can be transferred.
Next, we’ll walk you through how to transfer a domain from GoDaddy to Bluehost, step-by-step.
How to transfer your domain from GoDaddy to Bluehost: A step-by-step guide
Once you’ve completed your checklist, you can start the domain transfer process. Follow these simple step-by-step instructions to move your GoDaddy domain to your Bluehost account safely and efficiently.
Step 1: Unlock your domain in GoDaddy
Log in to your GoDaddy account and open the Domain Settings page. Under the Additional Settings section, turn off the Domain Lock feature. This ensures your domain’s status is eligible for transfer.
- Keep the domain unlocked until the transfer is complete.
- You can confirm the change in your registrar’s control panel.
Step 2: Disable WHOIS privacy protection
If your domain has WHOIS privacy or domain privacy enabled, disable it temporarily. This step allows your registrant information to be verified during the transfer.
- Go to your GoDaddy dashboard → Privacy Settings → toggle off Privacy Protection.
- This prevents unauthorized transfers and ensures communication with your new registrar.
Step 3: Get your authorization code (EPP code)
Next, request the authorization code from your current registrar.
- Click ‘Send Code’ or ‘Transfer Authorization Code’ in your GoDaddy dashboard.
- The code will be emailed to your registered email address. You’ll use this code later to initiate the transfer to Bluehost.
Troubleshooting missing authorization codes
If you requested your authorization code but haven’t received the email, start by checking your spam or junk folder since automated messages often get filtered there.
You should also verify that the administrator email address listed in your GoDaddy contact information is accurate, as the code is sent strictly to the registered contact on file.
System delays can occasionally occur, so we recommend waiting up to 24 hours for the email to arrive before attempting to send a new request.
Additionally, keep in mind that if you registered or transferred your domain within the last 60 days, it is likely subject to a standard ICANN transfer lock. In this case, the authorization code will not be generated or available until that mandatory 60-day period has passed.
Step 4: Start the transfer in your Bluehost account
Initiate the domain transfer process
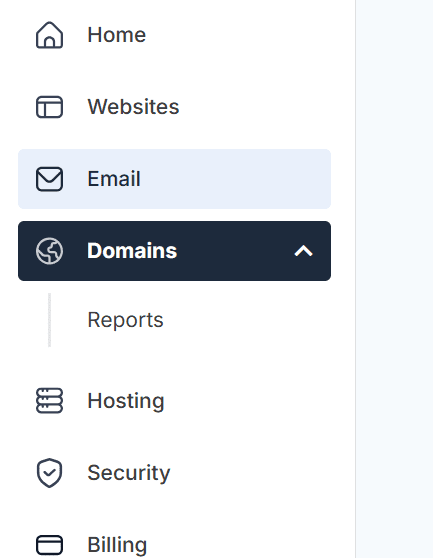
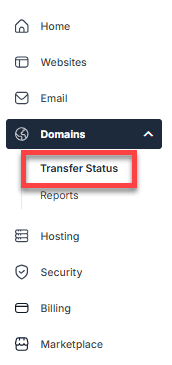
- Log in to your Account Manager.
- Click ‘Domains’ on the left menu.
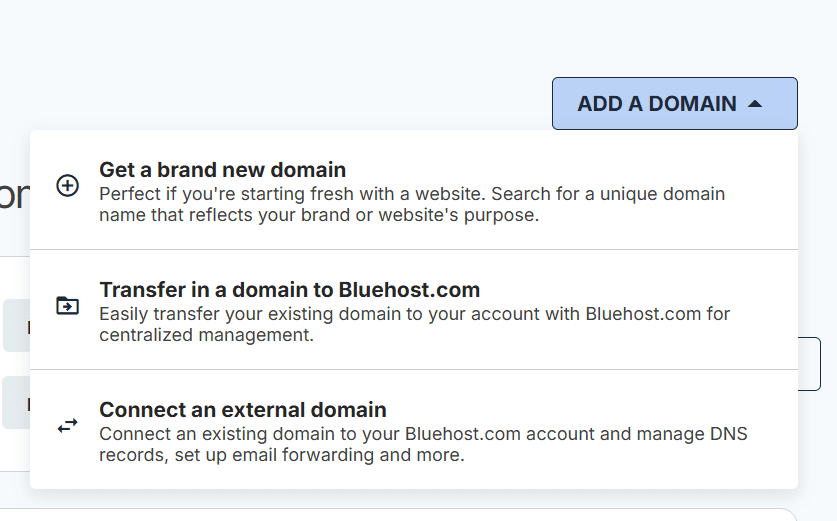
3. On the Domains page, you can have several options:
Option 1: Click the ‘ADD A DOMAIN’ menu on the right pane and select ‘Transfer in a domain to Bluehost.com’.
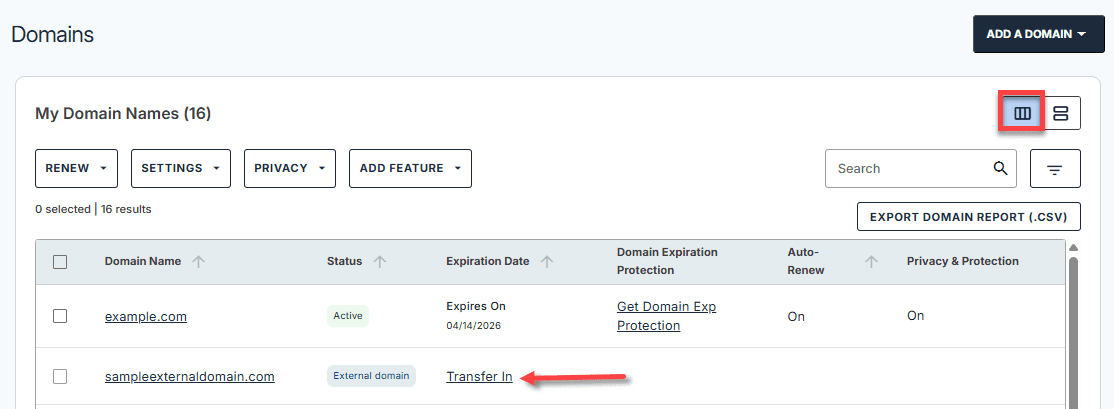
Option 2: If the domain is already added to your Account Manager as an External Domain:
List View: Click the ‘Transfer In’ link next to the “external domain” to initiate the process of domain transfer.
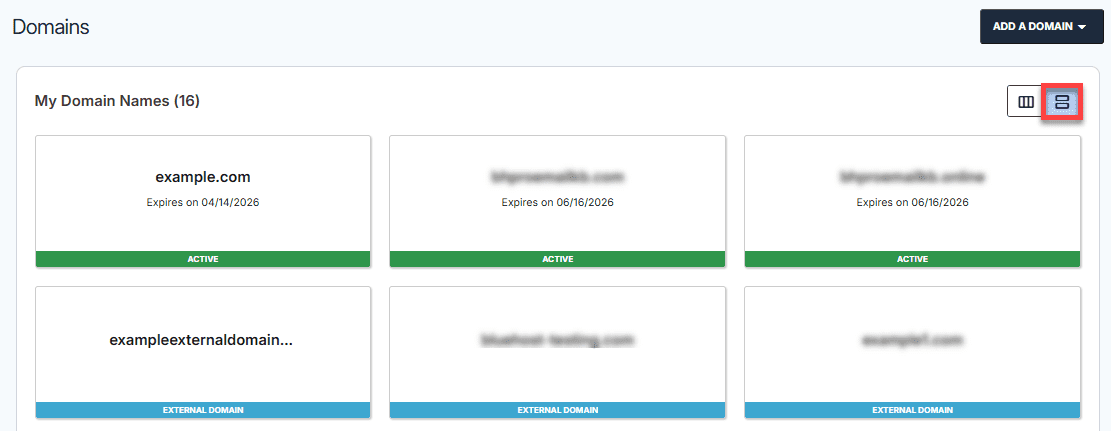
Card View: Click the ‘external domain’ card you want to transfer to your Bluehost account.
4. Click the ‘Transfer In’ button.

Submit the EPP Code (Post-Purchase)
After submitting the request for the domain transfer and settling the one-time service fee, your next step is to submit your domain’s EPP code.
- Within your Account Manager, click ‘Domains’ on the left menu, then select ‘Status’.
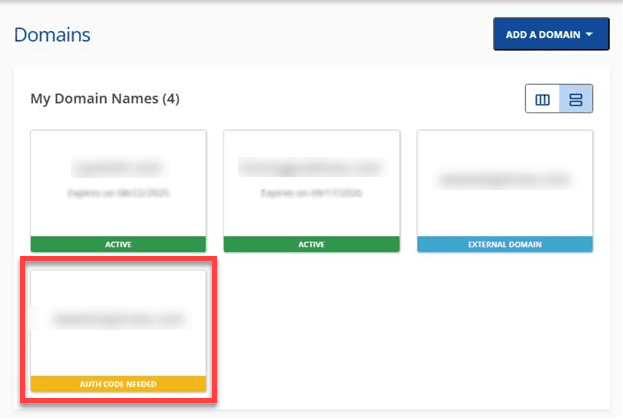
In Card View, you can click on the domain with the ‘AUTH CODE NEEDED’ status to transfer.

2. On the ‘Domain Transfers’ page, click the plus (“+”) icon next to ‘Pending Auth Code’.
3. Enter your EPP code (also known as the authorization code or key) and then click ‘Submit’.

4. After submitting, the system will verify your domain and its EPP code. The Transfer Status page will display the image below after your submission.
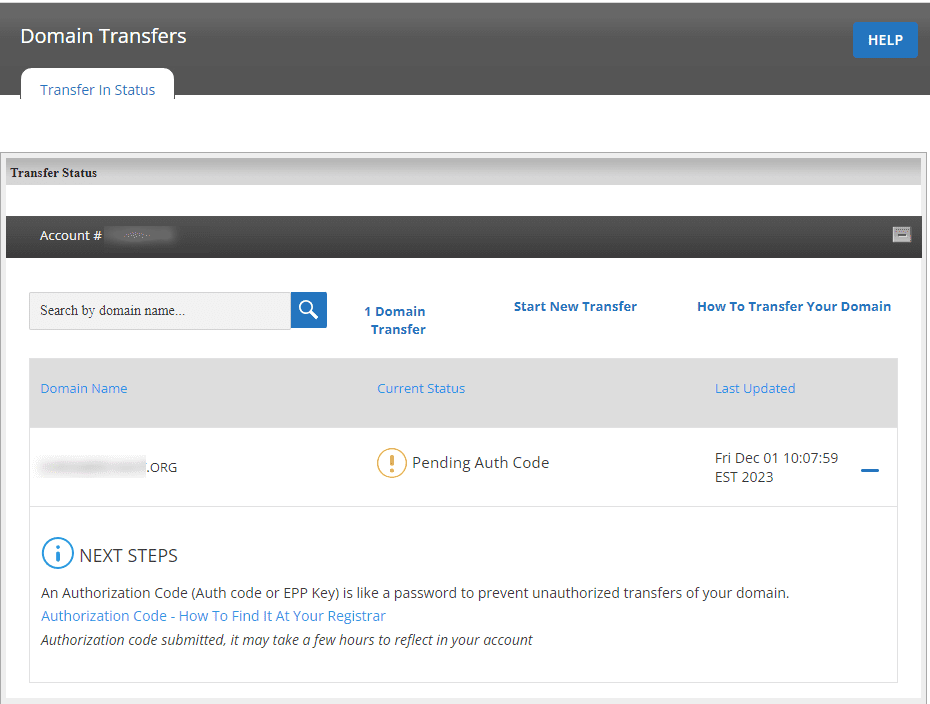
5. Allow some time for the system to check your domain and its EPP code. You can check your domain’s status in the Account Manager later.
Also read: How to Transfer A Domain Name To Us
Step 5: Approve the transfer request via email
Once the transfer has been initiated, you’ll receive confirmation emails from both GoDaddy and Bluehost.
- Look for an email titled “Domain Transfer Request” or “Approve Your Domain Transfer.”
- Click the verification link to confirm your transfer request and approve the transfer.
- This confirmation authorizes Bluehost to complete the process securely.
After approval, the domain transfer typically takes 5–7 days to complete. During this transfer period, your website, DNS settings and email services will continue functioning correctly without downtime.
Pro tip: Avoid making DNS changes or re-enabling WHOIS Privacy Protection until the transfer is complete to prevent delays.
How to expedite the transfer process in GoDaddy?
While a standard domain transfer typically involves a 5–7 day waiting period due to security protocols, you can bypass this delay by manually approving the release directly within your GoDaddy dashboard. This proactive step allows you to transfer your domain from GoDaddy to Bluehost almost immediately, rather than waiting for the automatic timer to expire.
To expedite the process, log in to your GoDaddy account and navigate to the Transfers page. Select Transfers Out to view your pending requests, then locate the domain you are moving and check the box next to it. Finally, click the Approve Transfer button. This manual confirmation overrides the standard holding period, prompting GoDaddy to release your domain instantly. This may significantly reduce the overall transfer time, sometimes completing within a few hours instead of the standard waiting period.
Step 6: Wait for the transfer period to complete
After approval, the transfer process can take 5–7 days to complete. During this time, your website and DNS settings will continue functioning correctly.
- Avoid making major DNS changes during the transfer.
- Once finished, your domain will appear in your Bluehost account under My Domains.
Step 7: Verify DNS and website functionality
Once your domain is successfully transferred, verify that your DNS settings and name servers are correctly configured in your new control panel.
- Check that your site loads properly and your website traffic remains stable.
- Update records only if needed for your hosting account.
Pro tip: If your domain isn’t transferring or you receive an error, check that the code matches, your domain isn’t locked and there are no transfer restrictions on your current web hosting provider. You can also contact Bluehost support for help with domain transfer issues or stalled transfers.
Troubleshooting common GoDaddy to Bluehost transfer issues
Most transfer friction stems from the mandatory 60-day transfer lock enforced by ICANN policy. If you recently registered or transferred your domain, you cannot move it until this period expires. Another common hurdle involves incorrect EPP codes; generating a new authorization code immediately invalidates the previous one, so ensure you are using the most recent sequence generated in your GoDaddy dashboard.
If you fail to receive the authorization email, verify your administrator contact details and check your spam folder, as these automated messages are often filtered. Finally, if your domain appears “unlocked” in your settings but the transfer remains blocked, this often indicates a synchronization error. You must contact GoDaddy support directly to manually refresh the status and release the lock on their end.
What to expect after initiating the transfer?
Once your domain transfer is complete, your domain will officially move from your current registrar (GoDaddy) to Bluehost. This process usually takes between 5–7 days, depending on registrar response times and verification emails.
When the transfer is complete, your domain will appear in your Bluehost account under Domains → My Domains in your Control Panel. From here, you can manage all your domain settings, including DNS records, name servers and domain privacy preferences.
1. Verify your domain’s DNS settings
After your domain name transfer, log in to your Bluehost hosting account and confirm your DNS settings are functioning correctly.
- Check that your name servers point to Bluehost (ns1.bluehost.com and ns2.bluehost.com).
- If your website was hosted elsewhere, update the DNS changes accordingly.
- Test your site to ensure it’s loading properly and that website traffic remains uninterrupted.
2. Check domain privacy and security settings
Once your domain appears in your Bluehost dashboard, review your domain privacy settings.
- Enable WHOIS Privacy Protection to keep your registrant information private.
- Confirm that transfer locks are active to prevent unauthorized transfers in the future.
- Verify that your contact details are correctly configured under your domain registration information.
3. Manage renewals and auto-renew settings
After the transfer, your renewal date resets based on your new registrar’s policy.
- Go to Account → Billing → Renewal Settings in your Bluehost Control Panel.
- Enable Auto-Renew to ensure your domain name never expires unexpectedly.
- You’ll receive renewal reminders via your Bluehost account email notifications.
4. Update email and hosting connections (If needed)
If your email accounts or website hosting were linked to your old registrar, reconnect them under your new control panel.
- Reconnect email settings through Email & Office → Manage Email Accounts.
- Confirm your website hosting provider and DNS records are linked properly.
- Check that your new site continues functioning correctly after propagation.
5. Enjoy simplified domain management with Bluehost
With your domain to Bluehost successfully transferred, you can now manage your hosting, DNS and website in one place.
- Use a single control panel to manage domains, hosting and renewals.
- Take advantage of domain transfer tools, 24/7 expert support and a smooth transition experience.
- Benefit from security measures like SSL certificates, domain privacy and advanced ICANN-compliant management.
Pro tip: Always check your Bluehost dashboard after your domain transfer process to confirm everything is functioning correctly, from DNS records to hosting connections.
Setting up your Bluehost website after transfer
Now that your domain transfer is successfully complete, you can launch your site using Bluehost’s modern onboarding experience. This intuitive interface replaces complex legacy control panels with a streamlined dashboard designed specifically to help WordPress novices get started.
To begin, navigate to your “My Sites” tab and use the one-click WordPress installation tool for a standard setup. Alternatively, if you need a head start on design, the AI Website Builder can generate a fully customized site structure with relevant images and content quickly, allowing you to achieve professional results without writing a single line of code.
Beyond the website itself, it is crucial to establish trust and communication channels immediately. Ensure your site is secure by verifying that your free SSL certificate, automatically included with your plan is active, which encrypts visitor data and improves search rankings. Next, set up your professional email address to match your domain name.
You can easily configure solutions like Titan Email or integrate Google Workspace directly through your account manager. By centralizing your domain, hosting and email services, you simplify your workflow and ensure your digital presence is fully operational and professional from day one.
What are the benefits of managing your domain and hosting in one place: Bluehost?
Transferring your domain name from GoDaddy to Bluehost isn’t just about convenience, it’s about control, performance and security. Managing your domain and hosting account under one platform helps you streamline your website operations and reduce potential domain transfer issues.
Here’s why keeping everything under your Bluehost account is the smart choice:
1. Simplified domain and hosting management
Handle everything from one dashboard. Your domain registration, DNS settings, hosting plan and website files are all accessible through the same control panel.
- No need to switch between registrars or separate dashboards.
- Update name servers, renew domains and manage hosting with a single login.
2. Faster website setup and launch
Once your domain is successfully transferred, connecting it to your Bluehost hosting account takes just minutes.
- Connecting your domain to Bluehost hosting is streamlined, and you can update or confirm your DNS settings directly from your dashboard.
- No additional setup is needed to start building your new site.
- Get your website live faster with pre-configured DNS changes and SSL certificates.
3. Improved security and privacy
Bluehost includes built-in security measures to protect your domain and website from unauthorized access.
- WHOIS Privacy Protection hides your personal registrant information from public records.
- Transfer locks prevent unauthorized transfers or domain hijacking.
- Free SSL certificates keep your users’ data secure and your website traffic encrypted.
4. Unified billing and renewal management
Simplify your renewals and payments with everything under one account.
- Manage your domain registration and hosting billing cycles together.
- Enable Auto-Renew in your control panel to prevent missed payments.
- Get notifications directly in your Bluehost dashboard for upcoming renewals.
5. Access to top-notch expert support
Our support team is available day and night to help with your domain transfer process, DNS setup and hosting configuration.
- Contact our experts via chat, phone or email.
- Get help verifying EPP codes, updating domain’s DNS settings or fixing transfer issues.
- Enjoy a smooth experience from start to finish, no technical expertise required.
By managing your previous transfer, hosting account and DNS configuration in one place, you reduce risks, improve performance and save valuable time. Whether you’re launching your first website or transferring multiple domains, Bluehost makes the transfer process fast, secure and reliable.
Final thoughts
Transferring your domain from GoDaddy to Bluehost is a strategic move toward a more secure, streamlined, and integrated web experience.
By following this transfer domain to Bluehost guide, you can navigate the transition smoothly and without downtime!
While the GoDaddy domain transfer is an important milestone, it is just the beginning of your growth. Once your domain is hosted with Bluehost, you will benefit from our reliable hosting platform, free SSL security, and expert support available.
Ready to elevate your online presence? Explore Bluehost’s hosting and domain services today to simplify your website management and unlock world-class performance for your brand.
FAQs
To transfer your domain from GoDaddy to Bluehost, log in to your GoDaddy account, unlock your domain and request your authorization code (EPP code). Then, sign in to your Bluehost account, go to Domains → Transfer, purchase or initiate the transfer and enter the EPP code in your transfer status page. Approve the confirmation email to complete the process.
A typical domain transfer process takes between 5–7 days, depending on your current registrar’s approval time. You can track your transfer status anytime in your Bluehost control panel under Domains → Transfer Status.
No. Transferring your domain name doesn’t affect your website files or email accounts. As long as your DNS settings are correctly configured, your site and email will remain live and fully functional throughout the transfer period.
Bluehost offers free domain transfer credits with eligible hosting plans. (Bluehost offers free domain transfer credits with eligible hosting plans, otherwise a small transfer fee applies, which usually includes a one-year domain renewal. Check your plan details before initiating the transfer).
Enable transfer locks in your Bluehost control panel and keep WHOIS privacy protection turned on. This helps secure your domain registration, hides your registrant information and prevents unauthorized transfers or registrar hijacking attempts.
If your transfer fails, check that your domain is unlocked, your authorization code is correct and your domain privacy is disabled. You can also contact Bluehost’s 24/7 support team for assistance with domain transfer issues, DNS troubleshooting or EPP code re-entry.


Write A Comment