Key highlights
- Download and install CuteFTP to securely transfer files between your local machine and remote servers.
- Configure your FTP or SFTP connections easily using the Site Manager tab for efficient file management.
- Transfer files seamlessly with drag-and-drop functionality between local folders and remote server directories.
- Display hidden files by adjusting filter settings to access important system and configuration files.
- Automate file transfers and backups using CuteFTP’s Transfer Engine and scripting capabilities for minimal overhead.
If you manage a website, you know how crucial it is to move files quickly and safely. Uploading updates, syncing backups or sharing data should never feel risky. Yet, one wrong transfer can break your site or expose sensitive files.
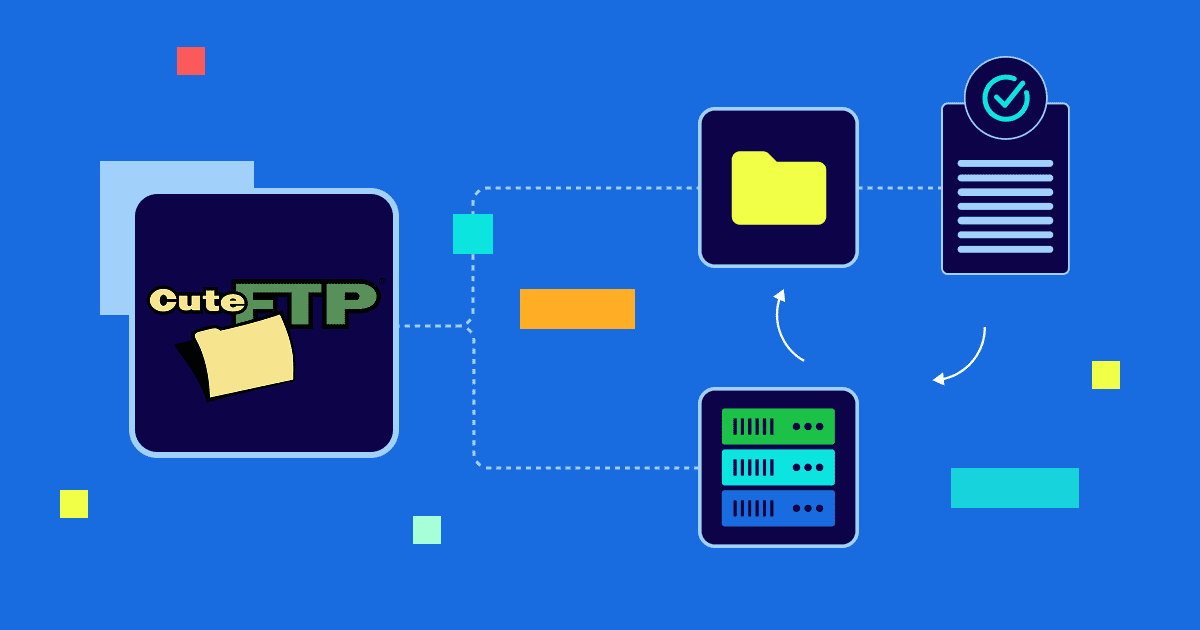
That’s why knowing how to use CuteFTP can make all the difference. CuteFTP is a trusted FTP client that helps you upload, download and manage files securely between your computer and your web server. You get full control, encrypted transfers and a clean interface built for both beginners and pros.
When you pair CuteFTP with Bluehost hosting, every transfer becomes faster, safer and more reliable. In this guide, you’ll learn how to set up CuteFTP, transfer files securely and make the most of your Bluehost hosting account.
But first, let’s look at what CuteFTP is used for and why it’s such a valuable tool for your website.
What is CuteFTP used for?
You use CuteFTP to transfer files securely between your computer and remote servers.
It’s a complete file transfer protocol (FTP) client that supports FTP, secure file transfer protocol (SFTP) and file transfer protocol secure (FTPS). This ensures every connection stays encrypted and private.
You gain faster control over file management because CuteFTP handles secure uploads, backups and updates without complex setup.
Primary uses
The software excels in several key areas:
- Website management: Easily update and publish web pages by transferring html documents and related files to your web server
- Data backup: Create automated backup solutions for mission critical files across multiple locations
- File synchronization: Keep local folders and remote directories perfectly synchronized
- Secure transfers: Protect sensitive data using advanced encryption protocols during file transfers
- Bulk operations: Handle large-scale file transfers with queue management and scheduling capabilities
The best part is, you can perform all these actions through an easy, dual-pane interface designed for clarity and speed.
Why it matters?
For anyone managing websites, databases or important business files, reliable file transfer capabilities are essential. CuteFTP eliminates the complexity typically associated with ftp operations by providing:
- An intuitive dual-pane interface that clearly shows local and remote files
- Support for transferring files of any size with resume capabilities
- Advanced security options to protect data during transmission
- Automation features that reduce manual work and human error
- Integration capabilities with popular hosting providers, including Bluehost
Understanding its features is only half the story. Let’s see how you can install CuteFTP and connect it to your hosting.
How do you set up CuteFTP on your computer?
Setting up CuteFTP correctly is the first step in mastering how to use CuteFTP effectively. You can install it in minutes and connect it directly to your hosting account.
You get the best performance when you follow these steps carefully.
1. Download and installation
- Visit the official GlobalSCAPE website to download the software.
- Choose between CuteFTP Home, CuteFTP Pro or CuteFTP Professional based on your needs.
- Run the installation wizard and follow the prompts.
- Enter your license key when asked or select the trial version to explore first.
- Complete setup and launch the application from your desktop or start menu.
The best part is, once installed, CuteFTP opens with a clean layout so you can start transferring files immediately.
2. Initial configuration
Next, set up CuteFTP for smooth performance. When you open the software, you’ll see a simple dual-pane interface that makes navigation easy.
- The left pane shows your local files.
- The right pane displays remote files after you connect to your server.
- You can customize these panes for better visibility.
This layout helps you organize uploads faster because you see both sides of your file system clearly.
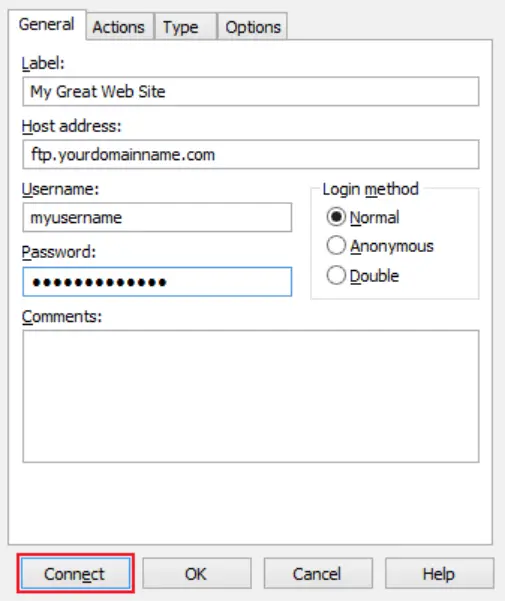
3. Setting up your first connection
Now, connect CuteFTP to your web host. You do this through the Site Manager, which stores all your FTP or SFTP connections.
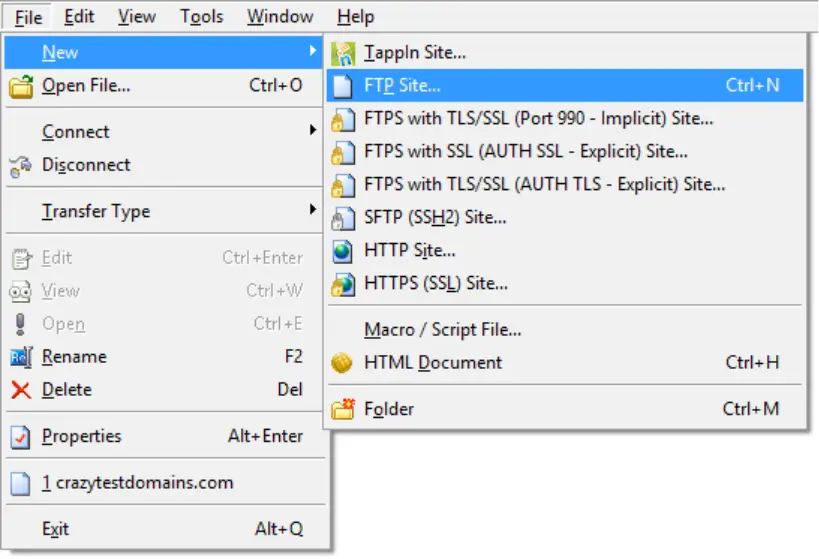
- Click the connection icon or open the Site Manager tab.
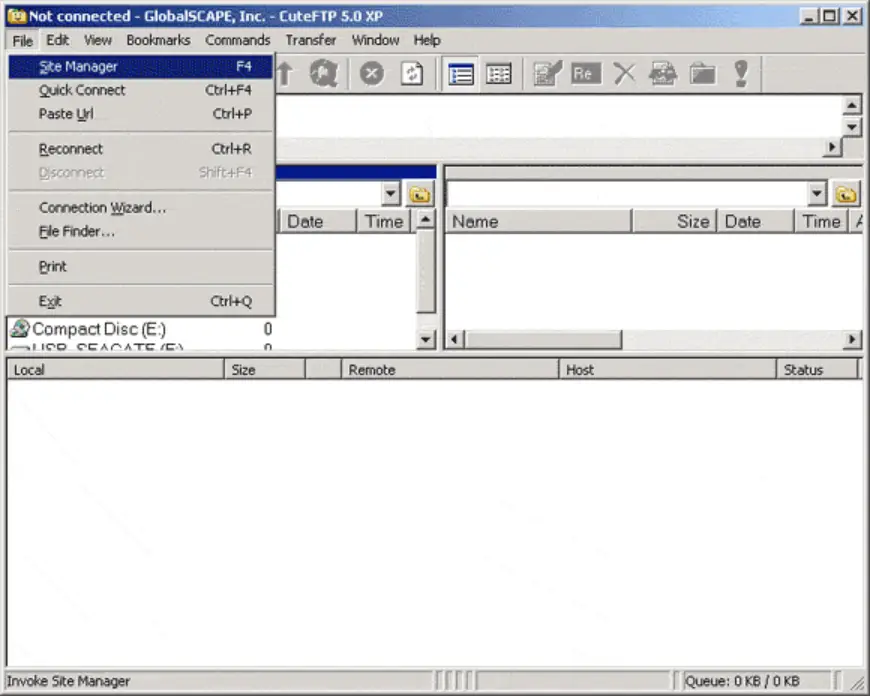
- Select New to create a new FTP profile.
- Enter the following details provided by your hosting provider:
- Host address (your domain or server IP)
- Correct ftp username (often your cPanel username)
- Correct password (the one you set for your hosting account)
- Port field (usually 21 for standard FTP, 22 for SFTP)
- Protocol selection (FTP, SFTP or FTPS depending on your server’s capabilities)
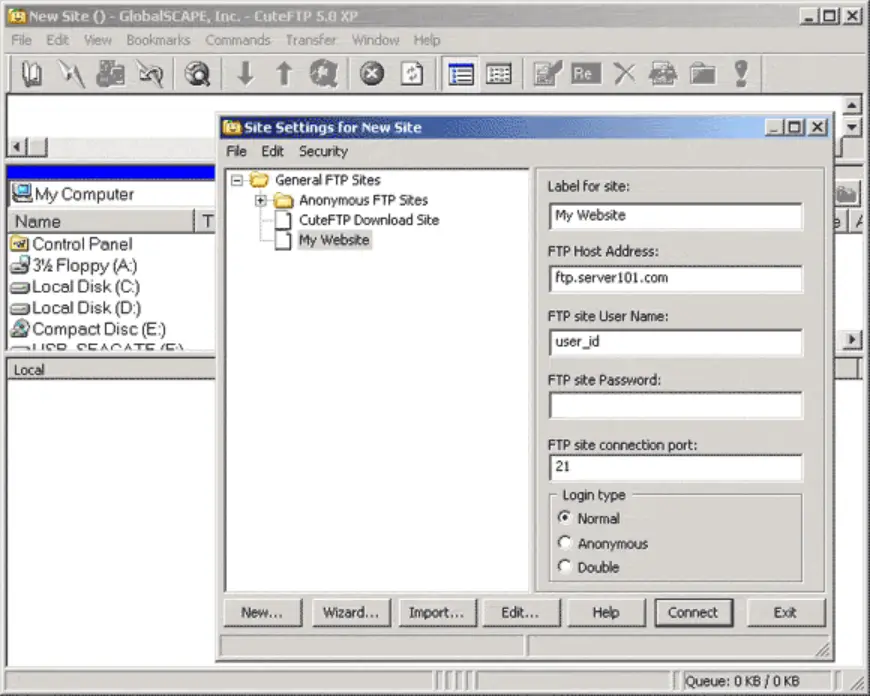
As a result, CuteFTP will save this information so you can connect automatically next time without re-entering credentials.
If you’re using Bluehost as your hosting provider, configuring CuteFTP becomes even simpler. You’ll find your FTP credentials directly inside the Bluehost control panel, including your server name, username and port settings.
- Copy these details into your CuteFTP connection fields.
- Click Connect and watch both panes populate instantly.
- You can now upload, edit or sync files securely between your computer and your hosting space.
The best part is, our servers are optimized for secure, stable FTP sessions, so your transfers stay fast and uninterrupted. With your connection ready, you can now upload, download and manage files directly.
How to use CuteFTP to transfer files?
You’re now ready to start moving files between your computer and your hosting account. CuteFTP makes the process fast and secure, so you can manage your site with confidence.
Here’s how to do it step by step.
1. Connect to your server
Before you can transfer files, you need to establish a connection to your remote server. Here’s how:
- Open CuteFTP and navigate to the site manager.
- Select your previously configured site or create a new connection.
- Ensure you have the correct ftp username and password.
- Click the connect button and wait for the connection to establish.
- Once connected, you’ll see your remote server files in the right pane.
That’s why using Site Manager saves time – it keeps all your login details organized and prevents connection errors. You can now manage files across your hosting space without entering credentials every time.
2. Understand the interface
Next, get familiar with the dual-pane interface. It’s built to make file management simple and transparent.
- The left pane shows your local folders on your computer.
- The right pane displays your remote directories after you connect.
- The toolbar provides quick access to common actions like upload, download or delete.
- The status bar tracks progress and transfer speed.
- The transfer queue at the bottom shows all ongoing and pending operations.
For instance, you can drag a file from the left pane and drop it into the right pane to upload it instantly.
You always know where each file goes: no confusion, no accidental overwrites.
In short, this clean layout gives you total visibility so you stay in control of your website content.
3. Transfer files
Now it’s time to move your files. CuteFTP supports both uploading and downloading, so you can manage data in both directions easily.
Uploading files to the server:
- Navigate to the desired local folder in the left pane
- Select the files you want to upload
- Drag them to the appropriate directory in the right pane
- CuteFTP will automatically begin the upload process
- Monitor progress in the transfer queue at the bottom of the screen
Downloading files from the server:
- Browse the remote server files in the right pane.
- Select the files you need to download.
- Drag them to your desired local directory in the left pane.
- The download will begin automatically.
If your connection drops, CuteFTP can resume large transfers automatically so you never lose progress.
Advanced transfer options
If you use CuteFTP Pro or Professional, you can do more:
- Split large files into parts for faster transfers.
- Schedule uploads through the Transfer Engine.
- Automate tasks with scripting support.
- Control speed with bandwidth throttling for balanced performance.
Beyond regular transfers, CuteFTP also lets you reveal hidden or configuration files.
How do you show hidden files in CuteFTP?
Sometimes you need to access system or configuration files that stay hidden by default. CuteFTP lets you reveal these files easily, so you can edit or troubleshoot without leaving the app.
Here’s how to configure CuteFTP to display hidden files:
1. Access site properties
First, open Site Manager and select your existing connection.
You’ll adjust settings for that site directly.
- Right-click your connection name.
- Choose Properties, or press Alt + Enter to open it quickly.
- The Site Properties window appears, showing connection details and options.
The best part is, you only need to change these settings once. CuteFTP will remember them for future sessions.
2. Configure file display settings
Next, go to the Actions tab inside the Site Properties window. This is where you can manage how your files appear.
- Click the Filter or Filtering Options button.
- Check for server-side filtering and enable it if available.
- Make sure no active filters are hiding system files.
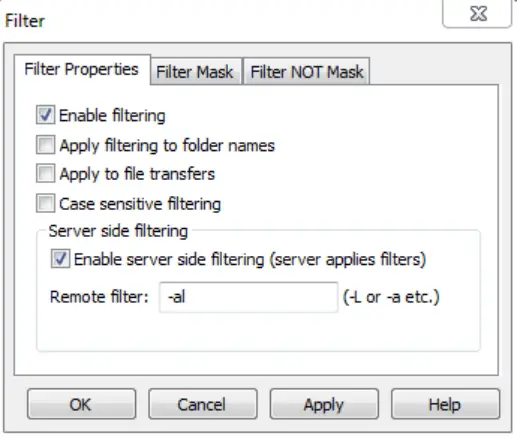
3. Apply hidden file commands
Now you’ll enter a short command to tell the server to show hidden files.
- In the remote filter box, enter the appropriate command for your server type:
- For Unix/Linux servers: Enter “-a” to show all files including hidden ones
- For Windows servers: Use appropriate directory listing commands
- Apply the settings and reconnect to your server
4. Verify hidden files display
Finally, check that your changes worked.
- Look for files starting with a dot (.) on Unix systems.
- Confirm that configuration or system files now appear in your remote directories.
- You can now open, edit or transfer those files as needed.
Remember that some hidden files are system-critical, so exercise caution when editing or moving these files. Always maintain backups before making changes to important system configurations.
If you host your site on Bluehost, you get an extra layer of safety. Bluehost automatically creates regular backups of your files, so you can recover previous versions anytime.
You can rely on our secure hosting platform to keep your site stable, your data protected and your workflow uninterrupted.
How does Bluehost hosting enhance CuteFTP use?
Bluehost and CuteFTP work well together to provide a seamless file management experience for website owners and developers. Here’s how this combination benefits users:
- Secure transfers with SFTP:
You protect your files with Bluehost’s built-in SFTP. This encryption keeps every upload and download private so your data stays safe at all times.
Also read: The 6 Best FTP Clients To Develop Your Website in 2024
- FTP account management:
You can create and manage multiple FTP accounts directly in your Bluehost Account Manager. This means you can set up dedicated CuteFTP access for team members without sharing your main credentials.
- Access to FTP connection details:
Bluehost shows all your FTP details in one place: host, username, password and port. You can copy these directly into CuteFTP for quick, error-free setup.
- Multiple FTP accounts for collaboration:
You can create separate FTP accounts for developers or partners. Each account connects through CuteFTP with controlled access to specific directories, keeping your files organized and secure.
- Intuitive file management:
Bluehost integrates smoothly with CuteFTP’s dual-pane interface. You can rename, move and organize files between your computer and hosting space quickly.
- Comprehensive support and resources:
You’re never on your own. Bluehost provides detailed FTP setup guides and 24/7 expert support. If you ever run into issues with CuteFTP, help is always available.
In short, you get secure transfers, flexible control and expert guidance when you use CuteFTP with Bluehost hosting. It’s the perfect combination for reliable, professional file management that keeps your site running smoothly.
Final thoughts
You keep your workflow smooth when your file transfers stay fast, secure and easy. CuteFTP gives you professional control over every upload and download through an intuitive interface that anyone can master. You can automate backups, manage multiple sites and protect sensitive data – all without complex setup.
That said, the right hosting makes all the difference. Bluehost enhances CuteFTP with built-in SFTP security, reliable uptime and easy FTP management tools. When you host your site on Bluehost, you get the speed, stability and support you need to manage every file with total confidence.
Start your Bluehost hosting plan today and experience secure, seamless file management that keeps your website running strong.
FAQs
You use CuteFTP to move files securely between your computer and your web server. It’s a professional-grade FTP client that supports FTP, SFTP and FTPS connections, giving you safe, encrypted transfers every time. You can upload website files, sync folders or back up content quickly through its simple two-pane interface.
CuteFTP offers a free trial so you can explore its core features before purchasing. The trial gives you access to secure file transfers, synchronization and basic automation tools. If you upgrade to CuteFTP Professional, you unlock advanced scheduling, scripting and multi-part transfer support – ideal for managing large websites or frequent updates.
Connecting CuteFTP to Bluehost takes just a few steps. Open Site Manager in CuteFTP and create a new site profile. In your Bluehost control panel, locate your FTP settings: host name, username, password and port (21 for FTP or 22 for SFTP). Enter those details in CuteFTP and click Connect. This setup ensures secure, direct access to your website, so you can manage updates and transfers confidently.
To reveal hidden files, go to your Site Properties in CuteFTP, open the Actions tab and click Filter. For Unix or Linux servers, add the command -a in the Remote Filter field. This shows all files, including those starting with a dot (.). Reconnect, and you’ll see configuration files that were previously hidden.
Yes, CuteFTP is built for secure file management. It supports SFTP (Secure File Transfer Protocol) and FTPS (FTP over SSL), which encrypt your data during uploads and downloads. You can also use advanced authentication options like SSH keys for added protection. When combined with Bluehost’s secure hosting infrastructure, every transfer remains private, stable and protected against unauthorized access.
Yes, CuteFTP includes a built-in text editor that lets you modify website files directly on your server. You can open HTML, CSS or PHP files, make quick changes and save them instantly – no separate software needed. This feature is perfect for small updates, testing fixes or editing configuration files on the go.
Absolutely. Bluehost hosting integrates seamlessly with CuteFTP for secure, fast and stable file transfers. You can set up multiple FTP accounts, use secure SFTP connections and resume large uploads without losing progress. Bluehost provides all your FTP details in one place, so setup takes minutes. You also get 24/7 support from experts who understand both platforms, making your file management experience smooth, secure and worry-free.


Write A Comment