
Key highlights:
- Generate secure SSH key pairs using PuTTYgen for Windows-based authentication
- Convert existing OpenSSH and PEM keys to PuTTY’s PPK format seamlessly
- Configure your server’s authorized_keys file to accept your public key
- Connect to your server using PuTTY with passwordless SSH key authentication
- Troubleshoot common PPK file errors and connection issues effectively
- Integrate your PPK files with our hosting platform for streamlined access
Setting up secure SSH access on Windows can seem daunting, especially when you encounter requests for a “PuTTY PPK file” or need to convert between different SSH key formats.
Knowing how to create, convert and use PuTTY PPK files is essential for anyone working with remote servers. Whether you’re a developer, system administrator or website owner, mastering these SSH key formats ensures secure and efficient server management.
This comprehensive guide will walk you through everything you need to know about PuTTY PPK files, from basic concepts to advanced troubleshooting. You’ll learn how to generate new key pairs, convert existing SSH keys and establish secure connections using Windows SSH private keys. By the end of this article, you’ll be confidently using PuTTY key authentication for all your server access needs.
What is a PuTTY PPK file and why does PuTTY need it?
Before diving into the practical aspects of creating and using PPK files, it’s important to understand what they are and why PuTTY requires this specific format for SSH key authentication on Windows.
What is a .ppk file and how does it work in SSH authentication?
A PuTTY PPK file (PuTTY Private Key) is a proprietary file format used by PuTTY to store private SSH keys on Windows systems. The PPK file extension stands for “PuTTY Private Key” and contains encrypted private key data that enables secure authentication to remote servers without requiring a password.
SSH key authentication works on a public-private key pair principle. Your private key (stored in the PPK file) remains secure on your local machine, while the corresponding public key is placed on the server you want to access. When you connect, PuTTY uses your private key to prove your identity to the server, which verifies it against the stored public key.
This PuTTY private key file format includes additional metadata and uses PuTTY’s specific encryption methods, making it incompatible with standard OpenSSH implementations found on Unix-based systems. However, this design provides Windows users with a robust and secure method for SSH key authentication.
Given these distinct characteristics and the inherent incompatibility with standard formats, you might wonder why PuTTY developers chose to create their own proprietary key format. The decision to develop PPK rather than adopt existing standards like PEM or OpenSSH wasn’t arbitrary. Specific technical considerations and the unique requirements of Windows-based SSH clients drove it.
Why does PuTTY use PPK instead of PEM or OpenSSH formats?
PuTTY’s decision to use its own PPK format stems from several technical and security considerations. When PuTTY was first developed, OpenSSH key formats weren’t standardized across platforms and PEM format had limitations in terms of key type support and encryption options.
These design choices have resulted in several advantages for the PPK format. It supports stronger encryption algorithms, includes built-in integrity checking and provides better error handling. Additionally, PPK files can store additional metadata about the key, such as comments and creation timestamps, which helps with key management in enterprise environments.
For Windows users, these technical advantages translate to better integration with the Windows ecosystem and more reliable performance. However, it also means that if you have existing SSH keys in PEM or OpenSSH format, you’ll need to convert them to PPK format before using them with PuTTY.
Understanding when and where you’ll need your PPK file is essential for smooth SSH operations. Whether you’re setting up automated deployments, managing remote servers or configuring SFTP clients, knowing the specific scenarios that require a private key file will help you prepare and troubleshoot more effectively. Let’s explore the most common situations where PuTTY asks for your private key file.
Common situations where you are asked for a “private key file” in PuTTY
When working with SSH connections on Windows, you’ll need your PuTTY PPK file in several key situations. These are the most common scenarios where you’ll encounter requests for your private key file:
- Setting up SSH connections to web hosting providers that require key-based authentication for enhanced security.
- Working with cloud platforms like AWS, Digital Ocean and others that provide keys in different formats, needing conversion to PPK.
- Accessing Git repositories in development environments.
- Connecting to staging servers or managing containerized applications.
- Managing multiple servers as a system administrator to streamline access without repeatedly entering passwords.
- Configuring SSH access to cPanel or server management interfaces with hosting providers.
This ssh key setup using PPK files creates a seamless and secure workflow for managing your online presence. Now that you understand how PPK files can streamline your SSH connections and enhance security for your server management, let’s walk through the essential prerequisites you’ll need to get started with creating and using your own PuTTY PPK file.
What you need before creating or using a PuTTY PPK file
Setting up SSH key authentication on Windows starts with understanding the fundamentals and gathering the right tools. Before you create or use a PuTTY PPK file, you’ll need to prepare a few essential components that make the authentication process seamless and secure.
1. Required tools
The primary tool you’ll need is PuTTYgen, which comes bundled with the PuTTY installation package. PuTTYgen serves as the PuTTYgen key generator and handles all key creation, conversion and management tasks. You can download the complete PuTTY suite from the official website, which includes PuTTY (the SSH client), PuTTYgen (key generator) and other useful utilities.
For basic operations, you only need PuTTYgen and PuTTY itself. However, if you plan to work with multiple key formats or automate key management tasks, consider installing additional tools such as WinSCP for file transfer or Pageant for SSH agent functionality.
Most modern Windows systems (Windows 10 and later) include built-in OpenSSH clients that can complement your PuTTY setup. While these tools use different key formats, understanding both ecosystems will make you more versatile when working across different environments.
With your tools downloaded and installed, the next step is gathering the specific information you’ll need to establish a successful SSH connection to your target server.
2. Server access details you need
Before creating your PPK file, gather the essential connection information for your target server. Your hosting provider or system administrator should provide these details:
- Server hostname or IP address: This identifies your server location and might appear as [yourserver].com or a direct IP like 192.168.1.100.
- Username: The account name you’ll use to connect to the remote server via SSH. This could be a custom username you created, ‘root’ for full administrative access or a username provided by your hosting provider.
- Port number: Typically port 22 for SSH connections, though some configurations use custom ports for enhanced security.
Different servers may use different username conventions, so verify this information with your provider. If your server uses a non-standard port, note this number, as you’ll need it when configuring your PuTTY session.
Now that you have your tools ready and connection details at hand, it’s crucial to understand how SSH key authentication works and the security practices that will keep your connections safe.
3. Public vs private keys and basic security best practices
Understanding the relationship between public and private keys is crucial for effective SSH key authentication on Windows. Think of your private key as your personal password that must never leave your computer. It stays securely on your local machine at all times. Your public key, on the other hand, works like a lock that can be freely distributed to any server you want to access.
To keep your PuTTY PPK files secure, follow these essential best practices:
- Always use strong passphrases to encrypt your private keys
- Regularly rotate keys in high-security environments to minimize risk
- Maintain secure backup copies of your keys in encrypted storage locations
- Never store unencrypted private keys on shared systems or cloud storage without additional encryption layers
Another smart security strategy is to use different key pairs for different purposes. For example, create one key pair for development servers, another for production systems and separate keys for personal projects. This approach not only limits potential damage if a single key is compromised but also makes your overall key management more organized and easier to maintain.
Now that you understand the importance of using multiple SSH key pairs for enhanced security, let’s walk through creating a new PuTTY PPK file with PuTTYgen.
Generate a new PuTTY PPK file using PuTTYgen
Creating a new SSH key pair is often the first step in establishing secure server connections. PuTTYgen makes this process straightforward, though understanding each step ensures you create strong, reliable keys. Below, we’ll walk you through the complete process of generating your PuTTY ppk file from start to finish.
1. Launch PuTTYgen and choose the key type and size
Start by opening PuTTYgen from your Windows Start menu or by double-clicking the executable file. The interface presents several options, with RSA selected as the default key type. For most modern applications, RSA keys provide excellent security and broad compatibility.
When selecting your key configuration, consider both security and performance requirements. Here are your main options:
- 2048-bit RSA keys: The default setting offers good security for most applications while maintaining fast performance
- 4096-bit RSA keys: Provide enhanced security for high-security environments, though they may result in slightly slower performance
- ED25519 keys: A newer, more efficient algorithm that delivers strong security with smaller key sizes
Before selecting ED25519 keys, ensure your target servers support this format, as some older systems may not recognize them. Once you’ve selected your preferred key type and size, you’re ready to begin the actual generation process.
2. Generate a public and private key pair
Click the “Generate” button to begin the key generation process. PuTTYgen will prompt you to move your mouse randomly over the blank area below the progress bar. This mouse movement provides entropy (randomness) that helps create a more secure key pair.
As you generate your keys, keep these important points in mind:
- Continue moving your mouse until the progress bar completes
- The randomness from your movements contributes to cryptographic strength
- The process typically takes 30 seconds to a few minutes, depending on your key size selection
- Don’t rush this step—thorough randomization creates stronger keys
Once generation completes, PuTTYgen displays your new public key in the text area and shows the key fingerprint. The fingerprint serves as a unique identifier for your key pair and can help verify key authenticity when connecting to servers.
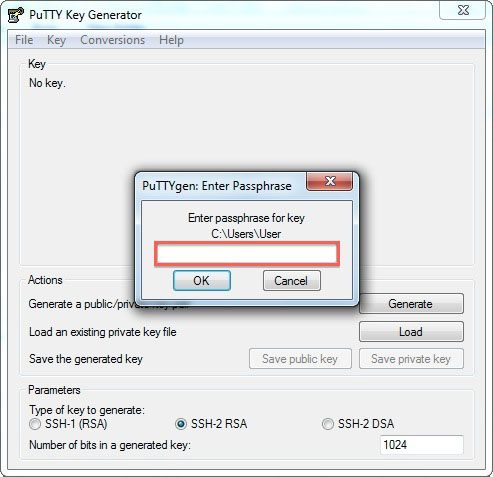
3. Save the private key as a .ppk file
Before saving your private key, consider adding a passphrase for additional security. Click in the “Key passphrase” field and enter a strong, memorable phrase. This passphrase encrypts your private key, so even if someone gains access to your PPK file, they cannot use it without the passphrase.
To properly secure your key file, follow these steps:
- Click “Save private key” to create your PuTTY ppk file.
- Choose a descriptive filename that helps you identify the key’s purpose (such as “myserver-ssh-key.ppk” or “development-server.ppk”).
- Store the file in a secure location on your system, preferably in a dedicated SSH key folder.
- Create backups in case of system failures.
The saved PPK file contains your encrypted private key and associated metadata. This file enables PuTTY to authenticate you to servers that have your corresponding public key installed. Keep this file secure and maintain regular backups.
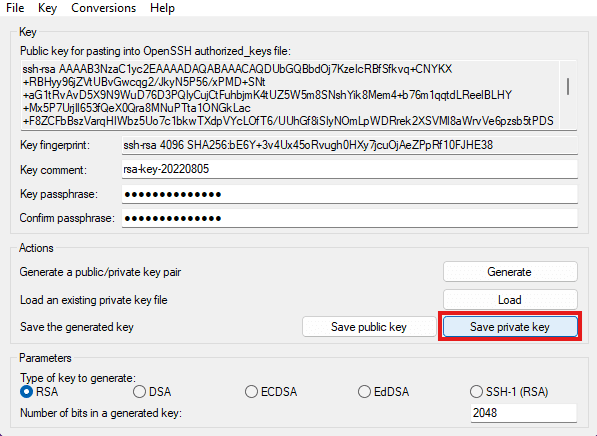
4. Copy the public key for server authorization
Select all text in the “Public key for pasting into OpenSSH authorized_keys file” section and copy it to your clipboard. This text string represents your public key in the format needed for most SSH servers.
Your public key has specific characteristics you should understand:
- It typically starts with the key type (ssh-rsa, ssh-ed25519, etc.)
- It contains a long string of characters that must be copied accurately
- Any missing characters or extra spaces can prevent authentication from working
- An optional comment may appear at the end
Save this public key text to a temporary file or paste it directly into your server’s configuration. You’ll need this exact text to configure server-side authentication, which we’ll cover in the next section. With both your private PPK file and public key text ready, you’re prepared to establish secure SSH connections.
While creating a new PuTTY PPK file from scratch works perfectly for fresh setups, you might already have an existing SSH key that you’d like to use with PuTTY. Rather than creating an entirely new key pair, PuTTY allows you to convert your existing OpenSSH or other SSH key formats into the PPK format it requires.
Convert an existing SSH key into a PuTTY PPK file
Many situations require converting existing SSH keys from other formats to PuTTY’s PPK format. This process is common when migrating from Unix-based systems, working with hosting providers or integrating with development tools that use standard OpenSSH keys.
Let’s explore when conversion is necessary and walk through the complete process step by step.
Step 1: When key conversion is required (PEM or OpenSSH keys)
Key conversion becomes necessary when you have existing SSH keys in PEM, OpenSSH or other standard formats that need to work with PuTTY. You’ll typically encounter this in several common scenarios:
- Receiving keys from hosting providers who distribute them in standard formats
- Migrating from macOS or Linux systems to Windows
- Working with development platforms that generate keys in standard formats
- Operating in mixed-platform environments where teams use different operating systems
The PEM (Privacy Enhanced Mail) format is widely used for SSL certificates and SSH keys, while the OpenSSH format is the default on most Unix-based systems. Understanding the conversion from OpenSSH to PPK enables seamless workflow integration regardless of your original key format.
Now that you understand when conversion is needed, let’s start by loading your existing key into PuTTYgen.
Step 2: Load an existing private key in PuTTYgen
The first step in converting your key is to import it into PuTTYgen. Here’s how to do it:
- Open PuTTYgen and click the “Load” button.
- Change the file type filter to “All Files (*)” in the bottom-right corner of the dialog box (by default, PuTTYgen only shows PPK files).
- Navigate to your existing key file and select it.
- If prompted, enter the passphrase for password-protected keys.
PuTTYgen can import keys in various formats, including OpenSSH, SSH.com and PEM formats. After a successful import, PuTTYgen displays the key information, including the public key text and key fingerprint. This confirms that your key has been loaded correctly and is ready for conversion to PPK format.
With your key successfully loaded, you’re ready to save it in the proper format.
Step 3: Save the converted private key as a .ppk file
Now that your key is loaded, you can save it in PPK format. Follow these steps to complete the conversion:
- If desired, add or change a passphrase by entering text in the “Key passphrase” and “Confirm passphrase” fields (this provides additional security).
- Click “Save private key” and choose a location for your new PPK file.
- Use a descriptive name that clearly identifies the converted key, such as “converted-server-key.ppk” or “hosting-account.ppk”.
The conversion process maintains all the cryptographic properties of your original key while formatting it for PuTTY compatibility. Your converted PPK file will work identically to newly generated keys, providing the same level of security and functionality for SSH authentication on Windows systems.
You’ve successfully converted your SSH key to PPK format. With your key file ready, you can now configure your server to accept connections using this key for secure, password-free authentication.
Add your public key to the server for SSH access
Creating your PPK file is only the first step in setting up key-based authentication. You also need to install the matching public key on your target server to enable passwordless SSH connections.
Let’s walk through where to add your public key and how to configure it properly for secure authentication.
Where the public key must be added
To enable SSH key authentication, you need to add your public key to the authorized_keys file on the server.
On most Linux systems, this file is located at:
~/.ssh/authorized_keys
The tilde (~) represents your home directory. The authorized_keys file contains a list of public keys that are permitted to authenticate with your user account.
Each public key must be placed on its own single line. If you’re using multiple keys, add each one on a separate line. The key must follow the OpenSSH public key format, which includes:
- The key type
- The key data
- An optional comment or identifier
Any extra spaces, line breaks or formatting errors will cause authentication to fail.
Once your public key is in place, you’ll need to set the correct file permissions to ensure the server accepts your key.
Correct directory and file permissions
SSH enforces strict permission requirements to maintain secure authentication. If your permissions are too open, the server will reject your key.
Use the following permissions:
.sshdirectory:700authorized_keysfile:600
Run these commands on the server after adding your public key:
chmod 700 ~/.ssh
chmod 600 ~/.ssh/authorized_keys
chown $USER:$USER ~/.ssh/authorized_keys
These settings ensure that only your user account can read or modify the SSH key files. Most SSH servers will block key-based login if these permissions aren’t set correctly.
With the correct permissions in place, you’ll be better equipped to troubleshoot any connection issues that might arise.
What are the common mistakes that prevent key-based login?
If SSH key authentication fails, the issue is usually caused by one of the following:
- Incorrect file or directory permissions
- Public key pasted with line breaks or extra whitespace
- Wrong username specified in the SSH client
- Public key authentication is disabled on the server
- SSH running on a non-standard port
Some hosting providers also require you to enable SSH access or add SSH keys through the control panel before they will work.
You can verify that public key authentication is enabled by checking the SSH configuration file. Make sure the following setting is present:
PubkeyAuthentication yes
Also, verify that your SSH client is connecting to the correct hostname and port provided by your hosting provider. After addressing these common issues, you should be ready to establish secure, key-based SSH connections to your server.
With your public key properly configured and your authentication setup complete, you can now use your PPK file to connect securely without entering passwords.
Connect to your server using a PuTTY PPK file
With your PPK file created and public key installed on the server, you’re ready to establish your first key-based SSH connection. The process involves configuring a few essential settings in PuTTY’s interface and once you understand these steps, connecting to your server becomes quick and straightforward.
Let’s walk through each configuration step to ensure your connection works flawlessly.
Enter the host name or IP address in PuTTY
Launch PuTTY and locate the main Session configuration screen. Here, you’ll need to configure three key settings to establish your initial connection:
- Host Name: Enter your server’s hostname or IP address in the “Host Name (or IP address)” field. This should be the same address you use for regular SSH connections, such as [yourserver].com or 192.168.1.100.
- Port Number: Verify the port number is correct. SSH typically uses port 22, but some servers use custom ports for enhanced security. If your server uses a non-standard port, update the “Port” field accordingly.
- Connection Type: Ensure the connection type remains set to “SSH” for secure, encrypted connections.
Consider entering a descriptive name in the “Saved Sessions” field, such as “My Web Server” or “Development Environment.” Saving your session now will store all connection settings for future use, eliminating the need to reconfigure everything each time you connect.
With your server address configured, you’ll now need to specify your login credentials.
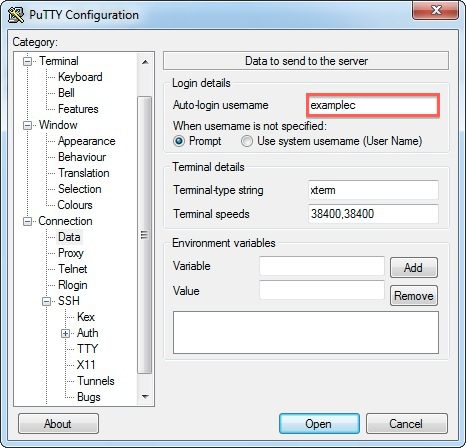
Set the username for auto-login
Navigate to Connection → Data in the left-side category tree. In the “Auto-login username” field, enter the username for your server account. This saves time by eliminating the need to type your username each time you connect.
The username must match exactly what your server expects. Common server usernames include:
- root: Used for administrative access on Linux servers
- Your account name: Specific to your hosting plan or shared hosting environment
- Service-specific names: Such as “ubuntu” for Ubuntu-based cloud instances or “ec2-user” for AWS systems
If you’re unsure of the correct username, verify it with your hosting provider or system administrator. Using an incorrect username will cause connection failures even when your key authentication is properly configured.
Now that PuTTY knows which account to access, the next step is configuring your authentication method.
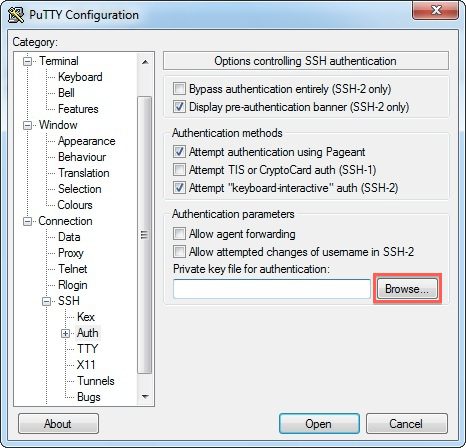
Attach the .ppk file under Connection → SSH → Auth
Navigate to Connection → SSH → Auth in the configuration tree. This section controls how PuTTY authenticates your connection. Click the “Browse” button next to “Private key file for authentication” and select your PPK file from your computer.
The complete path to your PPK file will appear in the text field once selected. When you connect, PuTTY will automatically use this private key to authenticate with the server. If you created your PPK file with a passphrase for added security, PuTTY will prompt you to enter it during the connection process.
For users managing multiple SSH keys, consider enabling “Attempt authentication using Pageant.” Pageant is PuTTY’s SSH authentication agent that can manage multiple keys simultaneously and provides additional security features, particularly useful in enterprise environments.
Before establishing your first connection, take a moment to save these settings for convenient future access.
Save the PuTTY session for future use
Return to the Session category at the top of the left-side menu. Enter a descriptive name in the “Saved Sessions” field to help you identify this connection, then click “Save” to save all your configuration settings. This includes your hostname, port, username and PPK file path.
Saving your session configuration offers several important benefits:
- Instant access: Simply select your saved session and click “Open” to connect immediately
- No reconfiguration: All settings remain intact between sessions
- Multi-server management: Easily maintain separate configurations for different servers with distinct authentication requirements
- Time savings: Particularly valuable when managing multiple servers or frequent connections
You’re now ready to test your connection. Click “Open” to establish your first key-based SSH connection. If everything is configured correctly, PuTTY should connect without prompting for a password. You may need to enter your PPK passphrase if you encrypted your private key, but server authentication should be automatic. A successful connection confirms that your PuTTY ssh key setup is working properly.
While this process works for any SSH server, Bluehost users can leverage additional tools to further streamline their workflow.
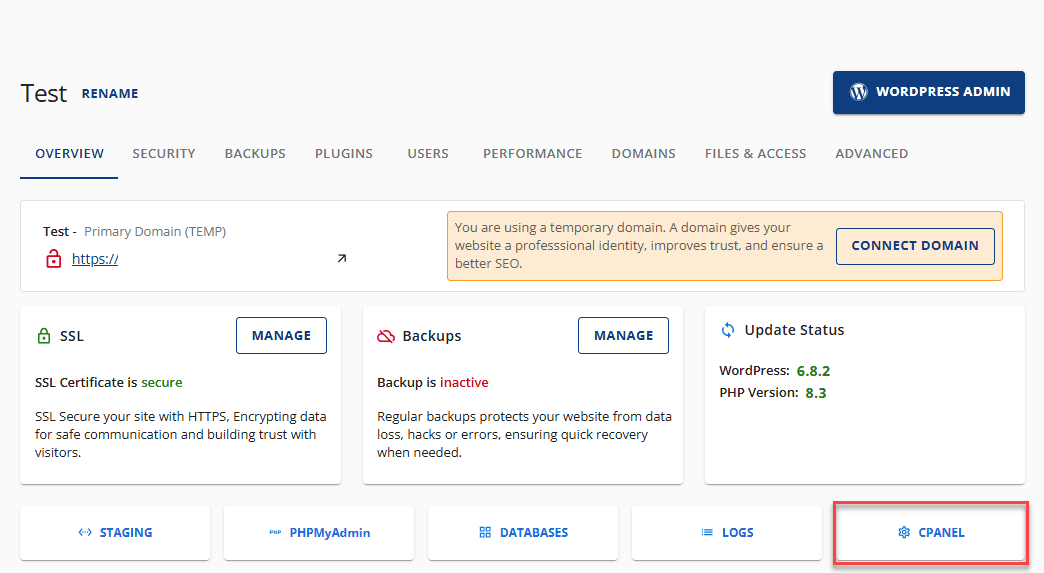
Generate and use a PuTTY PPK file with Bluehost hosting
Bluehost supports SSH key authentication through a combination of the account manager, cPanel and PuTTY tools on Windows. The process involves generating an SSH key pair, downloading the private key, converting it into a PuTTY-compatible PPK file and then configuring PuTTY to use that key for login.
The steps below walk through the complete flow in the order recommended by Bluehost.
Generate a public and private SSH key in the Bluehost account manager
Begin by signing in to the Bluehost Account Manager. Once logged in, move to the hosting section where server-level settings are available.
From the dashboard:
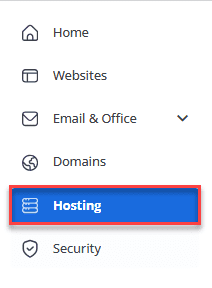
- Click Hosting in the left-hand menu
- Go to Server Information and select Manage Keys
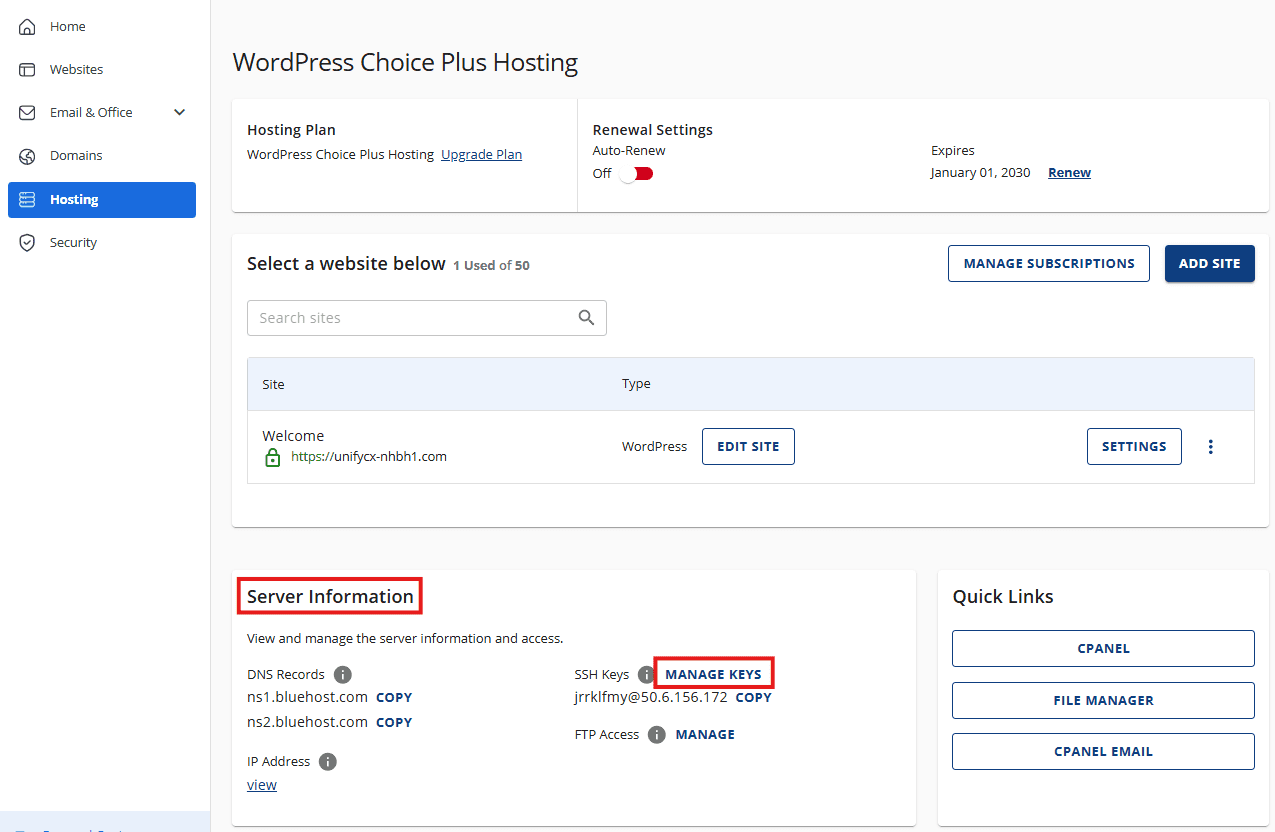
This opens the SSH Management area for your account, where SSH keys are managed.
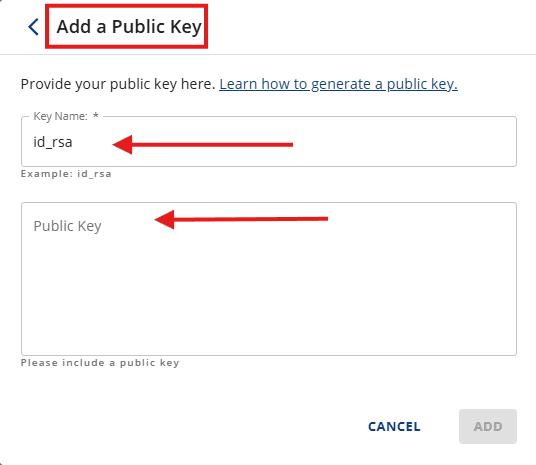
To create a new key entry:
- Click Add SSH Key
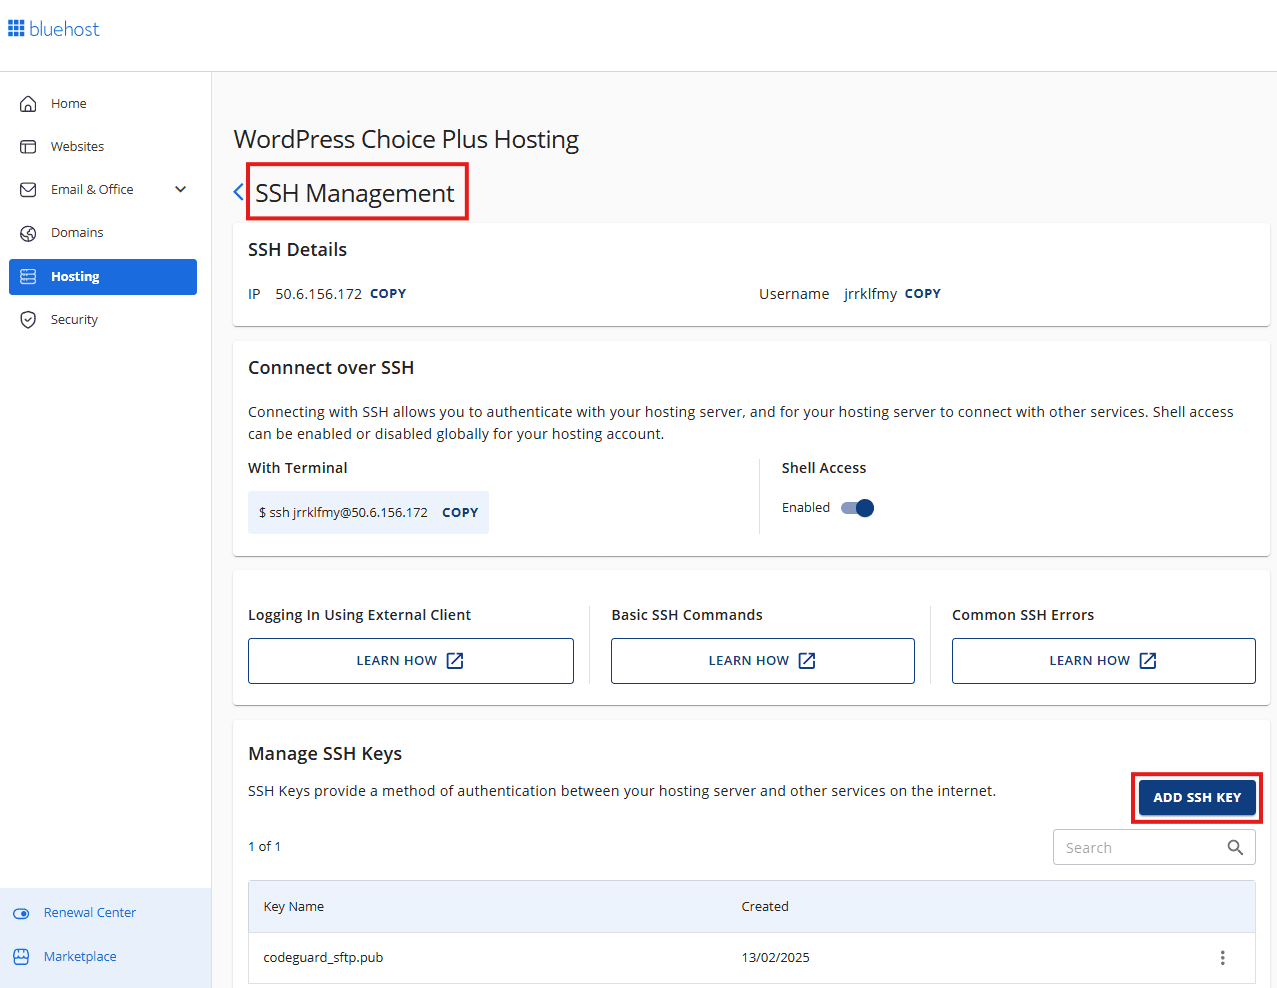
- Enter a key name
- Include a public key
At this point, the key itself still needs to be generated. Bluehost completes this step through cPanel.
Generate SSH keys in cPanel
From the Hosting overview, open cPanel to continue the key generation process.
Inside cPanel, navigate to:
- Security
- SSH Access
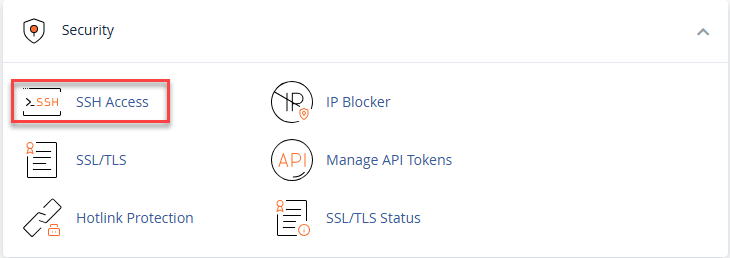
- Manage SSH Keys
This section allows you to generate and manage SSH authentication keys.
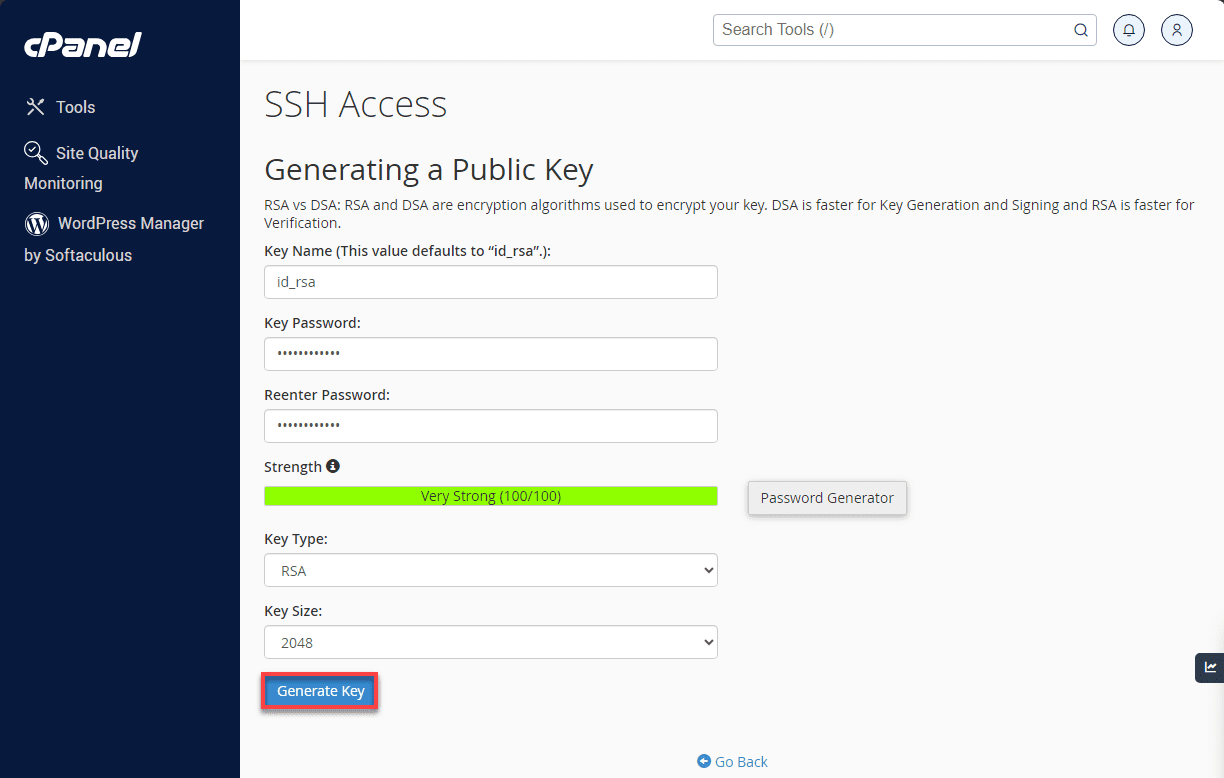
To create a new key pair:
- Click Generate a New Key
- Fill out the required fields
For security, Bluehost recommends using:
- RSA as the key type
- 4096 bits as the key size
Once selected, click Generate Key.
Then, the key is created and Bluehost displays the key location and fingerprint.
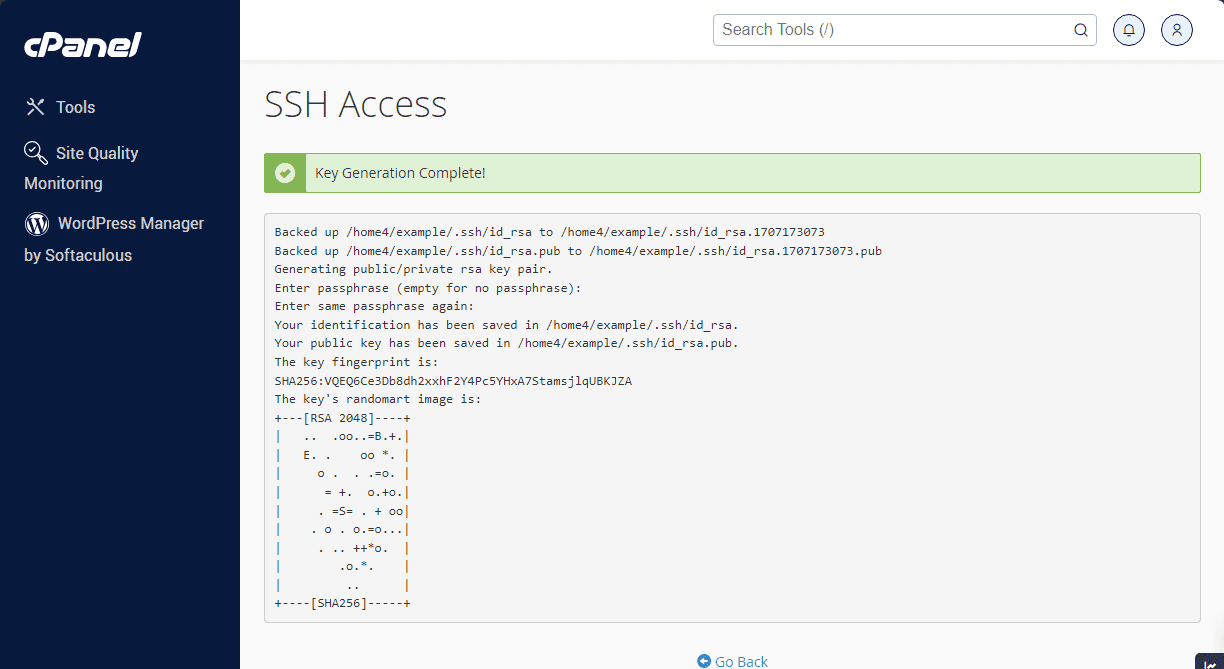
Later, click Go Back to return to the SSH Access page.
Also read: Generate SSH Keys: Windows & macOS/Unix (PowerShell, PuTTY)
Authorize and download the private key
Before the key can be used, it must be authorized.
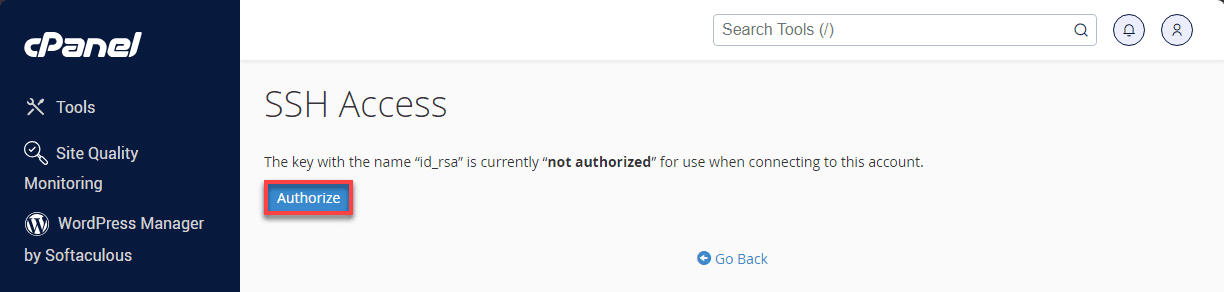
On the SSH Access page:
- Locate the newly generated public key
- Click Manage next to it
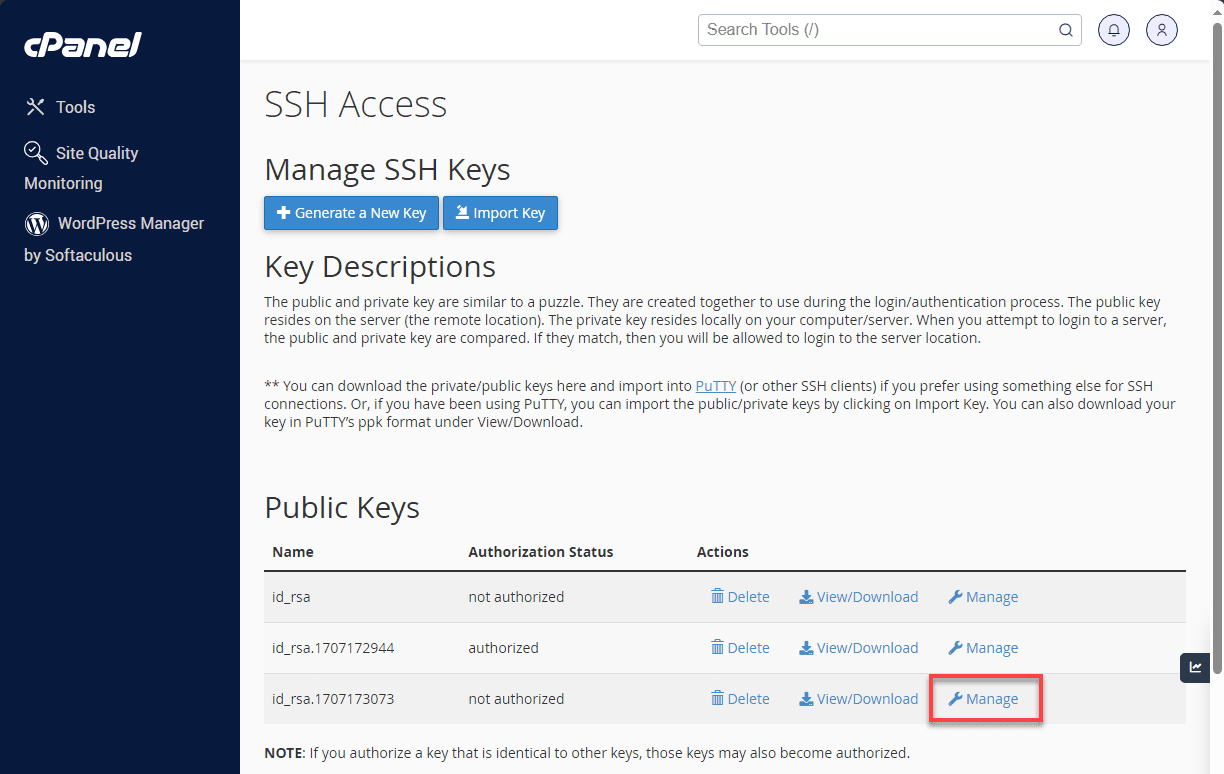
- Select Authorize
- Click Go Back
Next, download the private key so it can be used on your local machine:
- Click View/Download next to the private key

- Click Download Key
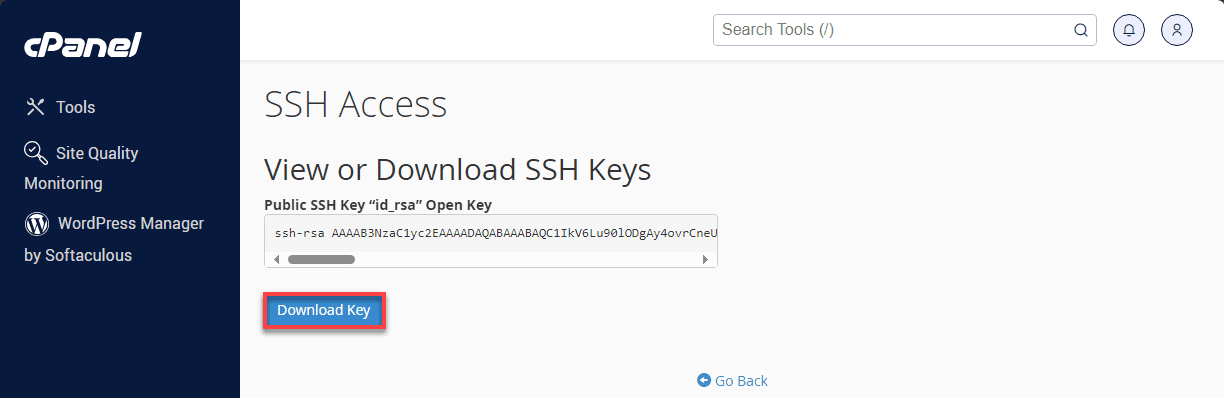
- Save the file to your computer
At this stage, the SSH key pair is fully generated and active on your Bluehost account.
Convert the downloaded Bluehost key into a PuTTY PPK file
PuTTY on Windows requires a PPK file, so the downloaded private key must be converted using PuTTYgen.
Open PuTTYgen, then:
- Click Load and browse to the downloaded private key
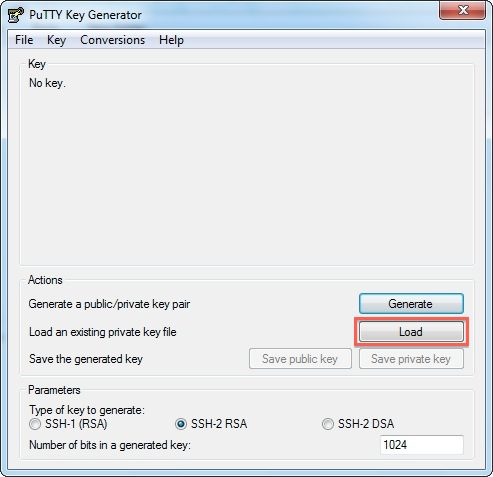
- Change the file filter to All Files (*) if the key is not visible
- Enter the SSH key passphrase when prompted
Once the key loads successfully:
- Click Save private key
- Save the file in
.ppkformat on your computer
This PPK file is now ready to be used with PuTTY.
Use the Bluehost PPK file in PuTTY
With the PPK file created, the final step is configuring PuTTY to use it.
Open PuTTY and start with the session details:
- Under Session, enter your Host Name

Next, configure login settings:
- Go to Connection → Data
- Enter your cPanel username as the auto-login username
Then attach the PPK file:
- Go to Connection → SSH → Auth
- Click Browse and select the PPK file you saved
To finish:
- Return to Session
- Enter a name under Saved Sessions
- Click Save
PuTTY will now connect to your Bluehost server using SSH key authentication, allowing secure access without a password.
While PuTTY’s PPK format works seamlessly with Windows applications, you may need to use your key with other SSH clients or systems that require different formats. Let’s explore how to convert your PPK file when needed.
Managing your server effectively requires reliable hosting infrastructure that supports secure SSH connections. Whether you’re converting PPK files or managing your website remotely, having a hosting provider that offers robust SSH access is essential for seamless server administration.
If you’re looking for dependable hosting with full SSH support, consider Bluehost shared hosting plans. With built-in SSH access, cPanel control and 24/7 expert support, we make server management straightforward for both beginners and experienced developers. Explore Bluehost shared hosting options today and experience hassle-free server administration.
Convert a PuTTY PPK file to PEM or OpenSSH format
While this guide focuses on creating and using PPK files, you may occasionally need to convert them to other formats for compatibility with different tools or systems. Understanding when format conversion becomes necessary and how to execute it properly will help you maintain seamless workflows across different development environments.
1. When you might need a different key format
Converting PPK files to other formats is necessary when working with Unix-based systems and when integrating with CI development tools that expect standard SSH key formats. Many automation tools and scripts are designed to work with OpenSSH format keys.
Cloud platforms and container orchestration systems often require PEM or OpenSSH format keys for configuration. If you’re deploying applications or managing infrastructure using tools like Terraform, Ansible or Docker, you may need keys in standard formats.
Cross-platform development teams often standardize on OpenSSH format to ensure compatibility across Windows, macOS and Linux systems. Converting your PPK files enables seamless collaboration regardless of team members’ operating systems.
Once you’ve identified your conversion needs, the next step is performing the actual export using PuTTYgen’s built-in tools.
2. Exporting OpenSSH keys from PuTTYgen
PuTTYgen provides built-in export capabilities for multiple key formats. Load your existing PPK file using the “Load” button, then look for export options in the Conversions menu. Select “Export OpenSSH key” to save your private key in standard OpenSSH format.
For public keys, the text displayed in PuTTYgen’s main window is already in OpenSSH format. You can copy this text directly and save it as a .pub file for use with OpenSSH-compatible systems.
When exporting private keys, consider whether to include a passphrase. Exported keys maintain the same security properties as your original PPK file, but different systems may have varying passphrase requirements.
With your keys successfully exported, it’s important to understand how these converted formats behave across different systems.
3. Compatibility and security notes
Exported keys maintain the same cryptographic strength as your original PPK files, but different formats may support different metadata. The OpenSSH format preserves key comments, whereas other formats may discard them.
Be aware that different SSH implementations may support different key types and sizes. While RSA keys are universally supported, newer formats like ED25519 may not work with older systems.
Always test exported keys thoroughly before deploying them in production environments. Key format conversion is generally reliable, but verifying functionality prevents authentication failures in critical systems.
Now that you understand how to convert and manage your SSH keys across different formats, you’re equipped to handle authentication requirements in any development environment you encounter.
Troubleshooting common PuTTY PPK file issues
Even with proper configuration, SSH key authentication can sometimes fail. Understanding common problems and their solutions helps you resolve issues quickly and maintain reliable server access.
Let’s start by examining one of the most frequently encountered errors when working with PPK files.
1. “Couldn’t load private key” errors
This error typically indicates file corruption, incorrect format or file access issues. Verify that your PPK file hasn’t been modified or corrupted by checking its size and creation date. If you suspect corruption, regenerate the key or restore from backup.
File permission issues can prevent PuTTY from accessing your PPK file. Ensure your Windows user account has read access to the file and that it’s not located in a restricted system directory.
Passphrase problems also trigger this error. If you’re certain your PPK file is valid but still can’t load it, verify you’re entering the correct passphrase. Remember that passphrases are case-sensitive and must be entered exactly as created.
Once you’ve successfully loaded your key, you might encounter authentication challenges from the server side.
2. “Server refused our key” messages
Server-side configuration issues are the most common cause of key refusal. Verify that your public key is correctly installed in the server’s authorized_keys file and that the key text hasn’t been modified or truncated during copying.
Check file permissions on the server. The .ssh directory must have 700 permissions and authorized_keys must have 600 permissions. Many SSH servers will refuse to use keys if permissions are too open.
Username mismatches can also cause key refusal. Ensure you’re connecting with the correct username that corresponds to the account where your public key is installed. Different users on the same server have separate authorized_keys files.
Speaking of permissions, they deserve a closer look since they’re critical to SSH security.
3. Permission issues on the server
SSH is strict about file and directory permissions for security reasons. If permissions are incorrect, SSH will refuse to use your keys even if they’re properly configured. Use the following commands to correct permissions:
- chmod 700 ~/.ssh (directory permissions)
- chmod 600 ~/.ssh/authorized_keys (file permissions)
- chown $USER:$USER ~/.ssh ~/.ssh/authorized_keys (ownership)
Some systems require additional permission checks on parent directories. Ensure your home directory isn’t world-writable, as this can cause SSH to reject key authentication for security reasons.
Beyond permissions and server configurations, authentication failures often come down to basic configuration mistakes.
4. Using the wrong username or key file
Authentication failures often result from simple configuration errors. Double-check that you’re using the correct username in PuTTY’s auto-login settings and that it matches the account where your public key is installed.
Verify you’re using the correct PPK file path in PuTTY’s authentication settings. If you have multiple keys, ensure you’re selecting the one that corresponds to the public key installed on your target server.
Key fingerprint verification can help identify mismatched keys. Compare the fingerprint displayed in PuTTYgen with server logs or documentation to ensure you’re using the correct key pair for authentication.
With these troubleshooting strategies in your toolkit, you’re now equipped to diagnose and resolve the most common PPK file authentication issues effectively.
Final thoughts
Mastering PuTTY PPK files enables Windows users to manage servers efficiently and securely. From generating new key pairs to converting existing keys and troubleshooting authentication issues, these skills form the foundation of professional SSH workflow management.
The investment in learning proper SSH key authentication pays dividends in improved security, streamlined access and enhanced productivity. Whether you’re managing a single website or dozens of servers, key-based authentication eliminates password management overhead while providing stronger security than traditional username-password combinations.
Remember that security is an ongoing process. Regularly review your key pairs, rotate keys in high-security environments and maintain secure backups of your authentication credentials. With these practices and the knowledge gained from this guide, you’ll be well-equipped to handle any SSH authentication challenge on Windows systems.
Ready to put your SSH expertise to work? Bluehost offers secure hosting solutions with full SSH access, allowing you to implement the key-based authentication methods you’ve mastered. With 99.9% uptime, 24/7 expert support and built-in security features, we provide the reliable infrastructure your projects deserve. Get started today and manage your servers with confidence using your PuTTY PPK skills.
FAQs
A PuTTY PPK file is PuTTY’s proprietary private key format used for SSH authentication on Windows. It stores encrypted private key data that enables secure, passwordless connections to remote servers when paired with corresponding public keys installed on those servers.
PPK files aren’t “opened” directly in PuTTY. Instead, configure PuTTY to use your PPK file by going to Connection → SSH → Auth and browsing to select your PPK file in the “Private key file for authentication” field. Save your session configuration for future use.
To use a PPK file with PuTTY, configure it in your session settings under Connection → SSH → Auth. Click “Browse” next to “Private key file for authentication” and select your PPK file. If you need to modify or view the key, use PuTTYgen to load the PPK file.
Store PPK files in a secure location within your user profile, such as a dedicated folder (e.g., C:\Users[YourUsername].ssh) or a password-protected folder. Avoid storing keys in shared directories, temporary folders or cloud-synchronized folders without additional encryption.
Yes, always protect your PPK files with strong passphrases. This adds an additional security layer, ensuring that even if someone gains access to your PPK file, they cannot use it without knowing the passphrase. Use unique, complex passphrases for each key pair.
Yes, you can use the same PPK file to authenticate to multiple servers by installing the corresponding public key on each server’s authorized_keys file. However, for enhanced security in enterprise environments, consider using separate key pairs for different servers or purposes.


Write A Comment