Key highlights
- Learn how to edit pages in WordPress using the Block Editor, Classic Editor and page builder tools.
- Test how to edit pages in WordPress using a staging site before publishing changes to your live website.
- How to delete pages in WordPress while maintaining SEO through proper redirects and site structure optimization.
- Avoid common mistakes that lead to broken layouts and 404 errors.
- Master professional techniques for WordPress page management.
Your WordPress pages are core business assets. They drive traffic, shape trust and support conversions. When those pages are edited carelessly, the damage shows up fast in broken layouts, confused visitors and lost SEO value.
WordPress gives you several ways to edit pages, but each editor works differently. Block Editor, Classic Editor and page builders all follow their own structure. Using the wrong one can undo design work or corrupt content. Deleting pages adds another layer of risk when removed URLs turn into 404 errors and ranking authority disappears.
This guide brings the workflow together. You will learn how to edit pages using the correct editor, how to remove content safely and how to test changes on staging before they reach your live site. The goal is simple. Fewer mistakes, cleaner updates and a WordPress site that stays reliable as it evolves.
How to add a new page in WordPress?
WordPress pages serve as the foundation for evergreen content that remains relevant throughout your website’s lifetime. You’ll create pages for permanent elements like About Us, Contact, Services, Privacy Policy and other content that doesn’t follow a chronological blog format. Unlike posts that appear in your blog feed, pages exist independently in your site’s navigation structure.
To add a new page in WordPress:
- Navigate to Pages > Add New from your WordPress dashboard sidebar.
- Enter your page title in the field at the top; this becomes the heading visitors see.
- Add your content using blocks by clicking the “+” icon to insert paragraphs, images, headings or other elements.
- Set your URL slug in the Permalink section. Choose a descriptive, keyword-rich slug like “about-us” or “contact-information”.
- Choose a parent page (optional) in the Page Attributes panel if you’re creating a hierarchical structure.
- Select a page template (if your theme offers options) to control the layout.
- Preview your page by clicking Preview to see how it appears before publishing.
- Click Publish to make your page live immediately.
If you’re not ready to publish, click “Save Draft” to preserve your work without making the page visible. You can also schedule publication by selecting a future date and time when the page should automatically go live.
Also read: How to Easily Create a Website on WordPress (2026)
How to edit a WordPress page (The standard way)
Editing WordPress pages is one of the most common tasks you’ll perform as a website owner. The standard editing process depends on which editor your WordPress installation uses, but the Block Editor (Gutenberg) has become the default interface for most modern WordPress sites.
Using the Block Editor (Gutenberg)
The Block Editor revolutionized WordPress page editing by introducing a modular approach to content creation. Each element on your page—from paragraphs to images to buttons—exists as an individual block that you can easily add, move or customize.
To edit a page using the Block Editor:
- Log into your WordPress Dashboard: Navigate to [yourdomain].com/wp-admin and enter your login credentials.
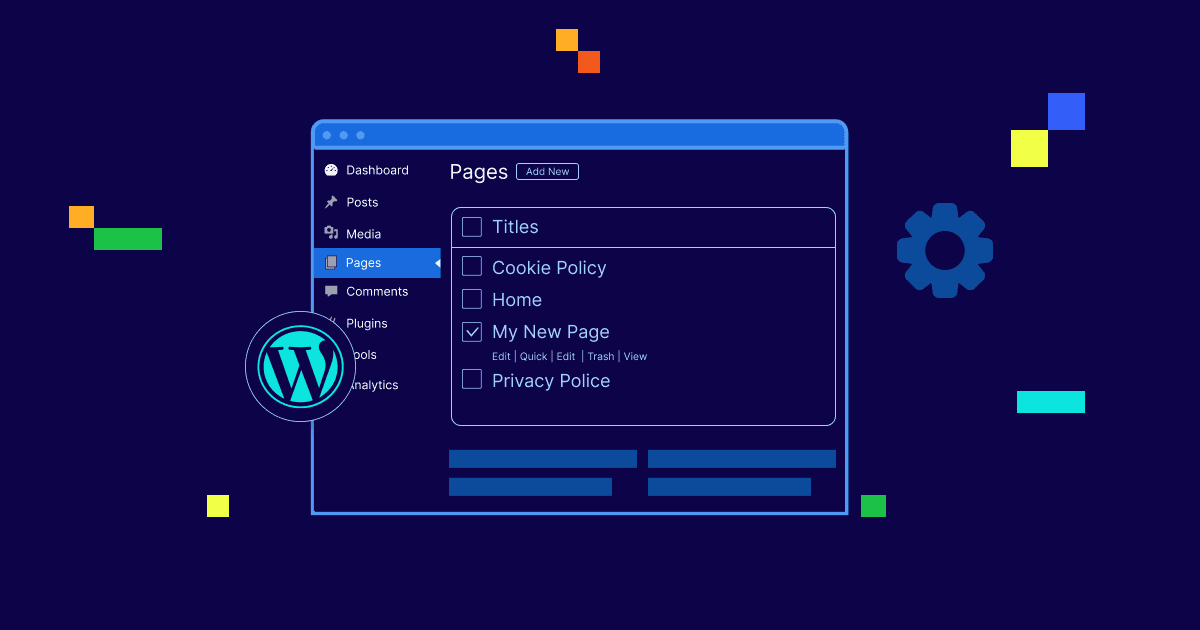
- Access the Pages section: In the left sidebar menu, click on “Pages” then select “All Pages.”
- Locate the page you want to edit: Browse through your page list or use the search function to find the specific page.
- Click the page title or hover and select “Edit”: This opens the page in the Block Editor interface.
- Make your content changes: Click directly on any block to edit its content. You’ll see a toolbar appear above each block with formatting options.
- Add new blocks: Click the “+” icon in the top-left corner or between existing blocks to insert new content elements.
- Rearrange blocks: Click the up the block toolbar or drag blocks to reorder your content.
- Configure block settings: Use the sidebar on the right to adjust advanced settings for each block, including colors, spacing and custom CSS classes.
- Preview your changes: Click the “Preview” button in the top-right corner to see how your page looks before publishing.
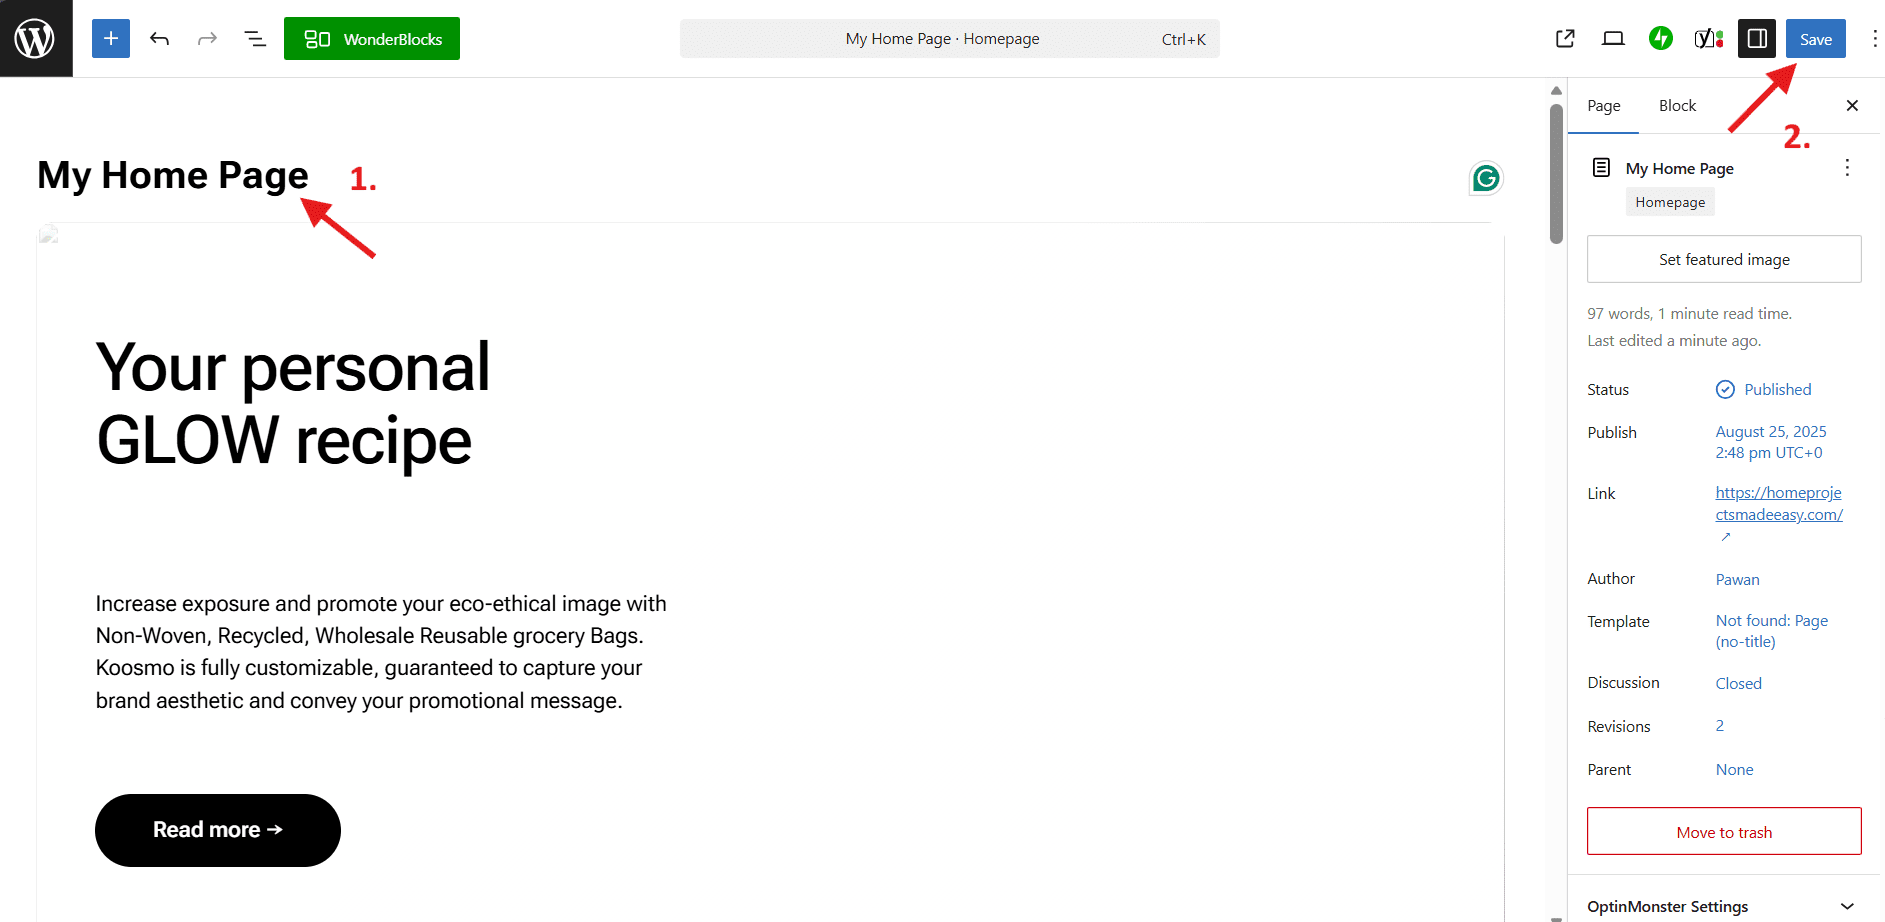
- Update the page: When satisfied with your edits, click the blue “Update” button to save your changes and make them live on your website.
The Block Editor interface includes several helpful features for efficient page editing.
- The Document tab in the right sidebar lets you modify page-level settings like the URL slug, featured image and discussion options.
- The List View button (icon with three horizontal lines) displays your page structure in an outline format, making it easy to navigate complex pages with many blocks.
Understanding the difference between the Document and Block tabs in the sidebar is crucial. The Document tab shows settings that apply to your entire page, while the Block tab displays options specific to whichever block you currently have selected. This distinction helps you make targeted changes without affecting your entire page layout.
Using “Quick Edit” for fast updates
WordPress includes a Quick Edit feature that lets you modify certain page properties without opening the full editor. This time-saving tool is perfect when you need to make simple administrative changes rather than content updates.
To use Quick Edit:
- Navigate to Pages > All Pages in your WordPress dashboard.
- Hover over the page title you want to modify.
- Click the “Quick Edit” link that appears below the title.
- Make your changes in the expanded form that appears inline.
- Click “Update” to save your modifications.
Quick Edit allows you to modify:
- Page title: The main heading displayed on the page and in your browser tab.
- Slug: The URL-friendly version of your page name (exercise caution as changing this on live pages creates broken links unless you set up redirects).
- Publication date: When the page was published or scheduled to publish.
- Status: Switch between Published, Draft, Pending Review or Private.
- Password protection: Require a password to view the page content.
- Parent page: Establish page hierarchy for nested site structures.
- Page order: Set numerical order when sorting pages.
- Template: Apply different page templates if your theme supports them.
- Allow comments: Enable or disable the comment section.
- Author: Reassign the page to a different user on your site.
Quick Edit is particularly useful when you need to change multiple pages’ status, adjust publication dates for content scheduling or reorganize your site hierarchy without editing individual page content.
Edit a page name in WordPress
Your page name (or page title) is what visitors see as the heading on your page and what appears in your WordPress Pages list. This is completely separate from your URL slug (the permalink); when you change the page title, your URL stays the same, so there’s no risk of broken links.
To edit the page title in the editor:
- Open your page in the WordPress editor
- Click the title field at the top
- Type your new page name
- Click Save
To edit the page title using Quick Edit:
- Go to Pages > All Pages
- Hover over the page and click Quick Edit
- Update the Title field
- Click Update
After renaming, remember to update navigation menu labels, internal links that mention the old title, your H1 heading if your theme displays it separately and the SEO title in plugins like Yoast SEO.
Also read: How To Hide Page Title in WordPress in 2026
How to edit a page with page builders?
Many WordPress users work with page builders that provide visual, drag-and-drop editing experiences. These tools create different editing workflows than the standard Block Editor, and it’s essential to use the correct editing method for pages built with these tools.
Editing with Elementor
Elementor is one of the most popular WordPress page builders, offering an intuitive visual interface for designing custom page layouts. If your page was created with Elementor, you must edit it using the Elementor interface to preserve your design and functionality.
To edit a page with Elementor:
- Go to Pages > All Pages in your WordPress dashboard.
- Find the page you want to edit.
- Look for the “Edit with Elementor” button that appears when you hover over the page title.
- Click “Edit with Elementor” to launch the page builder interface.
- Make your edits using Elementor’s visual editor, which displays a live preview as you work.
- Click “Update” or “Publish” in the bottom-left corner when finished.
Important warning: Do not use the standard “Edit” option for pages built with Elementor. Opening an Elementor-designed page in the Block Editor or Classic Editor can break your layout, strip custom styling and create code conflicts that are difficult to reverse. Always use the “Edit with Elementor” button for pages created with this builder.
If you accidentally open an Elementor page in the standard WordPress editor, close it immediately without making changes. Navigate back to the page list and use the correct “Edit with Elementor” option instead. Some themes and plugins display a notice warning you when you’re about to edit an Elementor page with the wrong editor.
Elementor stores page content differently than standard WordPress editors, using shortcodes and custom data structures. This is why switching between editors mid-stream causes problems. Your safest approach is to commit to one editing method per page from the beginning.
Also read: Best WordPress Builders for 2026
Editing with the Classic Editor (Legacy)
The Classic Editor was WordPress’s standard editing interface for over a decade before the Block Editor was introduced in 2018. While modern WordPress installations default to the Block Editor, many websites continue using the Classic Editor through the official Classic Editor plugin or theme compatibility settings.
You can identify whether your site uses the Classic Editor by checking your editing interface. The Classic Editor features a single content box with a toolbar at the top, similar to traditional word processing software. The Block Editor, by contrast, displays individual blocks for each content element.
To edit a page with the Classic Editor:
- Navigate to Pages > All Pages in your dashboard.
- Click the page title or hover and select “Edit (Classic Editor).”
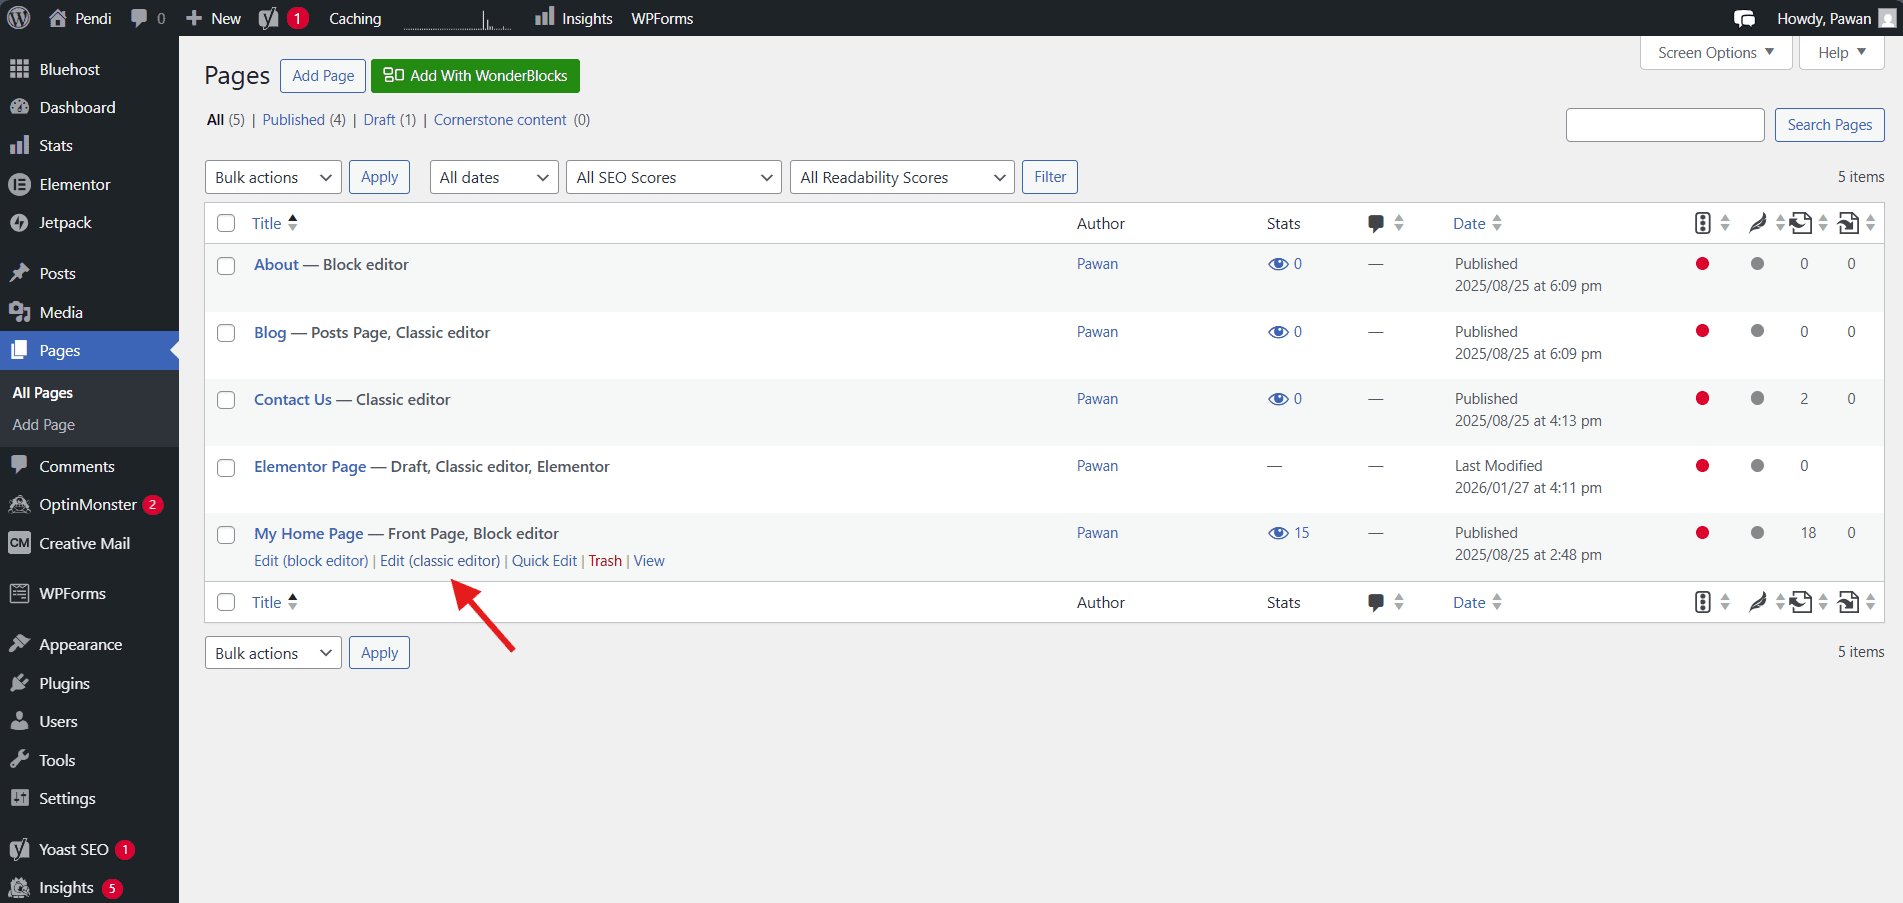
- Use the Visual or Text tabs to switch between WYSIWYG and HTML editing modes.
- Make your content changes using the formatting toolbar.
- Click “Update” to save and publish your modifications.
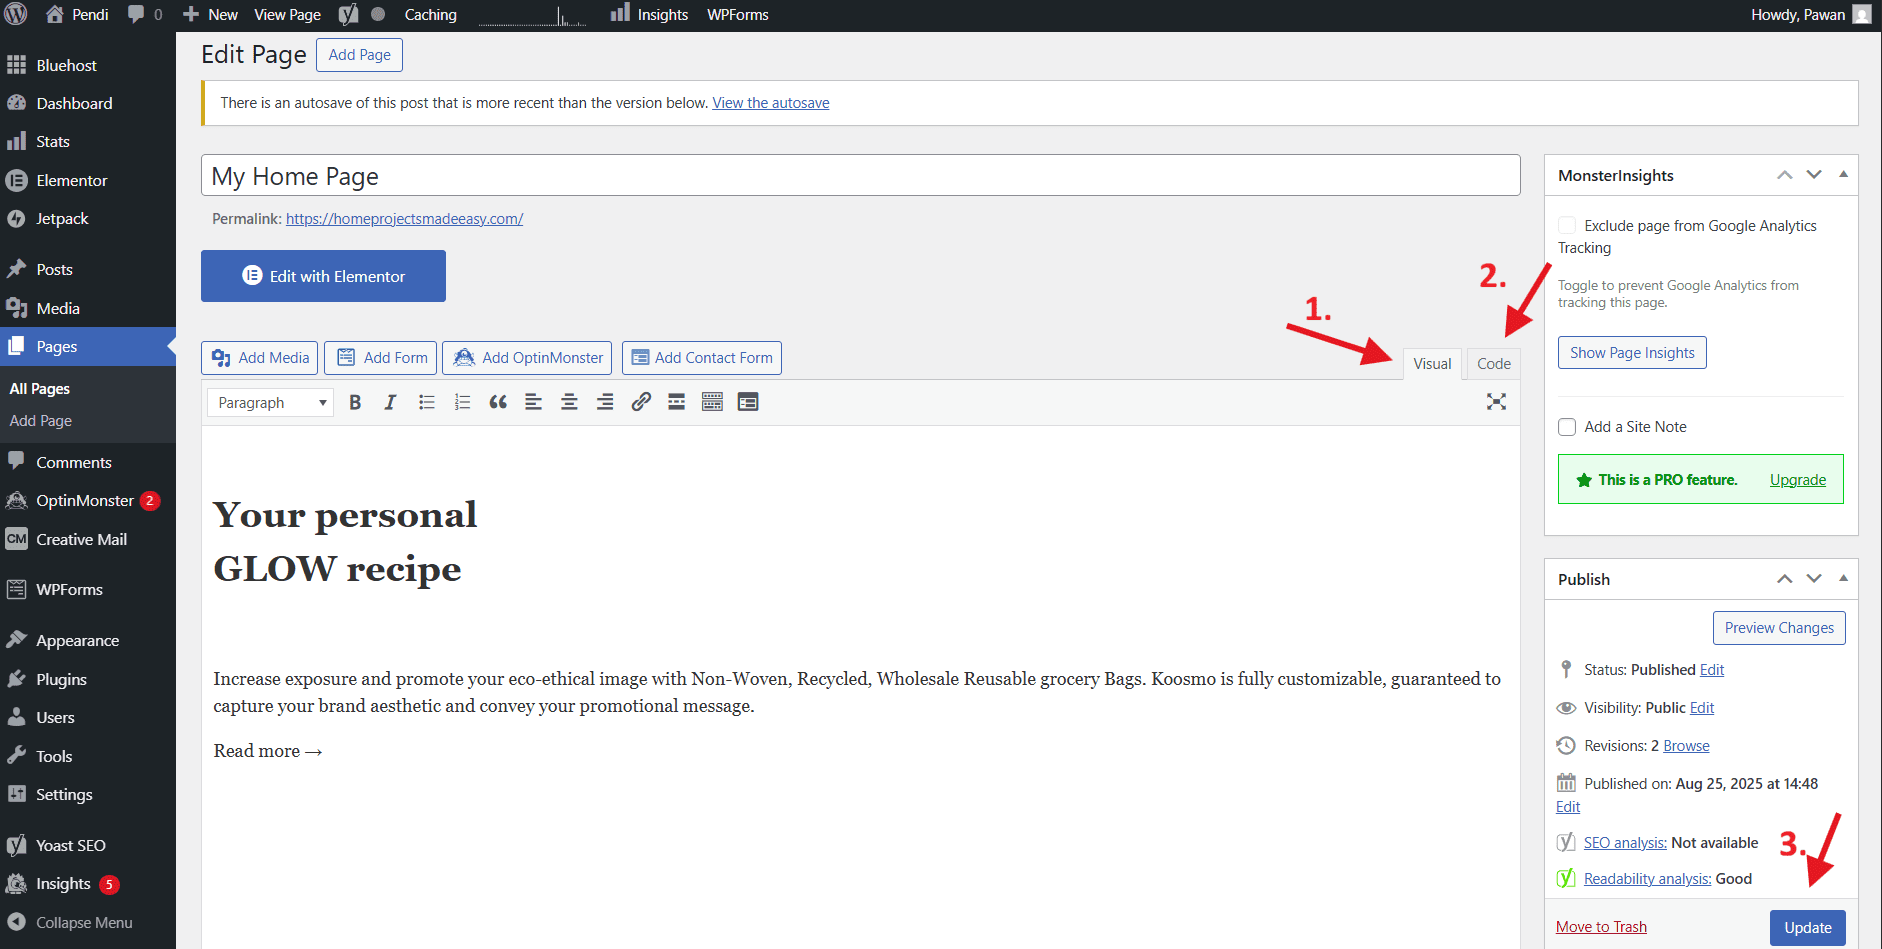
The Classic Editor includes two editing modes accessible via tabs at the top-right of the content area:
- Visual mode: Provides a WYSIWYG (What You See Is What You Get) interface showing formatted text and embedded media as they’ll appear on your published page.
- Text mode: Displays the raw HTML code, giving you direct access to the underlying markup for advanced customization.
Many long-time WordPress users prefer the Classic Editor for its familiarity and straightforward approach. However, the Block Editor offers more design flexibility and better accessibility features. If you’re comfortable with the Classic Editor and it meets your needs, there’s no urgent requirement to switch; but be aware that future WordPress development focuses primarily on the Block Editor experience.
How to delete a WordPress page?
Removing outdated, duplicate or unnecessary pages helps keep your website organized and improves the experience for both visitors and search engines. WordPress provides multiple methods for deleting pages, with built-in safety features that prevent accidental permanent deletion.
Moving a page to trash
WordPress uses a two-step deletion process similar to your computer’s recycle bin. When you initially delete a page, it moves to the Trash folder where it remains for 30 days before permanent deletion. This safety mechanism gives you ample opportunity to recover pages deleted by mistake.
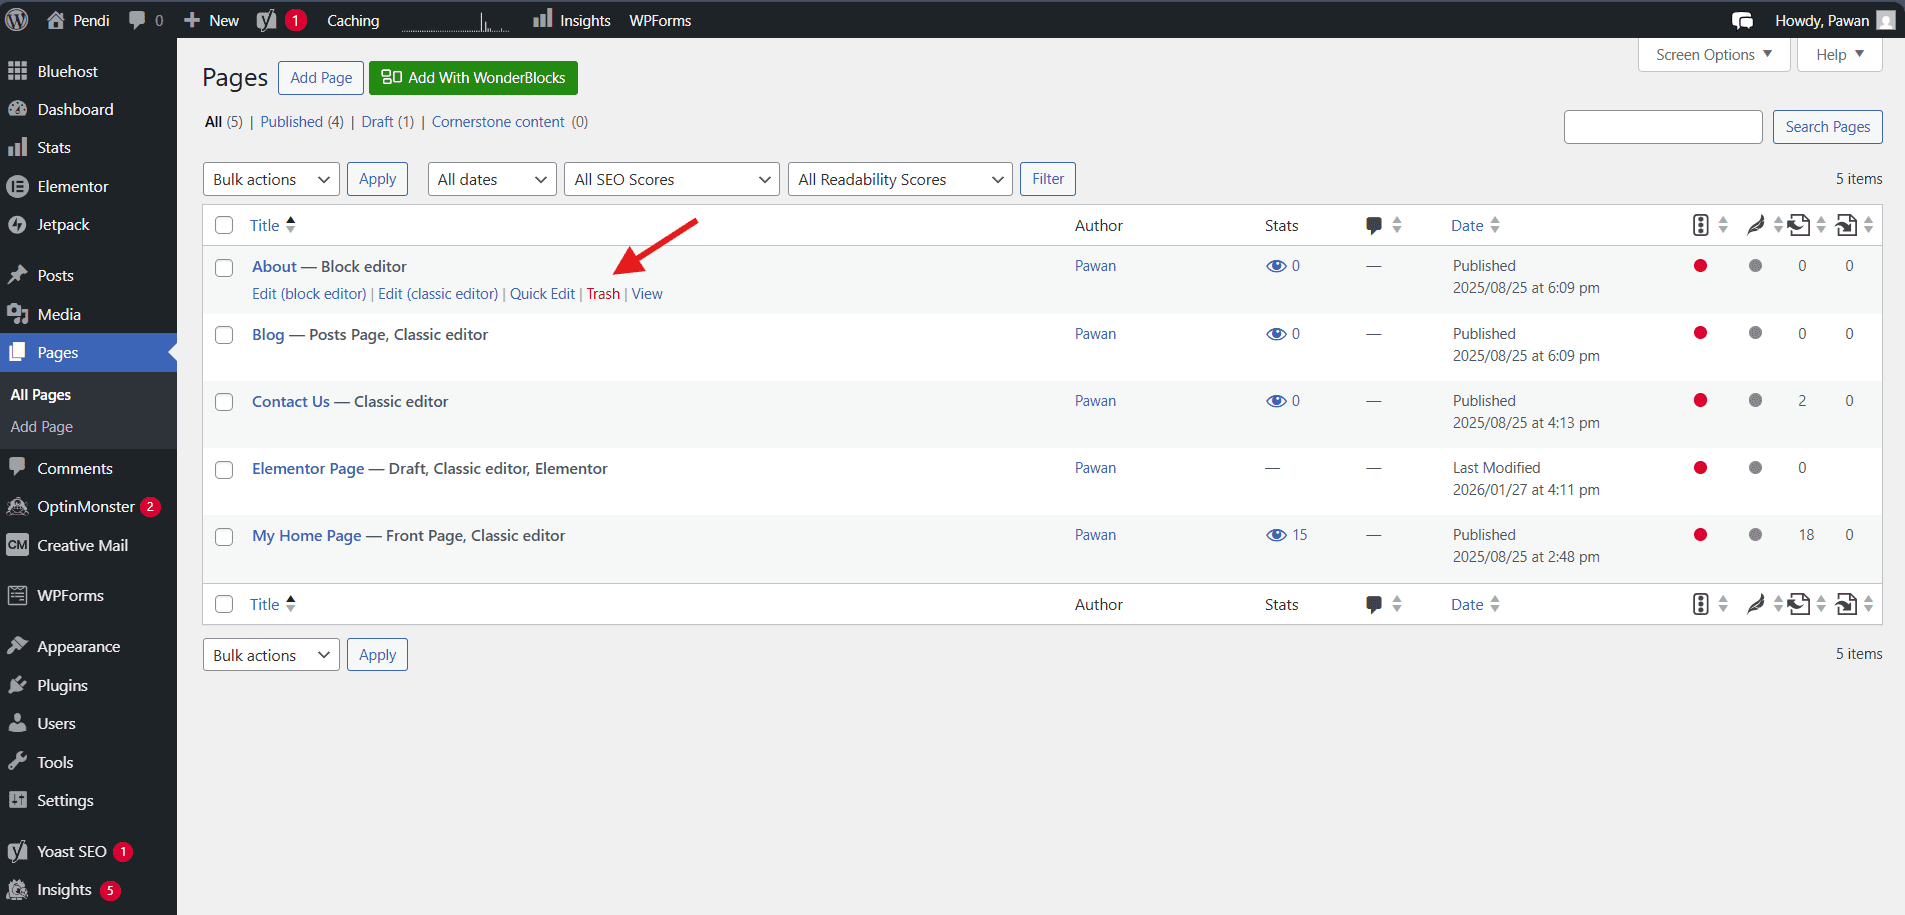
Method 1: Delete from the Pages list
- Go to Pages > All Pages in your WordPress dashboard.
- Hover over the page title you want to delete.
- Click the “Trash” link that appears below the title.
- The page moves to Trash immediately and disappears from your live website.
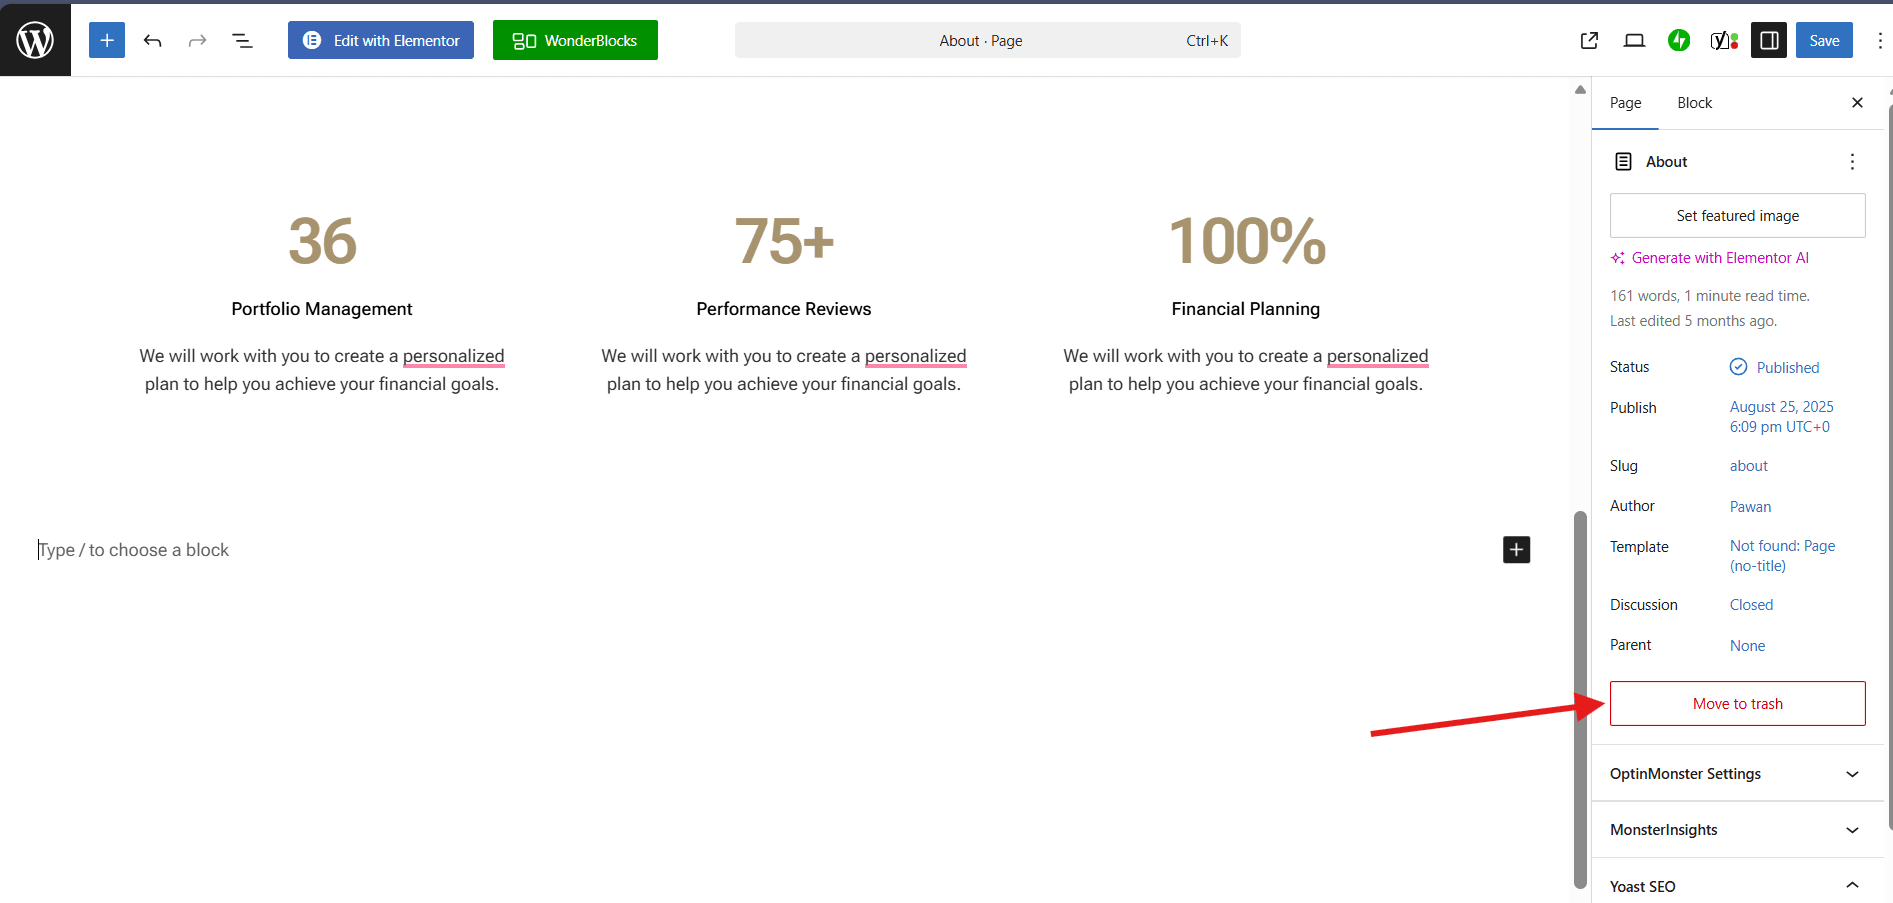
Method 2: Delete from within the editor
- Open the page you want to delete in your editor.
- Look for the page settings sidebar on the right side of your screen.
- Scroll down to find the “Move to Trash” link (typically in red text at the bottom).
- Click “Move to Trash” to remove the page.
- You’ll be redirected to the Pages list automatically.
Once a page is in the Trash, it’s no longer visible on your website. Any internal links pointing to that page will result in 404 errors, and search engines will eventually remove it from their index. However, the page content remains fully intact in your WordPress database, and you can restore it anytime within the 30-day window.
To view your trashed pages, click the “Trash” link that appears above your page list. This filtered view shows all pages currently in the Trash, along with how many days remain before automatic permanent deletion.
Bulk deleting pages
When you need to remove multiple pages simultaneously—such as cleaning up old test pages or removing an entire section of your website—WordPress’s bulk actions feature saves significant time compared to deleting pages individually.
To bulk delete pages:
- Navigate to Pages > All Pages.
- Check the box next to each page you want to delete, or check the box in the header row to select all pages on the current screen.
- Click the “Bulk actions” dropdown menu at the top of the page list.
- Select “Move to Trash” from the dropdown options.
- Click the “Apply” button next to the dropdown.
- WordPress moves all selected pages to Trash in a single action.
A confirmation message appears at the top of your screen showing how many pages were moved to Trash. This bulk operation follows the same safety protocol as individual deletions; pages remain recoverable from the Trash for 30 days.
Exercise caution when using bulk actions, especially if you select all pages on a screen. It’s easy to accidentally include pages you want to keep. Before applying bulk deletions, review your selections carefully and consider filtering your page list first to show only the pages you intend to remove.
Pro tip: If you need to delete pages matching specific criteria – such as pages in Draft status, pages from a particular category or pages created by a certain author – use the filter options above your page list first. This narrows down the visible pages to only those matching your criteria, making bulk selection safer and more accurate.
Permanently deleting a page
Permanent deletion removes a page completely from your WordPress database with no possibility of recovery through the dashboard. This action should be reserved for content you’re absolutely certain you’ll never need again.
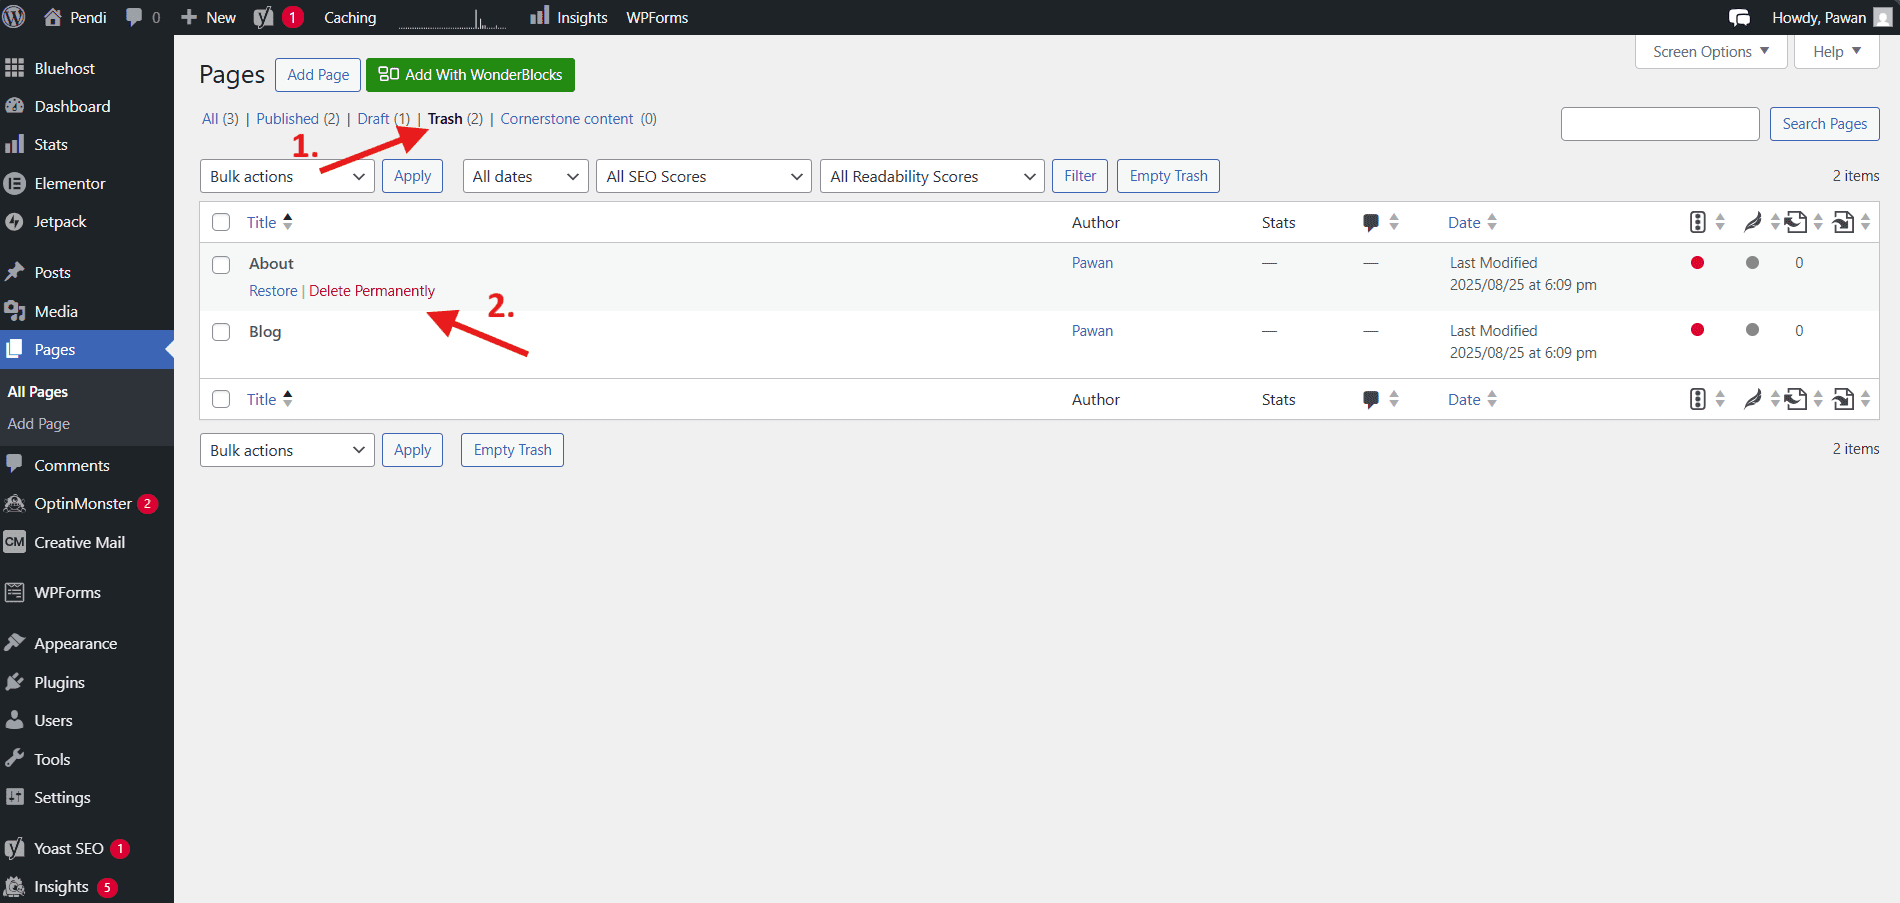
To permanently delete a page:
- Go to Pages > All Pages.
- Click the “Trash” link above your page list to view trashed pages.
- Hover over the page you want to permanently remove.
- Click “Delete Permanently” in the options that appear.
- Confirm your action if prompted.
- The page is removed permanently from your database.
You can also use the “Empty Trash” button at the top of the Trash view to permanently delete all trashed pages in a single action. WordPress displays a confirmation dialog warning you that this action cannot be undone.
Important considerations before permanent deletion:
- Backup first: Create a full website backup before permanently deleting important pages. Your hosting provider (like Bluehost) typically includes automated backup features, but manual backups provide extra security.
- Check for inbound links: Search for internal links pointing to the page you’re deleting. Update or remove these links to prevent 404 errors.
- Consider SEO impact: Pages that rank well in search engines and receive organic traffic should be redirected rather than deleted when possible.
- Export content if needed: Copy any content you might want for future reference before permanent deletion.
- Review child pages: If you’re deleting a parent page with child pages beneath it in your site hierarchy, decide whether to also delete, reassign or promote those child pages.
After permanent deletion, the only recovery option is restoring from a backup. This is why WordPress includes the 30-day Trash period—it’s your safety net against hasty decisions or accidental deletions.
The Bluehost integration workflow (Safe Editing)
Making major changes to your live website always carries some risk. A single formatting error, broken code snippet or incompatible plugin can temporarily take your site offline or create a poor user experience. Bluehost customers have access to powerful staging environments that eliminate this risk by letting you test changes in a safe, isolated copy of your website.
Using Bluehost Staging for major edits
A staging environment is a complete duplicate of your WordPress site that exists on a separate URL, invisible to your visitors and search engines. You can make any changes you want in staging—editing pages, installing plugins, modifying code, changing themes—without affecting your live website. Once you’re satisfied everything works correctly, you push those changes to your production site with a single click.
Use Bluehost staging for:
- Homepage redesigns: Your homepage is your most important page. Test layout changes and new content in staging before going live.
- Critical page updates: Service pages, pricing pages and landing pages that drive conversions deserve extra care during updates.
- Major content reorganization: Moving content between pages, changing site structure or reorganizing navigation menus are safer in staging.
- Testing new page builders: If you’re considering switching from Gutenberg to Elementor or another builder, test the transition in staging first.
- Theme changes: New themes can affect how your page content displays. Preview these changes in staging before impacting your live site.
- Plugin updates: Major plugin updates sometimes introduce compatibility issues. Test them in staging to avoid breaking your live site.
If you are new to staging or want a deeper walkthrough, refer to our dedicated guide on how to use a WordPress staging site in Bluehost.
The staging-to-production deployment process automatically syncs your database, files and settings from staging to your live website. Bluehost’s system handles the technical details, ensuring a smooth transition with minimal downtime.
This is exactly where Bluehost WordPress hosting helps you make changes faster without putting your live site at risk.
Best practices for staging workflow:
- Avoid editing both staging and live simultaneously: Changes made to your live site after creating a staging environment won’t exist in staging. Pushing staging to live will overwrite those live changes.
- Refresh staging regularly: If you need to keep a staging environment active long-term, periodically refresh it from your live site to ensure you’re working with current content.
- Test all critical functionality: Don’t just check how pages look. Test contact forms, eCommerce checkout processes and any interactive elements.
- Review on multiple devices: Check your staged changes on desktop, tablet and mobile devices before deploying.
- Document your changes: Keep notes about what you modified in staging, making it easier to troubleshoot if issues arise after deployment.
Common editing mistakes (What to avoid)
Even experienced WordPress users occasionally make mistakes that create technical problems or harm their site’s search engine performance. Understanding these common pitfalls helps you avoid them and maintain a healthy, functional website.
Changing the URL slug on live pages
This is the single most damaging mistake beginners make when editing WordPress pages. Your page slug is the URL-friendly version of your page name that appears in the web address. For example, if your page is titled “About Our Company,” the slug might be “about-our-company.”
When you change a page slug on a live website, you fundamentally change its web address. The old URL immediately becomes a dead link, creating 404 errors for:
- Visitors who bookmarked the old URL
- External websites linking to your page
- Internal links from other pages on your site
- Search engine index entries pointing to the old address
- Social media shares using the old link
- Email newsletters or marketing materials with the old URL
The SEO consequences can be severe. You risk losing all the ranking authority that page accumulated over time. Any backlinks pointing to the old URL no longer pass SEO value. Your page essentially starts from scratch in search engine rankings.
If you must change a page slug:
- Set up a 301 redirect from the old URL to the new one. This tells search engines and browsers that the page permanently moved.
- Update all internal links throughout your site to point to the new URL.
- Update external marketing materials where possible, including social media profiles and email signatures.
- Monitor 404 errors in your server logs and Google Search Console to identify and fix any links you missed.
- Submit the new URL to Google Search Console to expedite re-indexing.
Many SEO plugins, like Yoast SEO or Rank Math, automatically detect slug changes and prompt you to create redirects. Enable these features to protect your SEO investment.
The better approach: Choose your page slugs carefully from the beginning. Use descriptive, keyword-rich slugs that you won’t need to change. If you’re editing an existing page and notice the slug could be improved, carefully weigh the benefits against the risks and effort required for proper implementation.
Switching Editors mid-stream
WordPress stores page content differently depending on which editor created it. The Block Editor uses block markup, page builders like Elementor use shortcodes and proprietary data structures, and the Classic Editor stores standard HTML. These formats are not fully interchangeable.
Also read: How to Edit HTML in WordPress – Beginner’s Guide (2026)
Problems that occur when switching editors:
- Layout destruction: Complex layouts built in Elementor may render as shortcode text or break completely in the Block Editor.
- Lost styling: Custom colors, spacing and design elements specific to one editor may not translate to another.
- Broken blocks: The Block Editor may create invalid or corrupted blocks when attempting to interpret page builder content.
- Code bloat: Switching editors often leaves remnant code from the previous editor, slowing page load times.
- Inconsistent formatting: Text formatting, heading structures and media alignment may change unexpectedly.
If you need to change editors for a page:
- Back up the page content thoroughly, including screenshots of the current design.
- Create a new page with your preferred editor rather than converting the existing page.
- Manually rebuild the content in the new editor, rather than copying and pasting from the old version.
- Set up a redirect from the old page URL to the new page.
- Delete the old page once you’re satisfied with the replacement.
This complete rebuild approach requires more effort but produces cleaner code and better results than attempting to convert content between editors.
Forgetting to “Update”
This seemingly simple mistake frustrates countless WordPress users. You make careful edits to your page, close the editor, check your live site and discover none of your changes appear. The culprit? You forgot to click the “Update” button before closing.
Understanding WordPress page status:
- Published: The page is live on your website and visible to all visitors.
- Draft: The page is saved in your dashboard but not visible on your live site.
- Pending Review: The page awaits approval from an administrator or editor (useful for multi-author sites).
- Scheduled: The page will automatically publish at a specified future date and time.
- Private: The page is visible only to logged-in administrators and editors.
The critical distinction: “Save Draft” preserves your changes in the WordPress database but does not make them visible to your website visitors. “Update” (for existing pages) or “Publish” (for new pages) makes your content live.
WordPress includes an auto-save feature that periodically saves your work as you edit, but this creates a revision rather than updating your published page. These auto-saved revisions are accessible through the revision history, but they don’t appear on your live site until you explicitly click “Update.”
Best practices to avoid this mistake:
- Check the button text: Look for “Update” (blue button) rather than “Save Draft” before closing the editor.
- Use the Preview feature: Click “Preview” to open a new tab showing how your changes will look when published. This confirms your edits before making them live.
- Check the admin bar: After updating, look for the confirmation message that appears briefly at the top of your screen.
- Verify on your live site: Open your page in an incognito/private browser window to see the current live version without caching issues.
- Clear your cache: If you clicked Update but don’t see changes, clear your browser cache and any WordPress caching plugins.
How to restore a deleted page?
Accidentally deleting a page happens to everyone eventually. Perhaps you selected the wrong page when bulk deleting, or maybe you trashed a page then realized you still needed it. WordPress’s built-in recovery features make restoration simple as long as you act within the designated timeframe.
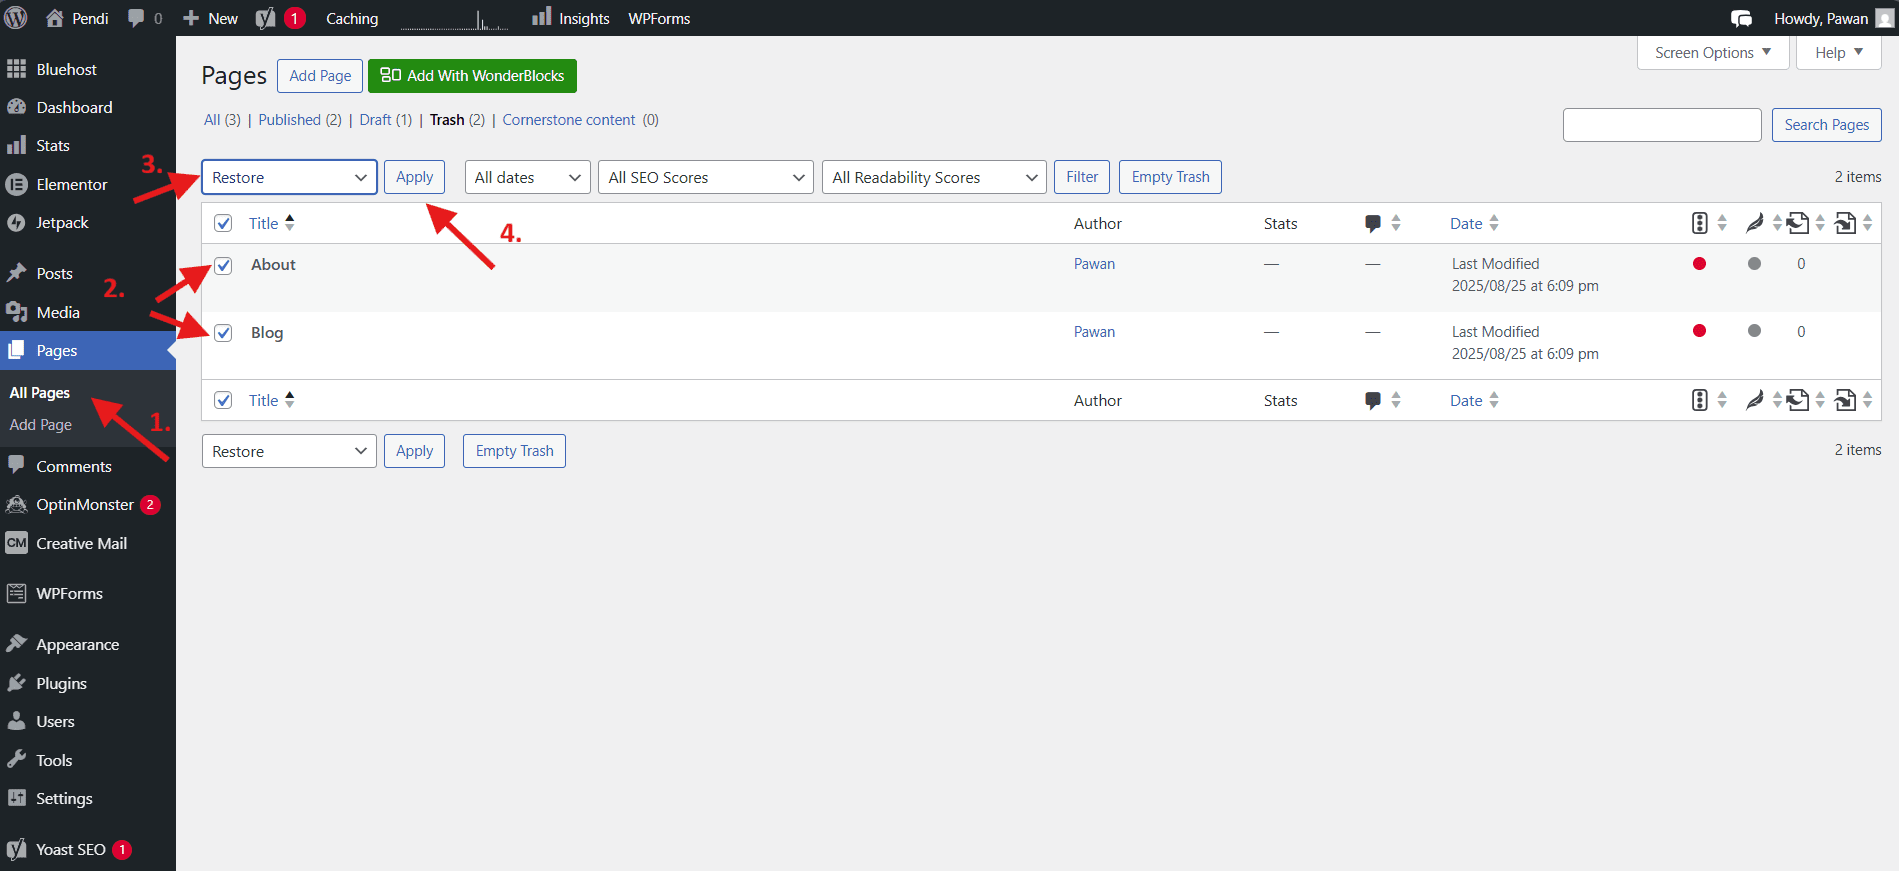
Restoring from Trash
WordPress retains deleted pages in the Trash for 30 days before permanent deletion. During this window, restoration is immediate and complete—all content, metadata, comments and settings return exactly as they were before deletion.
To restore a trashed page:
- Navigate to Pages > All Pages in your WordPress dashboard.
- Click the “Trash” link above the page list to filter and show only trashed pages.
- Find the page you want to restore. The Trash view shows when each page was moved to Trash and how many days remain before automatic permanent deletion.
- Hover over the page title to reveal action links.
- Click “Restore” to recover the page.
- The page returns to its previous Published, Draft or Scheduled status and reappears in your regular page list.
- Check your live website to confirm the restored page displays correctly.

Restored pages retain their original URLs, so any internal or external links pointing to the page will work immediately upon restoration. However, if you deleted the page because of broken layouts or other issues, those problems will still exist after restoration—the page returns exactly as it was.
Bulk restoration works similarly to bulk deletion:
- View the Trash from Pages > All Pages > Trash.
- Check the boxes next to pages you want to restore (or select all).
- Choose “Restore” from the Bulk actions dropdown.
- Click “Apply” to restore all selected pages simultaneously.
What to do if the 30-day window expired:
Once WordPress automatically purges a page from Trash, dashboard restoration is no longer possible. Your recovery options depend on your backup strategy:
- Bluehost automated backups: Bluehost customers can restore their entire site or individual files from automated weekly backups. You can access and manage these backups in your Bluehost dashboard under the “Backups” tab within the Websites section.
- Plugin-based backups: If you use backup solutions like CodeGuard, restore from your most recent backup that includes the deleted page.
- Manual backups: Restore from any manual backup files you created before deletion.
- Wayback Machine: For public pages that existed long enough to be archived, archive.org’s Wayback Machine may have cached copies. While you can’t restore directly, you can copy the content manually.
- Google Cache: Search for “cache:[your page URL]” in Google to potentially view a cached version of the page. This cache expires quickly, so it’s only useful for very recent deletions.
Important backup reminder: The best time to think about backups is before you need them. With Bluehost, you can configure automated backups either through our built-in backup options or by using reliable WordPress backup plugins like Jetpack or CodeGuard. Store backups in a location separate from your web server—cloud storage like Dropbox, Google Drive or Amazon S3 provides safe off-site storage.
Test your backup restoration process periodically to ensure it works when you need it. Many site owners discover their backups are corrupted or incomplete only when attempting recovery after a disaster.
Final thoughts
Mastering how to edit pages in WordPress and safely delete content you no longer need is fundamental to maintaining a healthy, effective website. WordPress offers multiple editing interfaces, including the Block Editor, Classic Editor and page builders like Elementor. Knowing when and how to use each one helps prevent layout issues and lost work.
Remember the key principles covered in this guide:
- Always use the correct editor for each page.
- Leverage Bluehost’s staging environments before making major changes.
- Avoid changing URL slugs on live pages without proper redirects.
- Understand the difference between saving drafts and publishing updates.
These practices protect both your content and your search engine rankings.
Ready to make edits with less risk and more speed? Choose a Bluehost WordPress hosting plan that gives you built-in staging for safe testing plus performance optimization and security tools that keep your site stable.
Start with a plan that matches your site type, then use staging for every big layout, plugin and template change so your live pages stay clean.
You can also check our pricing plans to start a WordPress site and choose an option that fits your needs.
FAQs
Pages are static content that doesn’t change frequently, like your About page, Contact page or Services page. They exist outside your chronological blog feed and typically don’t have publication dates displayed. Posts are blog entries that appear in reverse chronological order on your blog page, include publication dates and can be organized using categories and tags. Use Pages for timeless website content and Posts for date-specific blog articles and news updates.
When you edit pages in WordPress and don’t see changes appear on the live site, the issue typically stems from caching problems or not clicking the “Update” button. First, verify you selected “Update” instead of “Save Draft” before closing the WordPress editor. If you confirmed the update was published, clear your browser cache or view the page in an incognito/private browsing window to see the current version. Additionally, if your WordPress site uses caching plugins like WP Super Cache or W3 Total Cache, you’ll need to clear the plugin cache to display your recent edits. For Bluehost hosting customers, cache management can be handled directly through the WonderSuite dashboard for quick resolution.
Once you permanently delete a page from the Trash, recovery through the WordPress dashboard is impossible. Your only option is restoring from a backup. Bluehost provides automated daily backups accessible through your account dashboard. If you don’t have backups, the page is unrecoverable. This is why you should always maintain regular backups and use the Trash as intended—it gives you 30 days to change your mind before deletion becomes permanent.
WordPress offers several methods to hide pages. The simplest approach is changing the page status from “Published” to “Draft” using either the full editor or Quick Edit. This removes the page from your live site while preserving all content for future use. Alternatively, change the status to “Private” to make the page visible only to logged-in administrators and editors. You can also password-protect pages through the page settings, requiring visitors to enter a password before viewing content. For more complex scenarios, remove the page from navigation menus and avoid linking to it from other pages—this effectively hides it from normal visitor navigation while keeping the URL accessible to those who have the direct link.
When you delete a parent page in a hierarchical page structure, WordPress does not automatically delete the child pages beneath it. The child pages remain published but become orphaned—they lose their hierarchical relationship to the deleted parent. You’ll need to manually reassign these child pages to a new parent or promote them to top-level pages. Access this setting through Quick Edit or the full page editor’s “Page Attributes” section, where you can select a new parent from the dropdown menu.

Write A Comment