Key highlights
Understand why adding posts to specific WordPress pages improves content organization, SEO performance, and overall user engagement.
Learn multiple practical methods to display blog posts on any page using blocks, widgets, plugins, or Bluehost WonderBlocks.
Explore step-by-step workflows for customizing post layouts, filtering by category, and controlling how posts appear across devices.
Uncover how combining static pages with dynamic posts keeps content fresh, relevant, and easier for visitors to navigate.
Know how to choose between widgets, plugins, or dedicated blog pages based on your design needs and level of customization required.
WordPress is one of the most popular content management systems (CMS) available today, thanks to its flexibility and user-friendly design.
For most users, managing content, specifically blog posts, on their WordPress website is a key focus. One of the standout features of WordPress is the ability to add home and new blog page, allowing you to customize your posts beyond the default blog page.
In this guide, we’ll walk you through different WordPress methods for adding a post to a blog page. You’ll also learn how to create and manage posts and pages in WordPress, from setting up a new page to displaying your post content using blocks, widgets and plugins. By the end, you’ll know how to showcase posts exactly the way you want.
3 Reasons why you should add a post to a page on WordPress
Adding posts to specific pages in WordPress helps you combine fresh updates with evergreen content for stronger SEO and better user experience.
This strategy makes your site easier to navigate, improves SEO strategy and keeps visitors engaged. Whether you manage a blog, portfolio or business site, integrating posts into pages ensures your most valuable content appears exactly where it matters most. In summary, these are the 3 key reasons why you should add a post to your page on WordPress:
- Enhanced content organization
- Improved SEO performance
- Increased user engagement
Let us look at each of the pointers in detail.
1. Enhanced content organization
With WordPress, you can do more than publish standalone blog posts. Adding a post to a specific page helps you group content based on topics or themes, creating a more organized experience for your visitors.
For instance, if you have a photography site, you can add posts about gear directly to your “Equipment” page. It ensures visitors see relevant content right where they expect it, making navigating your site easier.
2. Improved SEO performance
Search engines love fresh, relevant content and WordPress simplifies adding that content to key pages. Integrating posts into specific pages lets you keep the content up-to-date and appropriate, which is a big plus for SEO.
When your posts align with the keywords and purpose of a page, it strengthens that page’s search ranking potential, making your WordPress site more visible in search engine results.
3. Increased user engagement
Instead of forcing visitors to search through a different blog page, placing posts directly on dedicated sections of your site keeps them engaged. When users see relevant, timely content on the page they’re visiting, they’re more likely to stay longer and explore more areas of your site.
This approach helps improve time on site and reduces bounce rates, which are suitable for SEO and overall user experience.
Let’s dive into three methods for adding posts to your WordPress website: using the Latest Posts Block, widgets and plugins.
Method 1: Adding a post to your page using WonderSuite
WonderSuite is our exciting tool, designed to make website customization easier than ever. It equips you with a powerful suite of features, from fully customizable templates to drag-and-drop editing, all wrapped in an intuitive interface.
It transforms website building into a smooth, enjoyable experience, giving you everything you need to create your perfect site with ease!
With its drag-and-drop templates and custom images, WonderSuites adapts to your WordPress preferences. It gives you a head start on creating a stunning website.
Let us look at the step-by-step process for adding a post to your WordPress page using WonderSuite.
1. Select the Page
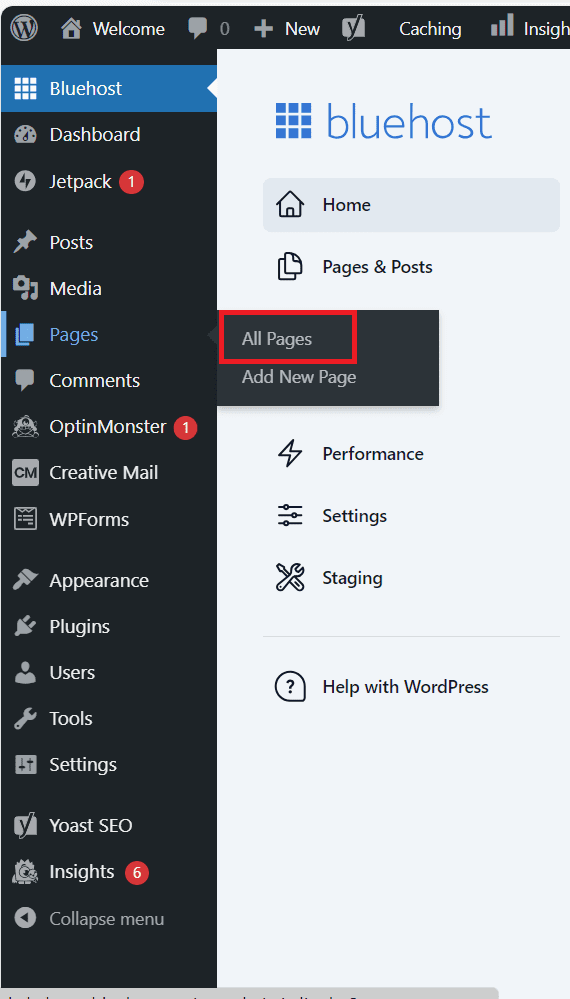
Go to Pages, select All Pages and choose the page you want to add a Post to.
3. Launch WonderBlocks
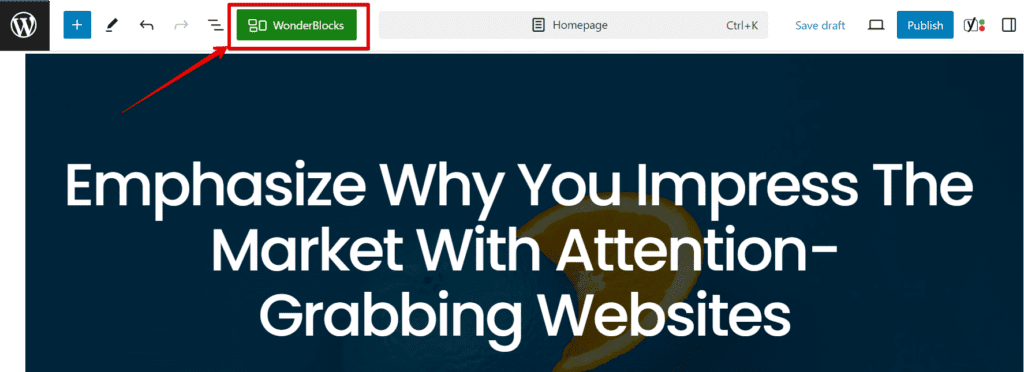
Once the page opens, you will see the WonderBlocks launcher (the green button) at the top bar.
Click on the WonderBlocks button to start using pre-designed blocks and custom templates.
4. Choose a Layout
In the WonderBlocks library, you can browse through a wide range of pre-designed Patterns including Headers, Text, Testimonials, Call to Action buttons and so on. For adding a Blog post, we will select Blog from Patterns.

Once you select Blog, you will find existing templates. Just click on the plus (+) button to add a Post to your page.
5. Customization options
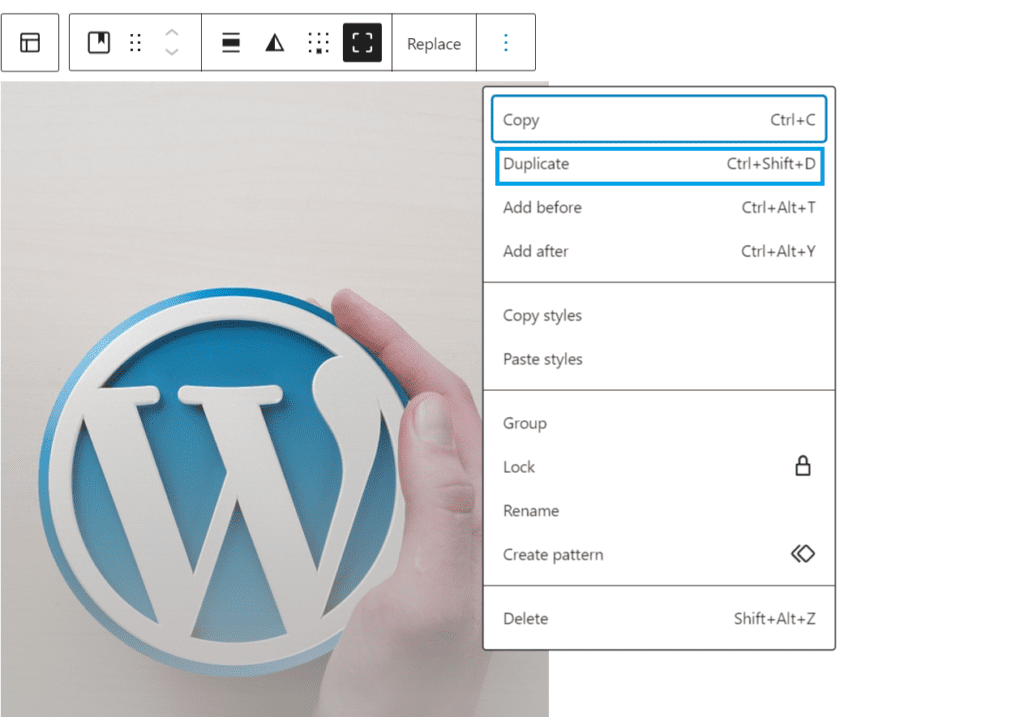
Once the Post is added, you can modify the blocks as you need. You can adjust the text, fonts and change images. You can also copy or duplicate blocks.
By clicking on the preview button on the left of Save, you can preview your page in three formats: Desktop, Tablet and Mobile.
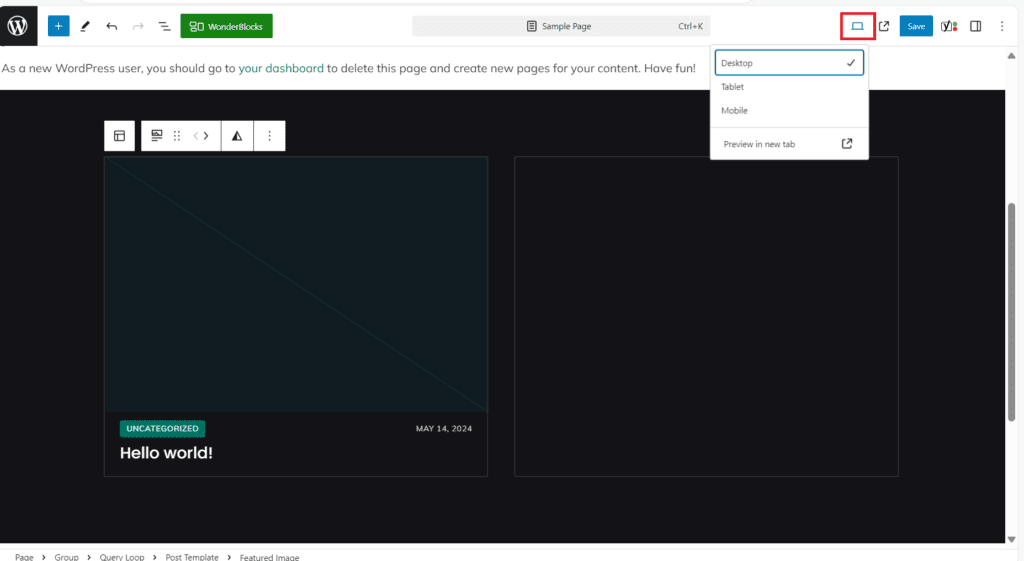
It gives you an accurate view of the UI of the page on the respective devices. It allows you to make changes in different formats to ensure accurate formatting. For example, if you select Mobile view, you get a UI as seen by users on mobile phones. You can edit your page in this format and ensure a fine and consistent user experience across devices.
Once you are satisfied with the Preview, you can save the Post by clicking on the Save button on the top right of the bar.
Method 2. Adding blog posts using the latest posts block (e.g., Gutenberg)
The Latest Posts Block is a game-changer introduced with the Gutenberg editor, now WordPress’s default editor. It lets you effortlessly display recent posts on any page, from your homepage to custom sections.
This method is perfect if you’re looking for a quick way to show off your most recent posts without extra hassle.
Let us explore the step-by-step process of how to create a new post using the latest posts block:
1. Navigate to the page you want to edit:
In your WordPress dashboard, you’ll first need to navigate to the page where you want to display the recent posts. To do this:
In your WordPress dashboard, you’ll first need to navigate to the page where you want to display the recent posts. To do this:
- Log in to your WordPress admin panel and click Pages on the left. It will take you to a list of all the pages on your website.
- Look through the list and select the page you want to edit. For example, if you’re going to add recent blog posts to your homepage, locate your homepage here.
- Once you’ve found the correct page, hover over the page name and click Edit. It will open the page in WordPress’s block editor (the Gutenberg editor). You can do this for any page, whether it’s your homepage, an about page, or a custom landing page you’ve created for specific purposes.
2. Add the latest posts block:
Now that you’re inside the Gutenberg editor, you’ll see an area where you can add new blocks to your page. You must add the Latest Posts Block to display recent blog posts.
- First, click the “+” button, which is usually visible at the top-left corner or directly within the editing area where you want to insert the posts. This button allows you to add a new block to your page.
- In the search bar that appears, type in “Latest Posts.” The Block will appear in the search results below. Click on Latest Posts and it will automatically be added to your page.
- The Block will show a list of your most recent posts by default, but there’s more you can do to customize it to fit your page’s style.
3. Customize the latest posts block:
Once the Latest Posts Block has been added, you’ll want to adjust how your posts are displayed. Several customization options allow you to control the appearance of the post listings on your page.
I. Number of posts:
You can decide how many posts you want to display on the page. For example, you may want to display the 5 most recent posts, or you’d like to show up to 10 posts.
II. Display options:
You can choose what information to display alongside each post. You can show:
III. Titles:
Display only the post titles for a clean, simple look.
IV. Excerpts:
Show a summary of the content to give visitors an idea of the post.
V. Publication dates:
Include the date each post was published to help visitors understand how fresh the content is.
Layout Options: You can also select how the posts are arranged:
- List format: This will display your posts one after another in a vertical list, ideal for blogs that prefer a clean, straightforward look.
- Grid format: This organizes the posts in a grid format, making them appear more visually appealing and structured.
These settings can be found in the right-hand menu once you’ve selected the Block and you can adjust them to suit the design and structure of your page.
4. Update or publish the page:
Once you’re satisfied with how your latest WordPress post looks, you’ll need to save your changes. At the top-right corner of the screen, you’ll see two buttons: Update or Publish.
I. Update:
- This button appears if the page has been published previously and you’re making edits. Click this to apply the latest changes to the live page.
II. Publish:
- If this is a brand-new page that has yet to be published, you’ll see the publish button. Clicking this will make your page live on your website, complete with the latest posts. After publishing or updating, head over to your website to see the changes in action. Your latest posts will now be visible on your chosen page.
5. Further customization:
To enhance the look and feel of the page, you can go beyond just adding the Latest Posts Block. For example, introduce your blog section with a brief heading block or add some visual appeal with image blocks.
I. Heading block:
You can add a heading above the Latest Posts to introduce the section more effectively. Simple like “Recent Blog Posts” or “What’s New” can help guide your visitors.
II. Image blocks:
If you want to make the section more engaging, add images above or alongside your posts. For example, you could add a banner image matching your blog section’s tone or theme.
Additionally, you can filter the posts shown by category. This is particularly useful if you want to showcase your WordPress post related to a specific topic. To do this, while editing the Latest Posts Block, look for the Post Category option in the block settings and select the particular category you want to display. This helps narrow down the posts to only those relevant to your page’s theme, such as “Travel” or “Tech Tips.”
Combining these options allows you to create a more personalized and attractive way of displaying posts on any WordPress site page.
Method 3: Using widgets for adding posts to pages
Widgets are another excellent way to add posts to your WordPress site. WordPress widgets let you drop content into predefined areas like Sidebars, Footers, or Headers. Even though WordPress now integrates widgets into the block editor, they remain a powerful tool for customizing how you showcase posts.
To start using widgets for adding posts to your pages, follow these simple steps:
1. Access the widgets section
- To begin, navigate to the Widgets section in your WordPress dashboard.
- From your admin panel, go to Appearance in the left-hand menu, and then click on Widgets. This section allows you to manage various widget areas of your site, such as Sidebars, Footers, and the other regions that support widgets.
- Depending on your theme, you might see several different widget areas, like “Sidebar,” “Footer 1,” “Footer 2,” or “Header Widget Area.” These areas correspond to different parts of your site where widgets can be displayed.
- Once you’re in the Widgets section, you’ll see a list of available widgets that you can drag into these areas.
2. Add the latest posts widget
In the Widgets section, scroll through the available widgets until you find the Latest Posts widget. Depending on your theme’s design, this widget allows you to display your most recent posts in any widget area, such as your sidebar, footer, or even header area.
To add it, click on the Latest Posts widget and drag it into the desired widget area. For example, you can drag it into the Sidebar to display recent posts alongside your main content. You may also place it in the Footer to showcase blog posts at the bottom of each page.
Once you’ve placed the widget in the desired area, you’ll see options to customize how the latest posts will appear.
3. Customize the widget
After placing the widget in your desired location, you’ll see several customization options to control how the posts will be displayed. Here’s what you can adjust:
I. Number of posts:
You can set how many of your recent posts you want to display. For example, you might show the five most recent blog posts, or you could opt to display a higher number, like 10 posts if you regularly publish content.
II. Post date:
There’s an option to display each post’s publication date. This can be useful for helping your visitors know how current the content is. If you’re showing evergreen content, you may hide the post date, but keeping the date visible for time-sensitive articles adds context.
III. Categories:
You can also filter the posts by category. If your site covers multiple topics, you might want only to show posts from a particular category, such as “Tech News” or “Health Tips.” This allows you to curate which posts appear, making it more relevant for the page or area where the widget is displayed.
Once you’ve made the necessary adjustments, click Save to apply your changes. Your site will now display your latest posts in the widget area you selected, and the customization options will ensure it’s tailored to your specific needs.
4. Preview and make more adjustments
After saving the widget, preview your site to ensure it displays correctly in your chosen area (e.g., sidebar or footer). Return to the Widgets section and update the settings if adjustments are needed.
Consider installing plugins like Post Carousel or Post Slider to create dynamic content displays for added visual appeal. These plugins allow displaying posts in rotating carousels or sliding formats, making your content more engaging.
To explore more customization options, head to Plugins > Add New in your dashboard and search for terms like “post carousel” or “post slider” to install relevant plugins that enhance the functionality of your widgets.
These minor enhancements can improve the user experience and encourage visitors to explore more of your content.
Method 4: Using plugins for adding posts to pages
Plugins take adding posts to the next level, offering more features and control than the built-in WordPress tools.
Plenty of plugins are available for adding posts to pages, many offering advanced filtering, design options, and post formatting.
Let us now explore the detailed step-by-step process of how to add a post to a page in WordPress.
1. Install the plugin:
1. After you’ve activated the plugin, head to its settings to begin configuring it. These settings are typically located under Settings or Appearance in your WordPress dashboard. 2. From here, you can decide how you want your posts to display. This might include choosing a layout (grid, list, or carousel), setting filters for specific categories, or selecting how many posts to show at a time.
3. Tailor the display to match your website’s design and user experience.
2. Configure the plugin:
1. Once the plugin is activated, go to its configuration panel under Settings or Appearance.
2. Follow the plugin’s specific instructions to set up how your posts should be displayed. You can customize options like layout formats, filter posts by categories, and choose how many posts to feature at once. This step lets you fine-tune the look and feel of your blog post display.
3. Use the plugin’s shortcode:
Most plugins provide shortcodes that make it easy to showcase posts exactly where you want them.
1. Once you’ve configured the plugin, copy the generated shortcode.
2. Head to the WordPress editor of the page or post where you want the blog posts to appear and paste the shortcode directly into the content.
3. The shortcode will automatically pull in the posts based on your WordPress settings.
4. Publish or update the page:
After pasting the shortcode into your page or post, click Publish or Update to save your changes. This will make the blog posts live on your website, displayed exactly how you’ve configured them through the plugin settings.
5. Additional customization:
Many plugins offer advanced features to customize your posts’ appearance further.
You can enable pagination to split posts into multiple pages, use sorting options to control the order in which posts are displayed, or even add custom CSS to style your posts to match your website’s branding.
These extra features allow for more precise control over how your content is presented.
Widgets vs. plugins: Which to choose?
When deciding between widgets and plugins, consider how much customization you need.
I. Widgets:
They are simple and perfect for quick tasks like adding recent posts to a sidebar or footer.
II. Plugins:
They provide more flexibility and are ideal for advanced filtering, custom layouts, or other complex features.
If your site requires primary post displays, widgets might be all you need. But plugins are the way to go if you want more design control and features.
Method 5: Adding posts on different pages on WordPress
1. Adding a separate blog page on WordPress
A static page or a separate blog page in WordPress is a page that doesn’t change dynamically. However, using blocks, widgets, or plugins, you can easily create posts on these pages to make them more dynamic and engaging.
I. Open the Static page:
Go to “Pages” from your WordPress dashboard and select the static page where you want to showcase the posts. Click the “Edit” button to open the post-editing screen. Now we will see how to add a static page using a block, widget and a plugin.
- Use the Latest Posts Block to add blog posts to the page:
- Inside the editor, click the “+” button (Add Block) to open the block inserter.
- Search for the “Latest Posts” block and click on it to add it to your page. This Block will automatically display your most recent blog posts.
II. Use a widget to add blog posts to the page:
You can use widgets if you want to display posts in the sidebar or footer of the static page.
- From the dashboard, go to Appearance > Widgets.
- Drag the Latest Posts Widget to the desired widget area (e.g., sidebar, footer) to showcase your blog posts.
III. You may use a shortcode plugin to add posts to the page:
For more advanced options, you can use a shortcode plugin. These plugins often offer shortcodes that allow you to place blog posts on a static page in a custom layout. After installing the plugin, follow these steps:
- After activating the plugin,
- Go to the page editor,
- Simply paste the shortcode where you want the posts to appear.
- Customize and Save:
Customize how the posts display on the page, then click the “Update” or “Publish” button to save your changes.
This method is beneficial because:
- A static page is ideal for more targeted content, as you can add blog posts that directly relate to the page’s theme or purpose.
- You can also improve your SEO performance by combining static content with dynamically updated blog posts, enriching the page with more keywords and relevant information.
2. Adding a dedicated blog page
WordPress also allows users to create a separate new blog page where all posts are automatically displayed. This is the most common way to organize blog content in WordPress.
I. Navigate to Settings
Go to “Settings”> “Reading” in your WordPress dashboard.
II. Set Static Page and Posts Page
Under the “Your homepage displays” section, choose a page for your homepage and select another page as your “Posts page.” This page will now serve as your standalone blog page.
III. Save your changes
Click “Save Changes,” and your blog page will display your posts.
People opt for this method because:
- It allows them to keep their blog content separate from their primary content.
- It provides easy navigation for users who want to browse all blog posts in one place.
3. Adding a list of posts to the Sidebar, Homepage or Other Pages
In addition to adding blog posts to static blog pages, you can display a list of recent posts in the sidebar widget area, homepage, or custom pages.
I. Go to Widgets
Navigate to “Appearance”> “Widgets” from your WordPress dashboard.
II. Add the Latest Posts Widget
Drag the Latest Post widget to the sidebar widget area, footer area, or homepage.
III. Customize and Save
Configure how many posts to display and click “Save” to update the widget on your site.
Add the page to the navigation menu
After creating or updating your page to display posts, ensure visitors can easily find it by adding the page to your site’s navigation menu. In your WordPress dashboard, navigate to Appearance → Menus (or use the Site Editor’s navigation block for block themes). Select your page from the list of available pages, click Add to Menu, then drag it into your preferred position within the menu structure. Click Save Menu to publish your changes.
Choose a clear, descriptive label that tells visitors exactly what they’ll find—options like “Blog,” “News,” or “Updates” work particularly well for pages displaying blog posts. After saving, preview your site on both desktop and mobile devices to confirm the menu item appears correctly and remains easy to navigate across all screen sizes. This simple step ensures every visitor can quickly access your posts.
Final thoughts
This article showed you how to add a post to a page in WordPress and how to post on a WordPress blog using different methods to customize your home and blog pages for a better user experience.
Whether you create a new page or blog post, utilizing blocks, widgets or plugins offers unique benefits that enable you to manage and display content effectively across your site.
If you’re looking to build faster, more secure and scalable websites, consider Bluehost WordPress Hosting solution. It is optimized for performance, automatic updates and effortless content management.
By experimenting with these options, from adding posts to pages to editing layouts before publishing, you can create the perfect balance of content presentation on your WordPress site.
FAQs
A post in WordPress is a dynamic content type typically used for blogs, news articles, or updates on a WordPress page
Navigate to “Posts”> “Add New” in your WordPress dashboard, write your blog post, and click the “Publish” button to make it live.
You can use blocks, widgets, or plugins to add blog posts to specific pages on your WordPress site.
Go to “Settings”> “Reading” and set one of your pages as the “Posts page” to create a separate blog page where all posts will be displayed.
Yes, you can display posts on your homepage using the Latest Posts block or widget or by setting your custom homepage to display your blog posts in the “Reading” settings.
Make sure you’ve correctly configured your page to display posts. If the problem persists, try clearing your WordPress cache or turning off conflicting plugins.
Yes, adding posts to pages in WordPress can improve SEO by keeping content fresh and regularly updated, which search engines favor. It also enhances keyword relevance and user experience, leading to better engagement and improved search rankings.
To publish posts to specific pages in WordPress, you can use blocks, widgets, or plugins depending on your setup. The simplest way is to use the Latest Posts block, just edit the page where you want posts to appear, click the “+” icon and add the block. From the block settings, you can customize how many posts to show, display excerpts, or filter posts by category.
You can also use widgets to add recent posts to areas like your sidebar, footer or other pages or install a plugin that provides shortcodes to display posts in custom layouts. Each method helps you control how your post content appears across different sections or even on a new blog page.

Write A Comment