Key highlights
- Understand what the fatal error allowed memory size exhausted message means and how WordPress memory limit and PHP memory limit restrictions cause site crashes or blank screens.
- Learn how to increase PHP memory limit WordPress safely using wp-config.php, php.ini, .htaccess or cPanel to fix allowed memory size bytes exhausted errors.
- Understand how WordPress runs out of memory during critical tasks like plugin loading, database queries or media uploads, leading to blank screens or fatal errors.
- Explore the most common causes of WordPress memory limit issues, including resource-heavy plugins, poorly coded themes, large media uploads and shared hosting limitations.
- Uncover step-by-step troubleshooting methods to identify memory-hogging plugins or themes and prevent the fatal error allowed memory size exhausted from returning.
- Know when recurring WordPress memory errors indicate it is time to upgrade your hosting plan for better performance, stability and scalable memory allocation.
Nothing stops your website’s momentum faster than the dreaded “Fatal error: Allowed memory size exhausted” message appearing on your screen. This cryptic error can transform your thriving WordPress site into a blank page, leaving you frustrated and your visitors unable to access your content. If you’re staring at this error right now, take a deep breath. You are not alone and more importantly, this problem is entirely fixable.
This comprehensive guide will walk you through everything you need to know about the fatal error allowed memory size exhausted issue. You’ll discover what causes this problem, learn multiple proven methods to resolve it and understand how to prevent it from happening again. Whether you’re managing a business website, personal blog or client sites, these solutions will get you back online quickly and keep your site running smoothly.
What does the WordPress allowed memory size exhausted error mean?
When WordPress displays a fatal error: allowed memory size message, it means your website has attempted to use more server memory than what’s currently allocated. Think of it like trying to pour a gallon of water into a cup, there simply isn’t enough space to contain everything.
The complete error message typically looks like this:
“Fatal error: Allowed memory size of 33554432 bytes exhausted (tried to allocate 2515174 bytes) in /path/to/WordPress/file.php on line 1331”
WordPress memory limits in simple terms
TL:DR; Every WordPress website operates within a memory limit set by your web hosting provider. This limit determines how much server memory your site can use to process requests, load plugins, execute themes and handle various operations.
Memory limits are measured in megabytes (MB). Common default settings include:
- 32MB – Extremely low, insufficient for most modern WordPress sites
- 64MB – Minimum for basic WordPress installations
- 128MB – Recommended for small to medium websites
- 256MB or higher – Ideal for complex sites with multiple plugins
Difference between WordPress memory limit and PHP memory limit
Understanding the distinction between WordPress and PHP memory limits is crucial for effective troubleshooting. The PHP memory limit is set at the server level and controls how much memory PHP scripts can use. The WordPress memory limit operates within this PHP limit and can be configured independently.
WordPress allows you to set its own memory limit through the wp-config.php file, but this setting cannot exceed the server’s PHP memory limit. For instance, if your server allows 256MB but WordPress is set to 512MB, the effective limit remains 256MB.
Why does WordPress fatal memory error causes site crashes or blank screens?
When WordPress exhausts its allocated memory, the server immediately stops processing the page to prevent system instability. This protective measure results in either a blank white screen or the fatal error message you’re seeing.
The fatal error allowed memory size exhausted occurs during critical operations such as loading plugins, processing large database queries or handling image uploads. Once triggered, your site becomes inaccessible until the memory issue is resolved.
What causes memory exhaustion errors in WordPress?
Understanding the root causes of allowed memory size bytes exhausted errors helps you implement targeted solutions and prevent future occurrences.
Low default memory limits on shared hosting
Many shared hosting providers set conservative memory limits to accommodate multiple websites on a single server. These restrictive settings often prove insufficient for modern WordPress sites, especially those using multiple plugins or processing complex content.
Shared hosting memory limits frequently range from 32MB to 128MB, which may seem adequate initially but quickly becomes problematic as your site grows in complexity and content volume.
Resource-heavy plugins and poorly coded themes
When you choose WordPress themes and plugins, be mindful of how much memory they consume. Certain themes and plugins have inefficient coding or resource-intensive features. Common culprits include:
- Page builders with extensive functionality
- SEO plugins that process large amounts of data
- Security plugins running continuous scans
- Backup plugins creating site copies
- Themes with bloated code or multiple widget areas
Large media uploads and database operations
Processing high-resolution images, videos or large file uploads requires substantial memory allocation. Similarly, complex database operations, such as importing content or running extensive queries, can quickly exhaust available memory resources.
WordPress automatically generates multiple image sizes when you upload photos and this processing can consume significant memory, especially with large or numerous images.
High traffic spikes and background processes
Sudden increases in website traffic or multiple simultaneous background processes can overwhelm your memory allocation. WordPress cron jobs, plugin updates and automated backups running concurrently often trigger memory exhaustion errors.
Outdated PHP versions or misconfigured servers
Older PHP versions handle memory less efficiently than current releases. Additionally, server misconfigurations or conflicting settings across configuration files can cause memory allocation issues.
Having understood the causes of memory exhaustion errors, let us now get an in-depth understanding of how to fix the WordPress memory limit errors.
How to fix the WordPress memory limit fatal error
Now that you understand what causes the increase PHP memory limit WordPress issue, let’s explore multiple proven solutions to resolve it quickly and effectively.
Increase the WordPress memory limit using wp-config.php
In order to understand how to increase memory limit, let us look at the most direct solution. It involves modifying your WordPress configuration file to request more memory from the server.
Where to find the file
You can increase the memory limit by locating the wp-config.php file in your WordPress root directory. You can access it through:
- Your hosting control panel’s file manager
- FTP/SFTP client software
- cPanel File Manager
- Your hosting provider’s dashboard
Safe values to set
To implement the wp config PHP memory limit fix, add this line to your wp-config.php file, just before the line that says ” That’s all, stop editing! Happy blogging. */”:
ini_set('memory_limit', '256M');Alternative syntax that often works better:
define('WP_MEMORY_LIMIT', '256M');Start with 256MB and increase incrementally if needed. Common safe values include:
- 256M – Suitable for most standard WordPress sites
- 512M – Recommended for complex sites with multiple plugins
- 1024M (1GB) – For large eCommerce or membership sites
How to confirm the change worked?
After making changes to fix the fatal error: allowed memory size, verify the new memory limit by creating a simple PHP file in your root directory with this content:
Then save it as memory-check.php.
Navigate to your website.com/memory-check.php in your browser to see the current memory limit displayed. If the change was successful, you should see your updated value instead of the previous lower amount that caused the fatal error allowed memory size exhausted issue or the allowed memory size bytes exhausted message.
Remember to delete this file after verification for security purposes, especially if you made changes using cPanel increase memory limit or server-level settings.
You can also check your current memory usage by addingecho memory_get_usage(true);
This helps you understand how to increase memory limit effectively by showing how much memory WordPress is actually consuming during normal operations and whether further optimization is needed.
How to increase PHP memory limit using php.ini or .htaccess?
When WordPress-level changes prove insufficient, server-level modifications may be necessary to increase memory limit effectively.
When to use php.ini vs .htaccess
Use php.ini when you have access to your server’s PHP configuration file, typically on VPS or dedicated hosting. Choose .htaccess for shared hosting environments where php.ini access is restricted.
For php.ini, add or modify this line:
memory_limit = 256MFor .htaccess, add this line to the top of your file:
php_value memory_limit 256MCommon mistakes to avoid
Never set memory limits excessively high without understanding your server’s capabilities. Setting a 2GB limit on a shared hosting account with 512MB total allocation will cause additional errors.
Always backup your original files before making changes. Incorrect syntax in configuration files can make your entire site inaccessible.
What to do if changes are ignored
If your changes don’t take effect, your hosting provider may have restrictions in place. Many shared hosts override user-defined memory limits for stability reasons.
Disable plugins to identify memory-heavy extensions
When configuration changes fail to resolve the issue, identifying problematic plugins becomes essential for effective troubleshooting.
How to disable plugins via dashboard and file manager
If you can access your WordPress dashboard, navigate to Plugins and deactivate all installed plugins. If the error prevents dashboard access, use your hosting file manager to rename the plugins directory from “plugins” to “plugins-disabled.”
This temporary change deactivates all plugins simultaneously without deleting any data or settings.
What are the signs that a plugin is causing memory exhaustion
If your site loads normally after disabling all plugins, a plugin is likely causing the memory issue. Reactivate plugins one by one, testing your site after each activation to identify the problematic extension.
Monitor your site’s performance and memory usage as you reactivate plugins. The plugin that triggers the error return is your culprit.
What to do after identifying the culprit
Once you identify the problematic plugin, you have several options:
- Update the plugin to the latest version
- Contact the plugin developer for support
- Find alternative plugins with similar functionality
- Increase server memory limits to accommodate the plugin
- Remove the plugin if it’s not essential
Switch to a default WordPress theme for testing
Themes can also cause memory exhaustion, particularly those with complex features or poor coding practices.
Why themes can trigger memory errors?
Modern WordPress themes often include extensive customization options, page builders and multiple widget areas. These features require substantial memory allocation, especially during initial page loads or when processing complex layouts.
Poorly coded themes may also create memory leaks or inefficient database queries that gradually consume available memory resources.
How to test safely without data loss
Temporarily switch to a default WordPress theme, such as Twenty Twenty-Four, via your dashboard or the file system. This change doesn’t affect your content, settings or customizations. It only changes your site’s appearance temporarily.
If switching themes resolves the memory error, your active theme is likely the cause. Contact the theme developer or consider upgrading to a more efficient theme.
Check memory limits using hosting control panel
Most hosting providers offer tools to monitor and adjust memory limits directly from your control panel.
How to verify limits in cPanel or hosting dashboards
To verify or increase the memory limit in cPanel, follow these steps:
1. Log in to your Bluehost Account Manager.
2. Click “Hosting” in the left-hand menu, then click the “cPanel” button on your hosting details page.
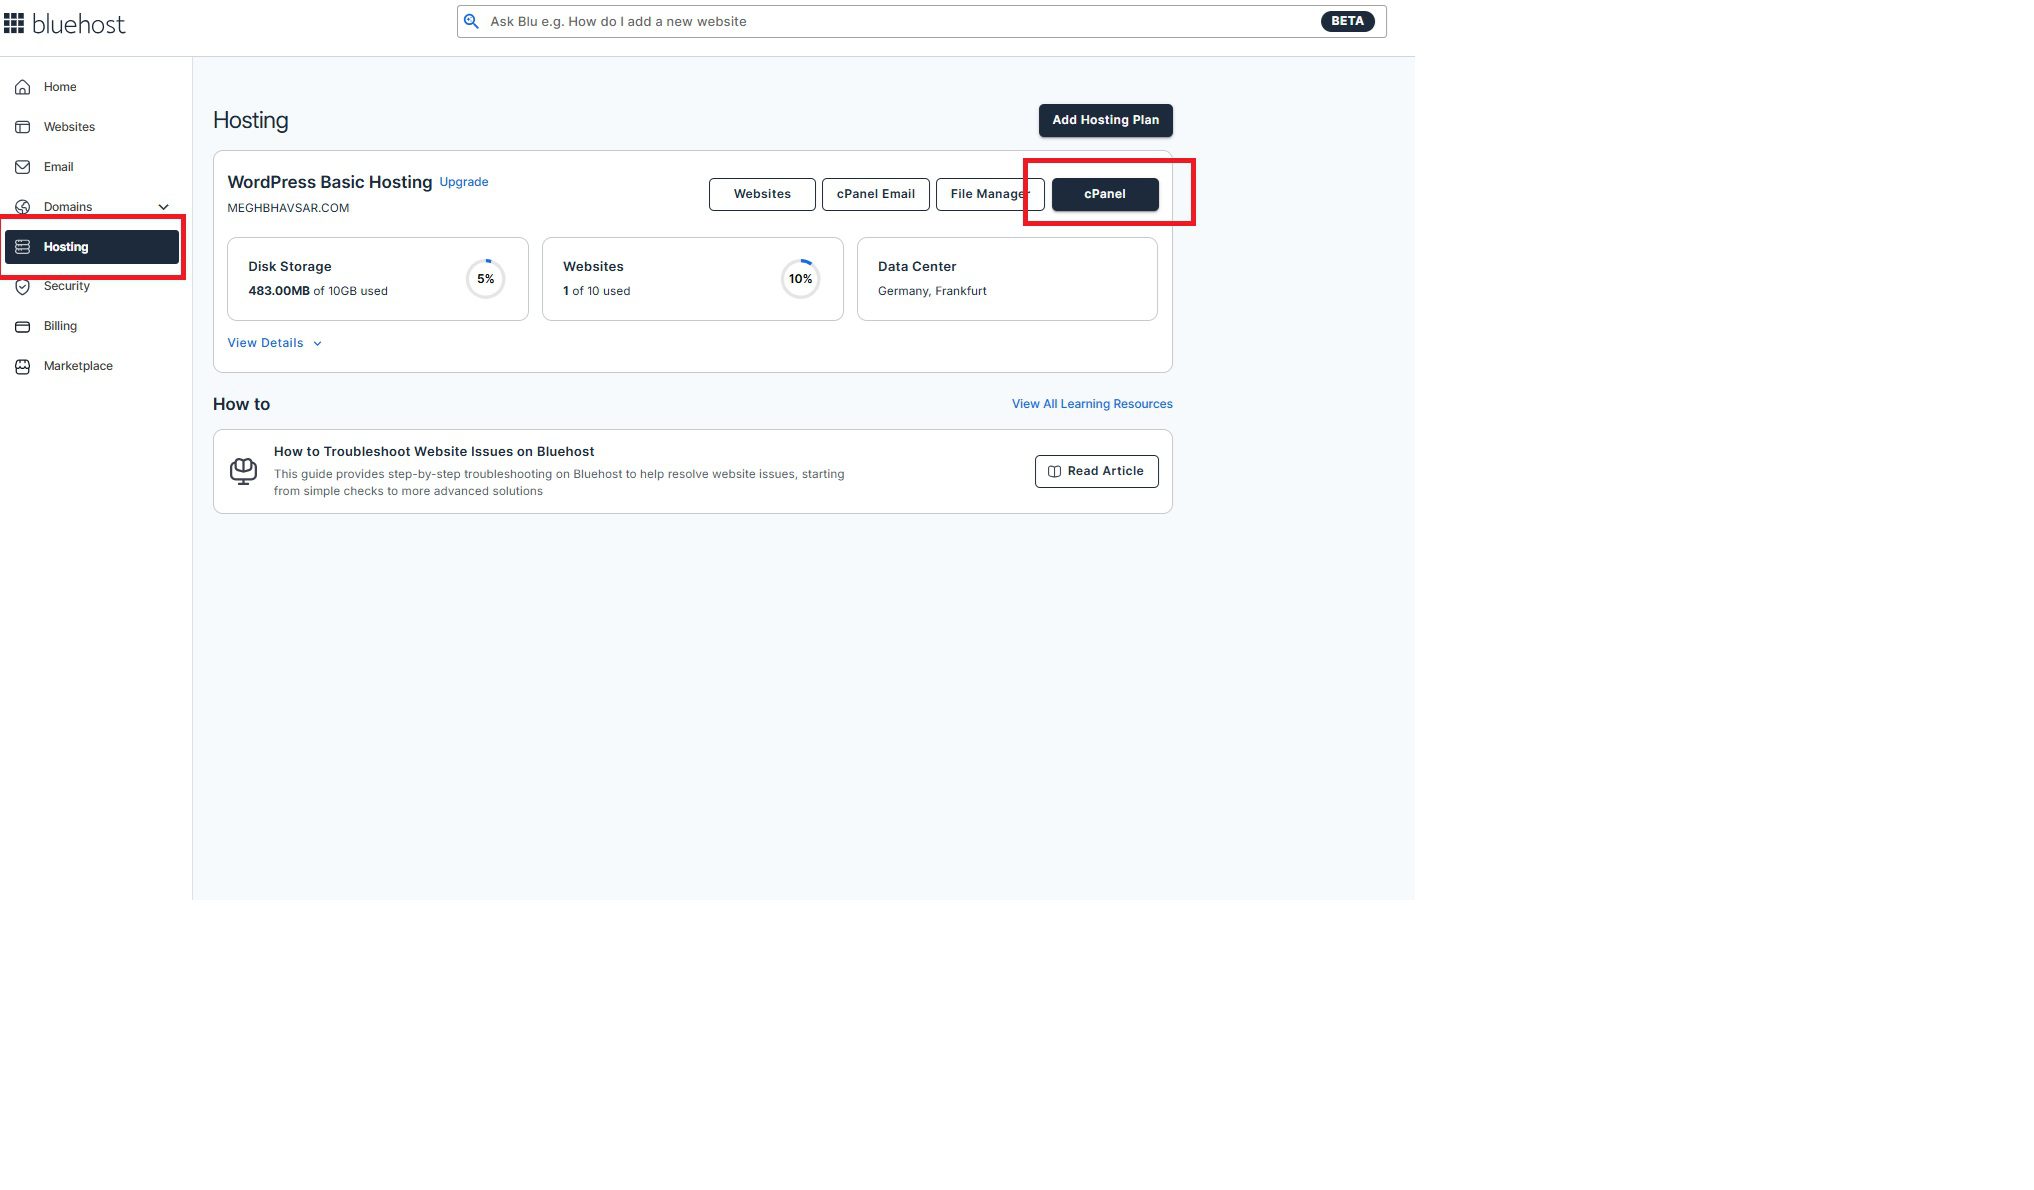
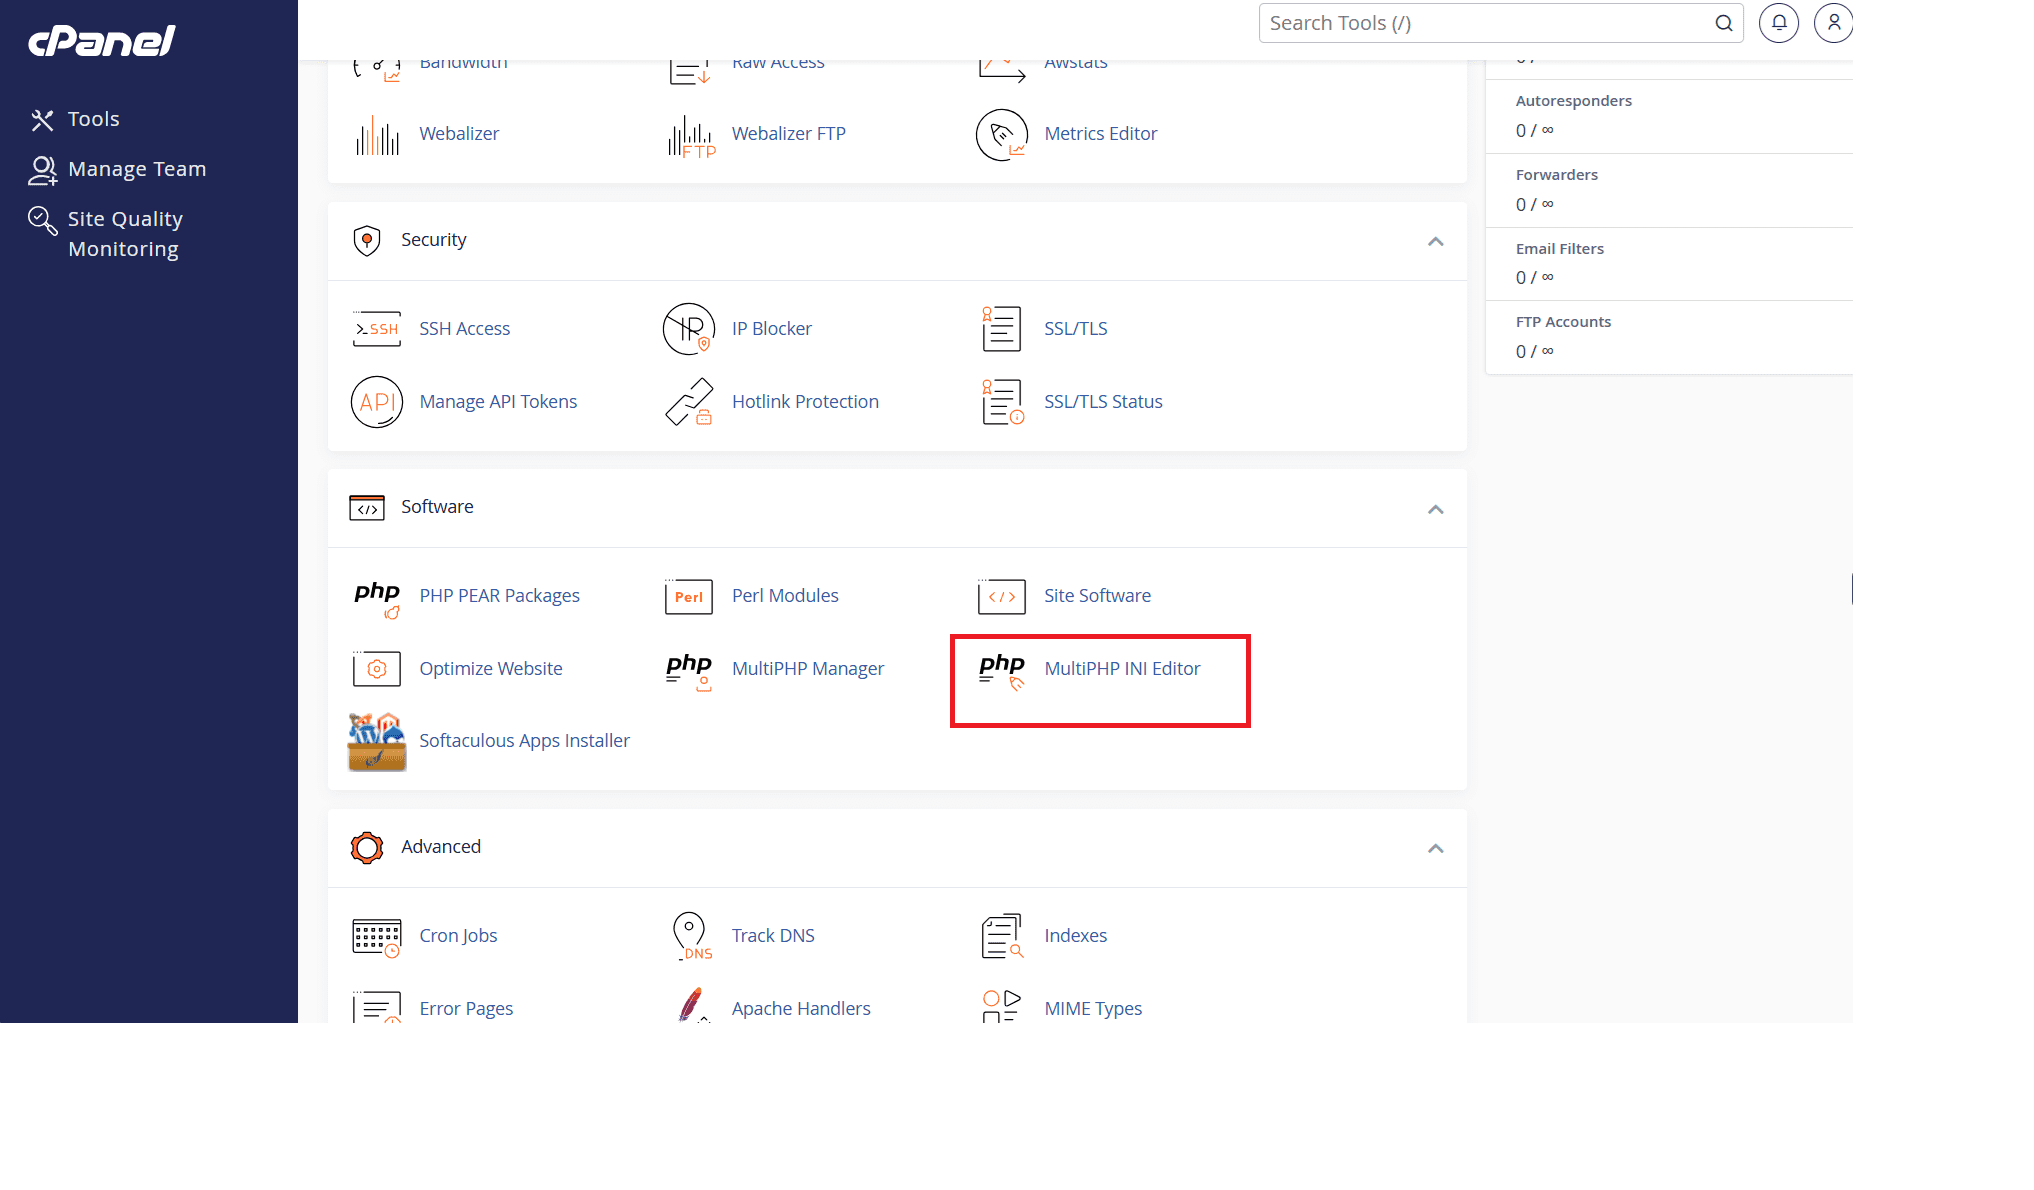
3. In cPanel, scroll to the “Software” section and click on “MultiPHP INI Editor.”
4. From the “Select a location” dropdown, choose the domain or home directory you want to update.
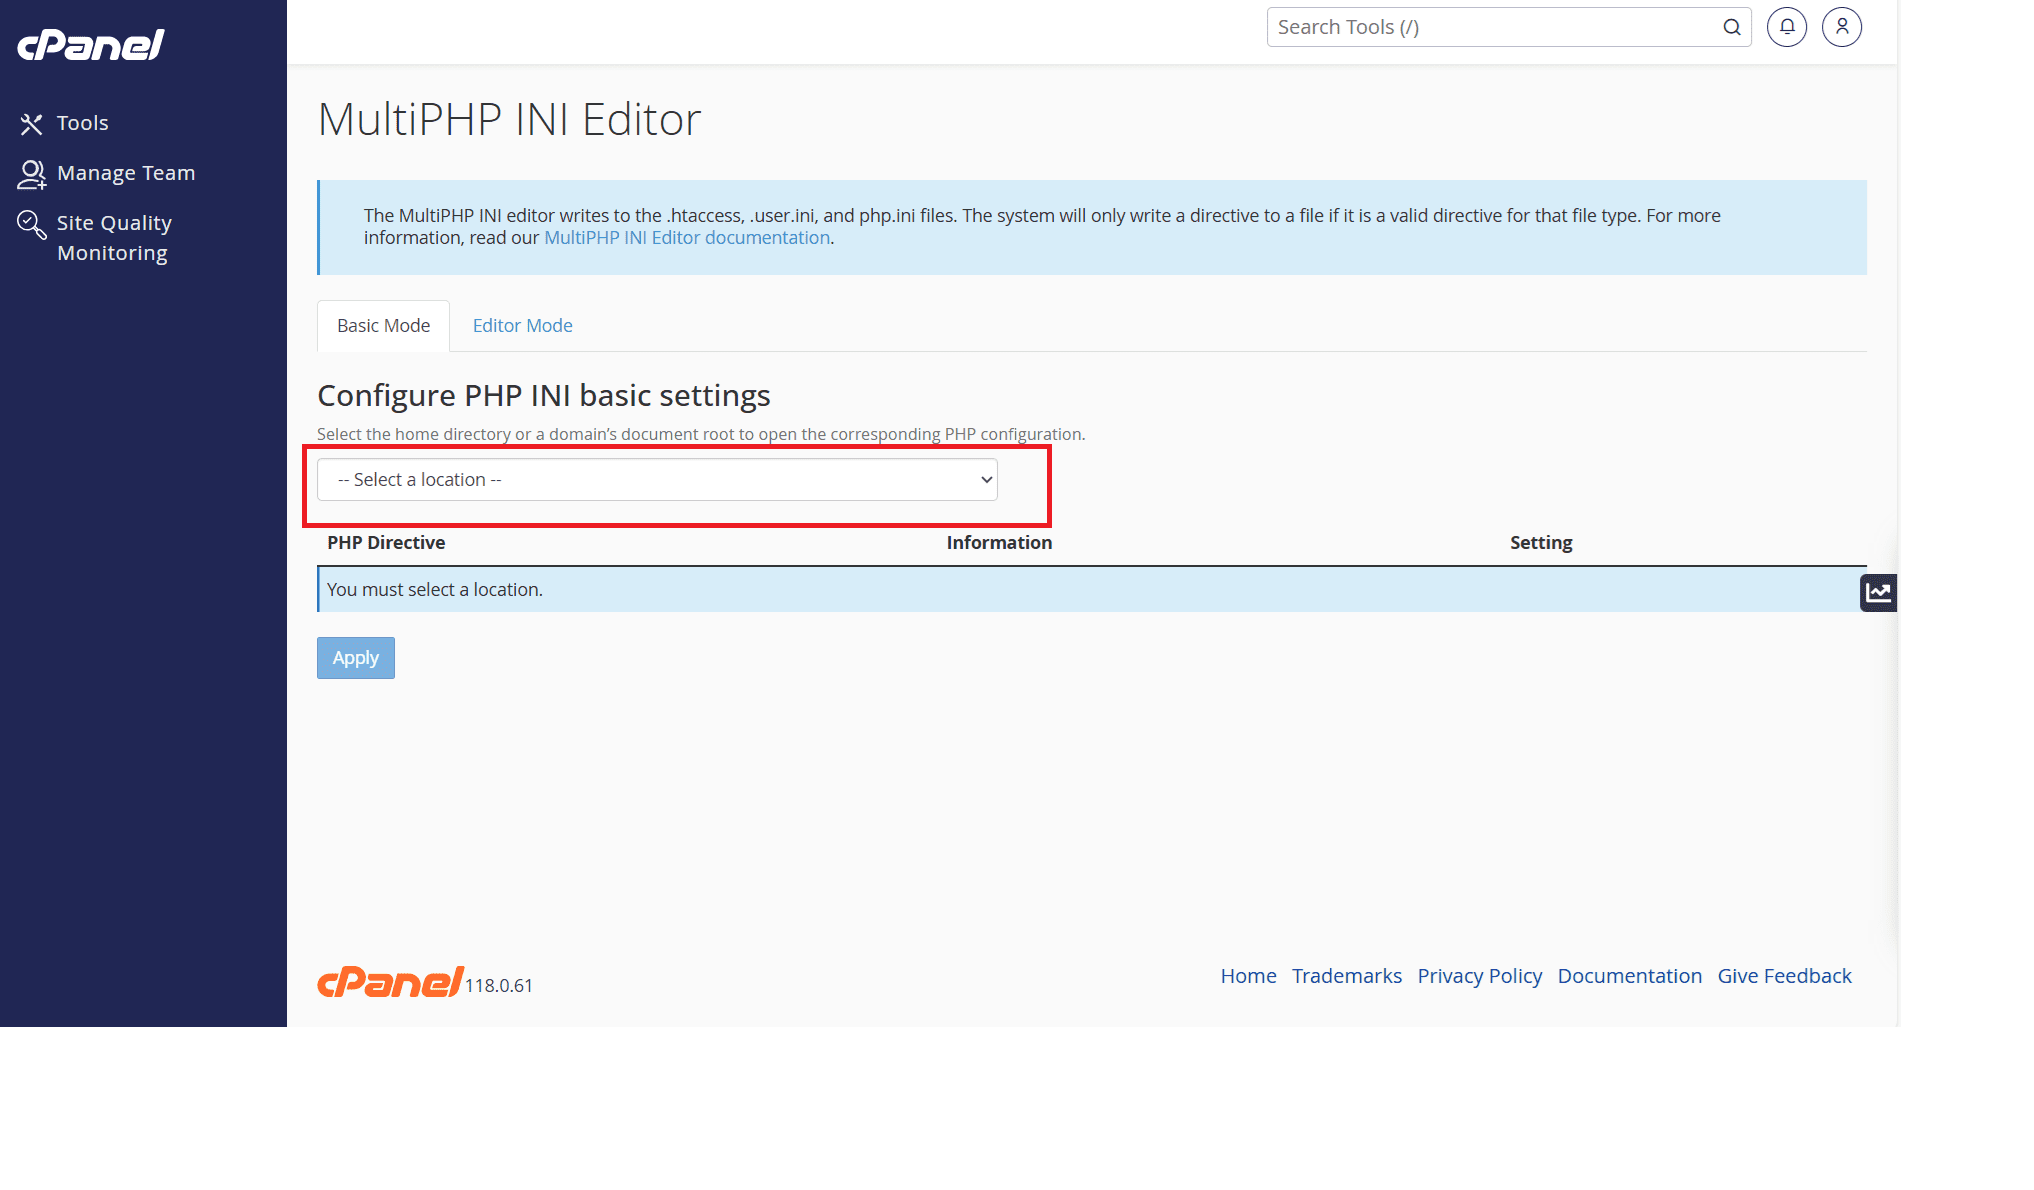
5. Under “Basic Mode,” find the “memory_limit” setting, verify or enter your desired value (e.g., 256M).
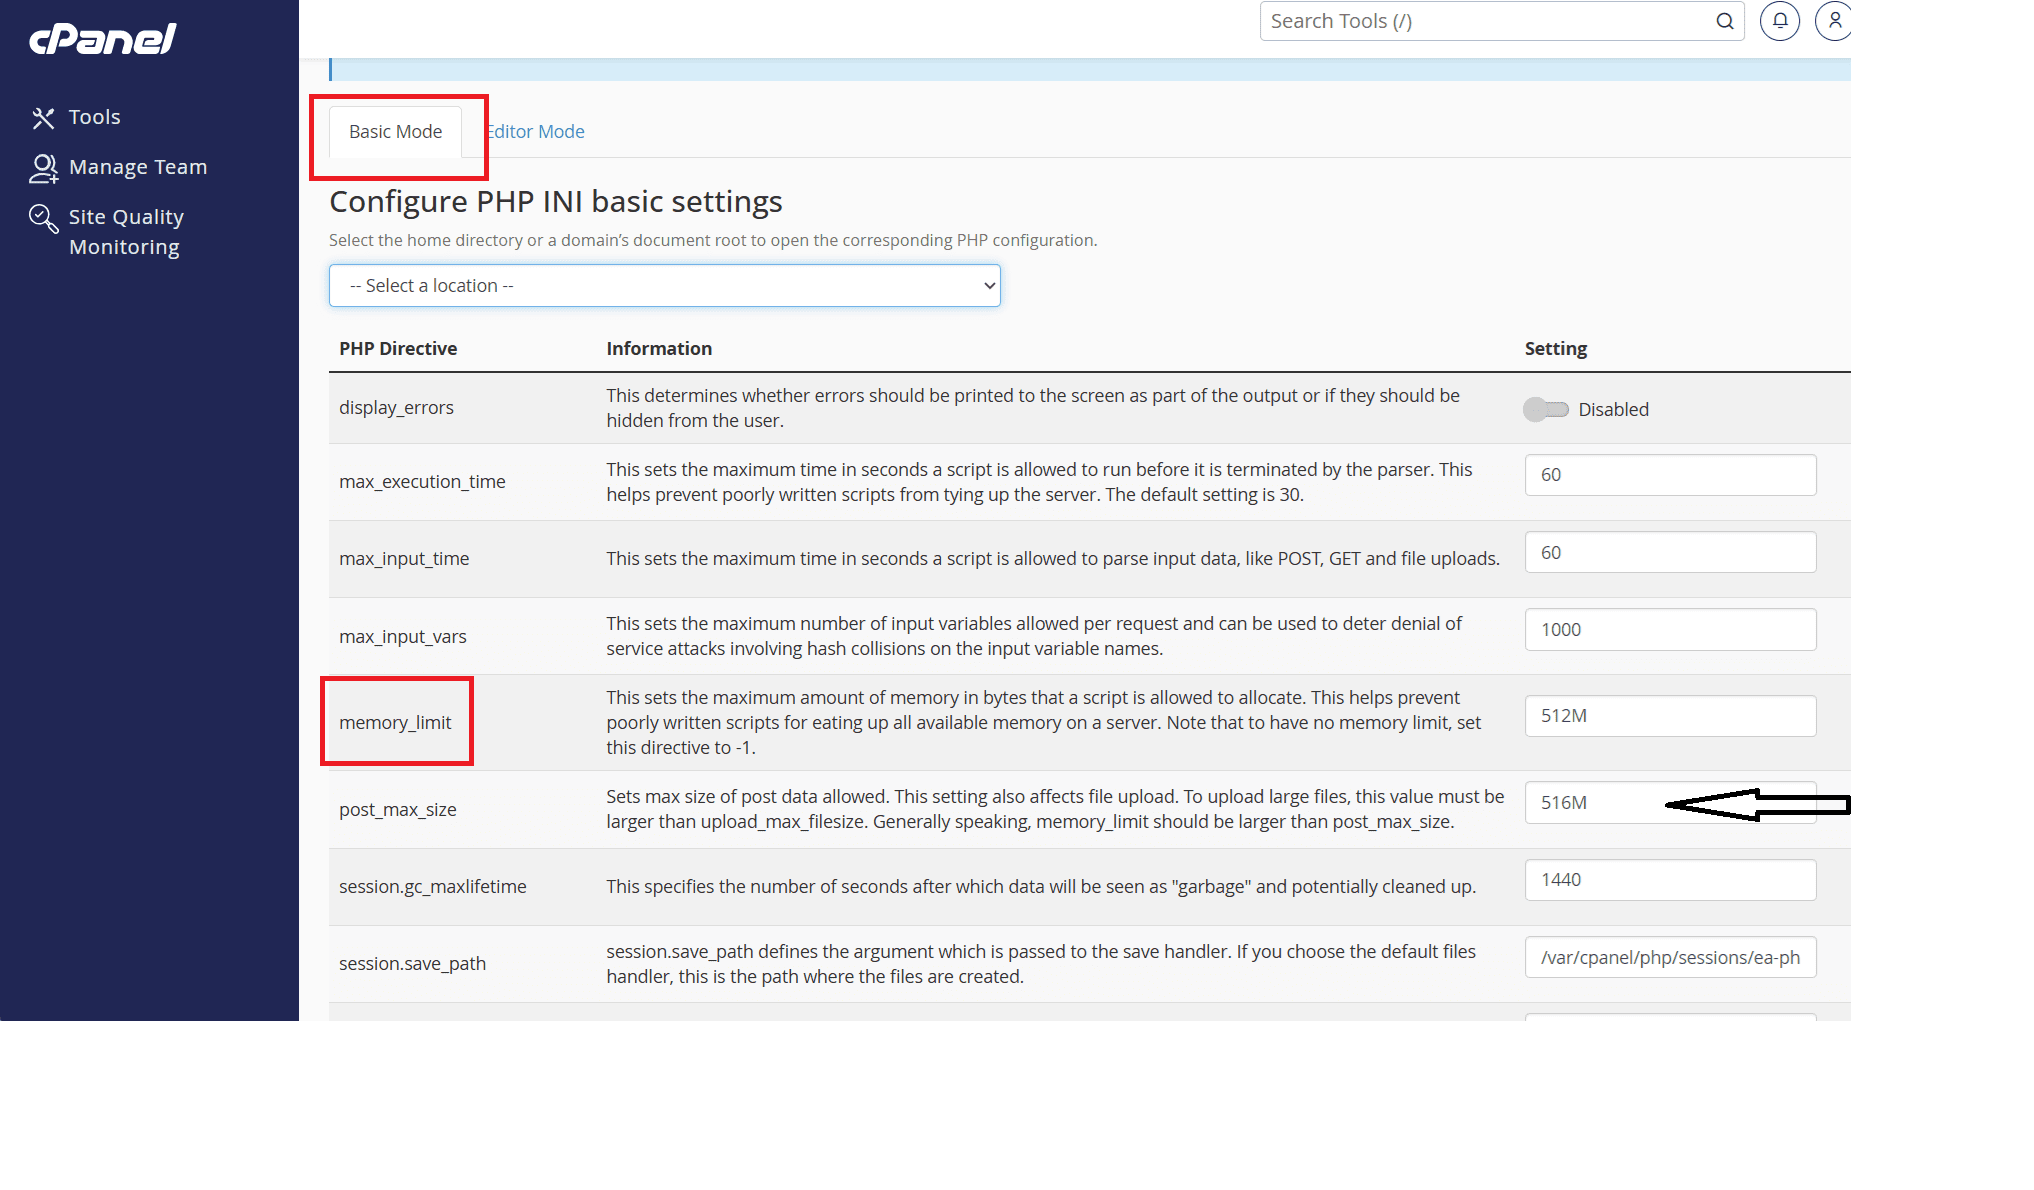
6. Click the “Apply” button at the bottom to save your changes.
To confirm, you can create a phpinfo.php file or check your site for improved performance.
Popular hosting control panels typically display current memory usage and allow you to modify limits within predetermined ranges.
When server-level limits override WordPress settings
Your hosting provider’s server-level limits always take precedence over WordPress-specific settings. If your host sets a maximum PHP memory limit of 128MB, setting WordPress to use 256MB won’t work.
Contact your hosting provider to increase server memory
When self-service solutions prove insufficient, professional hosting support can provide immediate resolution.
What information to share with support
When contacting support about wordpress memory limit plugin issues, provide:
- The complete error message
- When the error first occurred
- Recent changes to your site
- Current memory limit settings
- Your website’s traffic levels and plugin count
Typical memory limits on Shared vs Managed Hosting
Shared hosting typically offers 64MB to 256MB of memory, while managed WordPress hosting often provides 512MB or more. VPS and dedicated servers offer customizable limits based on your specific requirements.
Now that we have learned how to fix the WordPress memory limit error, let us now understand the memory error preventive measures.
How to prevent WordPress memory errors in the future
Prevention strategies help you avoid recurring memory issues and maintain optimal site performance long-term.
Choose lightweight plugins and themes
Select plugins and themes known for efficient coding and minimal resource consumption. Research user reviews and developer reputations before installation. Avoid plugins that duplicate functionality or provide unnecessary features.
Keep WordPress, themes and plugins updated
Regular updates often include performance improvements and memory optimization. Outdated software may contain memory leaks or inefficient processes that consume unnecessary resources.
Optimize images and media handling
Compress images before uploading and use appropriate file formats for different content types. Consider plugins that automatically optimize media files to reduce memory consumption during processing.
Monitor memory usage regularly
Install monitoring plugins that track memory usage and alert you to potential issues before they become critical. Regular monitoring helps you identify trends and address problems proactively.
Use caching and performance optimization tools
Implement caching solutions to reduce server load and memory consumption. Performance optimization plugins can automatically identify and resolve memory-intensive processes.
When memory errors indicate your hosting plan is not enough
Sometimes memory errors signal that your website has outgrown its current hosting environment and requires more robust infrastructure.
Signs you have outgrown shared hosting
Recurring memory errors, slow loading times and frequent downtime often indicate that shared hosting no longer meets your site’s requirements. High traffic volumes and extensive plugin usage typically necessitate hosting upgrades.
Why recurring memory errors keep coming back
If memory errors persist despite optimization efforts, your site likely requires more resources than your current plan provides. Growing websites naturally consume more memory as content and functionality expand.
Benefits of WordPress-optimized and scalable hosting
WordPress-optimized hosting environments provide better memory allocation, automatic scaling and performance optimizations specifically designed for WordPress sites. These solutions often resolve memory issues while improving overall site performance.
How better hosting improves performance and stability
Quality hosting providers offer higher memory limits, faster processors and optimized server configurations that prevent memory exhaustion. Professional hosting environments also provide expert support for technical issues.
Take control of your WordPress memory issues today
The fatal error allowed memory exhausted message doesn’t have to derail your website’s success. Armed with the comprehensive solutions outlined in this guide, you now possess the knowledge and tools necessary to diagnose, resolve and prevent memory-related errors effectively.
Remember that WordPress memory issues are common problems with straightforward solutions. Whether you need to increase php memory limit WordPress through configuration changes, optimize your plugins and themes or upgrade your hosting plan, you have multiple pathways to resolution.
When does upgrading to Bluehost WordPress hosting make sense?
Recurring fatal errors that indicate memory size exhausted often point to hosting-level limits rather than WordPress misconfiguration. On many entry-level plans, PHP memory limits cap how much memory WordPress can actually use, no matter what you set in wp-config.php.
Bluehost WordPress hosting plans provide higher and more predictable memory allocations. Additionally, it also offers environments optimized for WordPress performance.
In case your site continues to hit memory ceilings during plugin loads, database queries or media uploads, it makes sense to upgrade to a Bluehost WordPress hosting plan. Our hosting solution removes those memory constraints and reduces the risk of repeat crashes.
Our support team can also help confirm whether your PHP memory limit is restricting WordPress memory usage.
FAQs
You can check your current memory limit by creating a PHP info file with the code and uploading it to your server. Look for the “memory_limit” value in the displayed information. Alternatively, many hosting control panels display this information in their PHP settings section.
For most WordPress sites, 256MB provides a safe starting point. Complex sites with multiple plugins may require 512MB or 1GB. Start conservatively and increase gradually based on your site’s specific needs. Never set limits higher than your hosting plan supports.
Increasing memory limits doesn’t slow your site—it prevents crashes and improves stability. However, setting unnecessarily high limits won’t improve performance and may waste server resources. Focus on optimizing your site’s efficiency rather than simply increasing memory allocation.
Yes, a single poorly coded or resource-heavy plugin can trigger the fatal error: allowed memory size exhausted, even if your overall setup seems fine. Plugins that perform frequent background operations, such as backups, security scans or page building, can quickly consume available memory. If the plugin requests more memory than the server allows, WordPress will throw a fatal error allowed memory size exhausted message or an allowed memory size bytes exhausted warning. Disabling plugins one by one is often the fastest way to confirm whether a specific extension is responsible.
If the allowed memory size bytes exhausted error keeps reappearing, it usually means the underlying issue has not been fully resolved. Simply increasing limits without optimizing plugins, themes or media usage can lead to recurring problems. In some cases, server-level restrictions prevent your changes from applying, especially on shared hosting. If repeated attempts to increase memory limit fail, it may indicate that your hosting plan does not provide sufficient resources for your site’s current workload.
Using cpanel increase memory limit options is often more reliable than editing WordPress files alone. Changes made through cPanel affect PHP at the server level, which means they override WordPress-specific settings. If you update wp-config.php but still see the fatal error: allowed memory size message, the server’s PHP memory limit is likely lower. Adjusting the limit through cPanel ensures that PHP allows enough memory before WordPress attempts to use it.
If you frequently encounter the fatal error allowed memory size exhausted error despite optimizing plugins, switching themes and using cPanel increase memory limit, your hosting environment may be the limiting factor. Persistent crashes, slow performance and repeated allowed memory size bytes exhausted errors are strong indicators that your site has outgrown shared hosting. In such cases, upgrading to managed WordPress hosting, VPS or cloud hosting provides higher memory allocation, better scalability and long-term stability.

Write A Comment