 ChatGPT,
 Claude,
 Gemini,
 Grok — all four for
If you're moving your email from Professional Email to Google Workspace, you can copy your existing messages across so they come with you. The process uses the data import tool in the Google Admin console to copy the email from each Professional Email mailbox into the matching Google Workspace user.
To move your email, you import each Professional Email mailbox into Google Workspace with the data import tool in the Google Admin console, update your domain's email records to point to Google, run a delta import to catch anything that arrived in the meantime, and then turn off auto-renewal for Professional Email. This article covers email messages only. It doesn't move contacts or calendar events.
Before You Begin
Gather the following before you start:
- A Google Workspace account for your domain, with a Google Workspace user created for each Professional Email mailbox you want to move. Make a note of each person's new Google Workspace email address.
- Super administrator access to your Google Workspace account. The import tool only works when you're signed in as a super administrator.
- The email address and password for each Professional Email mailbox you're moving.
- Access from third-party apps turned on for each Professional Email mailbox, and two-factor authentication turned off, so Google can connect to the mailbox during the import. You can turn two-factor authentication back on after your final import is finished.
- IMAP turned on for your Google Workspace users in the Google Admin console.
Important: Keep Professional Email active until you've confirmed that everything copied over. The import copies your messages. It doesn't remove them from Professional Email.
Import Your Email Into Google Workspace
Start by connecting Google Workspace to your Professional Email mailboxes, and then choose which mailboxes to copy.
Connect to Professional Email
- Sign in to the Google Admin console with your super administrator account.
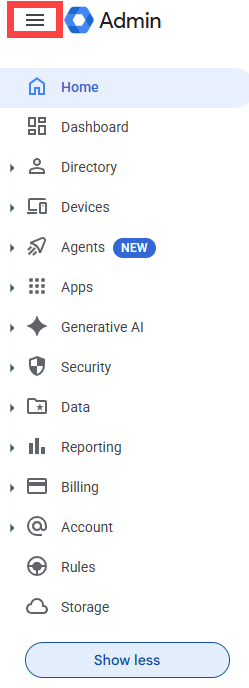
- In the Google Admin console, click the Menu hamburger icon (three horizontal lines) at the upper left, next to Admin.
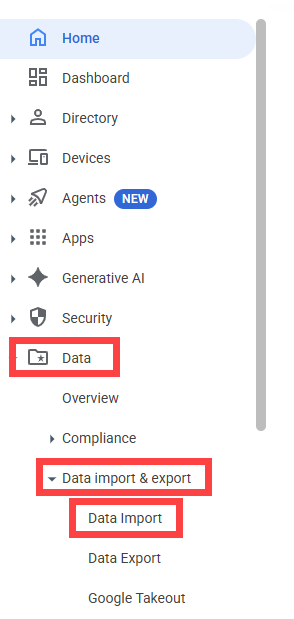
- Click Data > Data import & export > Data Import.
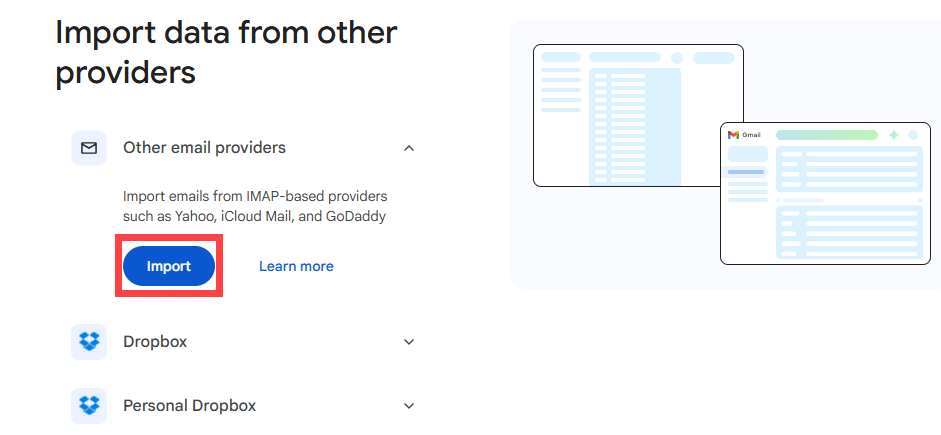
- Under Import data from other providers, click Import.
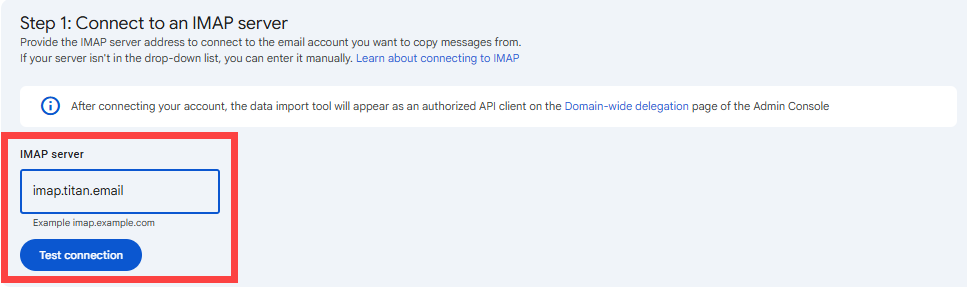
- In the IMAP server field, enter
imap.titan.email. - Click Test connection. When the connection works, a Connected label appears next to the IMAP server address.
Add Your Mailboxes
Each Professional Email mailbox can be copied to only one Google Workspace user. Choose the method that fits the number of mailboxes you're moving. You can enter up to 20 mailboxes by hand. If you have more than that, use a CSV file.
| Method | Mailbox limit | How you enter the mailboxes |
|---|---|---|
| Manually | Up to 20 at a time | Type each mailbox into the fields in the Google Admin console |
| CSV file | Up to 100 per import | Fill in Google's sample CSV file and upload it |
Add Mailboxes Manually
- Under Step 2: Add user information, enter the following for the first user:
- IMAP email address: Enter the Professional Email address.
- IMAP password: Enter the password for that mailbox.
- Workspace email address: Enter the user's Google Workspace email address.
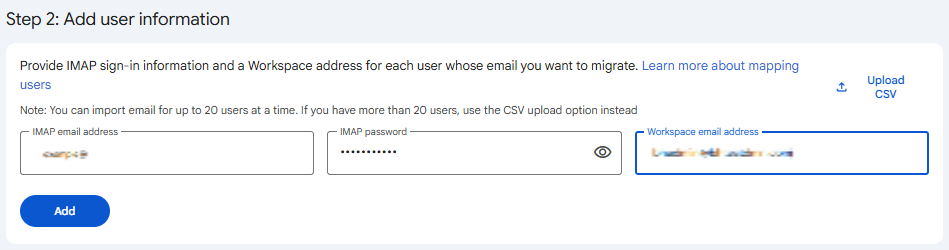
- Click Add. The mapping appears in a table below the fields.
- Repeat these steps for each mailbox you're moving. To remove a mapping, click Remove next to the user's row. Removing a mapping doesn't delete the user or their data.
Add Mailboxes With a CSV File
A single import can include up to 100 mailboxes. If you have more, run additional imports after the first one finishes.
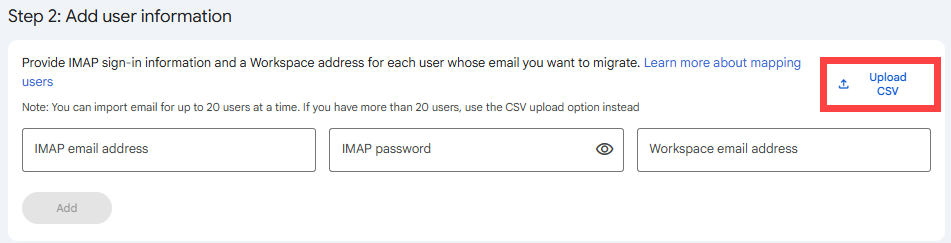
- Under Step 2: Add user information, click Upload CSV.
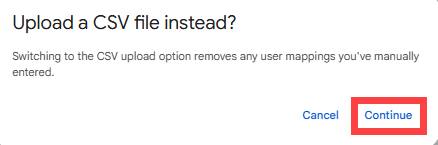
- In the Upload a CSV file instead? window, click Continue. Switching to the CSV upload option removes any user mappings you've entered manually.
- Click Download sample CSV file.

- Open the file in a spreadsheet program and fill in one row for each mailbox:
- Source ImapUser: Enter the Professional Email address.
- Source ImapPassword: Enter the password for that Professional Email mailbox.
- Target GUser: Enter the user's Google Workspace email address.
- Save the file as a CSV file.
- Back in the Google Admin console, click Upload CSV, select your file, and then click Open.
- Click Tasks to confirm that the file uploaded successfully.
Warning: The CSV file contains mailbox passwords in plain text. Delete the file from your computer when the import is finished.
If the file doesn't upload, select it, click Delete, and then click Yes to confirm. Create the file again and upload it. If it fails again, contact Google Workspace support.
Choose Your Import Settings (Optional)
These settings control which messages are copied. You can use some or all of them. If you don't change them, Google imports messages as far back as January 1, 2000.
- Under Step 3: Configure data import settings, click Edit settings.

- Fill in the fields:
- Start date: Enter the date you want to import messages from, in MM/DD/YYYY format. All messages sent or received after this date are copied to Google Workspace.
- Include deleted emails: Select this check box to copy messages you've deleted.
- Include spam emails: Select this check box to copy messages in the spam folder.
- Exclude specific folders: Select this check box to skip certain folders, and then enter the folder names in the Folders field, separated by commas. Enter each folder and subfolder separately. For a subfolder, type the full path with a forward slash between the parent folder and the subfolder, such as
Parent/Child.
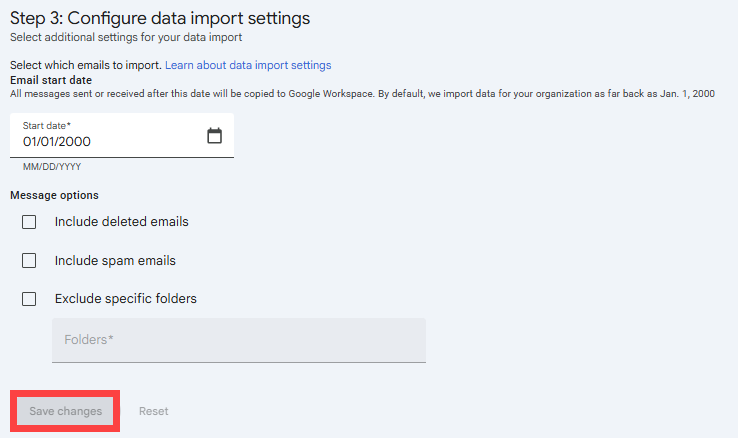
- Click Save changes.
Start the Import
- Click Start import.

- The status changes to In progress, and the page updates as messages are imported, skipped, or fail to import.
- When the import is complete, Google sends you an email with the import statistics and any reports attached.
Large mailboxes take longer to copy, so allow extra time if your users have a lot of stored email.
Update Your DNS Records
Until you update your domain's email records, new messages keep arriving in Professional Email. Once the records point to Google, new messages are delivered to Gmail instead.
For the steps to set up the SPF, DKIM, and DMARC records for Google Workspace, see Set up SPF, DKIM, and DMARC for Google Workspace.
Note: These steps assume your domain's DNS is managed in the Bluehost Portal. If your DNS is managed somewhere else, make the same changes with your DNS provider.
DNS changes can take up to 24 to 48 hours to fully take effect. During that time, some messages may still be delivered to Professional Email. You'll pick those up with a delta import in a later step. If the Google Admin console asks you to activate Gmail for your domain, follow the prompts on screen.
Run a Delta Import
After your MX records take effect, run a delta import to copy any messages that arrived in Professional Email after the first import finished. The Run delta import option only appears after your first import has completed.
- In the Google Admin console, click the Menu hamburger icon (three horizontal lines) at the upper left, next to Admin, and then click Data > Data import & export > Data Import.
- Under Import data from other providers, click Import to open your existing import.
- Click Run delta import.
When the delta import is complete, Google sends you an email with the import statistics.
Confirm Everything Works
Before you cancel Professional Email, check that your messages copied over and that new email is arriving in the right place.
- Sign in to Gmail with one of the Google Workspace users you migrated.
- Check the inbox and your other folders. Your Professional Email folders appear in Gmail as labels.
- Send a test message to the address from another email account, and then reply to confirm sending and receiving both work.
- In the Google Admin console, review the import report to see if any messages were skipped or failed.
- When you're finished, go to the Data Import page, click Exit import, and then click Exit and delete import.
- If you turned off two-factor authentication on any Professional Email mailbox for the import, turn it back on.
Warning: After you exit an import, you can no longer access its configuration or reports. Export any reports you want to keep before you exit.
Turn Off Auto-Renewal for Professional Email
Once you've confirmed that all your messages are in Google Workspace and new email arrives as expected, you can turn off auto-renewal for Professional Email from your Bluehost account so the service doesn't renew.
Warning: After your Professional Email service ends, you can no longer access its mailboxes. Make sure everything you need has been copied before you turn off auto-renewal.
Troubleshooting
The Connection Test Fails
Check that the IMAP server address is entered exactly as shown in this article. Then confirm that the Professional Email address and password are correct, that access from third-party apps is turned on for the mailbox, and that two-factor authentication is turned off. Click Test connection again.
Some Messages Did Not Copy
Check your import settings. Messages older than the start date, deleted messages, spam messages, and anything in an excluded folder aren't copied unless you adjust those settings. Review the import report for skipped or failed items, and then run a delta import after you make changes.
New Email Is Not Arriving in Gmail
MX record changes can take up to 24 to 48 hours to fully take effect. If it has been longer than that, go back to the DNS tab for your domain in the Bluehost Portal (Domains > DNS) and confirm that the only MX record for your domain is the Google record. Leftover MX records for Professional Email can cause some messages to be delivered to the old mailboxes.
Frequently Asked Questions
Q: Does the import delete my messages from Professional Email?
A: No. The import copies your messages to Google Workspace and leaves the originals in place. Keep Professional Email active until you've confirmed that everything copied over.
Q: Does the import move my contacts and calendar?
A: No. This process moves email messages only. Contacts and calendar events aren't included.
Q: How many mailboxes can I import at once?
A: You can enter up to 20 mailboxes by hand. With a CSV file, a single import can include up to 100 mailboxes. If you have more, run additional imports after the first one finishes.
Q: Can I copy one mailbox to more than one Google Workspace user?
A: No. Each Professional Email mailbox can be copied to only one Google Workspace user.
Q: When can I turn two-factor authentication back on?
A: After your final import is finished. Two-factor authentication needs to stay off for each mailbox while Google connects to it, which includes the delta import.
Summary
Moving from Professional Email to Google Workspace takes a few connected steps. You import each mailbox's messages using the data import tool in the Google Admin console, update your DNS records so new email is delivered to Google, run a delta import to catch anything that arrived in between, and then confirm everything works before you cancel Professional Email. This process moves email messages only, so keep Professional Email active until you've checked that nothing is missing.
If you need further assistance, Bluehost Chat Support is available 24 hours a day, 7days a week while Bluehost Phone Support is available 7 days a week from 7 am-12 midnight EST.
- Chat Support - While on our website, you should see a CHAT bubble in the bottom right-hand corner of the page. Click anywhere on the bubble to begin a chat session.
- Phone Support -
- US: 888-401-4678
- International: +1 801-765-9400
You may also refer to our Knowledge Base articles to help answer common questions and guide you through various setup, configuration, and troubleshooting steps.