 ChatGPT,
  Claude,
  Gemini,
  Grok — all four for
How to Set Up Bluehost MCP Server to Your AI Assistant
This guide walks you through connecting an MCP (Model Context Protocol) server — including Bluehost's own MCP server — to five AI assistants: Claude, ChatGPT, Hermes Agent, OpenClaw, and Nano Claw. Once connected, your assistant can call outside tools on your behalf, such as a file system, database, ticketing system, or your Bluehost account.
Prerequisites
- The AI assistant or agent installed and signed in — Claude Desktop, ChatGPT, Hermes Agent, OpenClaw, or nanobot.
- Node.js 18 or later, if you're connecting a server that runs through
npx(most community MCP servers do). - Admin access to your workspace if you're on a managed ChatGPT Business or Enterprise account — a workspace admin must enable custom connectors before you can add one.
- The URL, command, or package name of the MCP server you want to connect to. If you're connecting Bluehost's MCP server, you'll find its URL in the Bluehost section below — the other examples here (filesystem, memory, and so on) just illustrate the general pattern.
Claude
Claude Desktop — Extensions (recommended, no config file)
- Open Settings → Extensions.
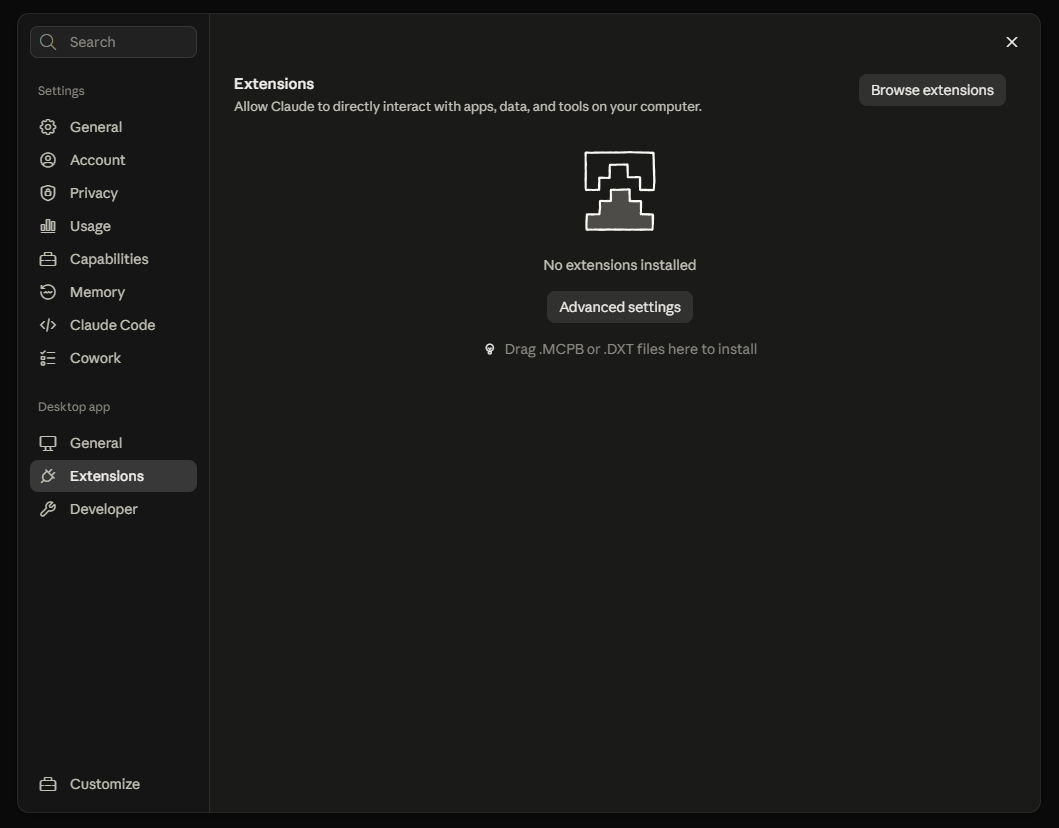
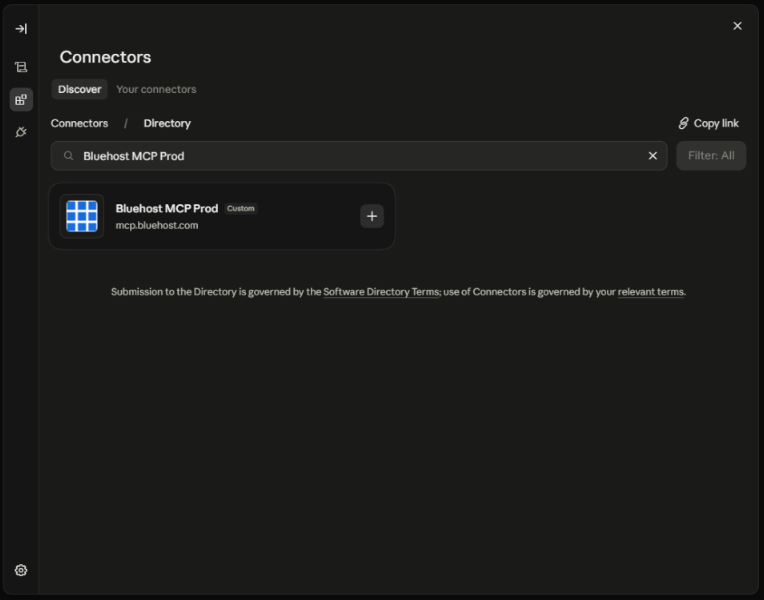
- Click Browse extensions, search for Bluehost MCP Prod, and select it.
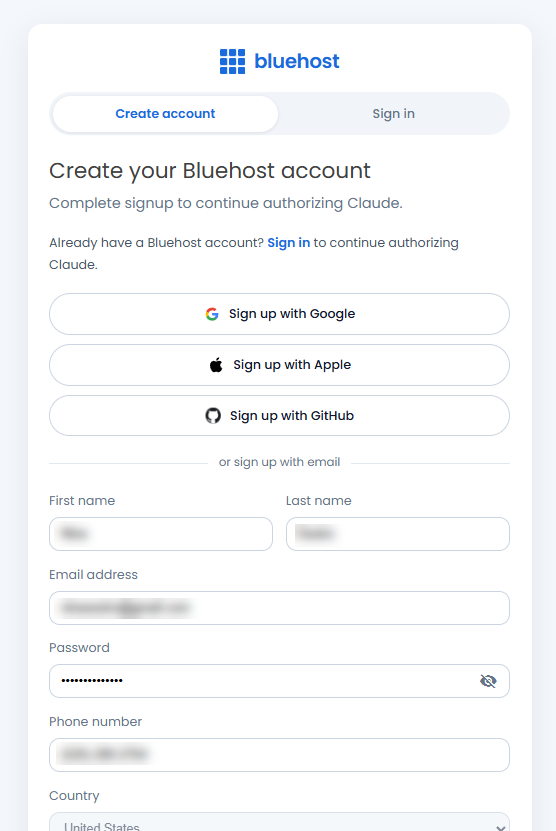
- You'll be prompted to sign in to your Bluehost account to authorize the connection. Don't have one yet? You can create an account right from this screen.
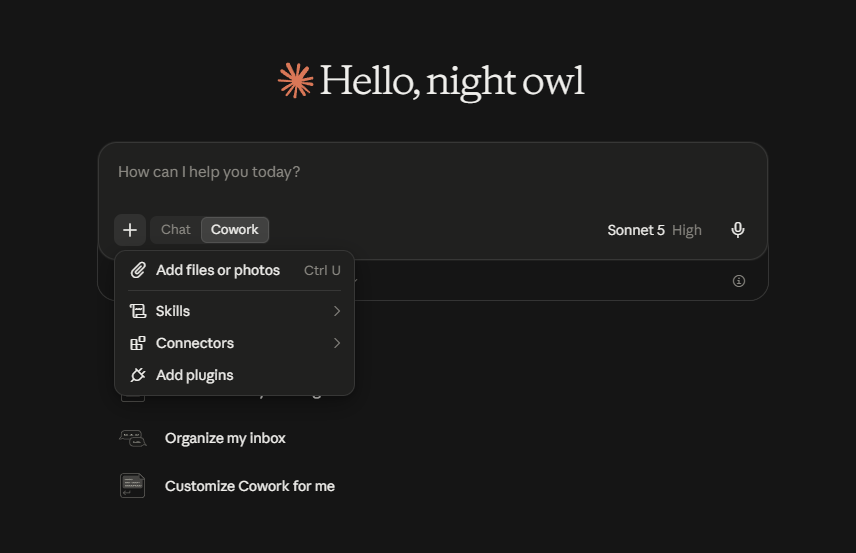
- Click the + icon in the chat box, then Connectors, to confirm that Bluehost MCP Prod is listed and connected.
Claude Desktop — manual config (for servers not in the directory)
- Open the Claude menu → Settings → Developer → Edit Config. This opens (or creates):
- macOS:
~/Library/Application Support/Claude/claude_desktop_config.json - Windows:
%APPDATA%\Claude\claude_desktop_config.json
- macOS:
- Open
claude_desktop_config.jsonusing a text editor and add an entry undermcpServers:{ "mcpServers": { "bluehost": { "command": "npx", "args": [ "-y", "mcp-remote", "https://mcp.bluehost.com/mcp" ] } } } - Save the file and fully quit and restart Claude Desktop.
- Click + → Connectors in the chat box to verify the server shows up and lists tools.
Claude Code (CLI)
Bluehost exposes an MCP endpoint at https://mcp.bluehost.com/mcp. Once it's registered with the Claude Code CLI, Claude can call Bluehost's tools directly from your terminal. This section covers adding the server, choosing a scope, and finishing authentication if the server asks for it.
Run this from any terminal with the Claude Code CLI installed. --transport http tells Claude Code to speak Streamable HTTP to the URL that follows — no local process to manage.
# Remote/hosted server (HTTP or SSE)
claude mcp add --transport http bluehost https://mcp.bluehost.com/mcp

# Check status
claude mcp list
- If the server needs a browser sign-in,
claude mcp listshows Needs authentication; run/mcpinside the session and select Authenticate.
Claude.ai (Web)
- Find the MCP URL:
https://mcp.bluehost.com/mcp - Open Connectors in Claude.
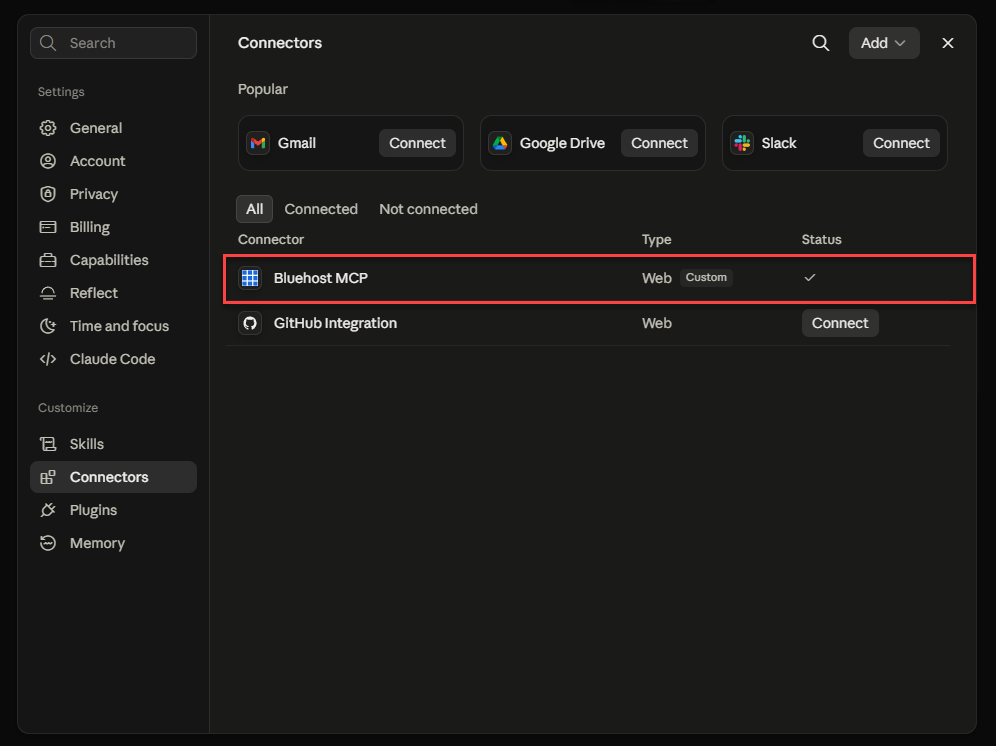
- Go to Settings → Connectors → Add → Add custom connector.
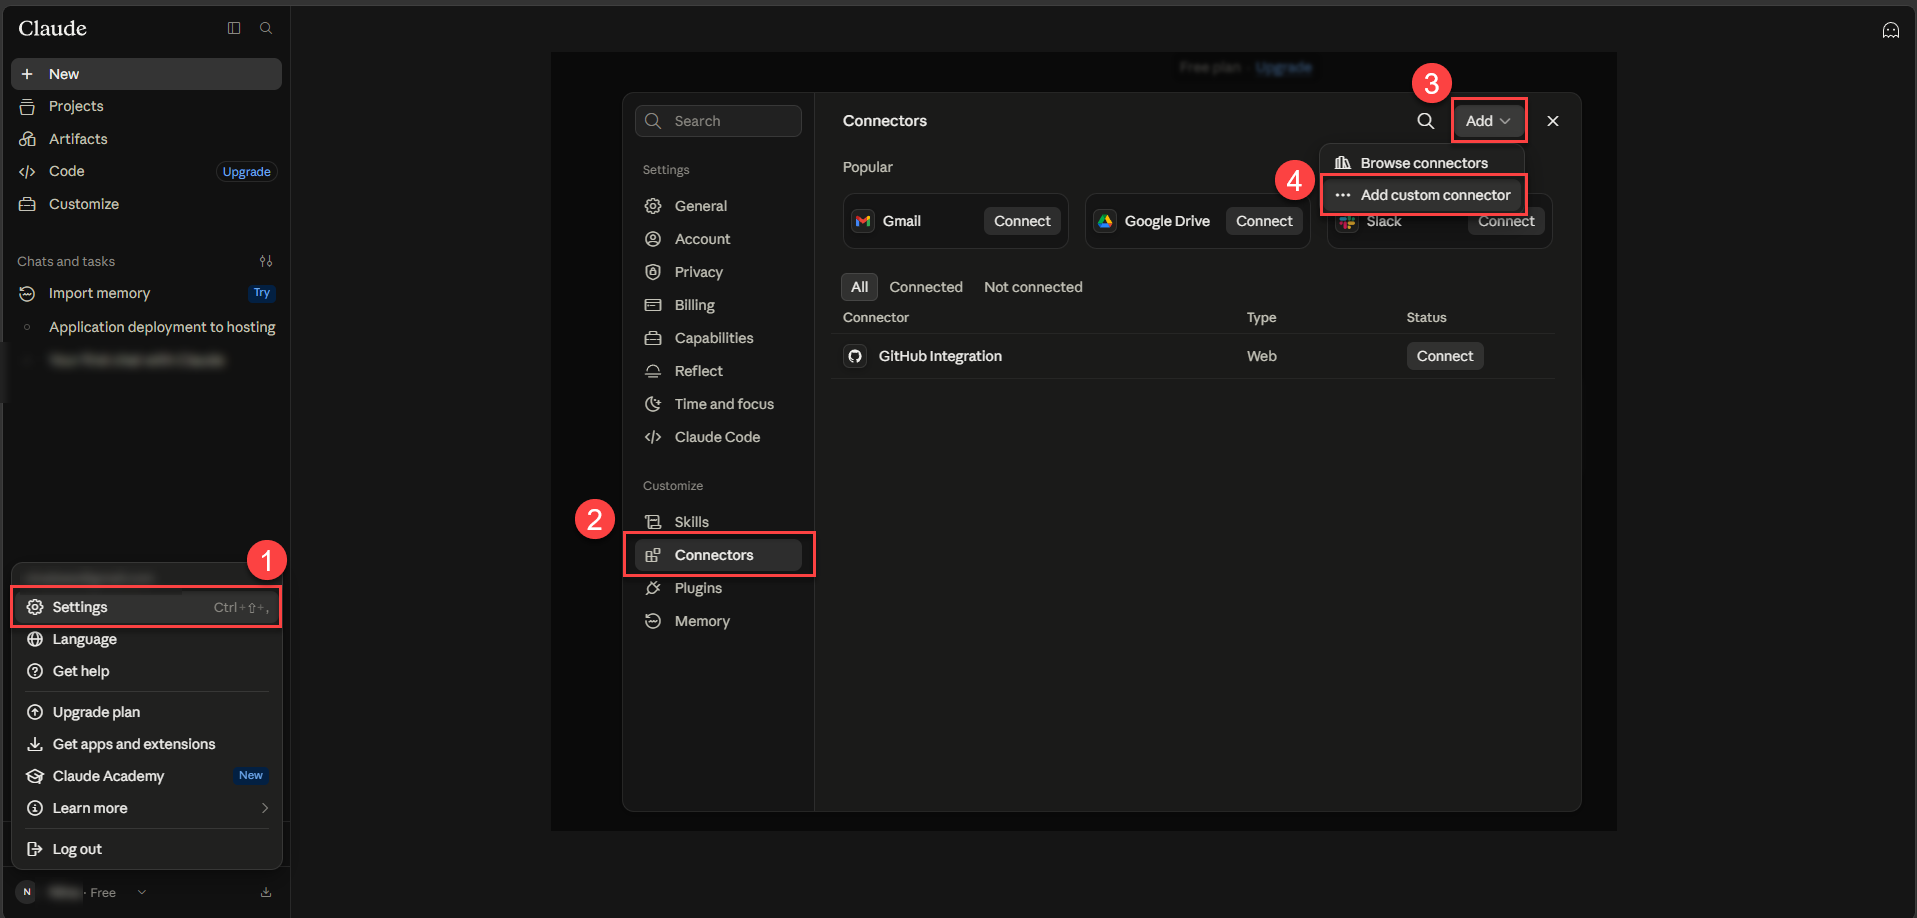
- Go to Settings → Connectors → Add → Add custom connector.
- Add the connector URL.
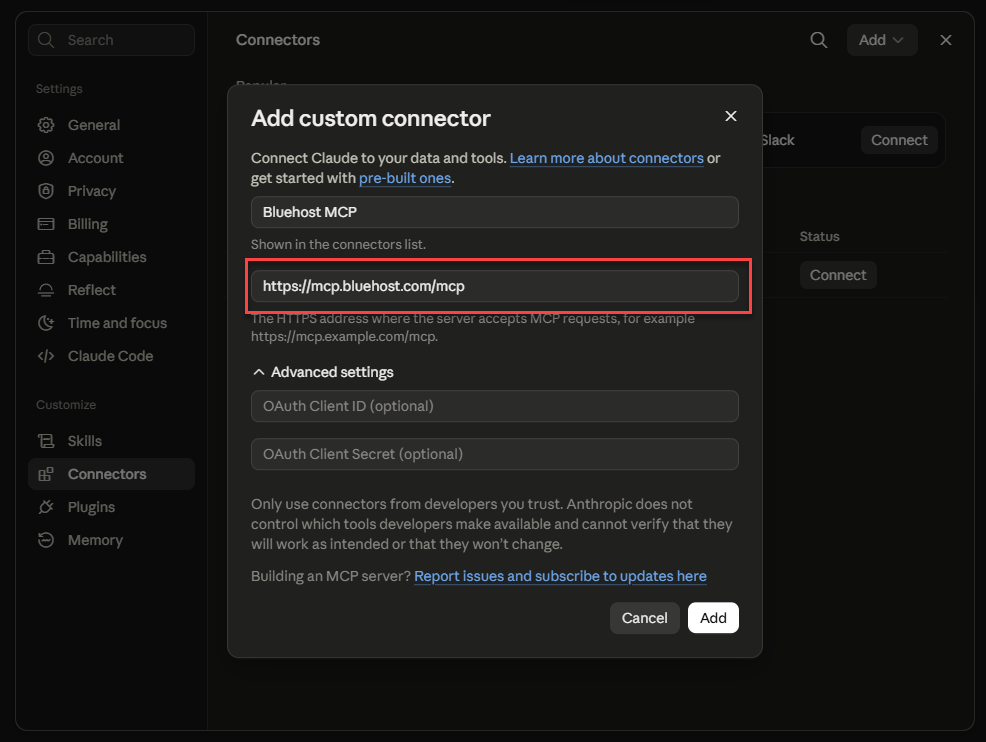
- Sign in or create an account — a browser tab opens automatically and takes you to the Bluehost login or account creation page. New to Bluehost? You can create an account right here.
- Add a payment method if you don't have a payment method on file yet. This is used only for purchases you make through the MCP connector later on, such as upgrading your plan; connecting the server itself doesn't charge you anything. Payment methods can only be added or changed in the browser, not through the MCP connector. For current pricing and plans, visit bluehost.com/pricing for more details.
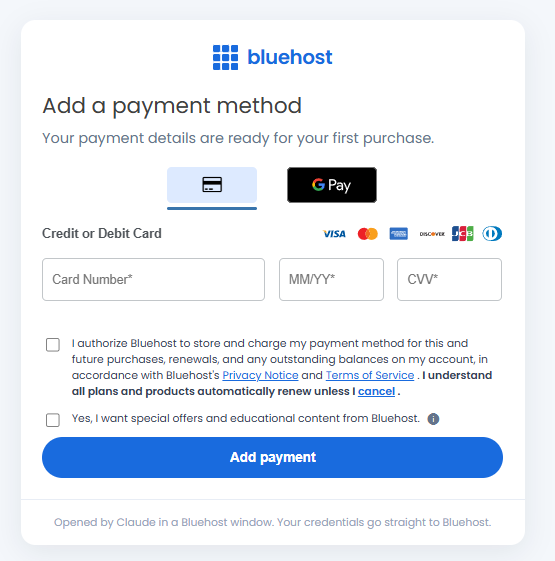
- Grant access — once your account and payment method are set up, you'll see an authorization screen asking you to grant the Bluehost MCP connector access to your account. Confirm the OAuth prompt, and the browser tab will close and return you to your AI assistant.
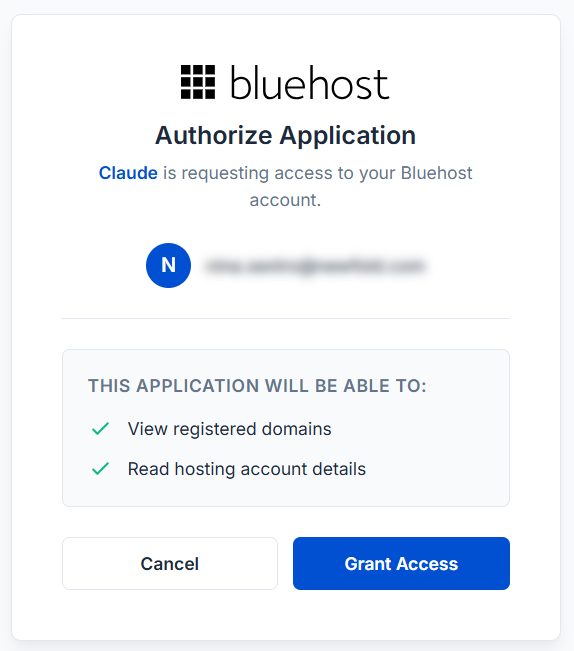
- Confirm the connection — the Bluehost MCP connector should now appear as an active, connected service in your assistant.
ChatGPT
Custom MCP connectors are available on Plus, Pro, Business, Enterprise, and Education plans, through the ChatGPT web app only — not the mobile apps. If you're on a managed workspace, an admin must enable this first, under Workspace Settings → Permissions & Roles → Connected Data → Create custom MCP connectors.
- Go to Settings → Apps → Advanced settings and turn on Developer mode.
- Go to Settings → Connectors → Create, and fill in:
- Name — what you'll see in the connector picker.
- Description — ChatGPT reads this to decide when to reach for the connector, so be specific.
- MCP Server URL —
https://mcp.bluehost.com/mcp - Authentication — OAuth (auto-discovered).
- On first use, a browser consent screen opens — sign in and approve.
- If the server's tools change later, go back to Settings → Connectors and hit Refresh.
Hermes Agent
Hermes Agent can reach your Bluehost account through Bluehost's MCP server, which lets the assistant look up account details and act on your behalf using the Model Context Protocol (MCP). This section walks you through adding the Bluehost MCP server to Hermes Agent, authenticating with your Bluehost account, and confirming the connection works.
What You'll Need
- Hermes Agent installed, with the
hermescommand available in your terminal. - Your Bluehost account login to complete the OAuth sign-in in Step 2.
Step 1: Add the Bluehost MCP Server
Register Bluehost's MCP server with Hermes Agent, pointing it at the server URL and telling Hermes to expect an OAuth-protected connection:
hermes mcp add bluehost --url https://mcp.bluehost.com/mcp --auth oauth
This adds an entry named bluehost to Hermes' configuration. You'll use that name in the remaining steps.
Step 2: Authenticate With OAuth
Run the login command to complete the OAuth handshake with your Bluehost account:
hermes mcp login bluehost
Hermes opens a browser window where you'll sign in to Bluehost and approve the connection. Once approved, Hermes stores the resulting credentials for the bluehost server.
Step 3: Verify the Connection
Confirm Hermes sees the server as connected, then run a test query:
hermes mcp list
hermes mcp test bluehost
OpenClaw
Add a server from settings
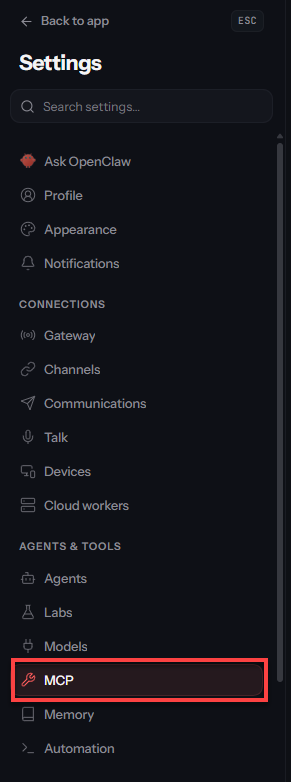
- Open the Control UI and go to Settings → MCP.
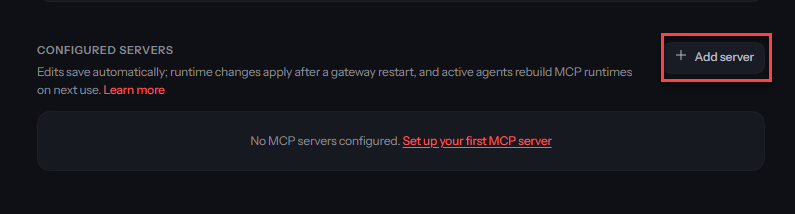
- Under Configured servers, select Add server.
- Give it a unique name and pick transport as Streamable HTTP. Enter
https://mcp.bluehost.com/mcpon the URL or command field.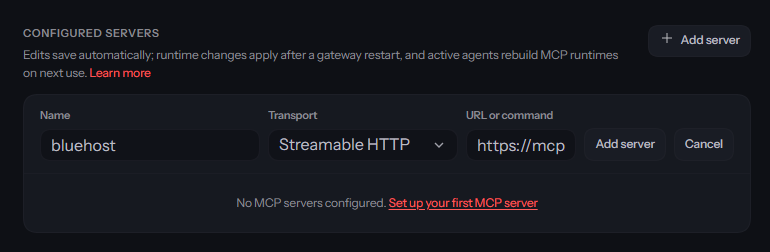
- Select Add server.
Add a server from the CLI
The openclaw mcp command group handles the full lifecycle of connecting an MCP server to your agent — adding it, authenticating, and confirming it's working before you rely on it. The example below connects a remote server over HTTP/SSE using OAuth.
# Remote HTTP/SSE server with OAuth
openclaw mcp add bluehost --url https://mcp.bluehost.com/mcp --transport streamable-http --auth oauth

# Verify if connection is established
openclaw mcp login bluehost        # start the OAuth flow
openclaw mcp status --verbose      # check without connecting
openclaw mcp doctor bluehost --probe   # verify it responds
Use --include or --exclude to scope down exactly which tools a new server exposes. OpenClaw agents typically already have shell, file, and messaging access, so this is a meaningful safety control, not a nicety — see Before You Add More Tools below.
Configure a server directly
This method skips the CLI and adds the remote server straight into your OpenClaw configuration file. Use it when you need finer control over the connection — custom headers, specific timeout values, or a headless setup you're managing over SSH.
- Open your
openclaw.json(or config-extensions) file in a text editor. - Under the
mcp.serversobject, add an entry for your remote server. Here's the block configured for the Bluehost MCP server:{ "mcp": { "servers": { "bluehost-mcp": { "url": "https://mcp.bluehost.com/mcp", "transport": "streamable-http", "requestTimeoutMs": 20000, "connectionTimeoutMs": 5000, "supportsParallelToolCalls": true, "headers": { "Authorization": "Bearer ${MCP_REMOTE_TOKEN}" }, "sslVerify": true } } } } - Once you save the file, OpenClaw automatically probes the remote endpoint and syncs its available tools into your active chat session — no restart needed.
Understand each setting
- url – the address of the remote MCP server your agent connects to.
- transport – the protocol used to talk to the server. Use
"streamable-http"or"sse", whichever the hosting provider requires. - requestTimeoutMs – how long the agent waits for a single request to finish before giving up.
- connectionTimeoutMs – how long the agent waits to establish the initial connection.
- supportsParallelToolCalls – set to
trueif the server can handle more than one tool call at the same time. - headers – custom HTTP headers sent with every request. This is where you pass an API key or bearer token if the server requires authentication.
- sslVerify – keep this set to
trueso the connection is verified as secure. Only turn it off for local testing, never in production.
Nano Claw (nanobot)
What You'll Need
- Python 3 with pip installed.
- An API key for your LLM provider (Anthropic, OpenAI, etc.) — you'll enter this during setup in Step 2.
Step 1: Install nanobot
Run:
pip install nanobot-ai --break-system-packages
Drop --break-system-packages if you're installing inside a virtual environment.
Step 2: Run the setup wizard
This sets your LLM API key and other basic settings:
nanobot onboard --wizard
Step 3: Add the Bluehost MCP server
Choose one of the two methods below.
Option A — Interactive (recommended)
- Run
nanobot webui. - Open the Apps tab.
- Choose to add a custom server, set the transport to HTTP, and enter
https://mcp.bluehost.com/mcpas the URL. - Restrict which tools are enabled, if you only need some of them.
- Save.
Option B — Manual config file
- Open
~/.nanobot/config.jsonin a text editor. - Add a
bluehostentry undertools.mcpServers:{ "tools": { "mcpServers": { "bluehost": { "url": "https://mcp.bluehost.com/mcp" } } } } - Save the file and restart nanobot for the change to take effect.
Step 4: Verify the connection
In the webui, open the Apps tab and confirm the bluehost server is listed as connected with its tools showing. From the CLI, @-mention the server in a chat — it should return a tool list instead of an error.
Verify It Worked
- Claude Desktop / Claude.ai: open the + → Connectors panel and confirm the server shows a connected status with tools listed.
- Claude Code: run
claude mcp listand confirm the server shows ✔ Connected. - ChatGPT: start a new chat, open the connector picker, and confirm the new connector appears and returns results.
- Hermes Agent / OpenClaw / nanobot: run the CLI's status or test command (
hermes mcp test,openclaw mcp doctor --probe, or a @-mention in nanobot) and confirm it returns a tool list instead of an error.
Common Issues
- Server doesn't appear after saving config: Fully quit and restart the app (a reload isn't enough for most of these clients). Recheck the config file path and JSON syntax.
- “Failed to connect” on first try: Common for npx-based servers — the first run downloads the package. Wait a few seconds and check status again.
- “Needs authentication”: The server is reachable but requires OAuth sign-in. Use the client's authenticate/login flow (
/mcpin Claude Code,mcp loginin Hermes/OpenClaw) rather than re-adding the server. - Tools connect but don't show up in chat: Check that the connector/tool wasn't filtered out (
enabledTools,--include, or a similar allow-list setting) and that any required environment variable, like an API key, is set.
Before You Add More Tools (OpenClaw and Nano Claw)
Hermes Agent, OpenClaw, and nanobot are legitimate open-source projects. OpenClaw specifically — also known as Clawdbot, briefly rebranded Moltbot — has drawn sustained, publicly documented security scrutiny through 2026. That matters here because it directly affects how safely you can add more MCP tools to it.
If you do connect MCP servers to OpenClaw or nanobot: run the agent in an isolated container or VM rather than your main machine, never expose it to the public internet, scope every server's tools to the minimum with --include or enabledTools, review a server's source before adding it — especially from a community skills hub — and avoid storing API keys or tokens in the agent's plaintext config where possible.
Summary
This guide shows you how to connect an MCP server — including Bluehost's own MCP server — to five AI assistants: Claude, ChatGPT, Hermes Agent, OpenClaw, and Nano Claw (nanobot). Claude and ChatGPT are mainstream assistants with built-in connector settings, while Hermes Agent, OpenClaw, and nanobot are independent, self-hosted open-source frameworks that use the same MCP standard but aren't official Anthropic products. For each assistant, the guide covers adding the Bluehost MCP server (at https://mcp.bluehost.com/mcp), completing OAuth sign-in, and verifying the connection returns a working tool list. It closes with troubleshooting steps for common connection issues and a security note for OpenClaw and nanobot users, since those frameworks typically already have shell, file, and messaging access and should be scoped and sandboxed carefully before adding more tools. Bluehost supports connecting and authenticating its own MCP server; troubleshooting the third-party assistant frameworks themselves is outside Bluehost's support scope — see each project's own documentation or community channels for issues that aren't specific to the Bluehost connection.
Related Articles
If you need further assistance, Bluehost Chat Support is available 24 hours a day, 7days a week while Bluehost Phone Support is available 7 days a week from 7 am-12 midnight EST.
- Chat Support - While on our website, you should see a CHAT bubble in the bottom right-hand corner of the page. Click anywhere on the bubble to begin a chat session.
- Phone Support -
- US: 888-401-4678
- International: +1 801-765-9400
You may also refer to our Knowledge Base articles to help answer common questions and guide you through various setup, configuration, and troubleshooting steps.