 ChatGPT,
  Claude,
  Gemini,
  Grok — all four for
Reimage Your Server for BMAD - AI Agent Development Framework Installation
Reimaging your server is like giving your it a clean slate. It completely resets your server—removing your current operating system, applications, configurations, and data—and installs the BMAD - AI Agent Development Framework Application in a fresh, new environment.
When you reimage your server, we automatically install the newest version of the BMAD - AI Agent Development Framework Application and the best operating system for it. Just keep in mind that, unlike the first time you set up your server, you won't be able to pick a specific operating system version this time.
When Should I Reimage My Server?
Reimaging is often the fastest and most effective way to resolve major server issues or prepare your server for an entirely new purpose. You might want to consider reimaging if:
- You are experiencing persistent errors or complex configuration issues.
- You need to thoroughly remove malware or recover from a security event.
- You have noticed a significant decline in overall server performance.
- You are starting a brand-new project and want an untouched environment.
- Your current server setup simply no longer fits your needs.
Benefits of Reimaging with the BMAD - AI Agent Development Framework Application
Installing your application via a server reimage offers several great benefits:
- A Clean Environment: Clears out old files, unused applications, and misconfigurations.
- Improved Performance: Starts you off with a fresh, highly optimized installation.
- Enhanced Security: Eliminates potential vulnerabilities and unwanted software.
- Simplified Deployment: Automatically handles the installation of the application and the best OS for it.
- Latest Features: Ensures you are running the most up-to-date version available.
How to Reimage Your Server for BMAD - AI Agent Development Framework Installation
This applies to both VPS and VDS.
- You can install only one application using the one-click installer.
- To change or delete your application, follow the guide: How to Change an Application. Create a backup of your existing applications or templates.
- To keep your current template, install the new application manually using SSH. Follow the same steps for both Self-Managed VPS and Virtual Dedicated Server (VDS). The system automatically selects the recommended operating system for BMAD - AI Agent Development Framework .
- Log in to your Bluehost Portal.
- In the left-hand menu, click Hosting, then select My Plans.
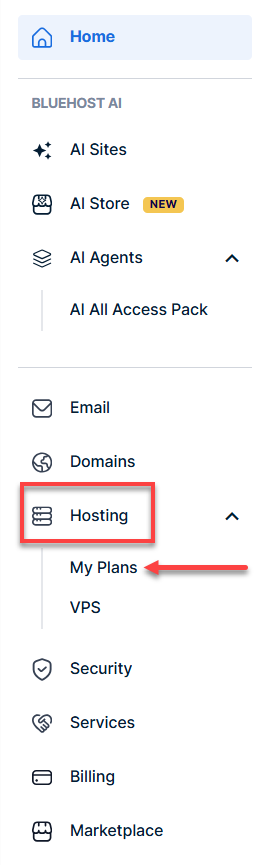
- Click the Manage button on the package you want to reimage.

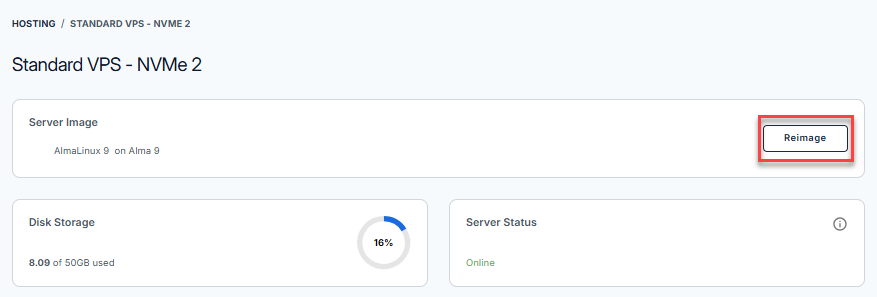
- Click the Reimage button.
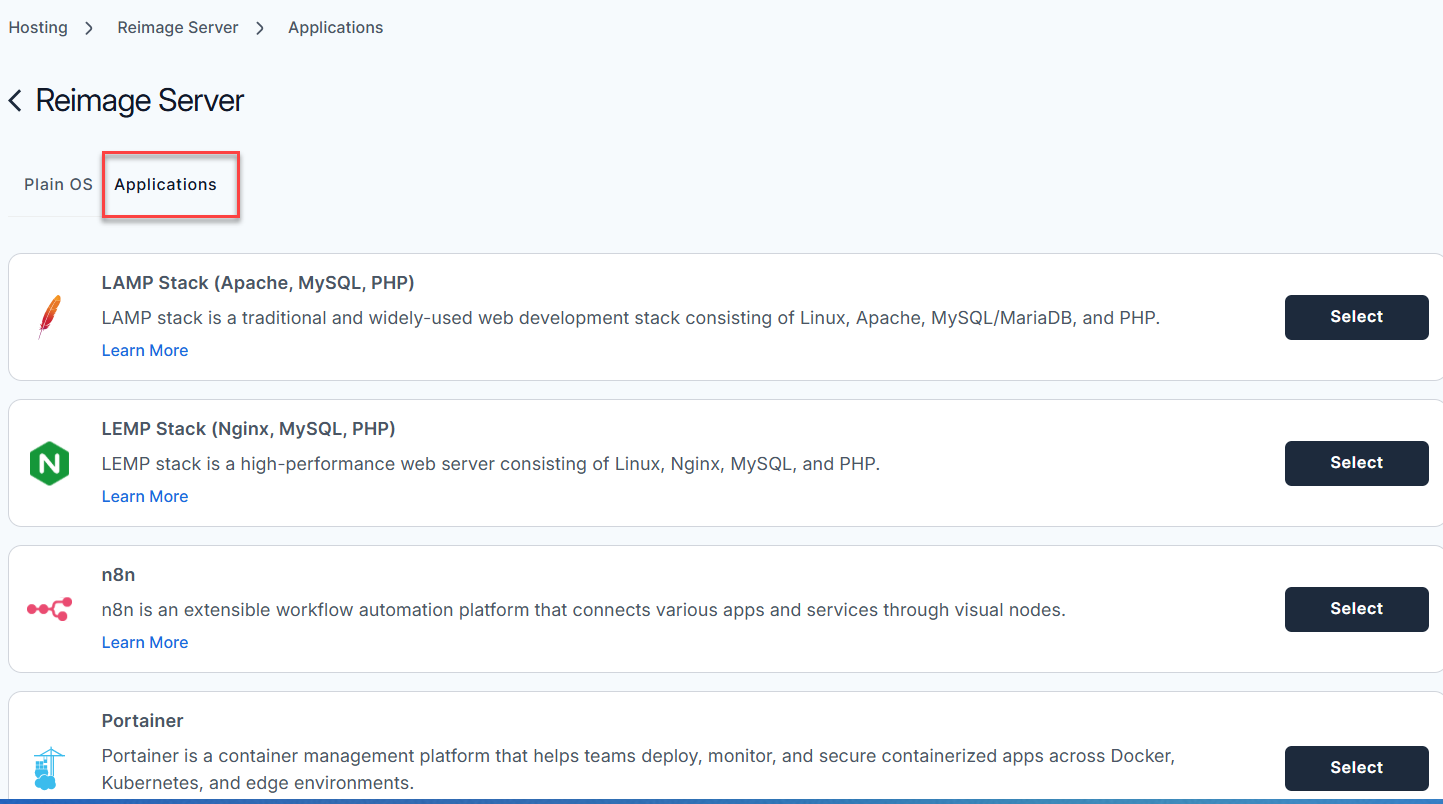
- Select the Applications tab.
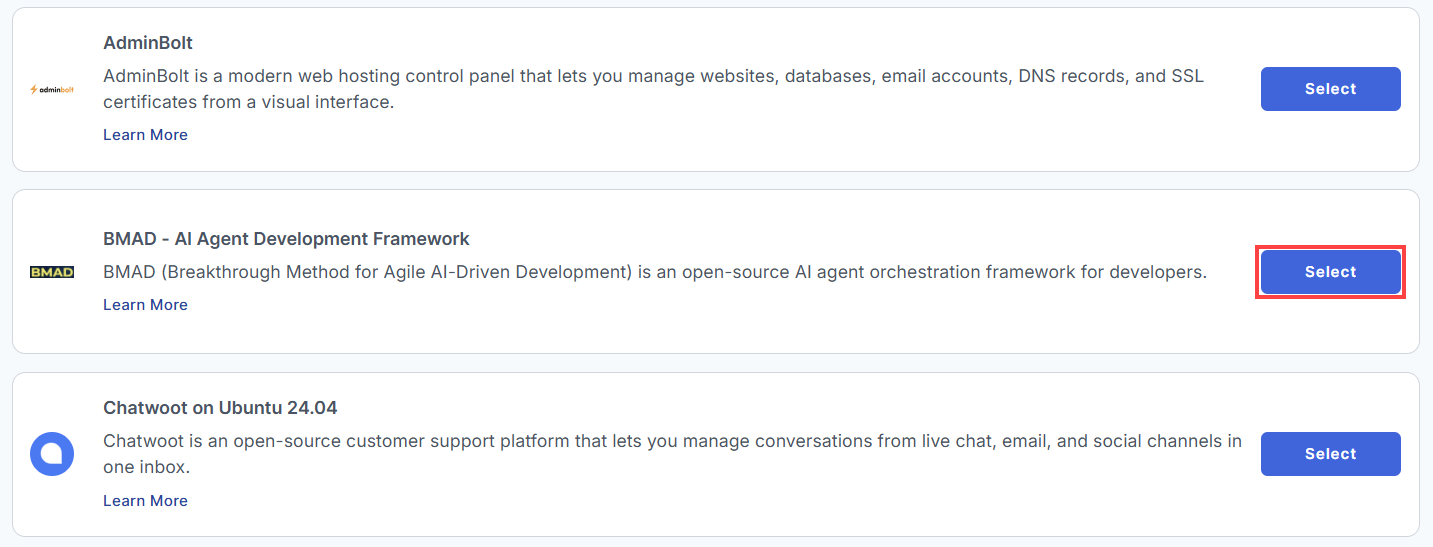
- From the list, locate BMAD - AI Agent Development Framework and click Select.
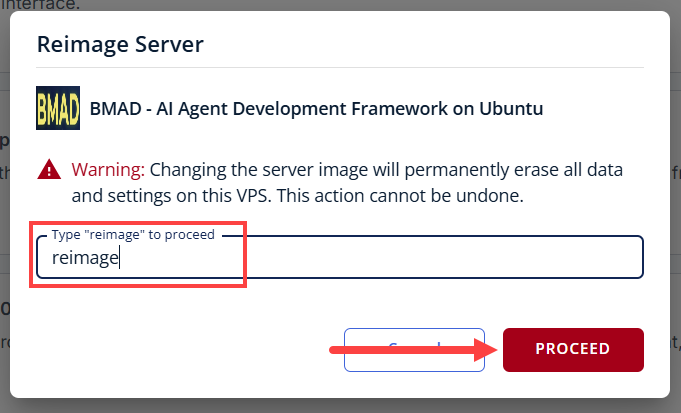
- To confirm, type "reimage" and then click Proceed to start the process.
- Wait a few minutes while the installation completes.

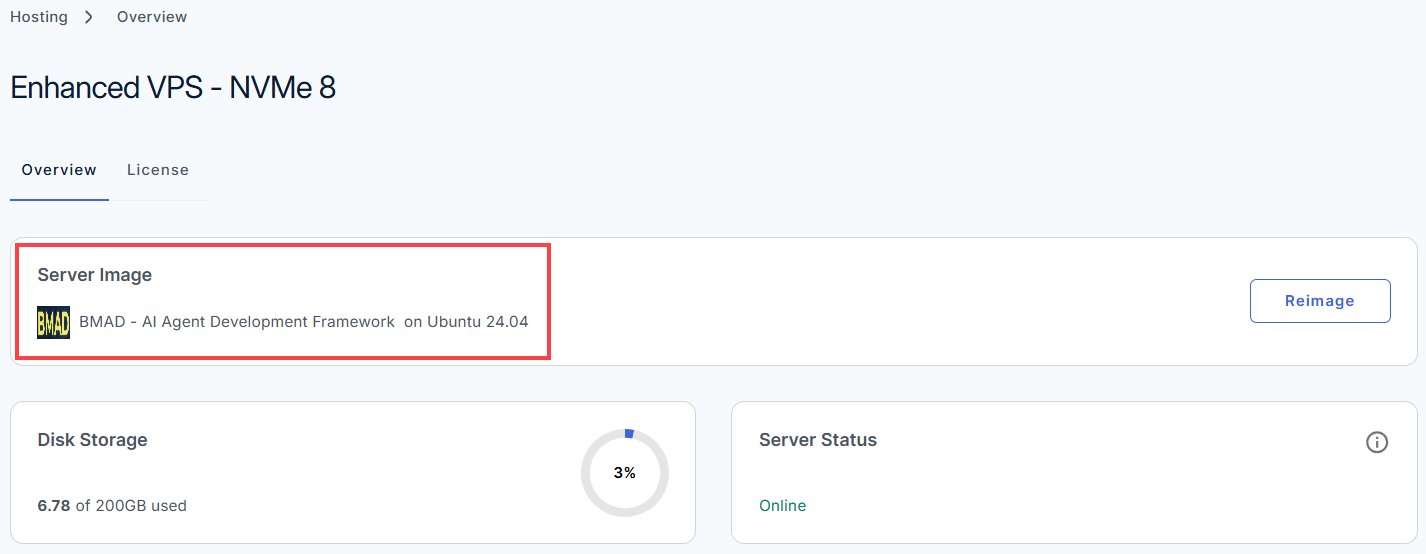
- Once completed, you will see BMAD - AI Agent Development Framework listed in the Server Image section.
Getting Started with Your BMAD AI Agent Development Environment
To get up and running with the BMAD (Breakthrough Method for Agile AI-Driven Development) framework, follow this structured, step-by-step workflow.
Step 1: Access your BMAD - AI Agent Development Framework Dashboard
After installation completes:
- Log in to your Bluehost Portal.
- In the left-hand menu, click Hosting, then select My Plans.
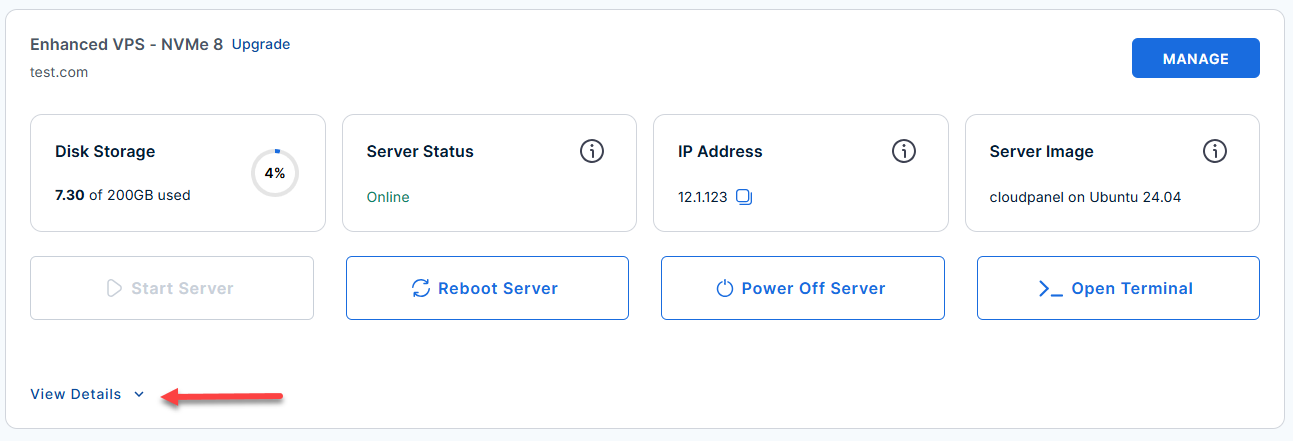
- Locate the server you want to manage, then click View Details in the bottom-left corner to expand the section and access additional server information.
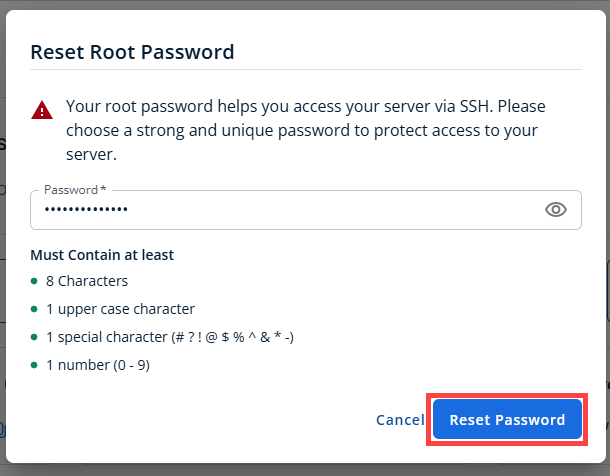
- Click the Reset Password.
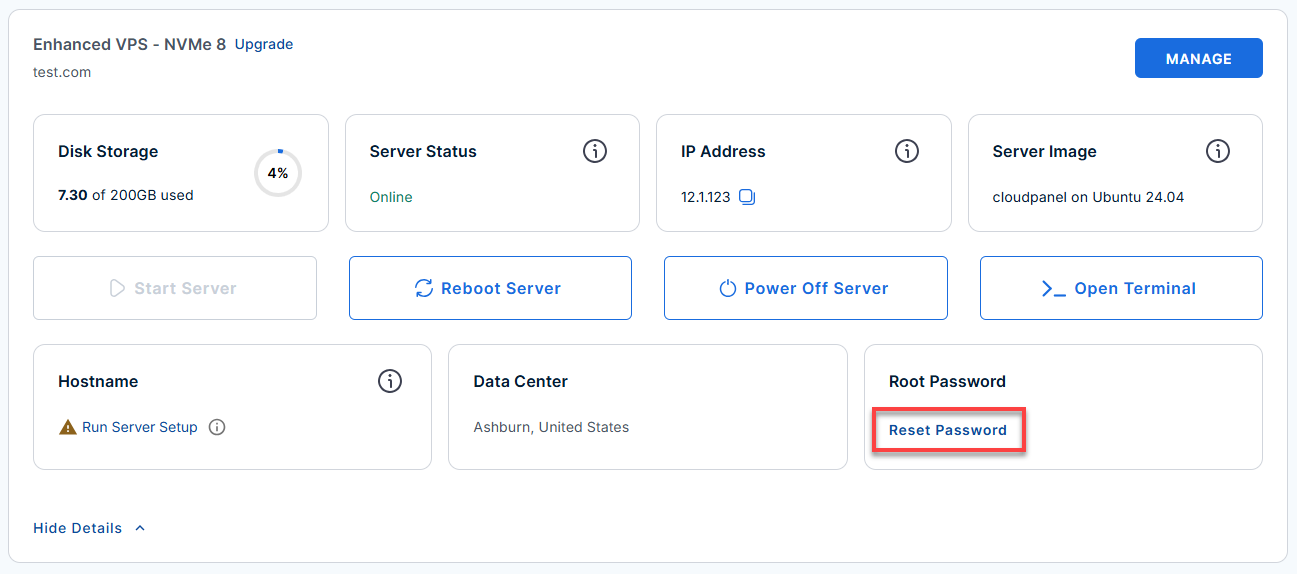
- In the pop-up window, type your new root password, then click Reset Password again to confirm and save the changes.
- Connect to your VPS via SSH.
Use your VPS IP and credentials with an SSH client, follow the prompts, and enter your root password when asked:Replaceyour_server_ipwith your actual server IP address.ssh root@your_server_ipExample Output:
Welcome to Ubuntu 24.04.4 LTS (GNU/Linux 6.8.0-124-generic x86_64)
********************************************************************************

  BMAD — AI Agent Development Framework
  Tier 3: CLI/dev-environment — no web GUI

  Node.js        : v24.17.0
  bmad-method    : 6.9.0
  claude-code    : anthropic-ai/claude-code

  ANTHROPIC_API_KEY :   configured
  Default track     : standard

  - Access ----------------------------------------
  SSH only      : ssh [email protected]
  No web UI     : CLI framework — terminal access only

  - Quick start -----------------------------------
  1. Run /opt/bmad/setup-env.sh  (set ANTHROPIC_API_KEY)
  2. bmad-init project-name [quick|standard|enterprise]
  3. cd /srv/bmad-projects/project-name
  4. Open Claude Code or your AI tool in that directory

  - Tracks ----------------------------------------
  quick       Rapid prototype  (analyst, pm, developer)
  standard    Full workflow    (all 5 agents)
  enterprise  Scaled delivery  (all 5 agents + sub-agents)

  - Firewall --------------------------------------
  Port open     : 22/tcp (SSH only)

  For full details refer: /root/README.md

********************************************************************************
Last login: Tue Jul  7 23:24:12 2026 from 113.19.181.245
Step 2: Configure Your API Key
BMAD requires an active Anthropic API key to orchestrate the AI agents. You can set this up quickly using the built-in helper script:
-
Run the setup script:
bash /opt/bmad/setup-env.shExample Output:
root@server-12345:~# bash /opt/bmad/setup-env.sh BMAD Environment Setup ──────────────────────────────────────────────────── This script sets your Anthropic API key in /etc/bmad/.env Get your key at: https://console.anthropic.com Paste your Anthropic API key (sk-ant-...): sk-ant-api03-abc1234-dKacbdaaDJO94JMENRT-sRXR-VlF1234j7HqvLQd-wBbabcdsBM API key saved to /etc/bmad/.env You can now run: bmad-init project-name [quick|standard|enterprise] -
Follow the prompts to securely input your API key.
Step 3: Initialize Your Project
Once configured, use the bmad-init command to create your project. Choose the track that best fits your needs:
- Quick: Ideal for prototyping and small scripts.
- Standard: Best for general greenfield or brownfield projects.
- Enterprise: Designed for large-scale codebases and multi-team collaboration.
Example Command:
Example Output:
root@server-12345:~# bmad-init my-new-project standard
│ ╭─Update Available───────────────────────────────────────────────────────────────────────────────────────────────────╮
│ │  You are using version 6.9.0 but 6.10.0 is available.                                                              │
│ │                                                                                                                    │
│ │  To update, exit and first run:                                                                                    │
│ │    npm cache clean --force && npx bmad-method@latest install                                                       │
│ ╰────────────────────────────────────────────────────────────────────────────────────────────────────────────────────╯
│ ╭────────────────────────────────────────────────────────────────────────────────────────────────────────────────────╮
│ │            ██████╗ ███╗   ███╗ █████╗ ██████╗     ███╗   ███╗███████╗████████╗██╗  ██╗ ██████╗ ██████╗ ™            │
│ │            ██╔══██╗████╗ ████║██╔══██╗██╔══██╗    ████╗ ████║██╔════╝╚══██╔══╝██║  ██║██╔═══██╗██╔══██╗             │
│ │            ██████╔╝██╔████╔██║███████║██║  ██║    ██╔████╔██║█████╗     ██║   ███████║██║   ██║██║  ██║             │
│ │            ██╔══██╗██║╚██╔╝██║██╔══██║██║  ██║    ██║╚██╔╝██║██╔══╝     ██║   ██╔══██║██║   ██║██║  ██║             │
│ │            ██████╔╝██║ ╚═╝ ██║██║  ██║██████╔╝    ██║ ╚═╝ ██║███████╗   ██║   ██║  ██║╚██████╔╝██████╔╝             │
│ │            ╚═════╝ ╚═╝     ╚═╝╚═╝  ╚═╝╚═════╝     ╚═╝     ╚═╝╚══════╝   ╚═╝   ╚═╝  ╚═╝ ╚═════╝ ╚═════╝              │
│ │                                               Build More, Architect Dreams                                         │
│ │                                                     © BMad Code                                                    │
│ ╰────────────────────────────────────────────────────────────────────────────────────────────────────────────────────╯
│
●  ━━━━━━━━━━━━━━━━━━━━━━━━━━━━━━━━━━━━━━━━━━━━━━━━━━━━━━━━━━━━━━━━━━━━━━━━
│
│  Agile AI-Driven Development. Powered by BMad Core and a growing module ecosystem.
│  Install official and community modules during setup to customize your experience.
│
│  🌟 100% free. 100% open source. Always.
│    No paywalls. No gated content. Knowledge shared, not sold.
│
│  🐍 HEADS UP: uv (https://docs.astral.sh/uv/) is becoming the de facto standard
│    for running the Python scripts BMAD workflows rely on (`uv run script`).
│    If it's not set up yet, ask your AI agent to "install and set up uv for me".
│
│  🌐 CONNECT:
│    Website:   https://bmadcode.com/
│    Discord:   https://discord.gg/gk8jAdXWmj
│    YouTube:   https://www.youtube.com/@BMadCode
│    X:         https://x.com/BMadCode
│    Facebook:  https://facebook.com/@BMadCode
│
│  ⭐ SUPPORT THE PROJECT:
│    Star us:   https://github.com/bmad-code-org/BMAD-METHOD/
│    Donate:    https://buymeacoffee.com/bmad
│    Corporate sponsorship and speaking inquiries: [email protected]
│
│  Docs, blog, and latest updates: https://bmadcode.com/
│
│  ━━━━━━━━━━━━━━━━━━━━━━━━━━━━━━━━━━━━━━━━━━━━━━━━━━━━━━━━━━━━━━━━━━━━━━━━
│
│
▲  uv not found on PATH. uv is becoming the de facto standard for running BMAD's Python
│  scripts (`uv run script`), and it provisions the interpreter for you. BMAD installs
│  fine without it, but setting up uv now keeps you ahead as workflows adopt it.
│
◇  uv recommended ─────────────────────────────────────────────────────────────╮
│                                                                              │
│  BMAD workflows increasingly run Python scripts via `uv run`, which manages  │
│  the interpreter and dependencies for you — no manual venv or pip needed.    │
│                                                                              │
│  Easiest path: ask your AI agent to "install and set up uv for me".          │
│                                                                              │
│  Or install it yourself:                                                     │
│    macOS/Linux:  curl -LsSf https://astral.sh/uv/install.sh | sh             │
│    Windows:      powershell -c "irm https://astral.sh/uv/install.ps1 | iex"  │
│    Homebrew:     brew install uv                                             │
│    Docs:         https://docs.astral.sh/uv/getting-started/installation/      │
│                                                                              │
├──────────────────────────────────────────────────────────────────────────────╯
◇  Installation directory:
│  /srv/bmad-projects/my-new-project/cd /srv/bmad-projects/my-startup-app
│
●  Resolved installation path: /srv/bmad-projects/my-new-project/cd /srv/bmad-projects/my-startup-app
│
◇  Create directory: /srv/bmad-projects/my-new-project/cd /srv/bmad-projects/my-startup-app?
│  Yes
│
●  Using modules from command-line: bmm
│
●  Using tools from command-line: claude-code
│
│  Selected tools:
│    • Claude Code ⭐
│
●  Using default configuration (--yes flag)
│
●  Using default configuration for BMM Module
│
◇  Shared scripts installed
│
◇  2 module(s) installed
│
◇  Module directories created
│
│  Created directories:
│    planning artifacts: _bmad-output/planning-artifacts
│    implementation artifacts: _bmad-output/implementation-artifacts
│    project knowledge: docs
│
│
●  Applied --set overrides: bmm.planning_depth → config.toml, bmm.skip_architecture_doc → config.toml, bmm.story_granularity → config.toml
◇  Configurations generated
│
●  Setting up claude-code...
│ ╭─BMAD is ready to use!──────────────────────────────────────────────────────────────────────────────────────────────╮
│ │    ✓  Shared scripts                                                                                               │
│ │    ✓  BMad Core Module (v6.9.0, installed)                                                                         │
│ │    ✓  BMad Method (v6.9.0, installed)                                                                              │
│ │    ✓  Module directories                                                                                           │
│ │    ✓  Configurations (generated)                                                                                   │
│ │    ✓  Help catalog                                                                                                 │
│ │    ✓  claude-code                                                                                                  │
│ │                                                                                                                    │
│ │    Installed to: /srv/bmad-projects/my-new-project/cd /srv/bmad-projects/my-startup-app/_bmad                      │
│ │                                                                                                                    │
│ │    Get started:                                                                                                    │
│ │      1. Launch your AI agent from your project folder                                                              │
│ │      2. Not sure what to do? Invoke the bmad-help skill and ask it what to do!                                     │
│ │                                                                                                                    │
│ │      Tip: BMAD workflows increasingly run Python scripts via uv run — uv is                                        │
│ │      becoming the de facto standard. If you don't have it yet, ask your agent to set it up.                        │
│ │                                                                                                                    │
│ │      Blog, Docs and Guides: https://bmadcode.com/                                                                  │
│ │      Community: https://discord.gg/gk8jAdXWmj                                                                      │
│ ╰────────────────────────────────────────────────────────────────────────────────────────────────────────────────────╯
>>> Project ready: /srv/bmad-projects/my-new-project
/srv/bmad-projects/my-new-project/.Step 4: Begin Development
Navigate to your project directory and open your preferred AI coding tool (such as Claude Code or Cursor) to start building:
Once inside, your BMAD agents (Analyst, PM, Architect, Scrum Master, and Developer) are ready to assist you. They will guide you through the entire lifecycle—from refining your project brief to generating architecture and writing functional code.
Step 5: Launch the Agent
Since you selected claude-code as your tool, this is your AI collaborator for the project. You need to launch it inside your project directory:
- Launch: Type
claude(or the command associated with your installation) in your terminal./srv/bmad-projects/my-new-project# claude - Initialize: If this is your first time, it will ask for your Anthropic API key.
- Interact: Once inside the
claudesession, you can talk to it naturally. For example, you can tell it: "I want to build a startup app. Read the docs/project-brief.md file and help me plan the first steps."Welcome to Claude Code v2.1.186 .......................................................... * █████▓▓░ * ███▓░ ░░ ░░░░░░ ███▓░ ░░░ ░░░░░░░░░░ ███▓░ ░░░░░░░░░░░░░░░░░░░ * ██▓░░ ▓ ╭─── Claude Code v2.1.186 ─────────────────────────────────────────────────────────────────────────────────────────────╮ │ │ Tips for getting started │ │ Welcome back JC! │ Run /init to create a CLAUDE.md file with instructions for Cla… │ ╭─── Claude Code v2.1.186 ─────────────────────────────────────────────────────────────────────────────────────────────╮ │ │ Tips for getting started │ │ Welcome back JC! │ Run /init to create a CLAUDE.md file with instructions for Cla… │ │ │ ─────────────────────────────────────────────────────────────── │ │ ▐▛███▜▌ │ What's new │ │ ▝▜█████▛▘ │ Fixed hook events not streaming during SessionStart hooks in h… │ │ ▘▘ ▝▝ │ Added a warning when your login is about to expire, so you can… │ │ Opus 4.8 (1M context) · API Usage Billing · JC’s │ Added a grey ⏸ badge to the footer when in manual permission m… │ ╭─── Claude Code v2.1.186 ─────────────────────────────────────────────────────────────────────────────────────────────╮ │ │ Tips for getting started │ ╭─── Claude Code v2.1.186 ─────────────────────────────────────────────────────────────────────────────────────────────╮ │ │ Tips for getting started │ │ Welcome back JC! │ Run /init to create a CLAUDE.md file with instructions for Cla… │ │ │ ─────────────────────────────────────────────────────────────── │ │ ▐▛███▜▌ │ What's new │ │ ▝▜█████▛▘ │ Fixed hook events not streaming during SessionStart hooks in h… │ │ ▘▘ ▝▝ │ Added a warning when your login is about to expire, so you can… │ │ Opus 4.8 (1M context) · API Usage Billing · JC’s │ Added a grey ⏸ badge to the footer when in manual permission m… │ │ Individual Org │ /release-notes for more │ │ /srv/bmad-projects/my-new-project │ │ ╰──────────────────────────────────────────────────────────────────────────────────────────────────────────────────────╯ ▎ Meet Fable 5, our newest model for complex, long-running work. Switch anytime with /model. ❯ /init ⎿ Credit balance too low · Add funds: https://platform.claude.com/settings/billing ✻ Baked for 0s
From here, you will interact with the AI agents. The agents will work in sequence, producing the following artifacts in your directory:
- Analyst: Generates
project-brief.md. - PM: Generates
prd.mdand theepics/folder. - Architect: Generates
architecture.md(defining your stack and schema). - Scrum Master: Populates the
stories/folder. - Developer: Implements the logic in
src/andtests/.
Step 6: Maintenance and Validation
You can manage the environment using these built-in tools:
- Verify System Health: Run the test suite to ensure everything is configured correctly:
prove /root/app_test/main.t
- Manage Dependencies: If you are working outside a
bmad-initproject, you can initialize the framework in any directory using:npx bmad-method install - View Logs: If an agent fails or you need to debug the workflow, check the logs:
ls /var/log/bmad/
Quick Reference Checklist
- SSH Access Only: No web UI exists; all operations occur in the CLI.
- Storage: All project data lives under
/srv/bmad-projects/. - Security: The environment is hardened with UFW (only port 22 open) and root-only access to your
.envfile.
Additional Information and Example Documentation Output
You can run cat /root/README.md to see more information and useful commands:
root@server-12345:~# cat /root/README.md
# BMAD - AI Agent Development Framework

## Description

BMAD (Breakthrough Method for Agile AI-Driven Development) is an open-source AI agent orchestration framework for developers. It coordinates multiple specialist AI agents - Analyst, PM, Architect, Scrum Master, and Developer - to take a project from brief through to working code using a structured, repeatable workflow.

This image ships a fully pre-configured BMAD environment on Ubuntu 24.04, including Node.js 24 LTS, the bmad-method CLI, Claude Code, and all three tracks (Quick, Standard, Enterprise) pre-wired and ready to use. A first-boot script checks for your Anthropic API key and confirms the environment is ready.

This is a Tier 3 CLI/dev-environment framework. There is no web GUI, no HTTP server, no browser interface, and no SSO. All interaction is via SSH terminal.

---

## Services

| Service  | Ports | Purpose              |
|----------|-------|----------------------|
| OpenSSH  | 22    | Remote terminal access |

BMAD is a CLI framework - not a web application. There are no web services, no HTTP ports, and no browser interface. Port 22 (SSH) is the only open port.

---

## What is installed

| Component      | Detail                                                       |
|----------------|--------------------------------------------------------------|
| OS             | Ubuntu 24.04 LTS                                             |
| Node.js        | v24 LTS                                                      |
| bmad-method    | BMAD CLI - npx bmad-method install                           |
| claude-code    | Anthropic AI coding CLI                                      |
| Tracks         | Quick, Standard, Enterprise (pre-wired at /opt/bmad/tracks/) |
| Agent registry | /opt/bmad/agents/registry.json                               |
| bmad-init      | Convenience wrapper at /usr/local/bin/bmad-init              |

---

## Access

```
SSH only: ssh root@server-ip
```

There is no web UI, no port 80, no port 443, no port 3000. The only open port is 22 (SSH).

---

## How-to-use

### 1. Set your Anthropic API key

On first login, run the interactive setup helper:

```bash
bash /opt/bmad/setup-env.sh
```

Or edit the env file directly:

```bash
nano /etc/bmad/.env
```

Set:

```
ANTHROPIC_API_KEY=sk-ant-...
```

Get your key at: https://console.anthropic.com

### 2. Initialise a project

```bash
bmad-init project-name [quick|standard|enterprise]
```

Examples:

```bash
bmad-init my-api standard
bmad-init prototype quick
bmad-init platform enterprise
```

Projects are created under /srv/bmad-projects/.

### 3. Open your AI coding tool

```bash
cd /srv/bmad-projects/project-name
```

Open Claude Code, Cursor, or any AI coding tool in that directory. The BMAD agents embedded in the project will guide you from brief through to working code.

---

## Tracks

| Track      | Agents active                   | Use when                                |
|------------|---------------------------------|-----------------------------------------|
| quick      | Analyst, PM, Developer          | Prototyping, spikes, small scripts      |
| standard   | All five agents                 | Normal greenfield or brownfield projects|
| enterprise | All five agents plus sub-agents | Large codebases, multi-team delivery    |

Track configs live at /opt/bmad/tracks/

---

## Agents

| Agent        | Role                           | Produces                  |
|--------------|--------------------------------|---------------------------|
| Analyst      | Guided discovery, project brief| project-brief.md          |
| PM           | PRD and epic breakdown         | prd.md, epics/            |
| Architect    | Tech stack, DB schema, API spec| architecture.md           |
| Scrum Master | User stories, story context    | stories/                  |
| Developer    | Code implementation            | src/, tests/              |

---

## Manage

### bmad-method CLI

```bash
# Show available commands
npx bmad-method help

# Initialise BMAD in an existing project directory
cd /srv/bmad-projects/my-project
npx bmad-method install
```

### bmad-init wrapper

```bash
# Show usage
bmad-init

# Create a new standard project
bmad-init my-project standard
```

### Environment config

```bash
# View config
cat /etc/bmad/.env

# Edit config
nano /etc/bmad/.env

# Run interactive API key setup
bash /opt/bmad/setup-env.sh
```

### Logs

```bash
# BMAD agent output
ls /var/log/bmad/

# First-boot log
cat /var/log/cloud-init-output.log
```

### Tests

```bash
# Run the TAP test suite to verify the image is healthy
prove /root/app_test/main.t
```

### UFW Firewall

```bash
# Check firewall status
ufw status verbose
```

---

## Security hardening

| Hardening         | Detail                                         |
|-------------------|------------------------------------------------|
| UFW firewall      | Only port 22 (SSH) open. Default deny incoming |
| SSH rate limiting | Port 22 set to LIMIT - brute force protection  |
| .env permissions  | Mode 0600 - root read only                     |
| API key           | Never baked into the image - set after launch  |
| No web server     | No HTTP/HTTPS ports - no web attack surface    |

---

## Notes

- BMAD requires an Anthropic API key to run agents. Set ANTHROPIC_API_KEY in /etc/bmad/.env before calling bmad-init.
- This is a developer playground image - not a production service. It has no auth layer, no multi-user access control, and no SSO.
- Claude Code is the recommended AI coding companion. Connect it to the same API key.

---

## Links

- BMAD-METHOD GitHub: [https://github.com/bmad-ai/bmad-method](https://github.com/bmad-ai/bmad-method)
- Anthropic Console (API keys): [https://console.anthropic.com](https://console.anthropic.com)
- Claude Code Documentation: [https://docs.anthropic.com/en/docs/claude-code](https://docs.anthropic.com/en/docs/claude-code)
- Ubuntu 24.04 LTS Release Notes: [https://wiki.ubuntu.com/NobleNumbat/ReleaseNotes]https://wiki.ubuntu.com/NobleNumbat
Summary
Resetting your server with the BMAD - AI Agent Development Framework Application is a great way to start completely fresh. Because this process permanently deletes everything on your server, please make sure to save your settings and back up your important files before you begin!