 ChatGPT,
  Claude,
  Gemini,
  Grok — all four for
Reimage Your Server for GatorClaw Installation
GatorClaw is an artificial intelligence agent that acts as a digital assistant. With it, it is possible to connect artificial intelligence models, configure automations, and allow the agent to perform tasks directly in the server environment. When installed on a VPS or VDS, GatorClaw remains continuously active and can be accessed through a dashboard, where you can configure the agent, connect services, and manage automations.
How GatorClaw Works
GatorClaw is built on OpenClaw, an open‑source autonomous agent framework, and combines it with Bluehost’s high‑performance VPS and VDS environments. It follows a simple Build → Connect → Run model.
- Build
- Design AI agents using a guided visual interface
- Define multi‑step logic and workflows without writing code
- Connect
- Integrate with tools like Gmail, Slack, CRM systems and Notion.
- Use prebuilt automation blocks for common business tasks.
- Run
- Agents run 24/7 on a dedicated VPS and VDS
- Full control over resources, configurations, and performance
GatorClaw is ideal for
- Small and midsize businesses
- Solopreneurs
- Developers who want faster prototyping
- Teams running AI workloads on a Self‑Managed VPS and VDS
- Users who want private, always‑on AI agents
It’s designed to be beginner‑friendly while still allowing advanced control when needed.
How to Reimage Your Server for GatorClaw Installation
To install GatorClaw:
This applies to both VPS and VDS.
- You can install only one application using the one-click installer.
- To change or delete your application, follow the guide: How to Change an Application. Create a backup of your existing applications or templates.
- To keep your current template, install the new application manually using SSH. Follow the same steps for both Self-Managed VPS and Virtual Dedicated Server (VDS). The system automatically selects the recommended operating system for GatorClaw.
- Log in to your Bluehost Portal.
- In the left-hand menu, click Hosting, then select My Plans.
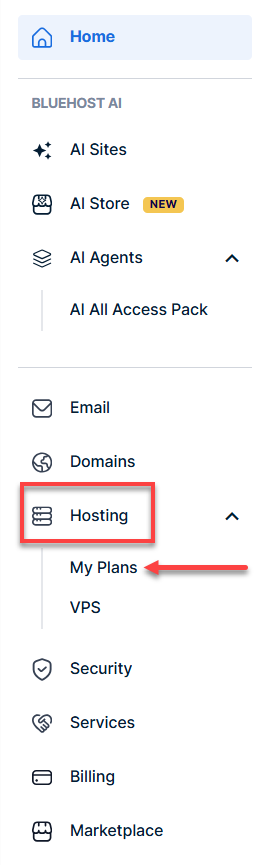
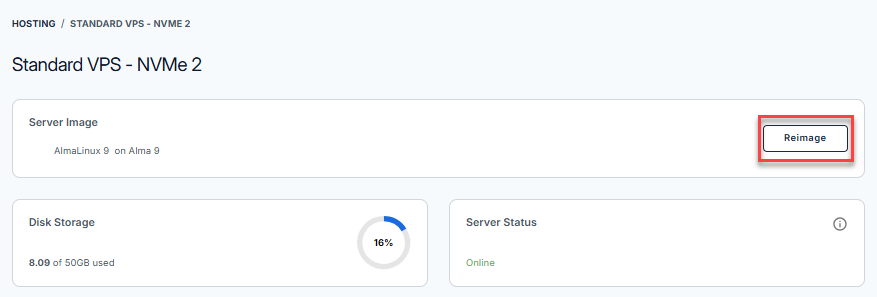
- Click the Manage button on the hosting package you want to reimage.

- Navigate to the Server Image section, then click the Reimage button.
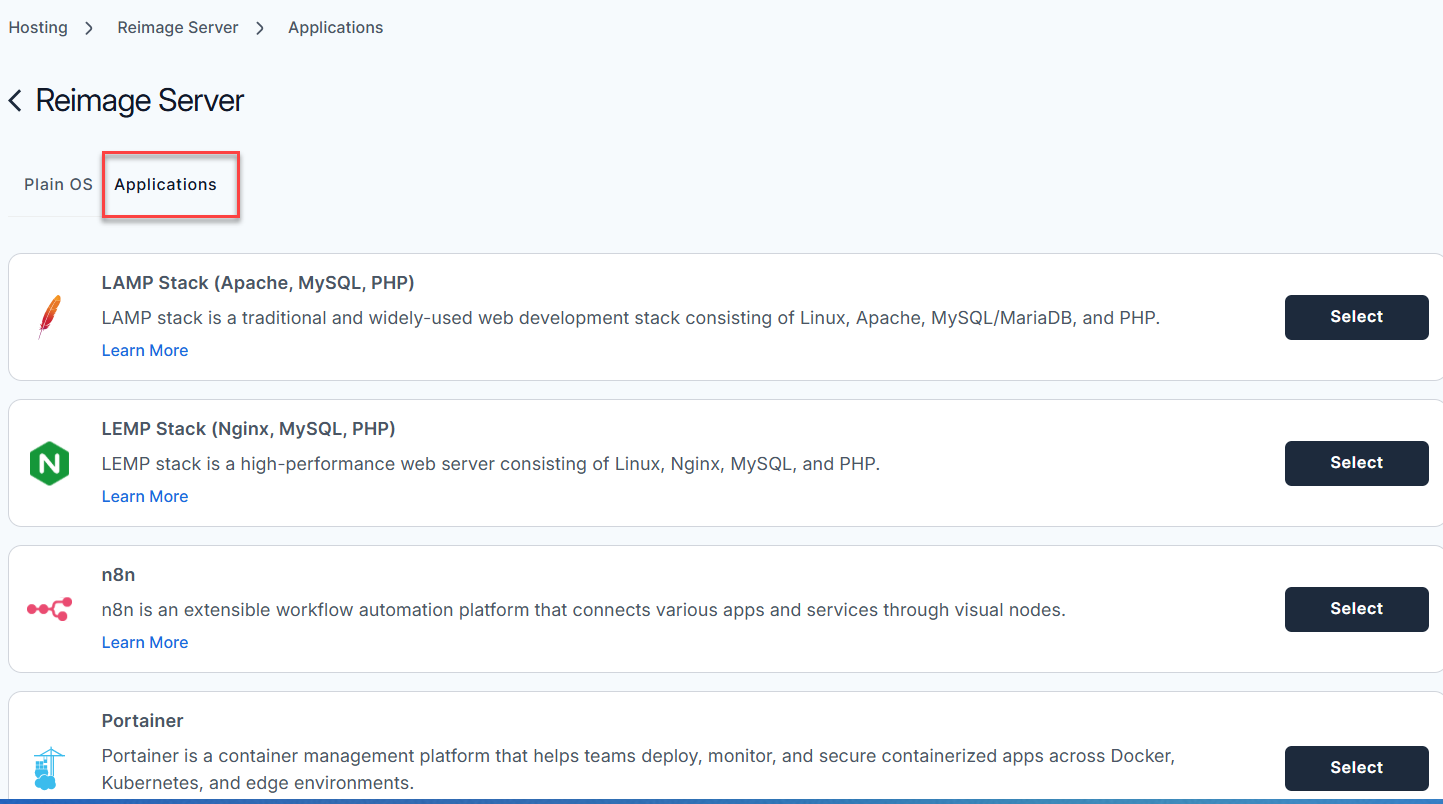
- Select the Applications tab.
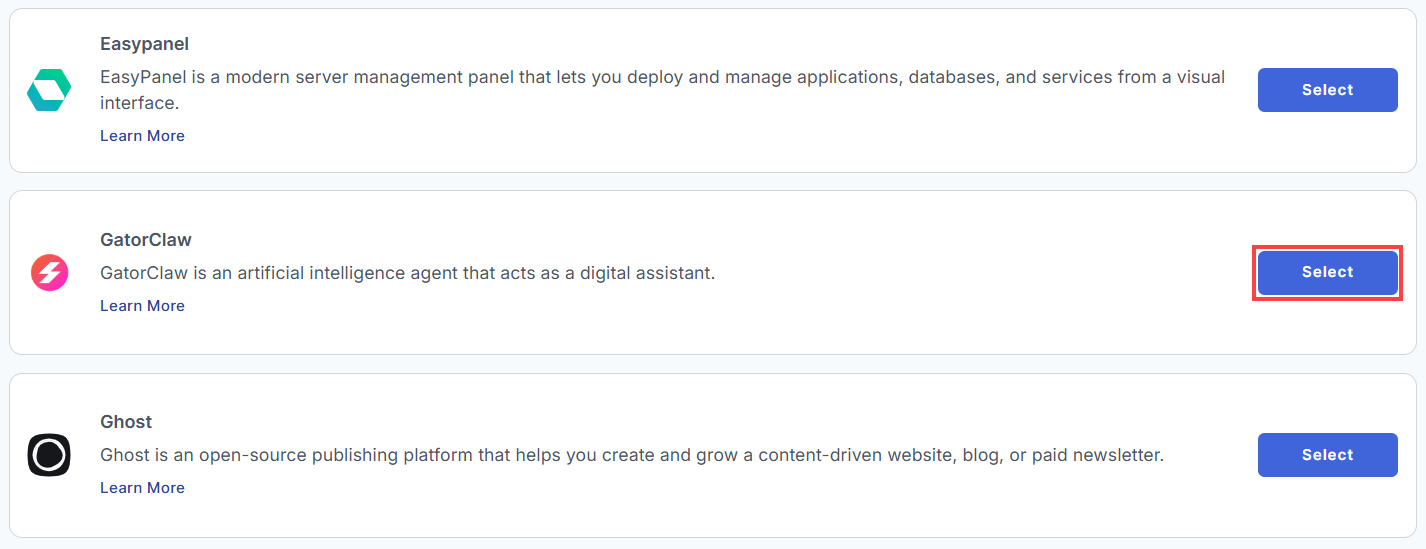
- From the list of available applications, find GatorClaw and click Select.
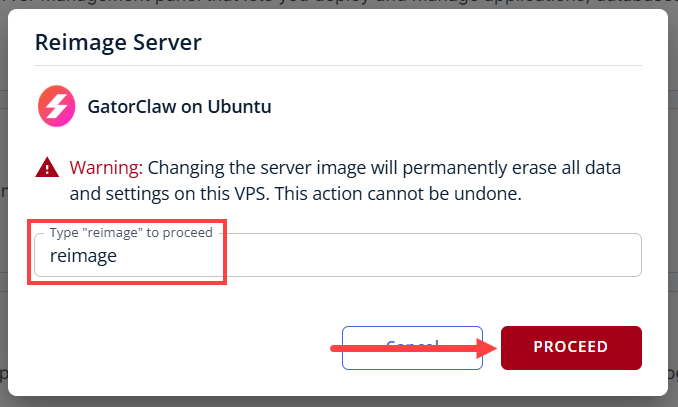
- On the pop-up message, type reimage in the field, then click Proceed.
- Wait a few moments while the installation completes.

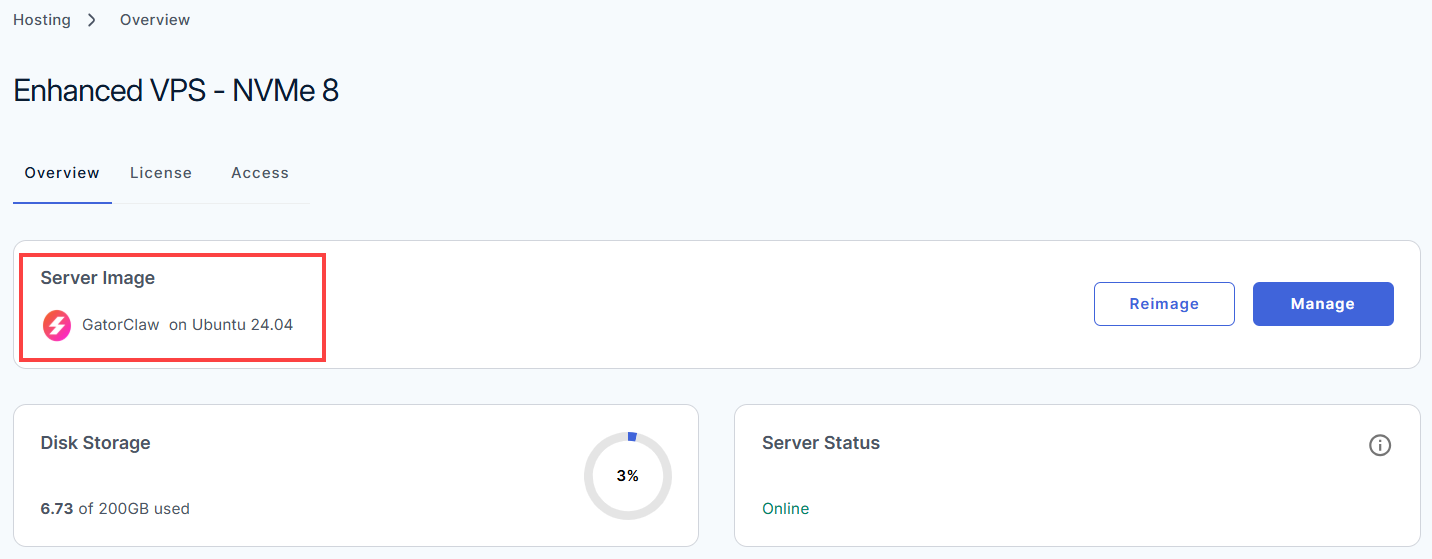
- Once completed, you will see GatorClaw is listed in the Server Image section.
Setting Up and Managing Your GatorClaw Assistant
Welcome to GatorClaw! Follow this step-by-step guide to complete your initial setup and learn how to manage your new AI digital assistant.
Access the Setup Dashboard
To complete the installation, open your preferred web browser and navigate to the initial setup page using your server's IP address:
- Log In via Your Browser:
http://your-server-ip:47716/setupImportant!Make sure you use https:// and include the trailing slash after your panel path.
- Bypass the Browser Security Warning
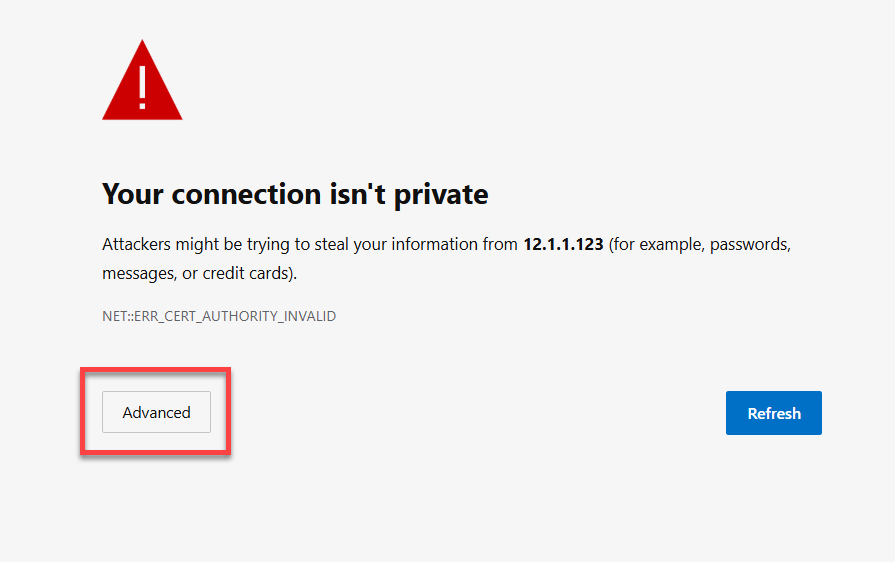
GatorClaw uses a temporary self-signed SSL certificate, your browser will flag it. Click Advanced and then Proceed/Continue to bypass it safely.
- Once the Bypass is done:
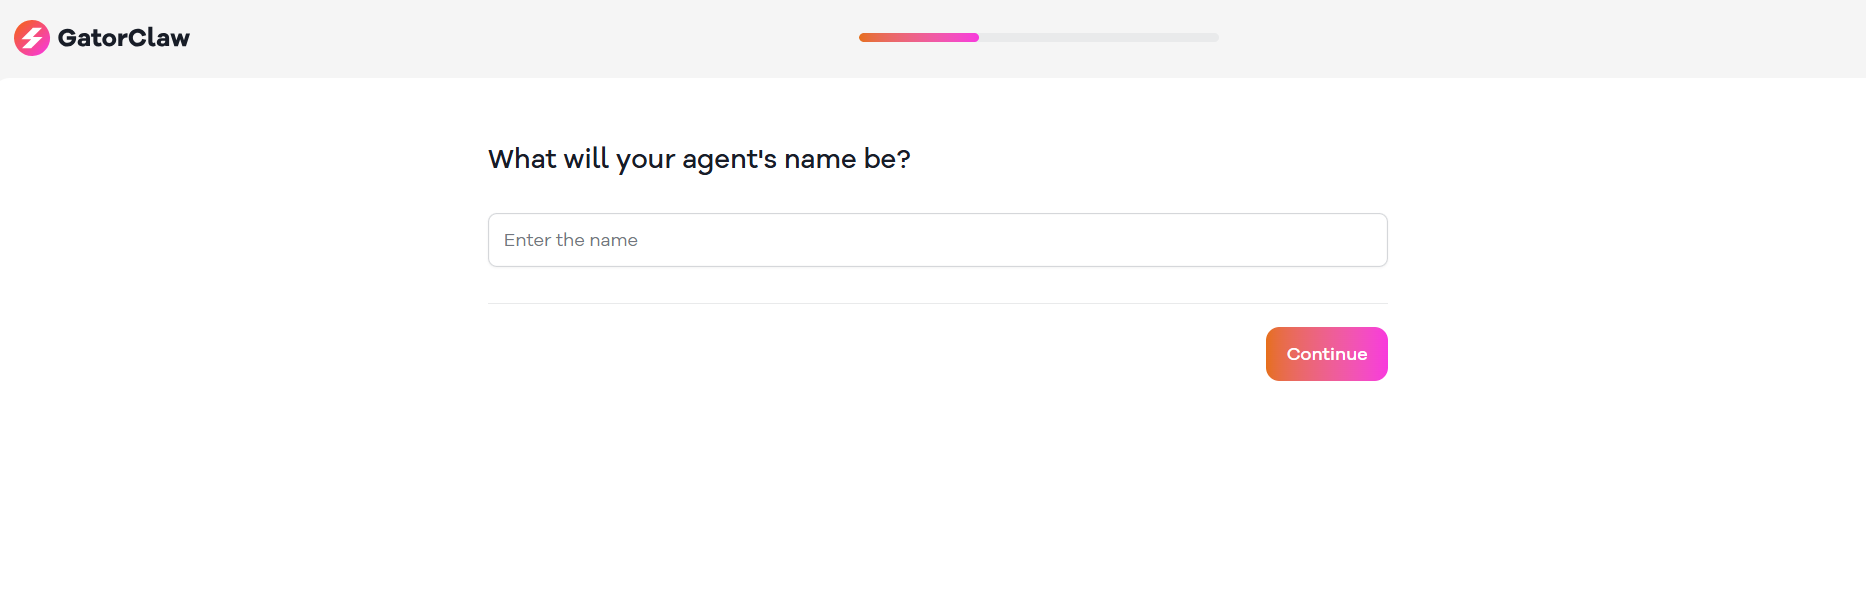
You will be routed to GatorClaw Set up page:
Your server uses a built-in firewall (ufw) to keep your connections secure. By default, GatorClaw communicates safely over port 47716 for the WebUI and port 22 for Secure Shell (SSH) access.
Configure Your Agent
Follow the on-screen prompts in the dashboard setup wizard to:
- Connect your preferred artificial intelligence models.
- Configure your automation workflows.
- Grant permission for the agent to execute tasks directly within your server environment.
Once configured, GatorClaw remains continuously active in the background, ready to assist you.
Verify the Health of the Application
If you want to ensure everything is running perfectly via the command line, SSH into your server (on Port 22) and check the status of GatorClaw.
- Check GatorClaw application status:
gatorclaw health
- Check the process manager status:
GatorClaw uses PM2 to keep its processes continuously active. You can check its running status by executing:
Example Output:pm2 statusroot@server-123456:~# pm2 status ┌────┬────────────────────┬──────────┬──────┬───────────┬──────────┬──────────┐ │ id │ name │ mode │ ↺ │ status │ cpu │ memory │ ├────┼────────────────────┼──────────┼──────┼───────────┼──────────┼──────────┤ │ 0 │ devclaw │ fork │ 0 │ online │ 0% │ 35.1mb │ └────┴────────────────────┴──────────┴──────┴───────────┴──────────┴──────────┘ root@server-123456:~#
Additional Useful Operational Commands
Should you ever need to inspect or manage application data directly, you can find all core files stored securely on your server at:
If you ever need to check on your system, view logs, or restart services, connect to your server via SSH (Port 22) and use the following operational commands:
- Monitor Live Logs:
View real-time logs and troubleshoot issues:
Example Output:pm2 logs devclawroot@server-123456:~# pm2 logs devclaw [TAILING] Tailing last 15 lines for [devclaw] process (change the value with --lines option) /opt/devclaw/logs/error.log last 15 lines: /opt/devclaw/logs/out.log last 15 lines: 0|devclaw | 2026-05-04T19:39:54: │ Open: http://10.0.2.15:47716/setup │ 0|devclaw | 2026-05-04T19:39:54: ╰──────────────────────────────────────────────╯ 0|devclaw | 2026-05-04T19:39:54: 0|devclaw | 2026-05-04T19:39:54: time=2026-05-04T19:39:54.715Z level=INFO msg="web UI starting" component=webui address=:47716 0|devclaw | 2026-06-25T21:21:19: 0|devclaw | 2026-06-25T21:21:19: ╭──────────────────────────────────────────────╮ 0|devclaw | 2026-06-25T21:21:19: │ 🐊 GatorClaw — First Run Setup │ 0|devclaw | 2026-06-25T21:21:19: │ │ 0|devclaw | 2026-06-25T21:21:19: │ No config.yaml found. │ 0|devclaw | 2026-06-25T21:21:19: │ Starting web setup wizard... │ 0|devclaw | 2026-06-25T21:21:19: │ │ 0|devclaw | 2026-06-25T21:21:19: │ Open: http://12.3.456.789:47716/setup │ 0|devclaw | 2026-06-25T21:21:19: ╰──────────────────────────────────────────────╯ 0|devclaw | 2026-06-25T21:21:19: 0|devclaw | 2026-06-25T21:21:19: time=2026-06-25T21:21:19.272Z level=INFO msg="web UI starting" component=webui address=:47716 - Restart the Agent:
Reboot the background application if you make configuration updates:
Example Output:pm2 restart devclawroot@server-123456:~# pm2 restart devclaw Use --update-env to update environment variables [PM2] Applying action restartProcessId on app [devclaw](ids: [ 0 ]) [PM2] [devclaw](0) ✓ ┌────┬────────────────────┬──────────┬──────┬───────────┬──────────┬──────────┐ │ id │ name │ mode │ ↺ │ status │ cpu │ memory │ ├────┼────────────────────┼──────────┼──────┼───────────┼──────────┼──────────┤ │ 0 │ devclaw │ fork │ 1 │ online │ 0% │ 28.1mb │ └────┴────────────────────┴──────────┴──────┴───────────┴──────────┴──────────┘ root@server-123456:~#
Additional Information and Example Documentation Output
You can run cat /root/README.md to see more information and useful commands:
Example Output:
Last login: Thu Jun 25 22:57:54 2026 from 123.45.567.890
root@server-123456:~# cat /root/README.md
# GatorClaw

## Description

GatorClaw is an artificial intelligence agent that acts as a digital
assistant.  With it, it is possible to connect artificial intelligence
models, configure automations, and allow the agent to perform tasks
directly in the server environment.  When installed on a VPS,
GatorClaw remains continuously active and can be accessed through a
dashboard, where you can configure the agent, connect services, and
manage automations.

The image prepares `/opt/gatorclaw`, downloads the current release
bundle and installer, runs the non-interactive installation, validates
that the WebUI setup endpoint is reachable, and exposes the default
GatorClaw port.


## Services

Service         | Ports | Purpose
----------------|-------|---------
GatorClaw WebUI | 47716 | Provides a browser based interface to setup and maintain GatorClaw
OpenSSH         | 22    | SSH

Ports are protected using ufw.


## How-to-use

After the instance boots, access the initial setup page at:

`http://server-ip:47716/setup`

Useful operational commands:

* `gatorclaw health`
* `pm2 status`
* `pm2 logs devclaw`
* `pm2 restart devclaw`

Application files are stored under `/opt/gatorclaw`.


## Links

Repository: [`LATAMD/repos/ansible-app-installer/ubuntu/roles/gatorclaw`](https://stash.newfold.com/projects/LATAMD/repos/ansible-app-installer/browse/ubuntu/roles/gatorclaw)

Manage: [http://{server_ip}:47716](http://{server_ip}:47716)root@server-650882:~#
Summary
GatorClaw represents a practical step forward in making artificial intelligence truly operational. By combining a guided, no‑code experience with the power of autonomous agents, it allows users to move beyond experimentation and into real, always‑on automation. When deployed on a Bluehost Self‑Managed VPS or Virtual Dedicated Server (VDS), GatorClaw benefits from dedicated resources, full server control, and continuous uptime—ensuring agents remain active and responsive within the server environment. Whether you’re connecting AI models, streamlining workflows, or building intelligent assistants that run around the clock, GatorClaw provides a clear, accessible path to running AI agents with confidence on infrastructure you control.