 ChatGPT,
  Claude,
  Gemini,
  Grok — all four for
Purchase a Virtual Dedicated Server with AdminBolt Installation
AdminBolt is a modern web hosting control panel that makes managing your hosting environment simple and straightforward. Through an easy-to-use interface, you can manage websites, databases, email accounts, DNS records, and SSL certificates without relying heavily on the command line. It comes with useful features such as Apache-based hosting, one-click Let's Encrypt SSL installation, support for multiple PHP versions, Roundcube webmail, and built-in spam protection powered by Rspamd. Whether you're hosting a single website or managing multiple projects, AdminBolt provides all the essential tools you need in one place.
This article explains how to purchase a Bluehost Virtual Dedicated Server (VDS) hosting plan with AdminBolt.
Why Choose AdminBolt?
AdminBolt gives you all the tools you need to manage your hosting environment without the expensive licensing fees that come with many traditional control panels. Its simple flat-rate pricing lets you host unlimited accounts and grow your business without worrying about unexpected costs. With a built-in AI assistant, you can manage settings and solve common issues using everyday language, while centralized server management and zero-downtime migrations make administration effortless.
Uses of AdminBolt
We use AdminBolt to simplify web hosting with an easy-to-use platform that supports unlimited websites, automates routine tasks, and makes server management faster and more efficient.
- Web Hosting – Easily manage websites, domains, databases, email accounts, SSL certificates, and other hosting essentials from a secure, user-friendly dashboard.
- AI Server Assistant – Get help instantly with an intelligent assistant that understands plain language, allowing you to update settings, manage security, and troubleshoot common issues with ease.
- Multi-Server Management – Monitor and manage multiple servers from a single dashboard, simplifying administration and improving visibility across your infrastructure.
- Server Automation – Automate routine tasks such as SSL provisioning, backups, and server maintenance to save time and reduce manual effort.
- Seamless Migrations – Move websites, email accounts, and configurations from legacy hosting panels safely and efficiently, with zero downtime..
System Requirements
Before deploying, ensure your server meets the following minimum hardware requirements. For a stable production deployment, we recommend using higher specifications than the minimum requirements.
- Do not purchase a server that only meets the minimum requirements. The minimum specifications represent the software's bare survival threshold and do not account for operating system overhead or production workloads. Running with only 2 vCPUs, 4 GB RAM, and 20 GB disk space can result in severe performance slowdowns, system freezes, or unexpected crashes during traffic spikes.
- Bluehost Self-Managed VPS and VDS lack dedicated GPUs (VRAM) . Running local LLMs entirely on their CPUs will cause extremely slow response times. For optimal performance, host your application on Bluehost but connect it to an external AI cloud provider (like OpenAI or Anthropic) via API.
- For a stable deployment, we recommend using at least 4 vCPUs, 8 GB DDR5 RAM , and 200 GB NVMe disk space. While lower specs might be sufficient for basic installation, consider allocating additional disk space if you plan to store recordings, logs, or other application data.
| Resource | Minimum | Recommended |
|---|---|---|
| vCPUs | 2 vCPUs | 4 vCPUs |
| RAM | 4 GB | 8 GB DDR5 |
| Disk | 20 GB | 200 GB NVMe |
How to Purchase a Virtual Dedicated Server with AdminBolt Installation
To run and manage AdminBolt efficiently, you can start by purchasing VDS hosting from Bluehost.
- In your browser, go to https://www.bluehost.com.
- Click Hosting in the top menu, then select Virtual Dedicated Server.

You can also go to this link directly: https://www.bluehost.com/vds-hosting.
- On the Virtual Dedicated Server Hosting page, click Explore Plans. You can also scroll down to the hosting plans section.

- Choose a plan from either tab — Standard or High Performance — by clicking Choose Plan.
 Pricing is subject to change. Please visit https://www.bluehost.com/vds-hosting for the current introductory/sign-up offer for the Bluehost Virtual Dedicated Server hosting. For the most up-to-date renewal pricing, visit your Bluehost Portal's Renewal Center.
 - On the next page, configure your VDS hosting to meet your requirements. The configuration options are divided into the following sections:
- Location: Select your data center in this section.

- Hardware: This section shows your pre-selected plan. You can also switch to another Virtual Dedicated Server plan in this section

- Software:
If the selected plan does not meet the app's minimum requirements, the app will be grayed out.
- Under the Application tab, click on AdminBolt.
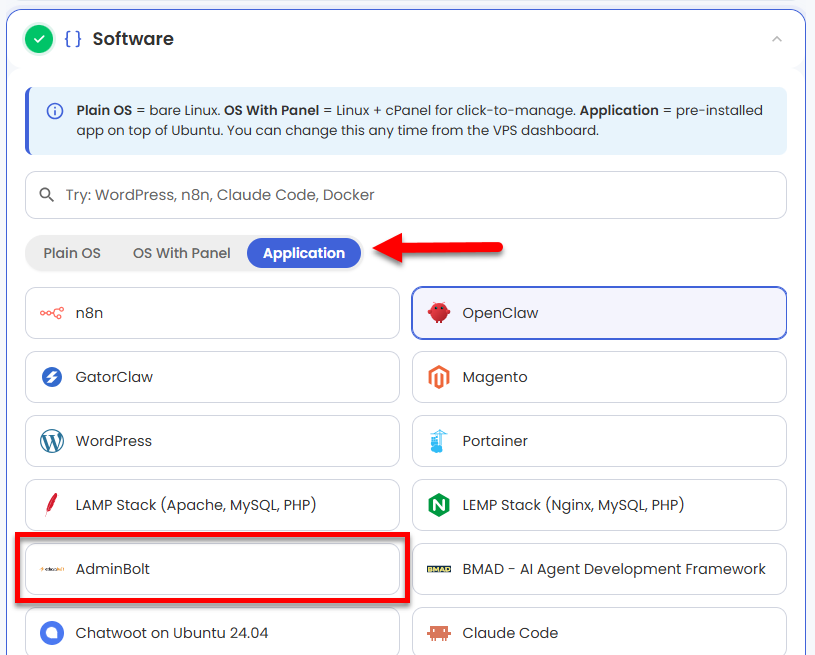 You can install only one application per purchase; the system will automatically select the best operating system for it.
 - In the pop-up, click Confirm.
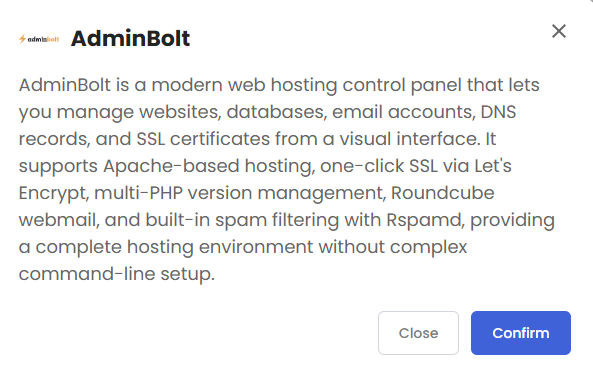
- Under the Application tab, click on AdminBolt.
- Support & Security: You can add Premium Support - Recurring, which provides priority access to expert assistance and faster response times.

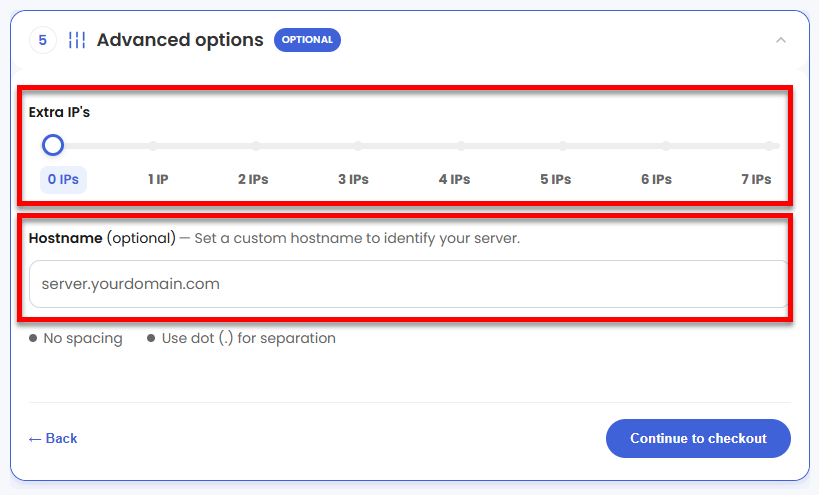
- Advanced Options:
- Extra IPs: You can add IP addresses for an additional fee. Pricing changes based on how many IPs you add.
- Hostname: Assign a custom hostname to identify your server. This is optional.
- Location: Select your data center in this section.
- Select your billing term and review your selected items on the right pane, along with the summarized total cost.
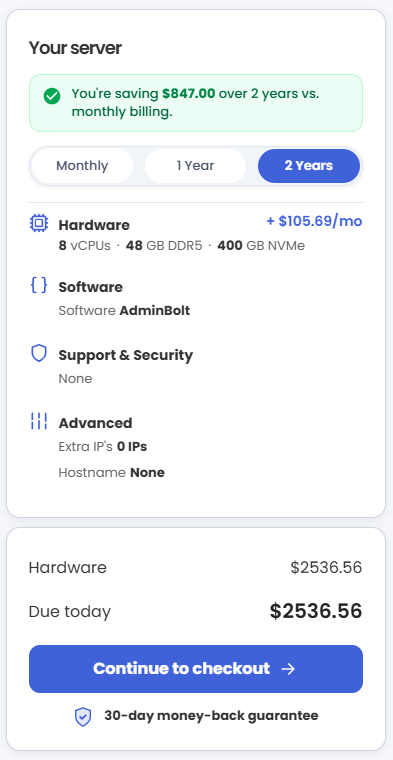
- Click Continue to checkout.
- Do the following on the Checkout page:
If you're new to Bluehost:- Create your Bluehost account by using your email address or by connecting with your Google, Apple, or GitHub account — whichever you prefer!

- Select your preferred payment method: credit card, Google Pay, or PayPal. Enter your billing information.

If you have an account with us, you will see your Bluehost login details when you are logged into your Bluehost Portal. If you are not logged in, please click the Log In link.

- Create your Bluehost account by using your email address or by connecting with your Google, Apple, or GitHub account — whichever you prefer!
- In the Shopping Cart, choose your billing term if you did not choose one on the previous page.
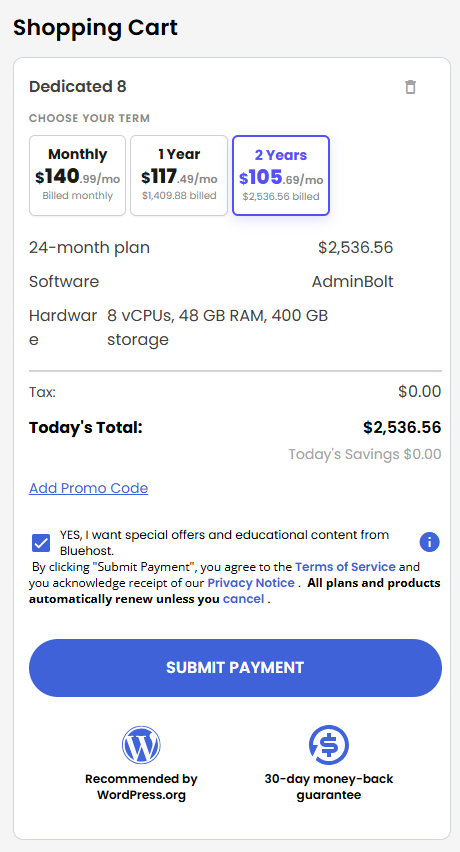
- Add a Promo code if you have one and then click Submit Payment to complete your purchase.
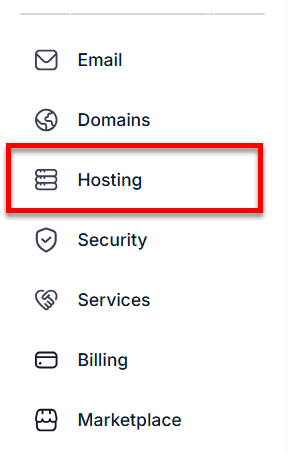
After completing the purchase, your VDS hosting will begin provisioning. You can access and manage your new VDS hosting in the Hosting tab of your Bluehost Portal.
Guide to the AdminBolt Web Hosting Control Panel
Follow this step-by-step guide to access your AdminBolt panel and set your account for the first time.
Step 1: Access your AdminBolt Dashboard
After installation completes:
- Log in to your Bluehost Portal.
- Click the Hosting tab in the left-hand menu.
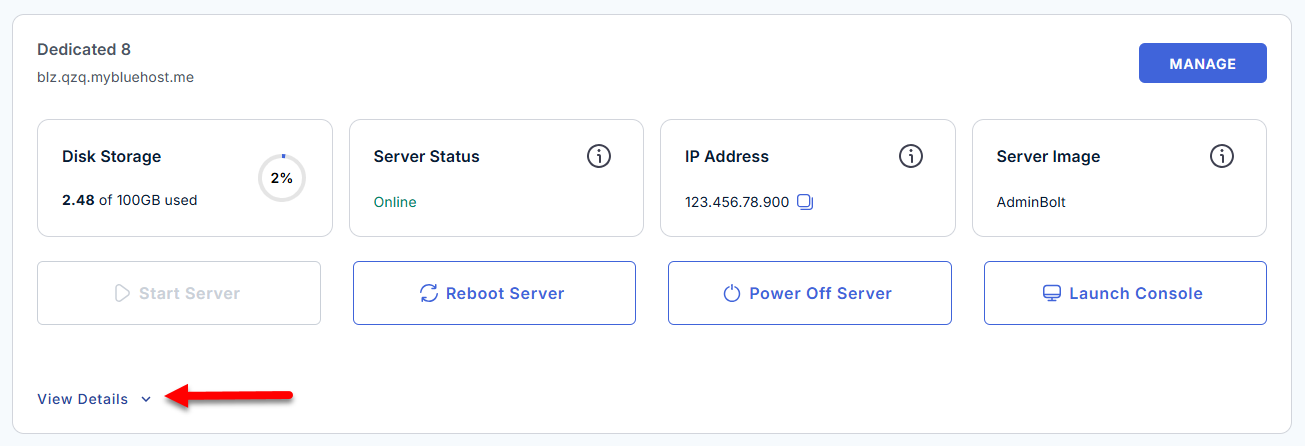
- Click the View Details link under the VDS hosting plan to see more options.
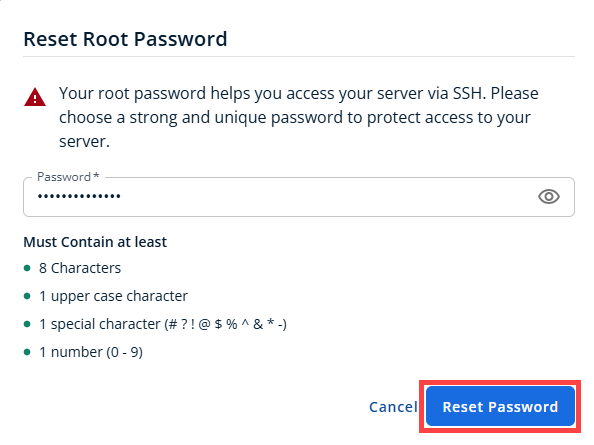
- Click the Reset Password.
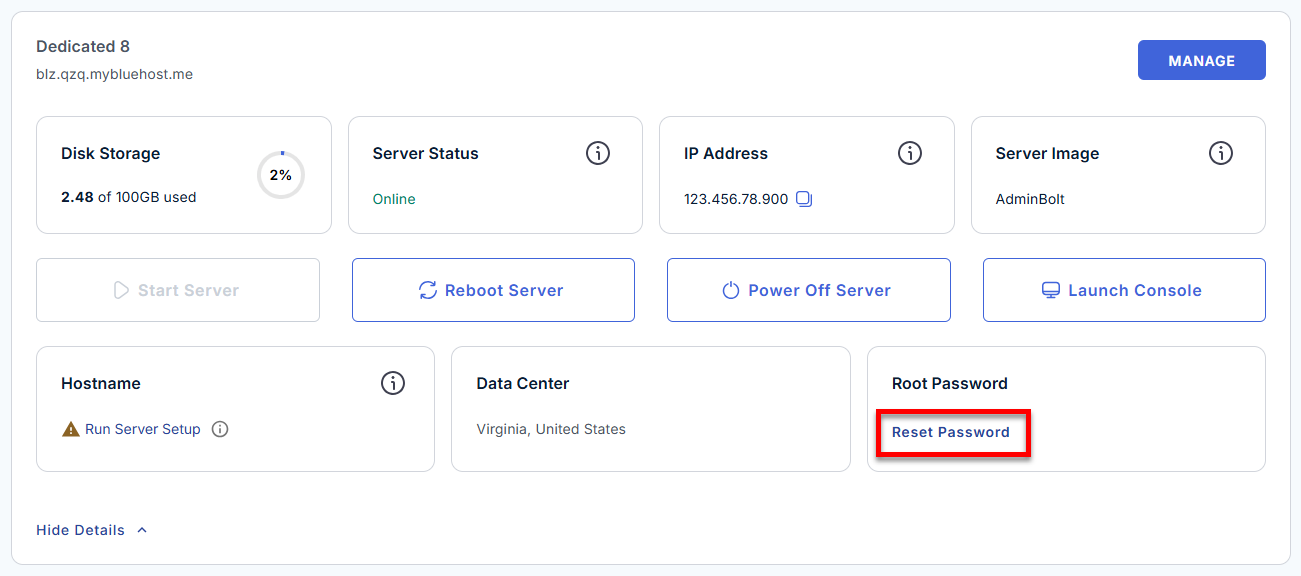
- In the pop-up window, type your new root password, then click Reset Password again to confirm and save the changes.
- Connect to your VPS via SSH.
Use your VPS IP and credentials with an SSH client, follow the prompts, and enter your root password when asked:ssh root@your_server_ipReplaceyour_server_ipwith your actual server IP address.Example Output:
******************************************************************************** AdminBolt Hosting Control Panel The firewalld firewall is enabled. All ports are BLOCKED except: 22 (SSH), 80 (HTTP), 443 (HTTPS), 8443 (AdminBolt Panel) 25/465/587 (Mail), 110/143/993/995 (IMAP/POP3), 53 (DNS), 21 (FTP Control), 20 (FTP data), 49152-65535 (FTP Passive) Panel access: https://your-server-ip.myboltip.com:8443 (AdminBolt Admin Panel) https://your-server-ip.myboltip.com:8443/client (Client Panel) https://your-server-ip.myboltip.com:8443/webmail (Roundcube Webmail) https://your-server-ip.myboltip.com:8443/phpmyadmin (phpMyAdmin) First-time setup: Username : admin The SSO login link expires after 5 minutes. Generate a fresh one: bolt-cli admin-sso-generate Common commands: systemctl status bolt-agent # check panel status systemctl status httpd # check Apache systemctl status mariadb # check MariaDB systemctl status postfix dovecot # check mail services journalctl -u bolt-agent -f # live panel logs bolt-cli admin-sso-generate # generate new login link Key directories: Panel logs : /var/log/adminbolt/ Apache logs : /var/log/httpd/ Mail logs : /var/log/maillog Web root : /home/<user>/public_html/ For details please refer to /root/README.md ******************************************************************************** To delete this message of the day: rm -rf $(readlink -f ${0}) Welcome to AdminBolt! If you want to access the AdminBolt control panel, you can run the following command: bolt-cli admin-sso-generate - If you ever need to quickly review the system's deployment notes directly inside your server terminal, you can print out the original README file by running:
cat /root/README.md
Step 2: Retrieve Your Admin Login Link
To log in for the first time, you need to grab your unique Single Sign-On (SSO) login URL from your server.
Run the following command to view your initial admin credentials and login link:
Example Output:
- Admin Panel URL:
https://your-server-ip.myboltip.com:8443— This is the main dashboard login page. - SSO Login Link:
https://your-server-ip.myboltip.com:8443/admin/sso-login/...— You can copy and paste this entire long URL directly into your browser to log in automatically without needing to type a username or password.
[root@your-server-ip ~]# cat /root/.app_passwords
AdminBolt Admin Panel
=====================
Panel URL : https://your-server-ip.myboltip.com:8443
SSO Login : https://your-server-ip.myboltip.com:8443/admin/sso-login/hwrjakN9jwG4iTnbiHSZ8UMqwCbp22muExQJTnMCykkY2OLzxUemi0Sf3p7h

To generate a new login link at any time:
  bolt-cli admin-sso-generate
Note: The SSO login link expires after 5 minutes. If that file is ever missing or empty, you can generate a fresh login link by running:
Step 3: Access the Panel in Your Browser
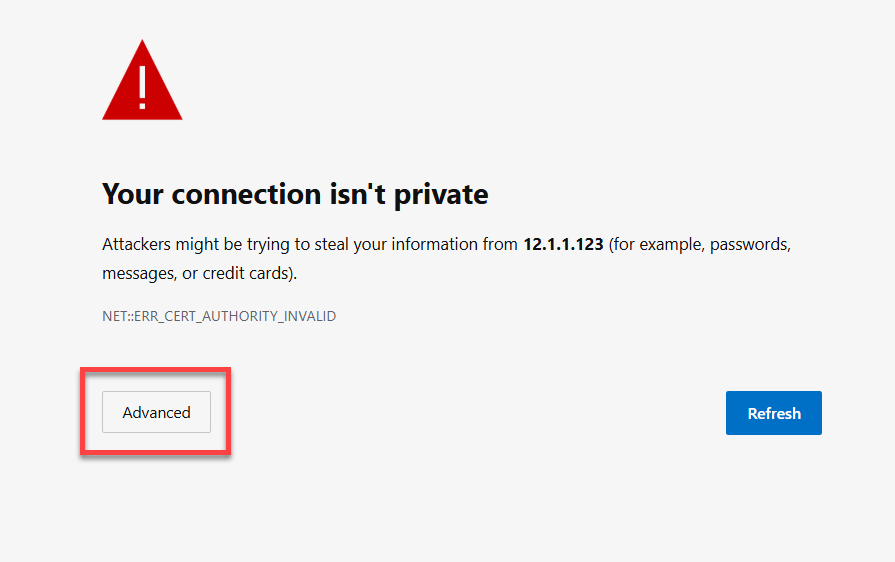
Because your fresh AdminBolt panel uses a temporary, self-signed certificate, your browser will flag it during your first visit.
- From the output of the command above, look for the SSO Login URL. It will look something like this:
https://your-server-ip:8443/admin/sso-login/{unique_token} - Copy that entire URL and paste it into your web browser.
- Bypass the SSL Warning: Because the panel is freshly installed, it uses a temporary, self-signed SSL certificate. Your browser will show a warning ("Your connection is not private"). Click Advanced, and then click Proceed to [your IP] (unsafe).
- Your AdminBolt dashboard will open.
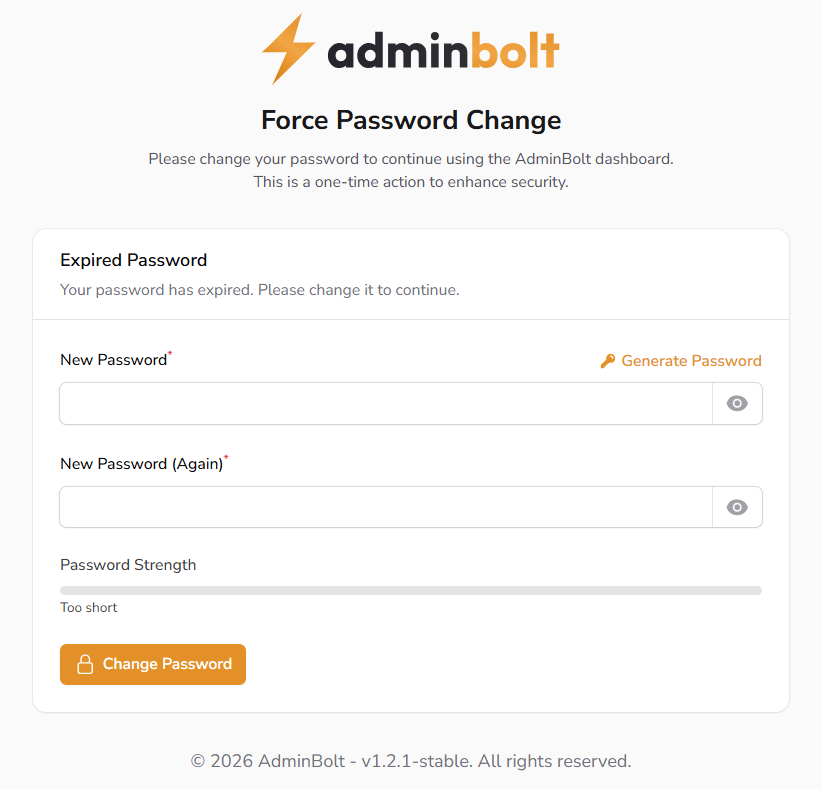
If prompted with the Force Password Change screen, choose a strong password (or click Generate Password), confirm it, and click Change Password.
If you are not prompted with the Force Password Change screen, proceed directly to step 4 to set your permanent password.
Step 4: Set Your Permanent Password
- Run the Admin Creation Command
Execute the following command to update or overwrite your admin account password:
bolt-cli create-admin-account - Follow the On-Screen Prompts
Enter your administrator username, email address, and your new secure password when prompted by the terminal. The system will activate your new password immediately.
Example Output:
Creating admin account...
 Enter name:
 > JC
 Enter username:
 > JC
 Enter password:
 >
Admin account created successfully
Step 5: Access Your Panel in the Future
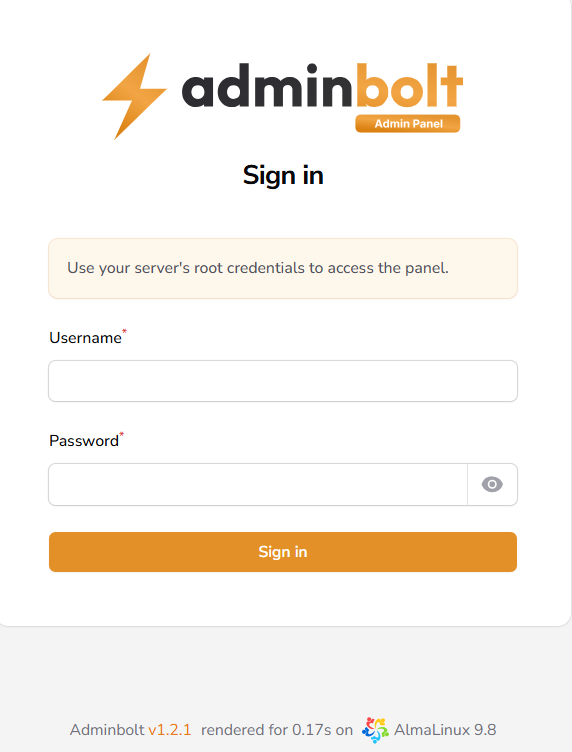
Now that you have configured your permanent password, you no longer need to use SSH to generate login links. You can access your panel directly at any time:
Navigate to your panel URL:
https://your-server-ip:8443
Enter your standard credentials:
- Username: The username you created in Step 4.
- Password: The permanent password you created in Step 4.
Verify Server Health (Optional but Recommended)
Before you start hosting websites, it's a good practice to ensure all backend engines are running smoothly. You can check them directly from your command line:
-
Check the Admin panel backend:
systemctl status bolt-agent -
Check the Web Server (Apache):
systemctl status httpd -
Check the Database Server:
systemctl status mariadbpd
From this point forward, you can handle tasks like adding domains, installing Let's Encrypt SSL certificates, creating databases, and setting up email routing completely from the visual AdminBolt web interface.
Managing Your Server
You can manage your complete hosting ecosystem directly from the interface. Use the sidebar menu to:
- Manage Websites & Files: Create hosting accounts, configure multi-PHP versions, and upload files via the built-in file manager.
- Secure Your Sites: Issue one-click SSL certificates via Let's Encrypt or ZeroSSL.
- Handle Email: Create email mailboxes, access Roundcube webmail, and rely on built-in Rspamd spam filtering.
- Control Databases & DNS: Add MariaDB databases (managed via phpMyAdmin or Adminer) and configure DNS records via PowerDNS.
Supporting Information and Sample Output
You can run cat /root/README.md to see more information and useful commands:
[root@123456 ~]# cat /root/README.md
# AdminBolt

## Description

AdminBolt is a modern web hosting control panel that lets you manage websites, databases, email accounts, DNS records, and SSL certificates from a visual interface. It supports Apache-based hosting, one-click SSL via Let's Encrypt, multi-PHP version management, Roundcube webmail, and built-in spam filtering with Rspamd, providing a complete hosting environment without complex command-line setup.

## Services

| Service    | Description                                                                | Managed By |
| ---------- | -------------------------------------------------------------------------- | ---------- |
| bolt-agent | AdminBolt core backend engine (port 3030)                                  | systemd    |
| bolt-nginx | AdminBolt panel web server (port 8443)                                     | systemd    |
| bolt-php   | AdminBolt PHP engine                                                       | systemd    |
| httpd      | Apache web server for hosted websites (ports 80, 443)                      | systemd    |
| mariadb    | Database server                                                            | systemd    |
| postfix    | Outgoing mail server (ports 25, 465, 587)                                  | systemd    |
| dovecot    | Incoming mail server (ports 110, 143, 993, 995)                            | systemd    |
| pdns       | PowerDNS authoritative DNS server (port 53)                                | systemd    |
| rspamd     | Spam filtering service                                                     | systemd    |
| vsftpd     | FTP server (port 21)                                                       | systemd    |
| fail2ban   | Brute-force protection                                                     | systemd    |
| firewalld  | Firewall (allows 22, 80, 443, 8443, 21, 20, 49152-65535, 25, 465, 587, 53) | systemd    |

## Stack

| Component   | Details                             |
| ----------- | ----------------------------------- |
| Web server  | Apache (httpd)                      |
| Database    | MariaDB                             |
| Mail        | Postfix + Dovecot                   |
| Spam filter | Rspamd                              |
| Webmail     | Roundcube                           |
| DNS         | PowerDNS                            |
| FTP         | vsftpd                              |
| SSL         | Let's Encrypt + ZeroSSL via acme.sh |
| Firewall    | firewalld                           |
| Panel       | AdminBolt (port 8443)               |

## Accessing AdminBolt

Retrieve your admin login link:

```bash
cat /root/.app_passwords
```

Copy the SSO Login URL and open it in your browser:

```
https://{server_ip}:8443/admin/sso-login/{token}
```

Your browser may show a certificate warning during first access because the panel initially uses a self-signed certificate. Click **Advanced** and continue to proceed.

After opening the SSO link:

1. Open your profile (top right)
2. Set a permanent password

After that, log in any time using:

```
https://{server_ip}:8443
```

Username:

```
admin
```

Password:

```
The password you set above
```

## Manage

From the admin panel you can:

- Create and manage hosting accounts and reseller accounts
- Add domains and configure DNS records
- Issue SSL certificates via Let's Encrypt
- Create and manage email accounts
- Manage databases via phpMyAdmin or Adminer
- Access webmail via Roundcube
- Monitor server metrics and services
- Manage files via the built-in file manager
- Configure PHP versions per hosting account
- Set up FTP accounts

## Useful Commands

```bash
# View admin credentials and login link
cat /root/.app_passwords

# Generate a new admin login link
bolt-cli admin-sso-generate

# Check panel status
systemctl status bolt-agent

# Check Apache
systemctl status httpd

# Check MariaDB
systemctl status mariadb

# Check mail services
systemctl status postfix dovecot

# Check DNS
systemctl status pdns

# Live panel logs
journalctl -u bolt-agent -f

# First boot log
journalctl -t adminbolt-firstboot -n 100 --no-pager
```

## Ports

| Port        | Service                          |
| ----------- | -------------------------------- |
| 22          | SSH                              |
| 80          | HTTP (Apache - hosted websites)  |
| 443         | HTTPS (Apache - hosted websites) |
| 8443        | AdminBolt panel (bolt-nginx)     |
| 21          | FTP (vsftpd)                     |
| 20          | FTP Active Data (vsftpd)         |
| 49152-65535 | FTP Passive Data (vsftpd)        |
| 25          | SMTP (Postfix)                   |
| 465         | SMTPS (Postfix)                  |
| 587         | SMTP Submission (Postfix)        |
| 110         | POP3 (Dovecot)                   |
| 143         | IMAP (Dovecot)                   |
| 993         | IMAPS (Dovecot)                  |
| 995         | POP3S (Dovecot)                  |
| 53          | DNS TCP/UDP (PowerDNS)           |

## Minimum Resources

| Resource | Minimum |
| -------- | ------- |
| vCPUs    | 2       |
| RAM      | 4 GB    |
| Disk     | 20 GB   |

## Links

- Manage: [https://{server_ip}:8443](https://{server_ip}:8443)
- AdminBolt documentation: [https://docs.adminbolt.com](https://docs.adminbolt.com)
Summary
Learn how to purchase a Bluehost Virtual Dedicated Server (VDS) with AdminBolt, a powerful yet easy-to-use hosting control panel. This guide walks you through the setup process, accessing your AdminBolt dashboard, and managing websites, email accounts, databases, DNS records, and SSL certificates from a single, streamlined interface.