 ChatGPT,
  Claude,
  Gemini,
  Grok — all four for
Purchase a Virtual Dedicated Server with Easypanel Installation
Easypanel is a modern server management platform designed to simplify the deployment, management, and monitoring of applications on your server. Through its intuitive web-based dashboard, you can easily manage websites, databases, domains, SSL certificates, and applications without requiring advanced server administration skills.
This article explains how to purchase a Bluehost Virtual Dedicated Server (VDS) hosting plan with Easypanel installed.
Why Choose Easypanel?
Managing websites and applications on a server can be complex, especially without command-line experience. Easypanel simplifies server management with a centralized dashboard, making it easy to deploy applications, manage resources, and scale projects on your Bluehost VDS hosting.
Uses of Easypanel
Easypanel supports a wide range of hosting and application management tasks, including:
- Website Hosting – Manage one or multiple websites from a single dashboard.
- Application Deployment – Launch web applications quickly with minimal setup.
- Database Management – Create and manage databases for your applications and websites.
- Development and Testing Environments – Set up development, staging, and testing environments with ease.
- Container Management - Deploy and manage containerized applications through a simple interface.
- Domain and SSL Management - Connect domains and secure sites with SSL certificates.
- Server Monitoring - Track server performance and resource usage from one centralized location.
How to Purchase a Virtual Dedicated Server with Easypanel Installation
- In your browser, go to https://www.bluehost.com.
- Click Hosting in the top menu, then select Virtual Dedicated Server.

You can also go to this link directly: https://www.bluehost.com/vds-hosting.
- On the Virtual Dedicated Server Hosting page, click Explore Plans. You can also scroll down to the hosting plans section.

- Choose a plan from either tab — Standard or High Performance — by clicking Choose Plan.
 Pricing is subject to change. Please visit https://www.bluehost.com/vds-hosting for the current introductory/sign-up offer for the Bluehost Virtual Dedicated Server hosting. For the most up-to-date renewal pricing, visit your Bluehost Portal's Renewal Center.
 - On the next page, configure your VDS hosting to meet your requirements. The configuration options are divided into the following sections:
- Location: Select your data center in this section.

- Hardware: This section shows your pre-selected plan. You can also switch to another Virtual Dedicated Server plan in this section.

- Software:
If the selected plan does not meet the app's minimum requirements, the app will be grayed out.
- Click the OS With Panel tab, then select Easypanel.
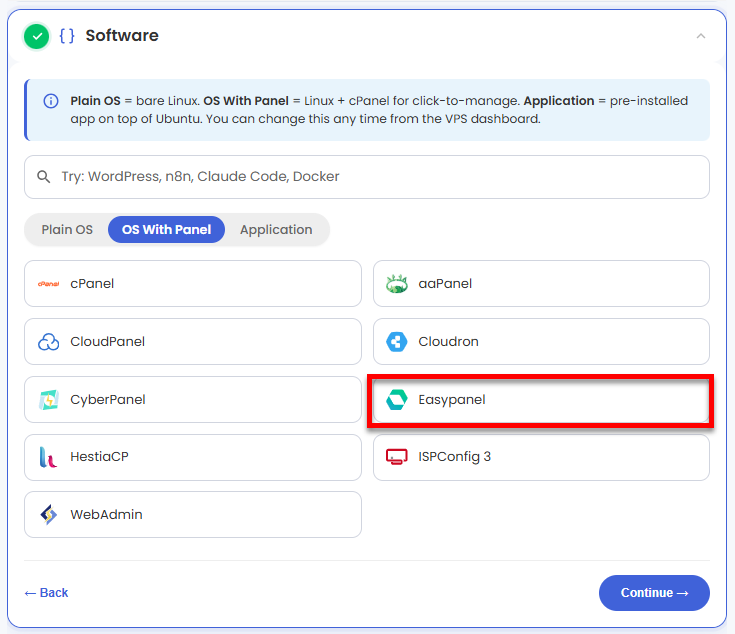 You can install only one application per purchase; the system will automatically select the best operating system for it.
 - In the pop-up, click Confirm.
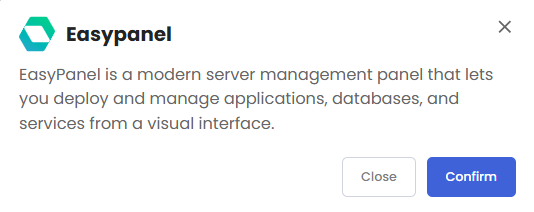
- Click the OS With Panel tab, then select Easypanel.
- Location: Select your data center in this section.
- Support & Security: You can add Premium Support - Recurring, which provides priority access to expert assistance and faster response times.

- AI Credits: Select a credit pack to access multiple AI models with one API key and consolidated billing.
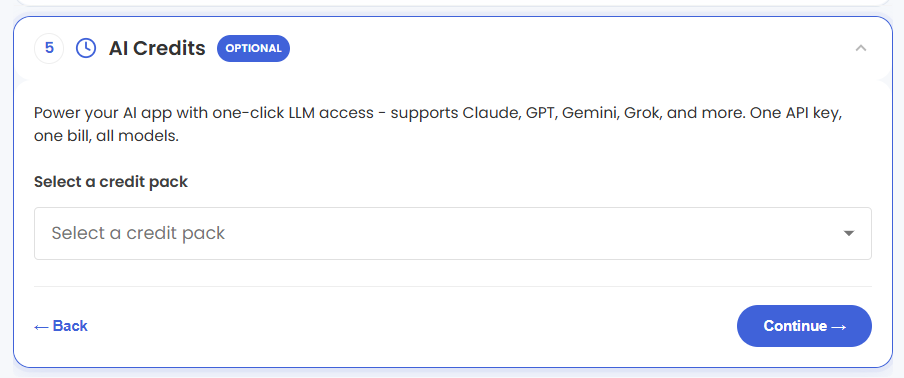
- Advanced Options:
- Extra IPs: You can add IP addresses for an additional fee. Pricing changes based on how many IPs you add.
- Hostname (Optional): Assign a custom hostname to identify your server.
- SSH Key (Optional): Add an SSH public key to enable secure, passwordless access after provisioning.
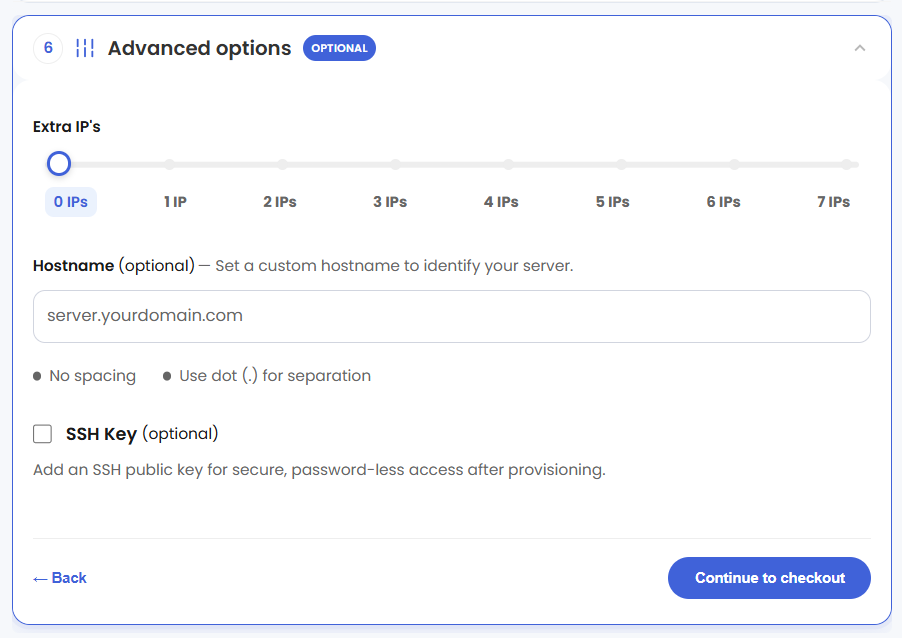
Pricing for optional add-ons is subject to change. Please visit bluehost.com/vds-hosting for current add-on pricing. - Select your billing term and review your selected items on the right pane, along with the summarized total cost.
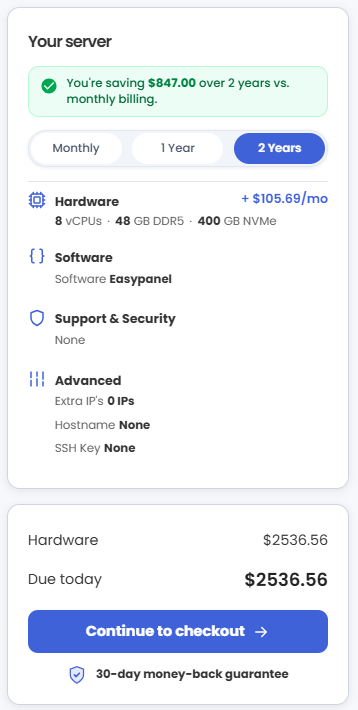
*Please review the current pricing plans available on Bluehost.com.
- Click Continue to checkout.
- Do the following on the Checkout page:
If you're new to Bluehost:- Create your Bluehost account by using your email address or by connecting with your Google, Apple, or GitHub account — whichever you prefer!

- Select your preferred payment method: credit card, Google Pay, or PayPal. Enter your billing information.

If you already have a Bluehost account, click Log In. If you're already signed in to your Bluehost Portal, your account details will be filled in automatically.

- Create your Bluehost account by using your email address or by connecting with your Google, Apple, or GitHub account — whichever you prefer!
- In the Shopping Cart, choose your billing term if you did not choose one on the previous page.
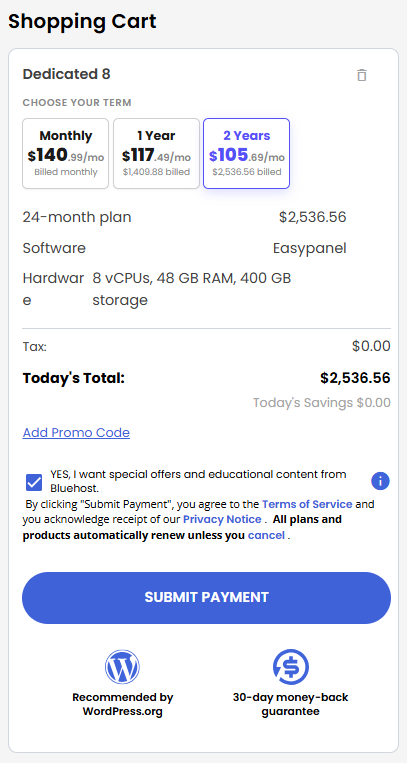
- Add a Promo code if you have one and then click Submit Payment to complete your purchase.
After completing the purchase, your VDS hosting will begin provisioning. You can access and manage your new VDS hosting in the Hosting tab of your Bluehost Portal.
First-Time Setup and Access to the Easypanel Dashboard
Follow these steps to access your Easypanel dashboard.
Step 1: Check the Docker Service Status
Run the following command:
root@1234:~# systemctl status docker
● docker.service - Docker Application Container Engine
     Loaded: loaded (/usr/lib/systemd/system/docker.service; enabled; preset: enab>
     Active: active (running) since Tue 2026-09-15 13:49:34 UTC; 30min ago
TriggeredBy: ● docker.socket
       Docs: https://docs.docker.com
   Main PID: 9358 (dockerd)
      Tasks: 11
     Memory: 30.9M (peak: 32.5M)
        CPU: 689ms
     CGroup: /system.slice/docker.service
             └─9358 /usr/bin/dockerd -H fd:// --containrd=/run/containerd/contain>

Sep 15 13:49:34 1234-example.com dockerd[PID]:time="2026-09-15T13:49:34.9>
Sep 15 13:49:34 1234-example.com dockerd[PID]: time="2026-09-15T13:49:34.9>
Sep 15 13:49:34 1234-example.com dockerd[PID]: time="2026-09-15T13:49:34.9>
Sep 15 13:49:34 1234-example.com dockerd[PID]: time="2026-09-15T13:49:34.9>
Sep 15 13:49:34 1234-example.com dockerd[PID]: Started docker.service - Docke>
Sep 15 14:16:45 1234-example.com dockerd[PID]: time="2026-09-15T14:16:45.8>
Sep 15 14:17:29 1234-example.com dockerd[PID]: time="2026-09-15T14:17:29.0>
Sep 15 14:17:48 1234-example.com dockerd[PID]: time="2026-09-15T14:17:48.5>
Sep 15 14:18:15 1234-example.com dockerd[PID]: time="2026-09-15T14:18:15.7>
Sep 15 14:18:26 1234-example.com dockerd[PID]: time="2026-09-15T14:18:26.1>
lines 1-22/22 (END)
Step 2: Log Into Your Easypanel Dashboard
After the configuration completes:
- Log In via Your Browser
https://dashboard.server-ip.sslip.io- Replace
server-ipwith your actual server IP address. - Make sure the URL starts with
https://and includes a trailing slash after your panel path once you have your full dashboard URL.
Fallback Option: If the secure link ever encounters a temporary DNS delay, you can access the dashboard directly via HTTP at:http://server-ip:3000- Replace
server-ipwith your actual server IP address.
If the SSL certificate fails to generate, or if the sslip.io service is temporarily down, this ensures you aren't locked out of your server.
- Replace
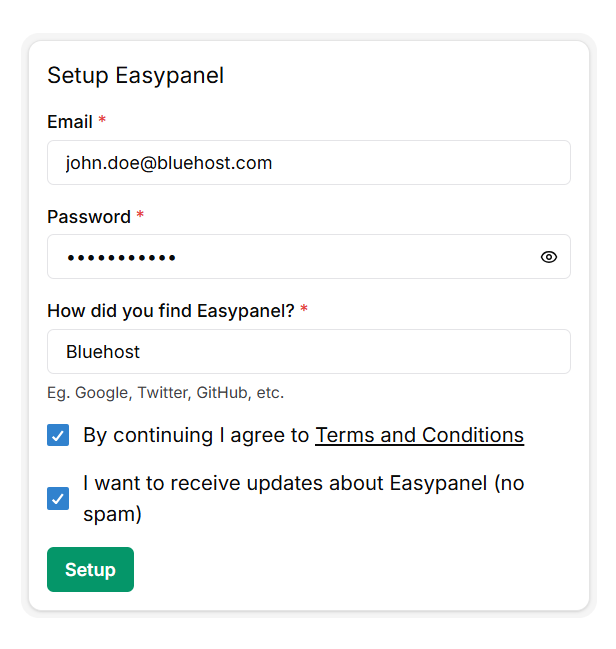
- Create Your Admin Account
Open the URL above in your browser to create your administrator account.
- On the first screen, enter your Email Address.
- Create a strong, secure Password.
- Fill out the "How did you find Easypanel?" section.
- Click Setup to finalize.
-
Once done, you will be routed to the Easypanel Dashboard:
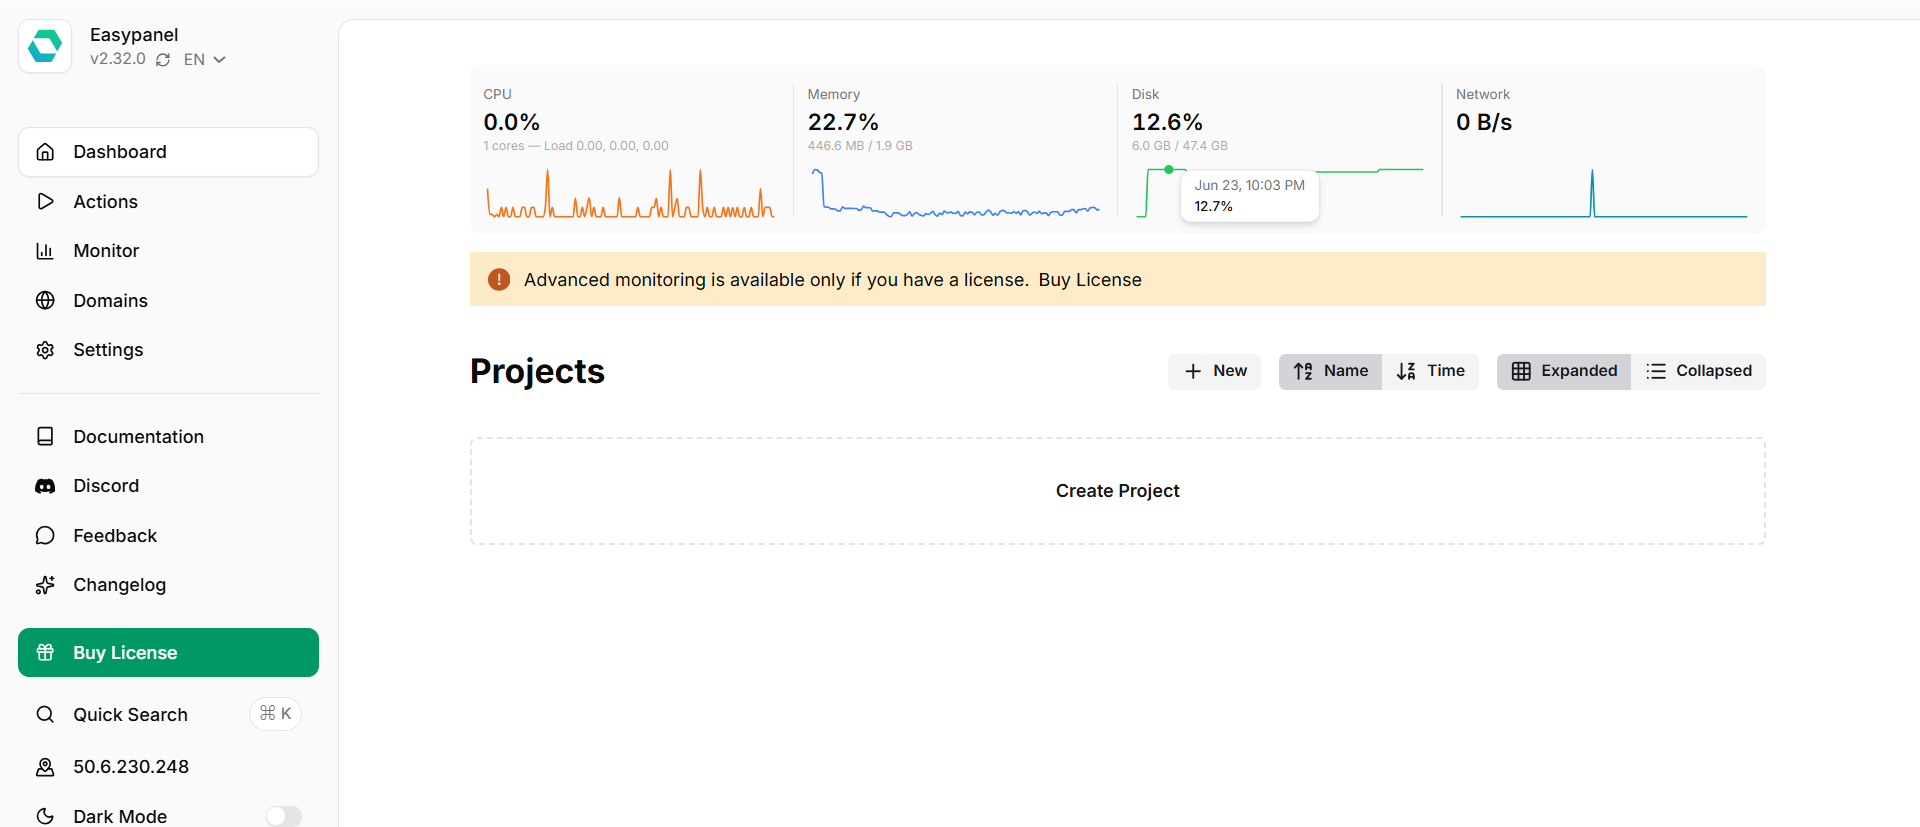
You can now manage databases, deploy applications, and configure domains directly through Easypanel's web interface, no command-line access required.
Supporting Information and Sample Output
You can run cat /root/README.md to see more information and useful commands:
Example Output:
root@server-123456:~# cat /root/README.md
# Easypanel

## Description

EasyPanel is a modern server management panel that lets you deploy and manage applications, databases, and services from a visual interface.

It supports Docker-based deployments, one-click app installs, custom domain management, and SSL automation, providing a streamlined way to run and monitor your server workloads without complex command-line setup.


## Services

| Service      | Description                                                        | Managed By |
| ------------ | ------------------------------------------------------------------ | ---------- |
| easypanel    | Web interface for managing applications (port 3000)                | docker     |
| traefik      | Reverse proxy and SSL termination for all traffic (ports 80, 443)  | docker     |
| docker       | Container runtime                                                  | systemd    |
| docker-swarm | Container orchestration                                            | docker     |
| ufw          | Firewall (allows 22, 80, 443, 3000)                                | systemd    |

## Stack

| Component         | Details                                    |
| ----------------- | ------------------------------------------ |
| Container runtime | Docker Engine                              |
| Orchestration     | Docker Swarm                               |
| Reverse proxy     | Traefik (ports 80, 443)                    |
| Firewall          | UFW (SSH 22, HTTP 80, HTTPS 443, direct 3000) |
| Panel             | EasyPanel (port 3000)                      |

## First Boot

On first boot, the image automatically:

1. Ensures Docker service is running
2. Confirms Docker Swarm is initialized
3. Verifies Easypanel service is active
4. Waits until Easypanel becomes available on port 3000
5. Detects the public IP and writes a Traefik dynamic config to `/etc/easypanel/traefik/config/custom.yaml`, routing `dashboard..sslip.io` -> `localhost:3000`
6. Traefik picks up the route immediately and obtains a Let's Encrypt certificate automatically via HTTP-01 on port 80

No default admin credentials are created during this process.

## Accessing EasyPanel

After first boot, access the dashboard at:

```
https://dashboard..sslip.io
```

For example, if your server IP is `1.2.3.4`:

```
https://dashboard.1.2.3.4.sslip.io
```

The Let's Encrypt certificate is obtained automatically by Traefik - no manual SSL setup required.

For direct fallback access (no SSL):

```
http://:3000
```

On first access:

- Enter your email address
- Set a password
- Complete the setup

This creates your admin account.

## Manage

From the panel you can:

- Deploy applications and databases
- Configure custom domains
- Monitor running services
- Manage SSL certificates (auto-provisioned via Traefik)

## Notes

- Traefik owns ports 80 and 443 for both the EasyPanel dashboard and all user-deployed applications
- The dashboard is served at `https://dashboard..sslip.io` - [sslip.io](https://sslip.io) is a wildcard DNS service that resolves `anything..sslip.io` to ``, enabling Let's Encrypt certificates without a registered domain
- Port 3000 provides direct HTTP access to EasyPanel (no SSL) - useful for private networks or debugging
- On private/local IPs, the sslip.io route is skipped and only direct port 3000 access is available

## Useful Commands

```
docker service ls
docker service logs easypanel --tail 50
systemctl status docker
ss -tulnp | grep -E '80|443|3000'
journalctl -t easypanel-firstboot -n 100 --no-pager
cat /etc/easypanel/dashboard-url
cat /etc/easypanel/traefik/config/custom.yaml
```

## Ports

| Port | Service                              |
| ---- | ------------------------------------ |
| 22   | SSH                                  |
| 80   | HTTP (Traefik - ACME challenge + redirect) |
| 443  | HTTPS (Traefik - dashboard + user apps)    |
| 3000 | EasyPanel UI (direct, no SSL)        |

## Links

- Documentation: [https://easypanel.io/docs](https://easypanel.io/docs)
- Docker documentation: [https://docs.docker.com](https://docs.docker.com)
- Traefik documentation: [https://doc.traefik.io/traefik/](https://doc.traefik.io/traefik/)
- sslip.io: [https://sslip.io](https://sslip.io)
Summary
Learn how to purchase a Bluehost Virtual Dedicated Server (VDS) with Easypanel installed, covering plan selection, server configuration, and checkout. It also outlines the automated setup process and provides steps to access and configure the Easypanel dashboard for managing websites, applications, databases, domains, and SSL certificates through a simple web interface.