 ChatGPT,
  Claude,
  Gemini,
  Grok — all four for
Purchase a Virtual Dedicated Server with ISPConfig 3 Installation
ISPConfig 3 is a web-based control panel that simplifies managing your Linux web hosting. It lets you create websites, set up email accounts, manage databases, and configure DNS records without complex command-line knowledge. You can control multiple servers and enforce account security from a single central portal. With customizable user roles and built-in resource limits, it gives you complete control over your entire hosting environment.
This article explains how to purchase a Bluehost Virtual Dedicated Server (VDS) hosting plan and set up and manage your ISPConfig 3 installation.
Why Choose ISPConfig 3?
Combining ISPConfig 3 with a VDS gives you full root access and dedicated resources, so the panel runs faster and more reliably than it would on shared hosting. You get complete freedom to host multiple websites, domains, and email accounts on one server, without the usage limits or licensing fees that come with commercial control panels. And since ISPConfig is open-source, you keep costs low while still having room to scale to additional servers as your hosting needs grow.
Uses of ISPConfig 3
Running ISPConfig 3 on a VDS supports a wide variety of hosting and server management tasks, including:
- Manage Multiple Websites: Host and administer numerous websites from one centralized dashboard.
- Multi-Server Management: Control multiple VDS or dedicated servers through a single web interface.
- Email Hosting: Create and manage email accounts, aliases, mailing lists, and spam filtering.
- Database Administration: Easily manage MySQL and MariaDB databases for your websites and applications.
- DNS and Domain Management: Easily set up and manage your domains, subdomains, and DNS records all in one intuitive place.
- FTP User Management: Create FTP accounts for secure website file access and management.
- SSL Certificate Management: Protect websites with Let's Encrypt SSL certificates and automatic renewals.
- Reseller and Client Management: Create separate client and reseller accounts with customizable permissions and resource limits.
With the dedicated resources and root access a VDS provides, ISPConfig 3 runs these tasks faster and more reliably, giving you full control over your hosting environment.
How to Purchase a Virtual Dedicated Server with ISPConfig 3 Installation
ISPConfig 3 can be installed on a Bluehost Virtual Dedicated Server (VDS). You can choose to have ISPConfig 3 installed during the initial VDS purchase or install it manually at a later time.
- In your browser, go to https://www.bluehost.com.
- Click Hosting in the top menu, then select Virtual Dedicated Server.

You can also go to this link directly: https://www.bluehost.com/vds-hosting.
- On the Virtual Dedicated Server Hosting page, click Explore Plans. You can also scroll down to the hosting plans section.

- Choose a plan from either tab — Standard or High Performance — by clicking Choose Plan.

Pricing is subject to change. Please visit https://www.bluehost.com/vds-hosting for the current introductory/sign-up offer for the Bluehost Virtual Dedicated Server hosting. For the most up-to-date renewal pricing, visit your Bluehost Portal's Renewal Center. - On the next page, configure your VDS hosting to meet your requirements. The configuration options are divided into the following sections:
- Location: Select your data center in this section.

- Hardware: This section shows your pre-selected plan. You can also switch to another Virtual Dedicated Server plan in this section.

- Software:
If the selected plan does not meet the app's minimum requirements, the app will be grayed out.
- Under the OS With Panel tab, click on ISPConfig 3.
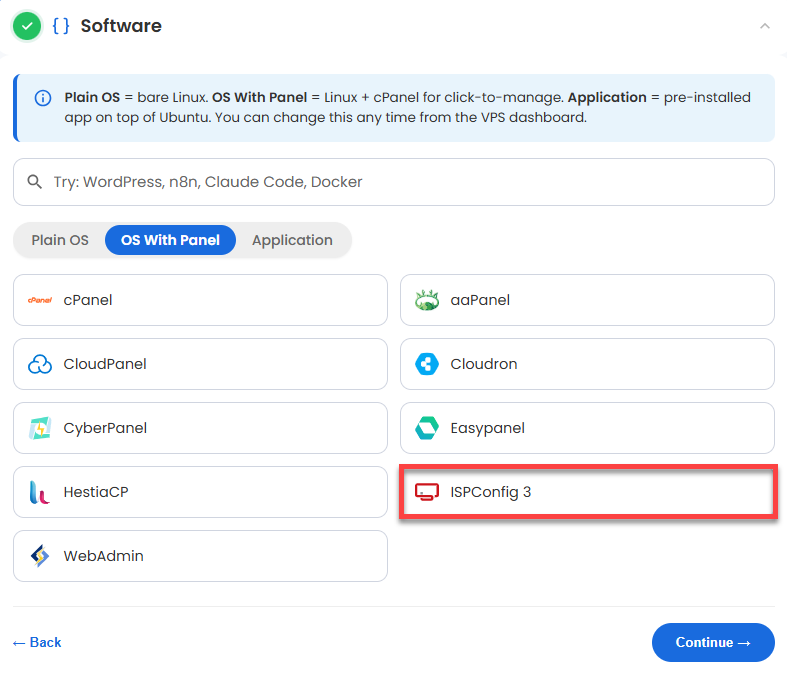
You can install only one application per purchase; the system will automatically select the best operating system for it. - In the pop-up, click Confirm.
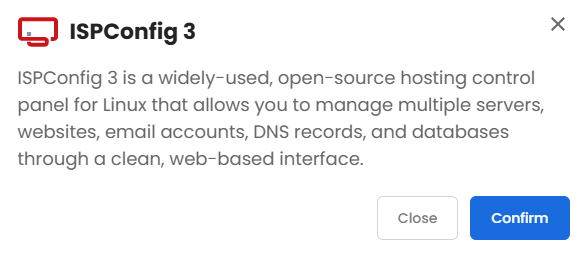
- Under the OS With Panel tab, click on ISPConfig 3.
- Support & Security: You can add Premium Support - Recurring, which provides priority access to expert assistance and faster response times.

- Advanced Options:
- Extra IP's: You can add IP addresses for an additional fee. Pricing changes based on how many IPs you add.
- Hostname: Assign a custom hostname to identify your server. This is optional.
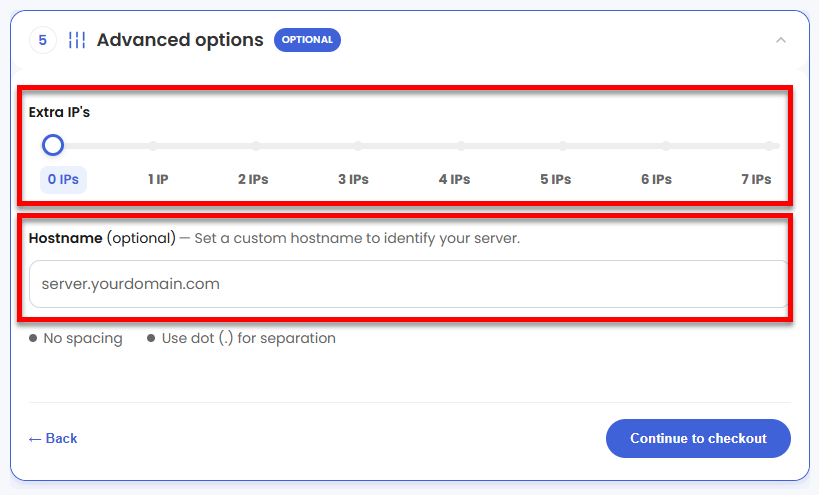
- Location: Select your data center in this section.
- Select your billing term and review your selected items on the right pane, along with the summarized total cost.
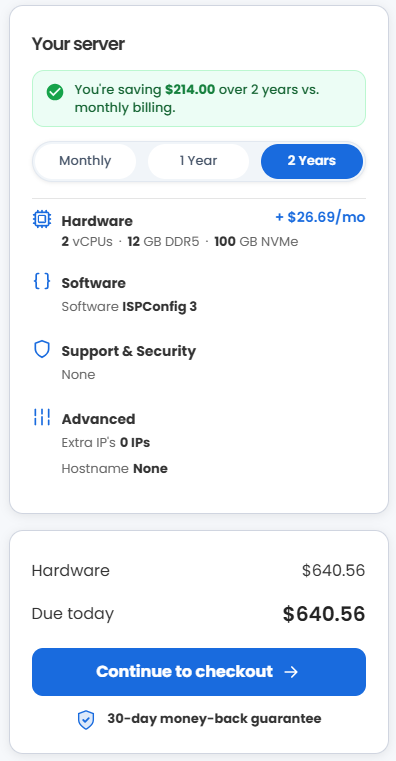
- Click Continue to checkout.
- Do the following on the Checkout page:
If you're new to Bluehost:- Create your Bluehost account by using your email address or by connecting with your Google, Apple, or GitHub account — whichever you prefer!

- Select your preferred payment method: credit card, Google Pay, or PayPal. Enter your billing information.

If you have an account with us, you will see your Bluehost login details when you are logged into your Bluehost Portal. If you are not logged in, please click the Log In link.

- Create your Bluehost account by using your email address or by connecting with your Google, Apple, or GitHub account — whichever you prefer!
- In the Shopping Cart, choose your billing term if you did not choose one on the previous page.
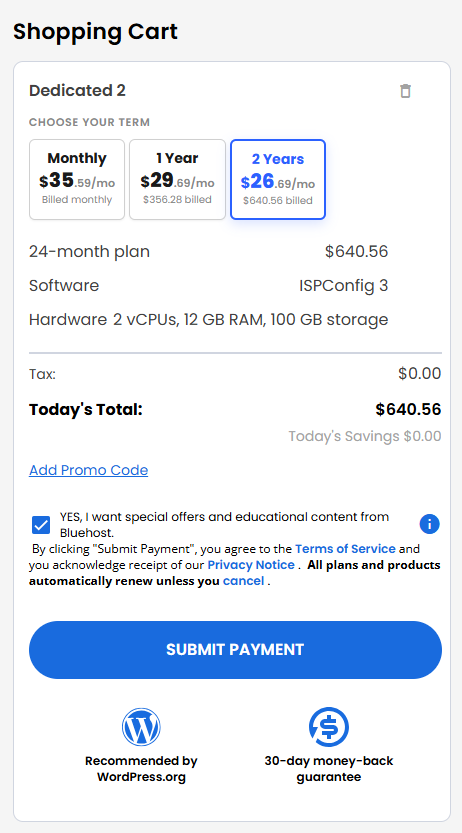
- Add a Promo code if you have one, and then click Submit Payment to complete your purchase.
After completing the purchase, your VDS hosting will begin provisioning. You can access and manage your new VDS hosting in the Hosting tab of your Bluehost Portal.
How to Set Up and Secure Your ISPConfig Server
ISPConfig is a powerful and flexible hosting control panel, but it requires a few essential configuration steps before it is ready for production. This guide outlines the complete initial setup process. Follow the phases below to securely retrieve your credentials, access the web interface, configure your hosting environment, apply a trusted SSL certificate, and follow security best practices for hosting websites and email domains.
Phase 1: Reset Your Root Password
- Log in to your Bluehost Portal.
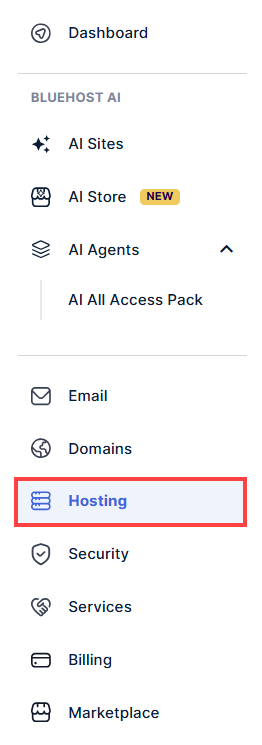
- In the left-hand menu, click Hosting, then select My Plans.
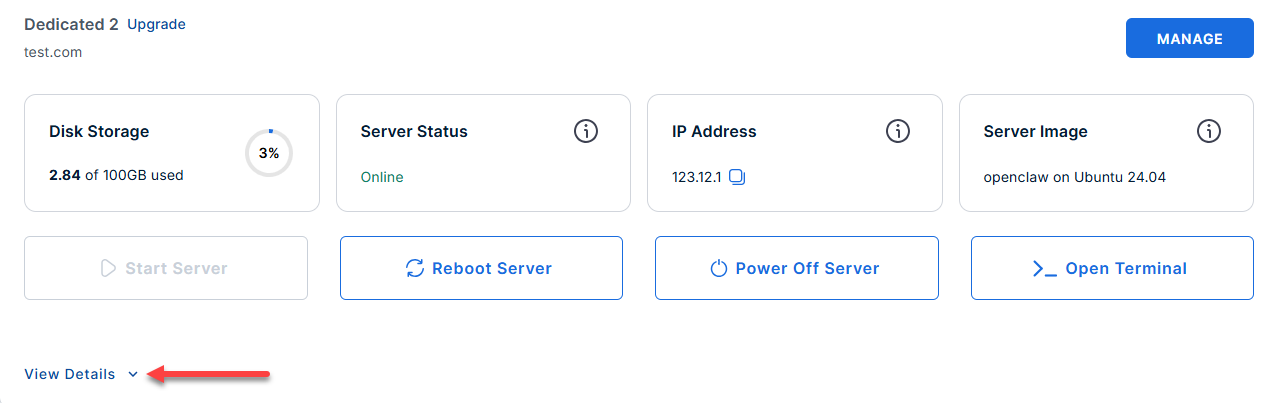
- Locate the server you want to manage, then click View Details in the bottom-left corner to expand the section and access additional server information.
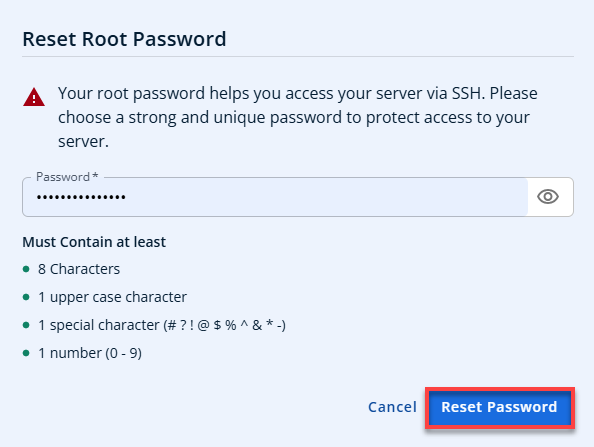
- Click the Reset Password.
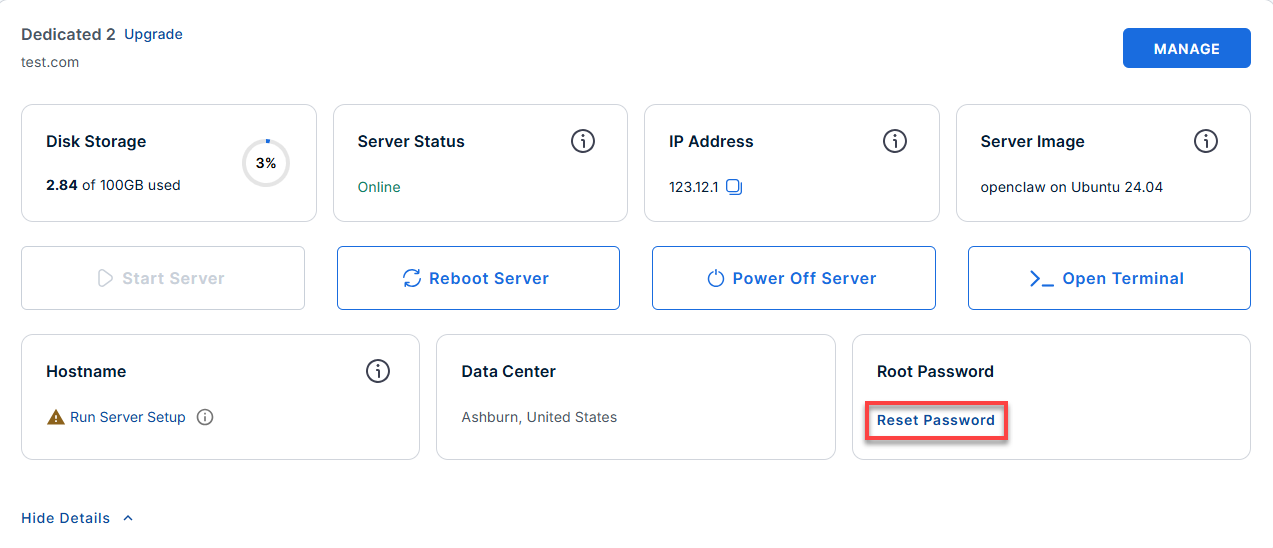
- In the pop-up window, type your new root password, then click Reset Password again to confirm and save the changes.
Phase 2: Connect To Your Server Through SSH
- Connect to your server via SSH.
Open your computer's terminal (or an SSH client like PuTTY) and run the following command to log into your server as the administrator, using your server's public IP address:Replaceyour_server_ipwith your actual server IP address.
Follow the prompts and enter the new root password you created in the step above.ssh root@your_server_ip - If you ever need to quickly review the system's deployment notes directly inside your server terminal, you can print out the original README file by running:
cat /root/README.md
Phase 3: Retrieve Your Login Credentials
After logging in through SSH, the automated background setup should be complete. This process typically takes 2–3 minutes to finish.
- Retrieve your password: Run the following command in your terminal to display the automatically generated administrator credentials.
cat /root/.app_passwords
- Save your password: Locate the line that begins with ISPCONFIG_ADMIN_PASSWORD= and copy the password that follows. You will use this password to sign in to the ISPConfig web interface in the next step.
Example Output:
root@hal-server-123456:~# cat /root/.app_passwords
ISPCONFIG_ADMIN_PASSWORD=t3st158b039dd4101e8e0d1b828dc9010df863adeexample
Phase 4: Access the Web Panel
Now, you will leave the terminal for a moment and move to your web browser.
- Open the ISPConfig web panel: In your web browser, go to https://<your-server-ip>:8080/, replacing <your-server-ip> with your server's actual public IP address.
Example:https://12.3.456.789:8080/ - Bypass the security warning: Your browser may display a warning that the connection is not private. This is expected during the initial setup because ISPConfig uses a temporary self-signed SSL certificate by default. Click Advanced, then Proceed (or the equivalent option in your browser) to continue to the login page.
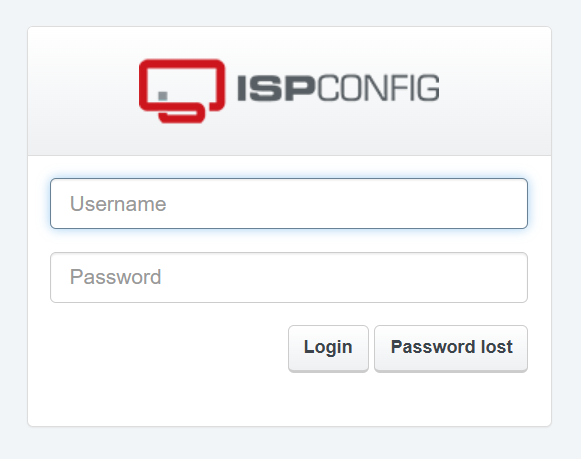
- Log in: Use the following credentials:
- Username: admin
- Password: The password you copied in Phase 3.
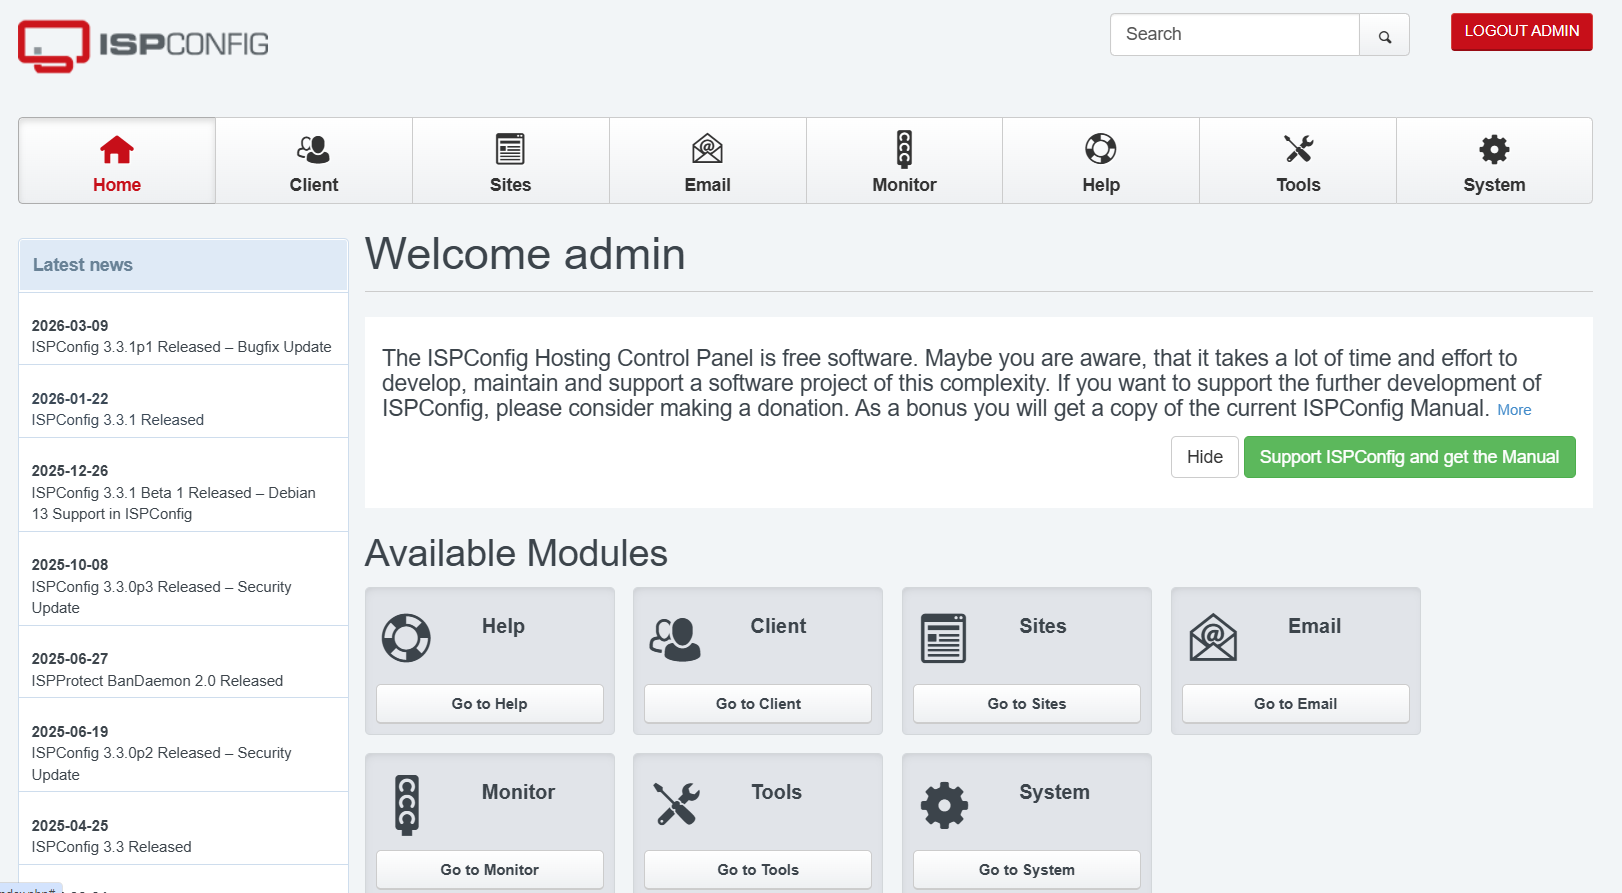
- You are now logged in to your Dashboard.
Phase 5: Configuring Your Hosting Environment
Once you are logged in to the ISPConfig web interface, you can begin configuring your hosting environment by adding the domains and services that your server will manage.
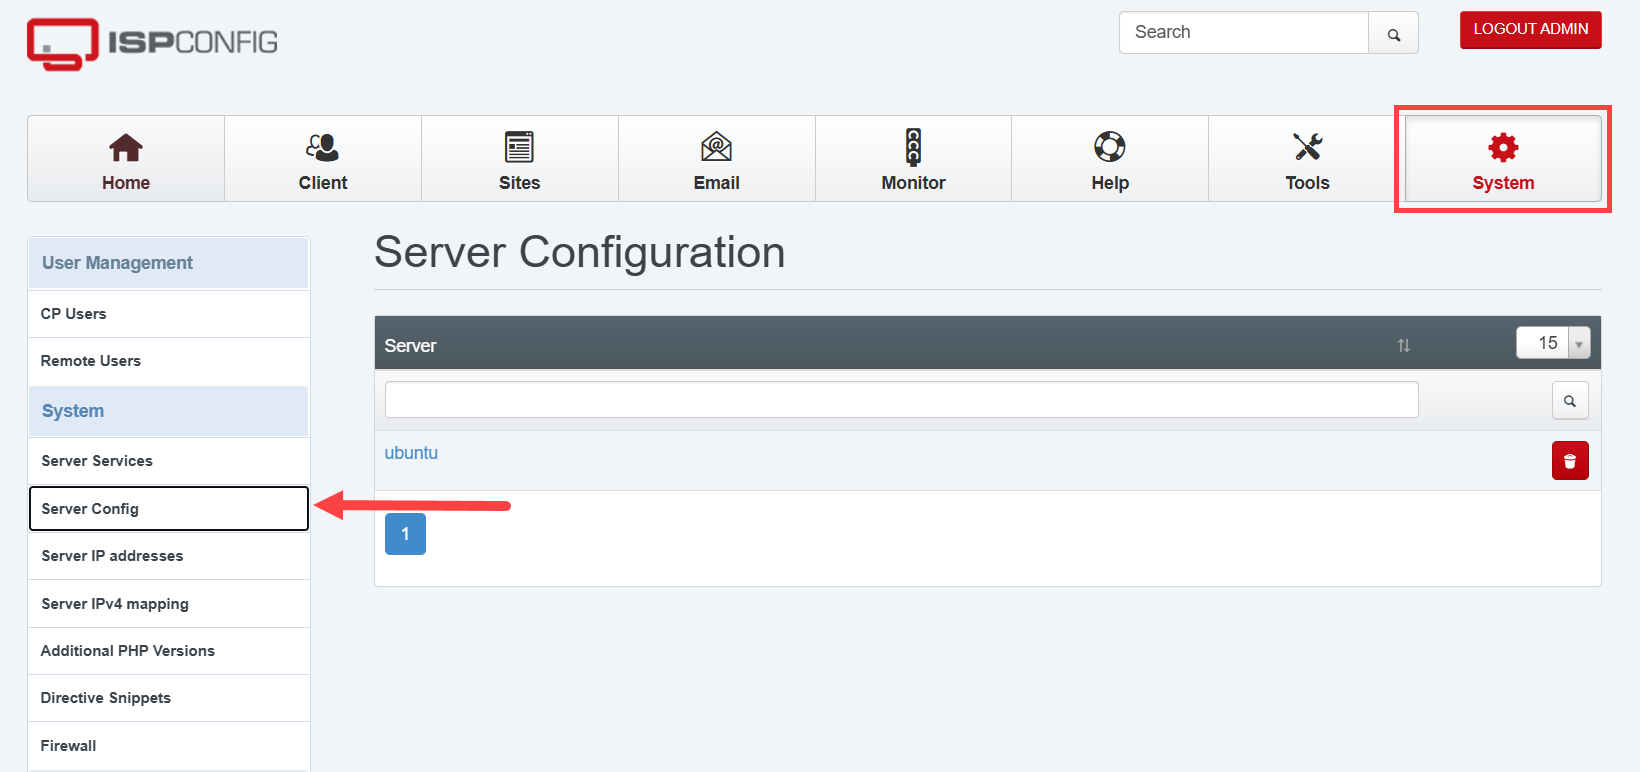
- Set the hostname: Navigate to System → Server Config, then update the server's hostname to match your fully qualified domain name (FQDN), such as server.yourdomain.com.
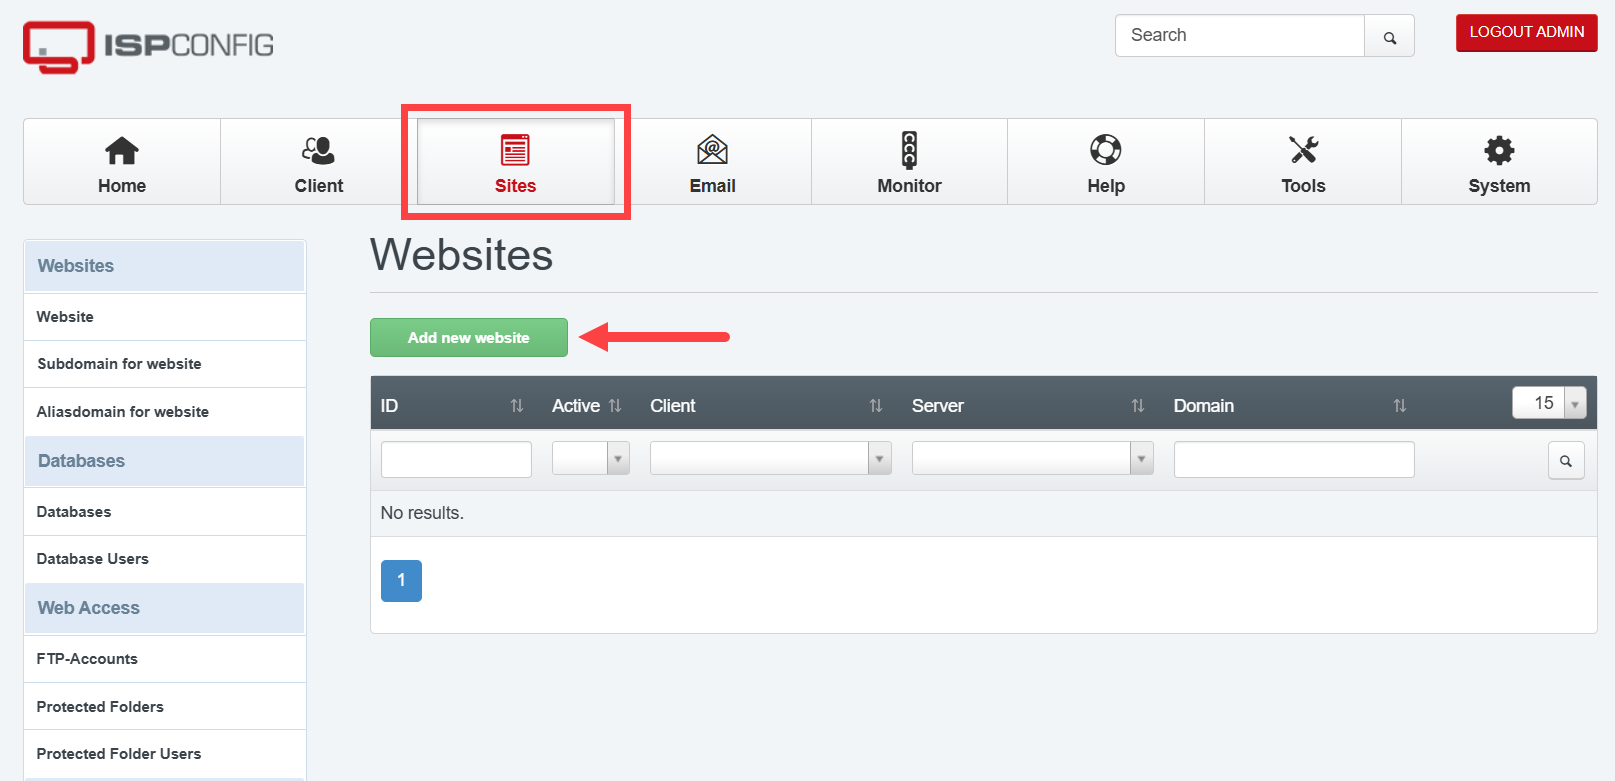
- Add a website: Navigate to Sites → Add New Website, then enter the domain name you want to host (for example, yourdomain.com). Configure the required settings, such as the client, IP address, and web server options, then save your changes. ISPConfig will create the website and configure the web server based on the settings you selected.
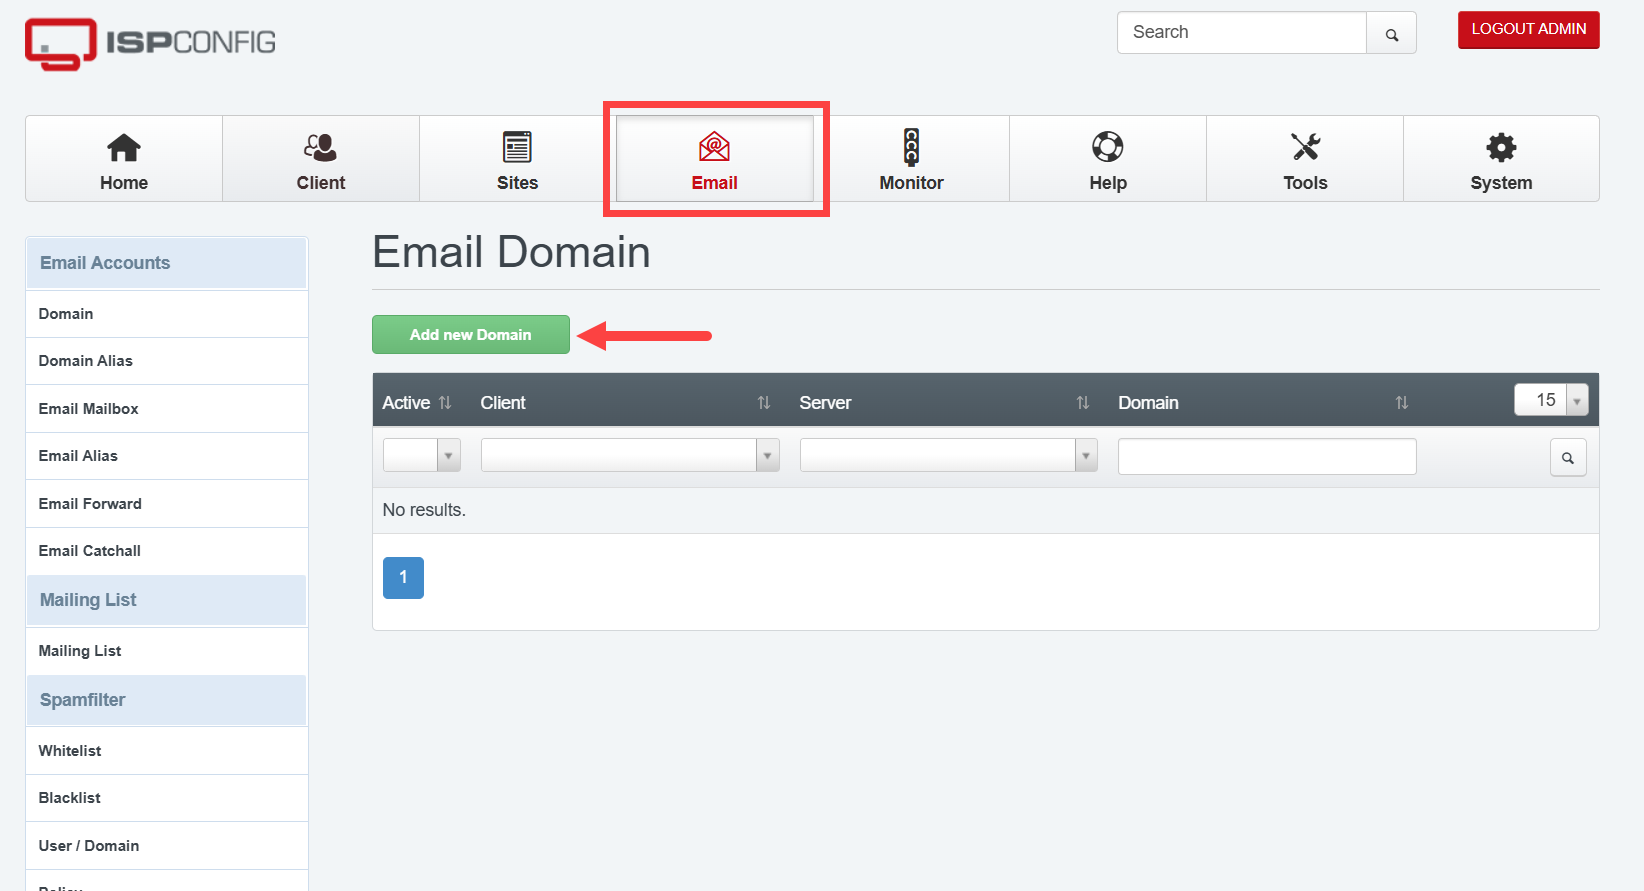
- Set up email (Optional): If you want to host email for your domain, navigate to Email → Domain and add your domain. Then, go to Email → Mailbox to create email accounts, such as [email protected].
Phase 6: Securing the Server (SSL)
At this point, your server is operational, but it is still using a temporary self-signed SSL certificate. As a result, browsers will display a "Not Secure" or similar warning. To establish a trusted, encrypted connection, replace the temporary certificate with a trusted SSL certificate.
-
Secure your hosted websites: From your SSH session, run the following command to request and install a free SSL certificate from Let's Encrypt for your hosted websites:
certbot --nginxFollow the prompts to complete the certificate installation. Before running this command, make sure your domain's DNS records are pointing to your server's public IP address.
-
Secure the ISPConfig web panel: Run the following command to replace the panel's temporary self-signed certificate with a trusted Let's Encrypt certificate:
sudo /opt/ispconfig/setup-ssl.sh panel.yourdomain.com [email protected]Replace panel.yourdomain.com with the fully qualified domain name (FQDN) you use to access the ISPConfig panel, and replace [email protected] with your email address. Once the script completes, the browser security warning displayed when accessing the ISPConfig web interface should no longer appear.
How to Monitor Things Moving Forward
After completing the initial setup, you can use the following tips to monitor your server and troubleshoot common issues:
- Check service status: Use the following command to verify that a service is running:
Replace with the service you want to check, such as nginx or mariadb.systemctl status service_name
- If the ISPConfig panel is unavailable: Verify that you are accessing the panel using https:// (not http://) and confirm that port 8080 is open and not being blocked by your firewall or network configuration.
Supporting Information and Sample Output
You can run cat /root/README.md to see more information and useful commands:
Example Output:
root@hal-server-123456:~# cat /root/README.md
# ISPConfig 3

## Description

ISPConfig 3 is a widely-used, open-source hosting control panel for Linux that allows you to manage multiple servers, websites, email accounts, DNS records, and databases through a clean, web-based interface.

With ISPConfig, you can manage web hosting, configure email mailboxes, set up FTP users, create databases, and enforce security policies without needing deep command-line expertise.

This image comes with a complete ISPConfig 3 stack pre-installed and configured on Ubuntu 24.04 LTS (Nginx, MariaDB, PHP 8.3-FPM, Postfix, Dovecot, and Fail2ban).
On first boot, a secure, randomized administrator password is automatically generated for you.

---

## Quick Start

Follow these three steps to get up and running.

### Step 1 - Wait for first boot to complete

After launching your instance, wait 2-3 minutes for the first-boot setup to finish.

The setup runs automatically in the background. It generates your randomized admin password, updates the database credentials, sets up system hostnames, and starts the panel services.

You do not need to do anything during this time.

### Step 2 - Get your login credentials

SSH into your server as the `root` user and run:

```bash
cat /root/.app_passwords
```

You will see output like this:

```
ISPCONFIG_ADMIN_PASSWORD=your_secure_randomized_password
```

Save this password - you will need it to log in.

### Step 3 - Open the panel in your browser

After first boot, open:

```
https://localhost:8080
```

On a real server, replace `localhost` with your server's IP address:

```
https://{server_ip}:8080
```

> **Browser warning:** ISPConfig uses a self-signed SSL certificate by default.
> When your browser shows a security warning, click **Advanced** then **Proceed** to continue.
> This is expected and safe for initial setup.

Log in with the following credentials:
- **Username:** `admin`
- **Password:** The password retrieved in Step 2.

---

## Next Steps

Once you are logged into the ISPConfig Control Panel, here is what to do next.

### 1. Configure Server Hostname

Go to **System** -> **Server Config** and select your server. Update the hostname and network configuration to match your domain and server setup.

### 2. Add your first website

Go to **Sites** -> **Add new website**.

Enter your domain name (e.g., `example.com`), configure any redirection or SSL preferences, and click **Save**.

ISPConfig will automatically create the web directories and configure Nginx backend virtual hosts.

### 3. Create Mail Domains and Mailboxes

Go to **Email** -> **Domain** -> **Add new domain** to register your mail domain.
Once registered:
- Go to **Email Mailbox** -> **Add new mailbox** to create individual email accounts.
- Use ports `25`, `465`, or `587` for sending mail (SMTP) and `110`, `995`, `143`, or `993` for receiving (IMAP/POP3).

### 4. Set up a real SSL certificate

Certbot is pre-installed on this image. After pointing your domain name's DNS records to your server's public IP, you can secure your website by running:

```bash
certbot --nginx
```

Follow the prompts to obtain a free, trusted Let's Encrypt SSL certificate, which replaces the self-signed certificate and removes browser warnings.

### 5. Set up a real SSL certificate for the Control Panel itself

On first boot, the ISPConfig panel uses a temporary self-signed SSL certificate. Once you have pointed a custom domain (e.g., `panel.example.com`) to your server's public IP, you can secure the control panel and remove browser warnings completely by running:

```bash
sudo /opt/ispconfig/setup-ssl.sh panel.example.com [email protected]
```

This helper script automatically shuts down Nginx, requests the Let's Encrypt certificate, updates the ISPConfig system configuration, restarts services, and installs a secure auto-renewal deploy-hook.

---

## Access

| URL | Purpose |
|-----|---------|
| `https://:8080/` | ISPConfig 3 Control Panel (HTTPS) |
| `http:///` | Default HTTP website landing page |
| `https:///` | Default HTTPS website landing page |

---

## Credentials

All credentials generated during deployment are stored in:

```bash
cat /root/.app_passwords
```

| Field | Description |
|-------|-------------|
| `ISPCONFIG_ADMIN_PASSWORD` | Randomized admin password generated securely on first boot |

To view the first boot setup logs:

```bash
cat /var/log/cloud-init-output.log
```

---

## Managing the Server

### Services

```bash
# Check service statuses
systemctl status nginx
systemctl status mariadb
systemctl status php8.3-fpm
systemctl status postfix
systemctl status dovecot
systemctl status fail2ban

# Restart a service (e.g. Nginx)
systemctl restart nginx
```

### Running Health Checks

To run the built-in system validation and health check suite, execute:

```bash
prove /root/app_test/main.t
```

### Firewall

```bash
# View open ports and firewall status
ufw status verbose
```

### Logs

```bash
# View ISPConfig panel and cron logs
tail -f /var/log/ispconfig/ispconfig.log

# View Nginx web server error logs
tail -f /var/log/nginx/error.log

# View mail server logs (Postfix & Dovecot)
journalctl -u postfix -u dovecot -f
```

---

## Troubleshooting

### Panel URL not opening in browser

1. Verify that Nginx is running: `systemctl status nginx`
2. Check that the ISPConfig port 8080 is listening: `ss -tlnp | grep 8080`
3. Verify that the UFW firewall allows traffic on port 8080: `ufw status | grep 8080`
4. Make sure you are explicitly typing `https://` in the browser (e.g., `https://:8080/`), as `http://` will fail.

### First boot did not run

If `/root/.app_passwords` does not exist or the password is not set, you can trigger the initialization script manually:

```bash
sed -i 's/\r//' /var/lib/cloud/scripts/per-instance/001_onboot
bash /var/lib/cloud/scripts/per-instance/001_onboot
```

Then read your credentials again:

```bash
cat /root/.app_passwords
```

---

## Security

| Feature | Detail |
|---------|--------|
| Firewall | UFW enabled - only minimal essential ports open by default |
| SSH Security | Rate limited on port 22 to block brute force attempts |
| Dynamic Passwords | Never baked into the image - uniquely randomized at first boot |
| File Credentials | `/root/.app_passwords` is owned by `root:root` with secure permissions (`0600`) |
| Intrusion Prevention | Fail2ban monitors log files and automatically bans abusive IPs |
| HTTPS Panel | SSL encryption active by default on the control panel (port 8080) |

---

## Services

| Service | Port | Purpose |
|---------|------|---------|
| ISPConfig (Nginx) | 8080 | Web administration interface |
| OpenSSH | 22 | Secure remote server access |
| Nginx | 80 / 443 | Web server (HTTP / HTTPS) |
| Postfix | 25 / 465 / 587 | Mail server (SMTP / SMTPS) |
| Dovecot | 110 / 995 / 143 / 993 | Mail server (POP3 / POP3S / IMAP / IMAPS) |
| MariaDB | 3306 | Local SQL Database |

---

## Links

- Manage: [https://:8080/](https://:8080/)
- ISPConfig Documentation: [https://www.ispconfig.org/documentation/](https://www.ispconfig.org/documentation/)
- Ubuntu 24.04 LTS Release Notes: [https://wiki.ubuntu.com/NobleNumbat/ReleaseNotes](https://wiki.ubuntu.com/NobleNumbat/ReleaseNotes)
Summary
ISPConfig 3 is a web-based control panel that lets you manage websites, email accounts, databases, and DNS records on your Linux server without deep command-line knowledge. Pairing it with a Bluehost Virtual Dedicated Server (VDS) gives you full root access and dedicated resources, so the panel runs faster and more reliably than on shared hosting, with no usage limits or licensing fees. You can purchase a VDS with ISPConfig 3 pre-installed directly from Bluehost, then complete a guided setup that includes resetting your root password, retrieving admin credentials, and securing the panel with a trusted SSL certificate. Once configured, ISPConfig gives you centralized control over multiple servers, websites, and mail domains, with built-in tools for monitoring services and troubleshooting along the way.