 ChatGPT,
  Claude,
  Gemini,
  Grok — all four for
Purchase a Self-Managed VPS with BMAD - AI Agent Development Framework Installation
Think of BMAD - AI Agent Development Framework as your smart, AI-powered assistant for building software. It is a set of tools designed to help you and your team create, manage, and automate software projects with ease. By combining smart features with simple routines, BMAD - AI Agent Development Framework takes the stress out of the entire process—from your very first idea all the way to launching and maintaining your project.
Whether you are building a website, creating tools for your team, designing AI solutions, or making custom software, BMAD - AI Agent Development Framework gives you a single, organized place to work. It helps your team stay on track, work better together, and get things done much faster.
The best part? It is incredibly flexible! Whether you are a solo developer, a growing startup, or a large business, BMAD - AI Agent Development Framework cuts down on busywork and helps you build a smooth, repeatable process for success.
Why Choose BMAD - AI Agent Development Framework?
People love using BMAD - AI Agent Development Framework because it makes work easier. Here is why so many teams choose it:
- Smart AI Help: Let BMAD - AI Agent Development Framework handle the boring, repetitive tasks, so your team can focus on the fun part: building great features and solving real problems.
- Get More Done: With clear steps and built-in automation, BMAD - AI Agent Development Framework helps you finish projects faster and removes roadblocks along the way.
- Grows With You: Whether you are building a tiny app or a massive software system, BMAD - AI Agent Development Framework is a perfect fit for startups, agencies, and large companies alike.
- Keep Things Organized: Easily keep track of your to-do lists, files, and progress from start to finish.
- Better Teamwork: Keep everyone on the same page by using standard processes and a clean, shared workspace.
- Launch Faster: Getting your software ready for the real world is a breeze, helping you go live without the headache.
- Everything in One Place: Manage all your tools, files, and team activities from one easy-to-use dashboard.
What Can You Do with BMAD - AI Agent Development Framework?
You can use BMAD - AI Agent Development Framework for almost any software or business need:
- Create Software: Keep your ideas organized, assign tasks, and speed up the process of building your app.
- Build AI Tools: Easily create smart applications, chatbots, and machine-learning tools.
- Automate Your Business: Stop wasting time on manual data entry or repetitive tasks. Let BMAD - AI Agent Development Framework handle them so you can save time and money.
- Make Custom Team Tools: Build helpful dashboards and internal apps just for your employees.
- Collaborate Smoothly: Give your team a structured home base to work together without confusion.
- Test Ideas Quickly: Have a great idea? Startups and product teams can quickly build a working model to test before spending too much time or money.
- Manage Your Tech: Keep your behind-the-scenes tech running smoothly and make updates a breeze.
- Standardize Your Work: Create reliable, step-by-step routines that improve quality and lower the risk of mistakes.
How to Purchase a Self-Managed VPS with BMAD - AI Agent Development Framework Installation
We’ve created a short video on how to purchase a Self-Managed VPS with BMAD AI Agent Development Framework Installation.

New to VPS or not sure where to start? No worries! At the top of the Self-Managed VPS purchase page, you’ll see the Pre-configured Setup section. This handy feature is perfect if you’re feeling a bit unsure—just pick the type of project you want, like WordPress Site, AI Agent/Claude Code, Dev/Staging, or eCommerce Store. We’ll take care of the rest by automatically filling in the best plan, operating system, and template for you.
- Super simple for beginners or anyone who just wants a quick setup
- Instantly get the recommended settings for your project
- Skip the guesswork and save time
- You can still customize things later if you want
- In your browser, go to https://www.bluehost.com/vps-hosting.
- Click the Choose Plan button under your preferred VPS hosting plan.
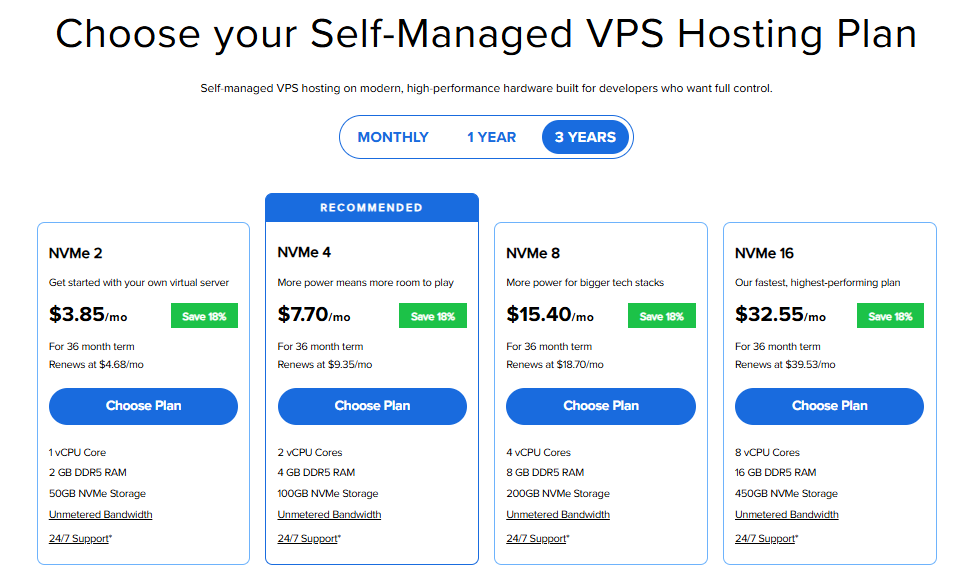
Important: Pricing is subject to change—please visit https://www.bluehost.com/vps-hosting for the current introductory/sign-up offer for Bluehost VPS Hosting. For the most up-to-date renewal pricing, visit your Bluehost Portal Renewal Center.
- Select your preferred Data Center location.

- On the Cart page, you can configure your server to fit your needs in the following section:
- Hardware:
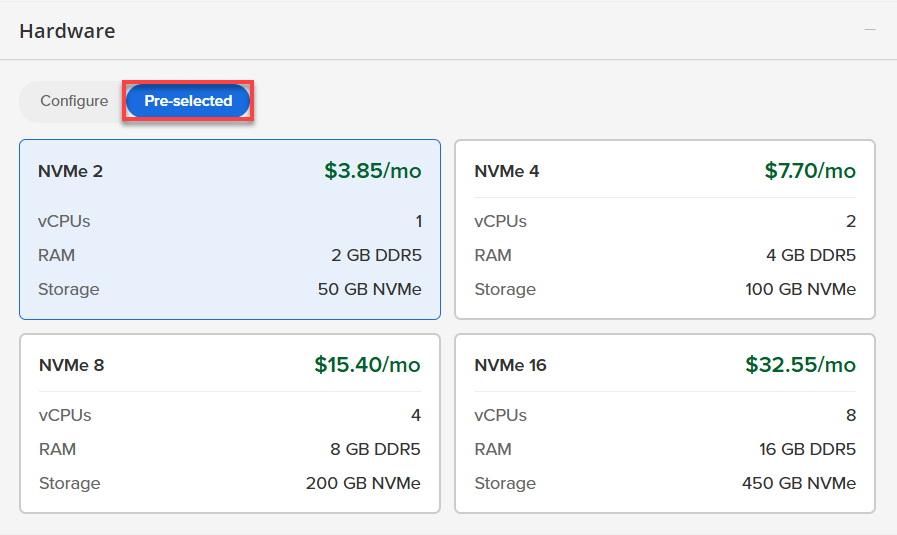
- Pre-selected:
You can select a different Self-Managed VPS plan in this section.
- Configure:
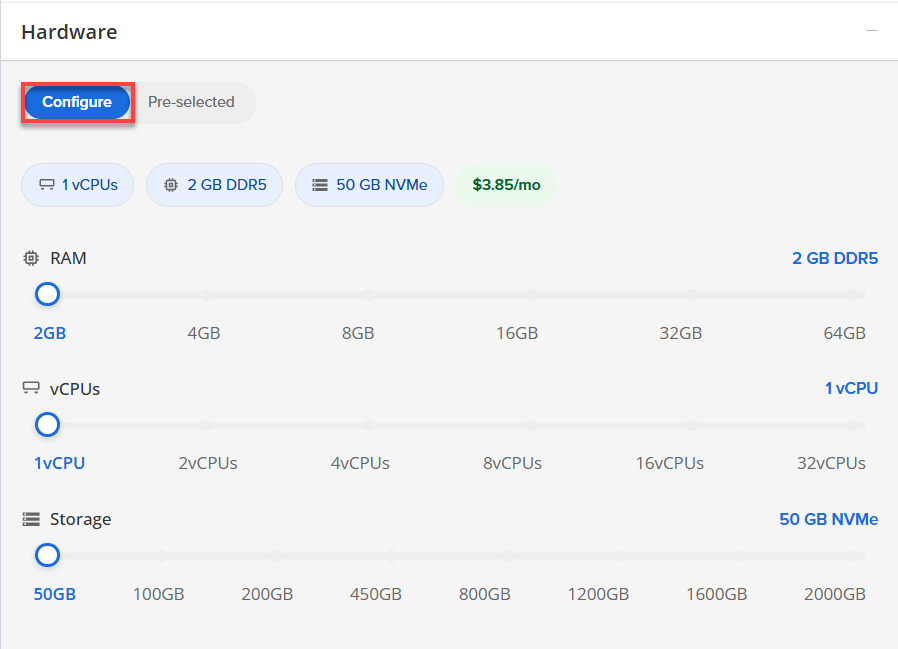
Click Configure to customize your package.
Note that your changes help customize your plan, and the overall cost will adjust accordingly to fit your needs.
- Pre-selected:
- Software:
If the selected plan does not meet the app's minimum requirements, the app will be grayed out.
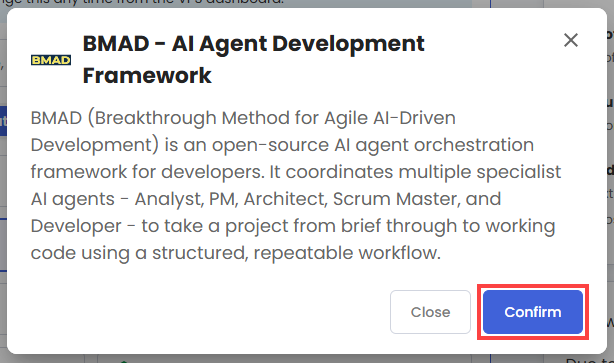
- Click the Application tab.
- Select BMAD - AI Agent Development Framework.
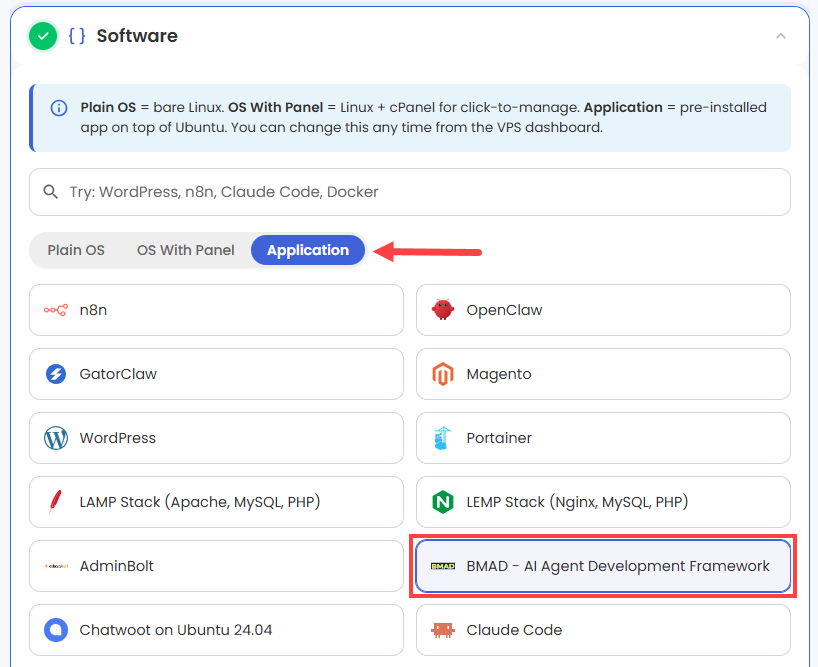
- In the pop-up, click Confirm.
- Hardware:
- Add-Ons: You can add Premium Support here, which gives you priority access to expert assistance and faster response times.

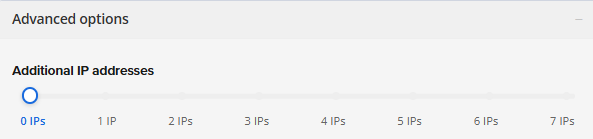
- In the Advanced options:
- Extra IP's: You can add extra IP addresses for an additional fee.
Pricing changes based on how many IPs you add. - Hostname: Assign a custom hostname to easily identify your server. This is optional.
- Extra IP's: You can add extra IP addresses for an additional fee.
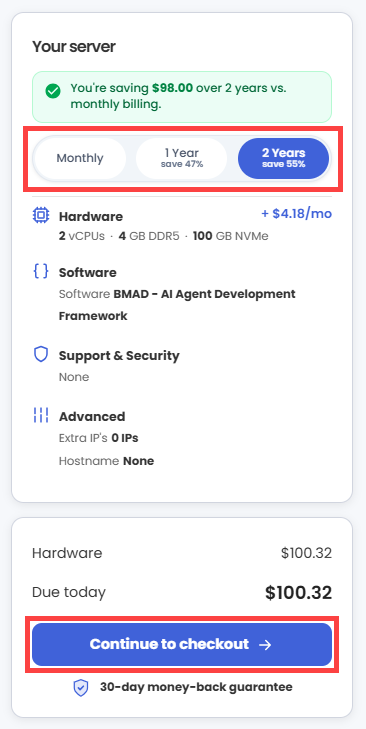
- Next, select your preferred billing term and review your Order Summary, then click Continue to Checkout.
- Do the following on the Checkout page:
If you're new with Bluehost:
- Create your Bluehost account by using your email address or by connecting with your Google, Apple, or GitHub account — whichever you prefer!

- Select your preferred payment method: credit card, Google Pay, or PayPal. Enter your billing information.

If you have an account with us, you will see your Bluehost login details when you are logged into your Bluehost Portal. If you are not logged in, please click the Log In link.

- Create your Bluehost account by using your email address or by connecting with your Google, Apple, or GitHub account — whichever you prefer!
- In the Shopping Cart section, you can still adjust your billing term if needed.
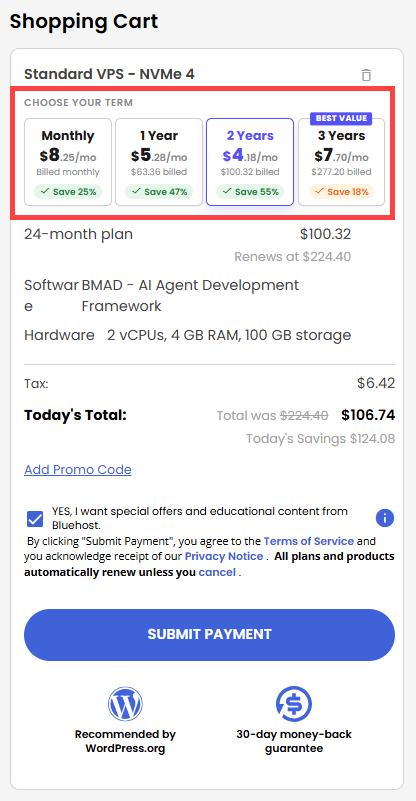
- Review the items in your cart, add a Promo Code if you have one, and then click Submit Payment to complete the purchase.
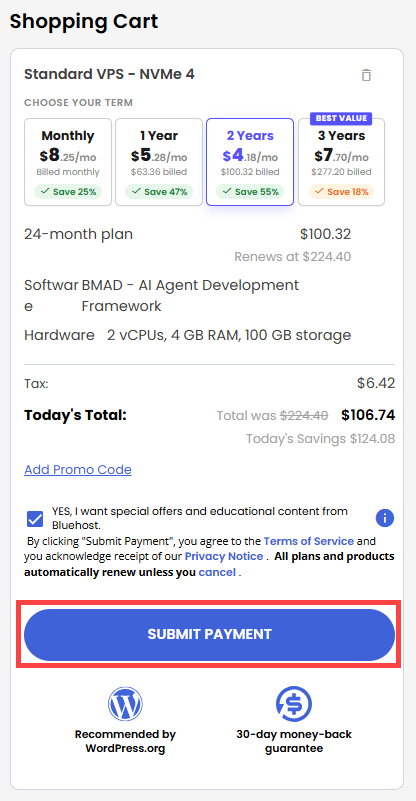
After completing the purchase, your VPS hosting will begin provisioning. You can access and manage your new VPS hosting in the Hosting tab of your Bluehost Portal.
Getting Started with Your BMAD AI Agent Development Environment
To get up and running with the BMAD (Breakthrough Method for Agile AI-Driven Development) framework, follow this structured, step-by-step workflow.
Step 1: Access your BMAD - AI Agent Development Framework Dashboard
After installation completes:
- Log in to your Bluehost Portal.
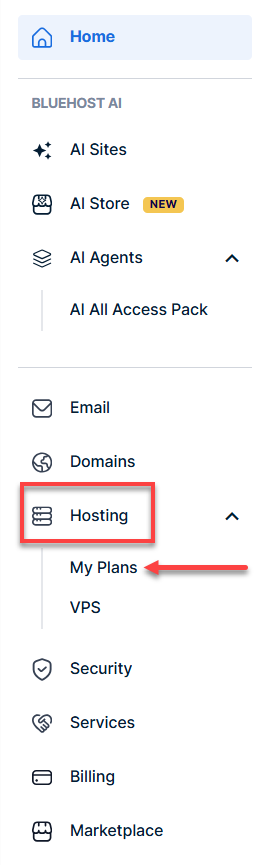
- In the left-hand menu, click Hosting, then select My Plans.
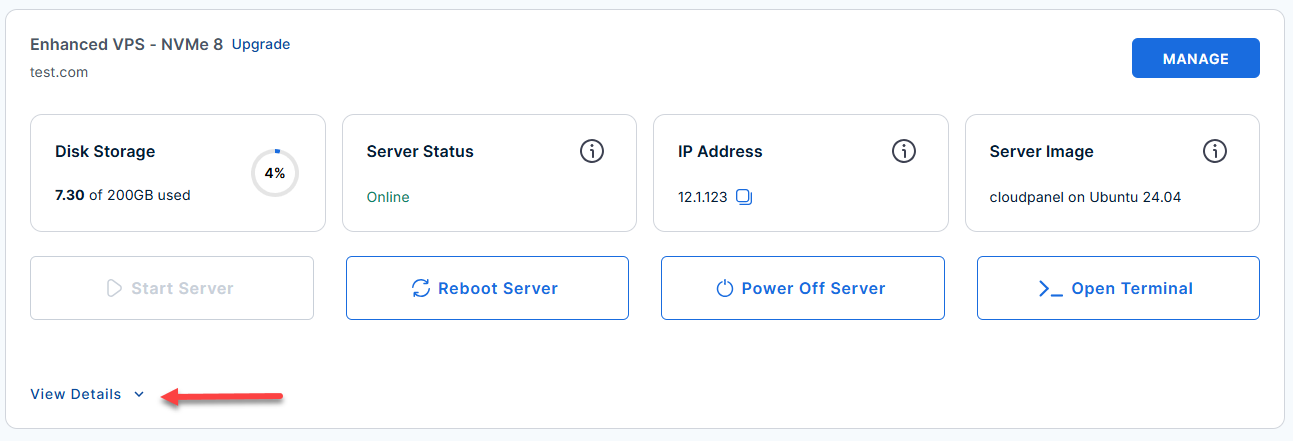
- Locate the server you want to manage, then click View Details in the bottom-left corner to expand the section and access additional server information.
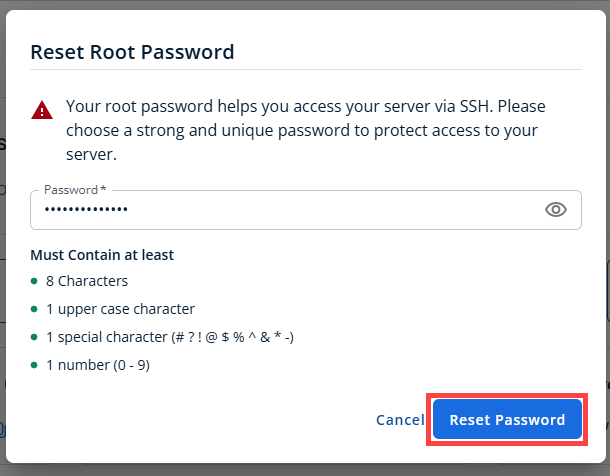
- Click the Reset Password.
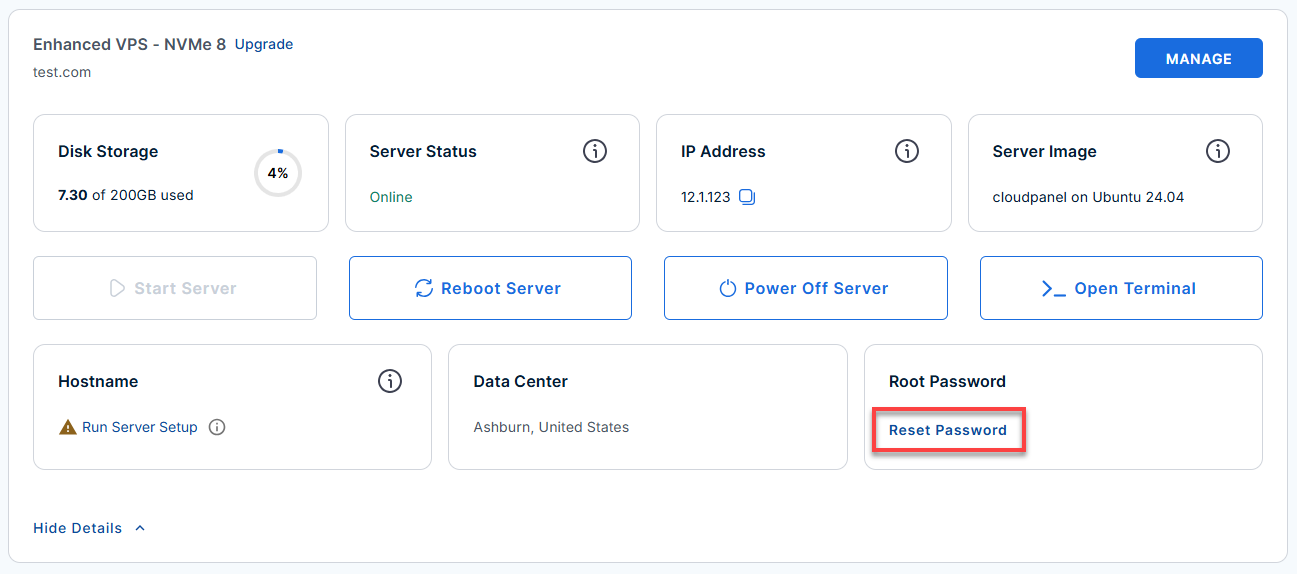
- In the pop-up window, type your new root password, then click Reset Password again to confirm and save the changes.
- Connect to your VPS via SSH.
Use your VPS IP and credentials with an SSH client, follow the prompts, and enter your root password when asked:Replaceyour_server_ipwith your actual server IP address.ssh root@your_server_ipExample Output:
Welcome to Ubuntu 24.04.4 LTS (GNU/Linux 6.8.0-124-generic x86_64)
********************************************************************************

  BMAD — AI Agent Development Framework
  Tier 3: CLI/dev-environment — no web GUI

  Node.js        : v24.17.0
  bmad-method    : 6.9.0
  claude-code    : anthropic-ai/claude-code

  ANTHROPIC_API_KEY :   configured
  Default track     : standard

  - Access ----------------------------------------
  SSH only      : ssh [email protected]
  No web UI     : CLI framework — terminal access only

  - Quick start -----------------------------------
  1. Run /opt/bmad/setup-env.sh  (set ANTHROPIC_API_KEY)
  2. bmad-init project-name [quick|standard|enterprise]
  3. cd /srv/bmad-projects/project-name
  4. Open Claude Code or your AI tool in that directory

  - Tracks ----------------------------------------
  quick       Rapid prototype  (analyst, pm, developer)
  standard    Full workflow    (all 5 agents)
  enterprise  Scaled delivery  (all 5 agents + sub-agents)

  - Firewall --------------------------------------
  Port open     : 22/tcp (SSH only)

  For full details refer: /root/README.md

********************************************************************************
Last login: Tue Jul  7 23:24:12 2026 from 113.19.181.245
Step 2: Configure Your API Key
BMAD requires an active Anthropic API key to orchestrate the AI agents. You can set this up quickly using the built-in helper script:
-
Run the setup script:
bash /opt/bmad/setup-env.shExample Output:
root@server-12345:~# bash /opt/bmad/setup-env.sh BMAD Environment Setup ──────────────────────────────────────────────────── This script sets your Anthropic API key in /etc/bmad/.env Get your key at: https://console.anthropic.com Paste your Anthropic API key (sk-ant-...): sk-ant-api03-abc1234-dKacbdaaDJO94JMENRT-sRXR-VlF1234j7HqvLQd-wBbabcdsBM API key saved to /etc/bmad/.env You can now run: bmad-init project-name [quick|standard|enterprise] -
Follow the prompts to securely input your API key.
Step 3: Initialize Your Project
Once configured, use the bmad-init command to create your project. Choose the track that best fits your needs:
- Quick: Ideal for prototyping and small scripts.
- Standard: Best for general greenfield or brownfield projects.
- Enterprise: Designed for large-scale codebases and multi-team collaboration.
Example Command:
Example Output:
root@server-12345:~# bmad-init my-new-project standard
│ ╭─Update Available───────────────────────────────────────────────────────────────────────────────────────────────────╮
│ │  You are using version 6.9.0 but 6.10.0 is available.                                                              │
│ │                                                                                                                    │
│ │  To update, exit and first run:                                                                                    │
│ │    npm cache clean --force && npx bmad-method@latest install                                                       │
│ ╰────────────────────────────────────────────────────────────────────────────────────────────────────────────────────╯
│ ╭────────────────────────────────────────────────────────────────────────────────────────────────────────────────────╮
│ │            ██████╗ ███╗   ███╗ █████╗ ██████╗     ███╗   ███╗███████╗████████╗██╗  ██╗ ██████╗ ██████╗ ™            │
│ │            ██╔══██╗████╗ ████║██╔══██╗██╔══██╗    ████╗ ████║██╔════╝╚══██╔══╝██║  ██║██╔═══██╗██╔══██╗             │
│ │            ██████╔╝██╔████╔██║███████║██║  ██║    ██╔████╔██║█████╗     ██║   ███████║██║   ██║██║  ██║             │
│ │            ██╔══██╗██║╚██╔╝██║██╔══██║██║  ██║    ██║╚██╔╝██║██╔══╝     ██║   ██╔══██║██║   ██║██║  ██║             │
│ │            ██████╔╝██║ ╚═╝ ██║██║  ██║██████╔╝    ██║ ╚═╝ ██║███████╗   ██║   ██║  ██║╚██████╔╝██████╔╝             │
│ │            ╚═════╝ ╚═╝     ╚═╝╚═╝  ╚═╝╚═════╝     ╚═╝     ╚═╝╚══════╝   ╚═╝   ╚═╝  ╚═╝ ╚═════╝ ╚═════╝              │
│ │                                               Build More, Architect Dreams                                         │
│ │                                                     © BMad Code                                                    │
│ ╰────────────────────────────────────────────────────────────────────────────────────────────────────────────────────╯
│
●  ━━━━━━━━━━━━━━━━━━━━━━━━━━━━━━━━━━━━━━━━━━━━━━━━━━━━━━━━━━━━━━━━━━━━━━━━
│
│  Agile AI-Driven Development. Powered by BMad Core and a growing module ecosystem.
│  Install official and community modules during setup to customize your experience.
│
│  🌟 100% free. 100% open source. Always.
│    No paywalls. No gated content. Knowledge shared, not sold.
│
│  🐍 HEADS UP: uv (https://docs.astral.sh/uv/) is becoming the de facto standard
│    for running the Python scripts BMAD workflows rely on (`uv run script`).
│    If it's not set up yet, ask your AI agent to "install and set up uv for me".
│
│  🌐 CONNECT:
│    Website:   https://bmadcode.com/
│    Discord:   https://discord.gg/gk8jAdXWmj
│    YouTube:   https://www.youtube.com/@BMadCode
│    X:         https://x.com/BMadCode
│    Facebook:  https://facebook.com/@BMadCode
│
│  ⭐ SUPPORT THE PROJECT:
│    Star us:   https://github.com/bmad-code-org/BMAD-METHOD/
│    Donate:    https://buymeacoffee.com/bmad
│    Corporate sponsorship and speaking inquiries: [email protected]
│
│  Docs, blog, and latest updates: https://bmadcode.com/
│
│  ━━━━━━━━━━━━━━━━━━━━━━━━━━━━━━━━━━━━━━━━━━━━━━━━━━━━━━━━━━━━━━━━━━━━━━━━
│
│
▲  uv not found on PATH. uv is becoming the de facto standard for running BMAD's Python
│  scripts (`uv run script`), and it provisions the interpreter for you. BMAD installs
│  fine without it, but setting up uv now keeps you ahead as workflows adopt it.
│
◇  uv recommended ─────────────────────────────────────────────────────────────╮
│                                                                              │
│  BMAD workflows increasingly run Python scripts via `uv run`, which manages  │
│  the interpreter and dependencies for you — no manual venv or pip needed.    │
│                                                                              │
│  Easiest path: ask your AI agent to "install and set up uv for me".          │
│                                                                              │
│  Or install it yourself:                                                     │
│    macOS/Linux:  curl -LsSf https://astral.sh/uv/install.sh | sh             │
│    Windows:      powershell -c "irm https://astral.sh/uv/install.ps1 | iex"  │
│    Homebrew:     brew install uv                                             │
│    Docs:         https://docs.astral.sh/uv/getting-started/installation/      │
│                                                                              │
├──────────────────────────────────────────────────────────────────────────────╯
◇  Installation directory:
│  /srv/bmad-projects/my-new-project/cd /srv/bmad-projects/my-startup-app
│
●  Resolved installation path: /srv/bmad-projects/my-new-project/cd /srv/bmad-projects/my-startup-app
│
◇  Create directory: /srv/bmad-projects/my-new-project/cd /srv/bmad-projects/my-startup-app?
│  Yes
│
●  Using modules from command-line: bmm
│
●  Using tools from command-line: claude-code
│
│  Selected tools:
│    • Claude Code ⭐
│
●  Using default configuration (--yes flag)
│
●  Using default configuration for BMM Module
│
◇  Shared scripts installed
│
◇  2 module(s) installed
│
◇  Module directories created
│
│  Created directories:
│    planning artifacts: _bmad-output/planning-artifacts
│    implementation artifacts: _bmad-output/implementation-artifacts
│    project knowledge: docs
│
│
●  Applied --set overrides: bmm.planning_depth → config.toml, bmm.skip_architecture_doc → config.toml, bmm.story_granularity → config.toml
◇  Configurations generated
│
●  Setting up claude-code...
│ ╭─BMAD is ready to use!──────────────────────────────────────────────────────────────────────────────────────────────╮
│ │    ✓  Shared scripts                                                                                               │
│ │    ✓  BMad Core Module (v6.9.0, installed)                                                                         │
│ │    ✓  BMad Method (v6.9.0, installed)                                                                              │
│ │    ✓  Module directories                                                                                           │
│ │    ✓  Configurations (generated)                                                                                   │
│ │    ✓  Help catalog                                                                                                 │
│ │    ✓  claude-code                                                                                                  │
│ │                                                                                                                    │
│ │    Installed to: /srv/bmad-projects/my-new-project/cd /srv/bmad-projects/my-startup-app/_bmad                      │
│ │                                                                                                                    │
│ │    Get started:                                                                                                    │
│ │      1. Launch your AI agent from your project folder                                                              │
│ │      2. Not sure what to do? Invoke the bmad-help skill and ask it what to do!                                     │
│ │                                                                                                                    │
│ │      Tip: BMAD workflows increasingly run Python scripts via uv run — uv is                                        │
│ │      becoming the de facto standard. If you don't have it yet, ask your agent to set it up.                        │
│ │                                                                                                                    │
│ │      Blog, Docs and Guides: https://bmadcode.com/                                                                  │
│ │      Community: https://discord.gg/gk8jAdXWmj                                                                      │
│ ╰────────────────────────────────────────────────────────────────────────────────────────────────────────────────────╯
>>> Project ready: /srv/bmad-projects/my-new-project
/srv/bmad-projects/my-new-project/.Step 4: Begin Development
Navigate to your project directory and open your preferred AI coding tool (such as Claude Code or Cursor) to start building:
Once inside, your BMAD agents (Analyst, PM, Architect, Scrum Master, and Developer) are ready to assist you. They will guide you through the entire lifecycle—from refining your project brief to generating architecture and writing functional code.
Step 5: Launch the Agent
Since you selected claude-code as your tool, this is your AI collaborator for the project. You need to launch it inside your project directory:
- Launch: Type
claude(or the command associated with your installation) in your terminal./srv/bmad-projects/my-new-project# claude - Initialize: If this is your first time, it will ask for your Anthropic API key.
- Interact: Once inside the
claudesession, you can talk to it naturally. For example, you can tell it: "I want to build a startup app. Read the docs/project-brief.md file and help me plan the first steps."Welcome to Claude Code v2.1.186 .......................................................... * █████▓▓░ * ███▓░ ░░ ░░░░░░ ███▓░ ░░░ ░░░░░░░░░░ ███▓░ ░░░░░░░░░░░░░░░░░░░ * ██▓░░ ▓ ╭─── Claude Code v2.1.186 ─────────────────────────────────────────────────────────────────────────────────────────────╮ │ │ Tips for getting started │ │ Welcome back JC! │ Run /init to create a CLAUDE.md file with instructions for Cla… │ ╭─── Claude Code v2.1.186 ─────────────────────────────────────────────────────────────────────────────────────────────╮ │ │ Tips for getting started │ │ Welcome back JC! │ Run /init to create a CLAUDE.md file with instructions for Cla… │ │ │ ─────────────────────────────────────────────────────────────── │ │ ▐▛███▜▌ │ What's new │ │ ▝▜█████▛▘ │ Fixed hook events not streaming during SessionStart hooks in h… │ │ ▘▘ ▝▝ │ Added a warning when your login is about to expire, so you can… │ │ Opus 4.8 (1M context) · API Usage Billing · JC’s │ Added a grey ⏸ badge to the footer when in manual permission m… │ ╭─── Claude Code v2.1.186 ─────────────────────────────────────────────────────────────────────────────────────────────╮ │ │ Tips for getting started │ ╭─── Claude Code v2.1.186 ─────────────────────────────────────────────────────────────────────────────────────────────╮ │ │ Tips for getting started │ │ Welcome back JC! │ Run /init to create a CLAUDE.md file with instructions for Cla… │ │ │ ─────────────────────────────────────────────────────────────── │ │ ▐▛███▜▌ │ What's new │ │ ▝▜█████▛▘ │ Fixed hook events not streaming during SessionStart hooks in h… │ │ ▘▘ ▝▝ │ Added a warning when your login is about to expire, so you can… │ │ Opus 4.8 (1M context) · API Usage Billing · JC’s │ Added a grey ⏸ badge to the footer when in manual permission m… │ │ Individual Org │ /release-notes for more │ │ /srv/bmad-projects/my-new-project │ │ ╰──────────────────────────────────────────────────────────────────────────────────────────────────────────────────────╯ ▎ Meet Fable 5, our newest model for complex, long-running work. Switch anytime with /model. ❯ /init ⎿ Credit balance too low · Add funds: https://platform.claude.com/settings/billing ✻ Baked for 0s
From here, you will interact with the AI agents. The agents will work in sequence, producing the following artifacts in your directory:
- Analyst: Generates
project-brief.md. - PM: Generates
prd.mdand theepics/folder. - Architect: Generates
architecture.md(defining your stack and schema). - Scrum Master: Populates the
stories/folder. - Developer: Implements the logic in
src/andtests/.
Step 6: Maintenance and Validation
You can manage the environment using these built-in tools:
- Verify System Health: Run the test suite to ensure everything is configured correctly:
prove /root/app_test/main.t
- Manage Dependencies: If you are working outside a
bmad-initproject, you can initialize the framework in any directory using:npx bmad-method install - View Logs: If an agent fails or you need to debug the workflow, check the logs:
ls /var/log/bmad/
Quick Reference Checklist
- SSH Access Only: No web UI exists; all operations occur in the CLI.
- Storage: All project data lives under
/srv/bmad-projects/. - Security: The environment is hardened with UFW (only port 22 open) and root-only access to your
.envfile.
Additional Information and Example Documentation Output
You can run cat /root/README.md to see more information and useful commands:
root@server-12345:~# cat /root/README.md
# BMAD - AI Agent Development Framework

## Description

BMAD (Breakthrough Method for Agile AI-Driven Development) is an open-source AI agent orchestration framework for developers. It coordinates multiple specialist AI agents - Analyst, PM, Architect, Scrum Master, and Developer - to take a project from brief through to working code using a structured, repeatable workflow.

This image ships a fully pre-configured BMAD environment on Ubuntu 24.04, including Node.js 24 LTS, the bmad-method CLI, Claude Code, and all three tracks (Quick, Standard, Enterprise) pre-wired and ready to use. A first-boot script checks for your Anthropic API key and confirms the environment is ready.

This is a Tier 3 CLI/dev-environment framework. There is no web GUI, no HTTP server, no browser interface, and no SSO. All interaction is via SSH terminal.

---

## Services

| Service  | Ports | Purpose              |
|----------|-------|----------------------|
| OpenSSH  | 22    | Remote terminal access |

BMAD is a CLI framework - not a web application. There are no web services, no HTTP ports, and no browser interface. Port 22 (SSH) is the only open port.

---

## What is installed

| Component      | Detail                                                       |
|----------------|--------------------------------------------------------------|
| OS             | Ubuntu 24.04 LTS                                             |
| Node.js        | v24 LTS                                                      |
| bmad-method    | BMAD CLI - npx bmad-method install                           |
| claude-code    | Anthropic AI coding CLI                                      |
| Tracks         | Quick, Standard, Enterprise (pre-wired at /opt/bmad/tracks/) |
| Agent registry | /opt/bmad/agents/registry.json                               |
| bmad-init      | Convenience wrapper at /usr/local/bin/bmad-init              |

---

## Access

```
SSH only: ssh root@server-ip
```

There is no web UI, no port 80, no port 443, no port 3000. The only open port is 22 (SSH).

---

## How-to-use

### 1. Set your Anthropic API key

On first login, run the interactive setup helper:

```bash
bash /opt/bmad/setup-env.sh
```

Or edit the env file directly:

```bash
nano /etc/bmad/.env
```

Set:

```
ANTHROPIC_API_KEY=sk-ant-...
```

Get your key at: https://console.anthropic.com

### 2. Initialise a project

```bash
bmad-init project-name [quick|standard|enterprise]
```

Examples:

```bash
bmad-init my-api standard
bmad-init prototype quick
bmad-init platform enterprise
```

Projects are created under /srv/bmad-projects/.

### 3. Open your AI coding tool

```bash
cd /srv/bmad-projects/project-name
```

Open Claude Code, Cursor, or any AI coding tool in that directory. The BMAD agents embedded in the project will guide you from brief through to working code.

---

## Tracks

| Track      | Agents active                   | Use when                                |
|------------|---------------------------------|-----------------------------------------|
| quick      | Analyst, PM, Developer          | Prototyping, spikes, small scripts      |
| standard   | All five agents                 | Normal greenfield or brownfield projects|
| enterprise | All five agents plus sub-agents | Large codebases, multi-team delivery    |

Track configs live at /opt/bmad/tracks/

---

## Agents

| Agent        | Role                           | Produces                  |
|--------------|--------------------------------|---------------------------|
| Analyst      | Guided discovery, project brief| project-brief.md          |
| PM           | PRD and epic breakdown         | prd.md, epics/            |
| Architect    | Tech stack, DB schema, API spec| architecture.md           |
| Scrum Master | User stories, story context    | stories/                  |
| Developer    | Code implementation            | src/, tests/              |

---

## Manage

### bmad-method CLI

```bash
# Show available commands
npx bmad-method help

# Initialise BMAD in an existing project directory
cd /srv/bmad-projects/my-project
npx bmad-method install
```

### bmad-init wrapper

```bash
# Show usage
bmad-init

# Create a new standard project
bmad-init my-project standard
```

### Environment config

```bash
# View config
cat /etc/bmad/.env

# Edit config
nano /etc/bmad/.env

# Run interactive API key setup
bash /opt/bmad/setup-env.sh
```

### Logs

```bash
# BMAD agent output
ls /var/log/bmad/

# First-boot log
cat /var/log/cloud-init-output.log
```

### Tests

```bash
# Run the TAP test suite to verify the image is healthy
prove /root/app_test/main.t
```

### UFW Firewall

```bash
# Check firewall status
ufw status verbose
```

---

## Security hardening

| Hardening         | Detail                                         |
|-------------------|------------------------------------------------|
| UFW firewall      | Only port 22 (SSH) open. Default deny incoming |
| SSH rate limiting | Port 22 set to LIMIT - brute force protection  |
| .env permissions  | Mode 0600 - root read only                     |
| API key           | Never baked into the image - set after launch  |
| No web server     | No HTTP/HTTPS ports - no web attack surface    |

---

## Notes

- BMAD requires an Anthropic API key to run agents. Set ANTHROPIC_API_KEY in /etc/bmad/.env before calling bmad-init.
- This is a developer playground image - not a production service. It has no auth layer, no multi-user access control, and no SSO.
- Claude Code is the recommended AI coding companion. Connect it to the same API key.

---

## Links

- BMAD-METHOD GitHub: [https://github.com/bmad-ai/bmad-method](https://github.com/bmad-ai/bmad-method)
- Anthropic Console (API keys): [https://console.anthropic.com](https://console.anthropic.com)
- Claude Code Documentation: [https://docs.anthropic.com/en/docs/claude-code](https://docs.anthropic.com/en/docs/claude-code)
- Ubuntu 24.04 LTS Release Notes: [https://wiki.ubuntu.com/NobleNumbat/ReleaseNotes]https://wiki.ubuntu.com/NobleNumbat
Summary
In short, BMAD - AI Agent Development Framework is the best smart assistant for software development. You can use it to automate tasks, organize your team, and build anything from simple apps to advanced AI tools. Now, with a Bluehost VPS with BMAD pre-installed, you can bypass the complicated setup and get your ideas out there!