 ChatGPT,
  Claude,
  Gemini,
  Grok — all four for
 Purchase a Self-Managed VPS with Coolify Installation
Coolify is an open-source, self-hosted platform that simplifies deploying and managing applications, databases, and websites. Built as a self-hosted alternative to platforms like Heroku, it allows developers and businesses to turn any private server into a fully managed cloud environment. It automates the deployment pipeline, making it easy to host multiple projects on your own infrastructure without the high costs.
Why Use Coolify?
Coolify is a user-friendly control panel that lets you easily launch and manage websites, apps, and databases on your own private server. It gives you the smooth, automated experience of expensive platforms like Heroku or Vercel, where your site updates automatically whenever you save your code, but without the hefty monthly fees. By putting you back in control of your own digital space, it cuts out the confusing tech setup and eliminates high cloud bills, allowing you to run as many projects as your server can handle for one low, predictable price.
Uses of Coolify
Coolify’s functionality is widely applicable in web development and software management:
- Application Hosting: Deploy and manage websites and applications built on any major framework like Next.js, Vue, Laravel, Python, or Go.
- Database Management: Launch, configure, and automatically back up databases like PostgreSQL, MySQL, MongoDB, and Redis with a single click.
- Self-Hosting Open-Source Tools: Easily run independent instances of popular software such as WordPress, Ghost blogs, analytics tools, and automation platforms.
- Automated Deployments: Connect your code repository (like GitHub) to automatically build and update your live website every time you save your work.
- Multi-Server Control: Act as a central command center to manage, monitor, and deploy apps across several different servers from one place.
System Requirements
Before deploying, ensure your server meets the following minimum hardware requirements. For a stable production deployment, we recommend using higher specifications than the minimum requirements.
- Do not purchase a server that only meets the minimum requirements (2 vCPUs, 2G RAM, 30G Disk). The minimum specifications represent the software's bare survival threshold and do not account for operating system overhead or production workloads. Running with lower specifications can result in severe performance slowdowns, system freezes, or unexpected crashes during traffic spikes.
- For a stable deployment, we recommend using the recommended specifications (4 vCPU Cores, 8 GB DDR5 RAM, and 200GB NVMe Storage). While minimum specs might be sufficient for basic installation, consider allocating additional disk space if you plan to store recordings, logs, or other application data.
| Resource | Minimum | Recommended |
|---|---|---|
| vCPUs | 2 | 4 vCPU Cores |
| RAM | 2G | 8 GB DDR5 RAM |
| Disk | 30G | 200GB NVMe Storage |
How to Purchase a Self-Managed VPS with Coolify Installation
We’ve created a short video on how to purchase a Self-Managed VPS with Coolify Installation.
To deploy and manage Coolify efficiently, start by purchasing a Self-Managed VPS Hosting from Bluehost. Follow these steps:

New to VPS or not sure where to start? No worries! At the top of the Self-Managed VPS purchase page, you’ll see the Pre-configured Setup section. This handy feature is perfect if you’re feeling a bit unsure—just pick the type of project you want, like WordPress Site, AI Agent/Claude Code, Dev/Staging, or eCommerce Store. We’ll take care of the rest by automatically filling in the best plan, operating system, and template for you.
- Super simple for beginners or anyone who just wants a quick setup
- Instantly get the recommended settings for your project
- Skip the guesswork and save time
- You can still customize things later if you want
- In your browser, go to https://www.bluehost.com/vps-hosting.
- Click the Choose Plan button under your preferred VPS hosting plan.
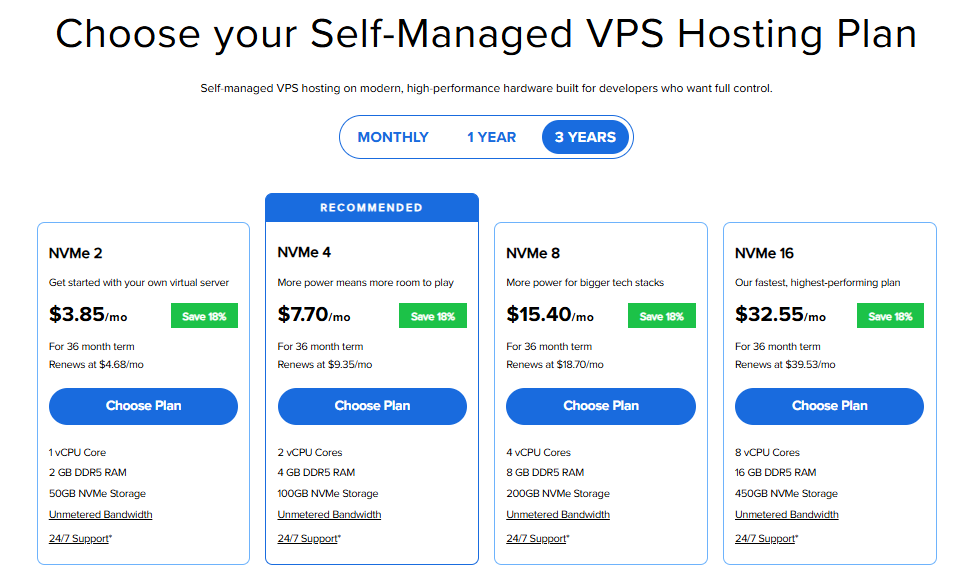
Important: Pricing is subject to change—please visit https://www.bluehost.com/vps-hosting for current sign-up pricing. For renewal rates, see your Bluehost Portal's Renewal Center.
- Select your preferred Data Center location.

- On the Cart page, configure your server as needed:
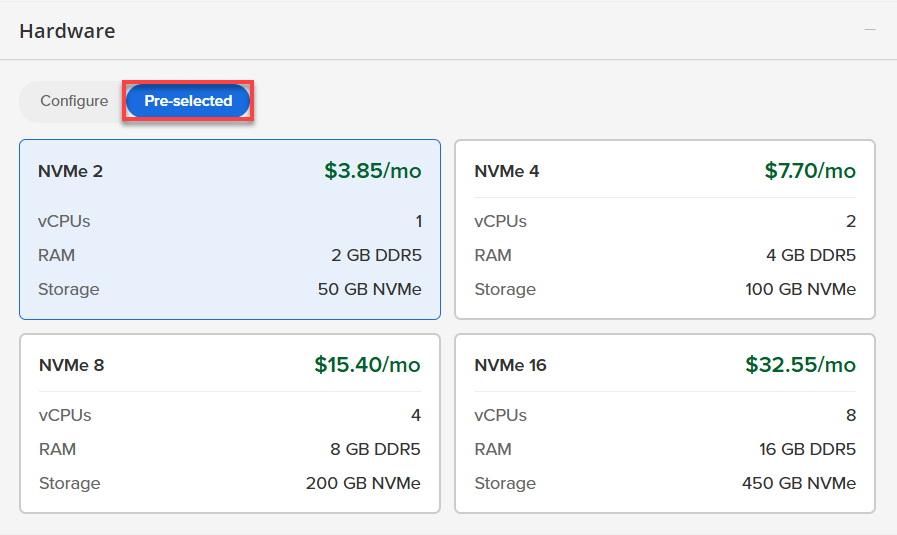
- Hardware:
- Pre-selected:
You can select a different plan if you need more resources.
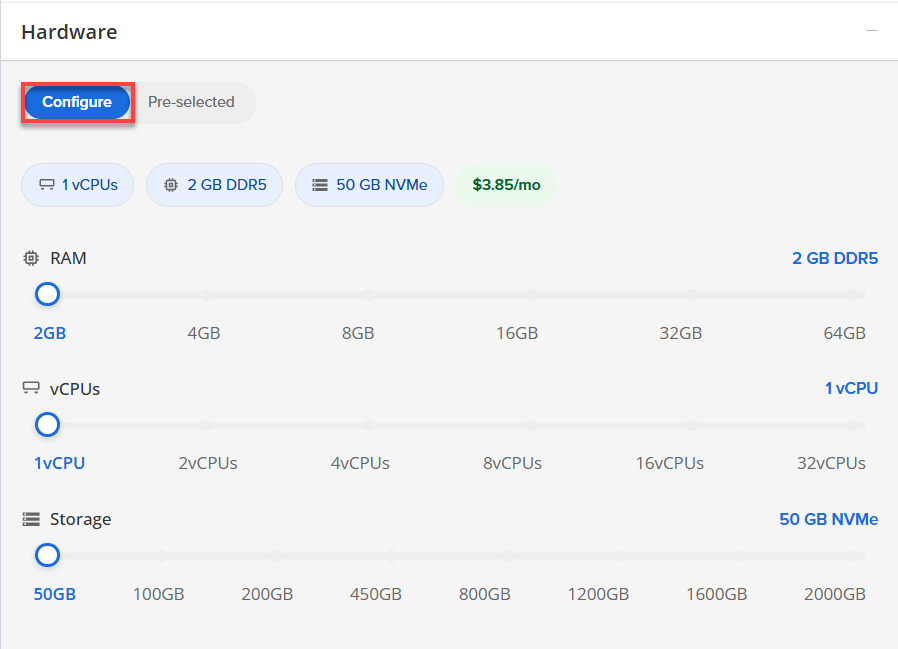
- Configure:
Click Configure to further customize your hardware.
Adjusting resources may affect your total monthly price.
- Pre-selected:
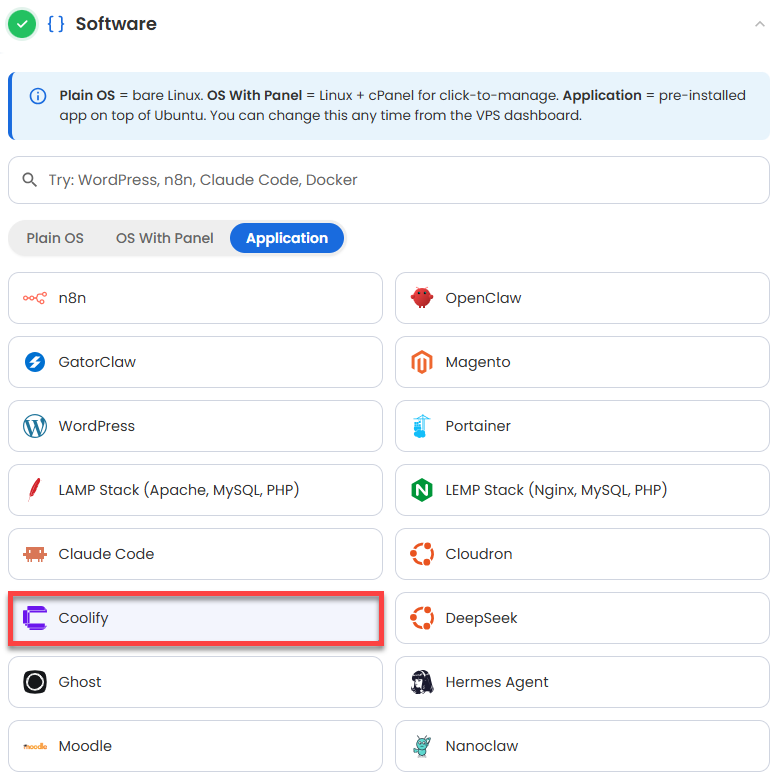
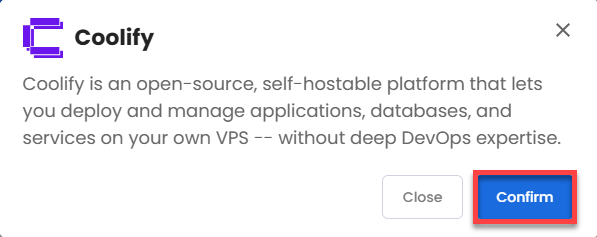
- Software:
If the selected plan does not meet the app's minimum requirements, the app will be grayed out.
- Click the Application tab.
- Choose Coolify.
- Click Confirm to continue.
- Hardware:
- Add-Ons:
- Premium Support:
Priority access to our team, for faster responses and personalized technical help.

- Premium Support:
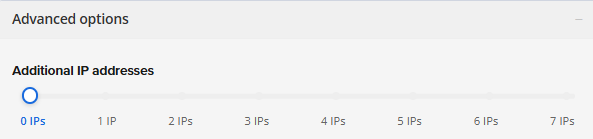
- In the Advanced options:
- Extra IP's: You can add extra IP addresses for an additional fee.
Pricing changes based on how many IPs you add. - Hostname: Assign a custom hostname to easily identify your server. This is optional.
- Extra IP's: You can add extra IP addresses for an additional fee.
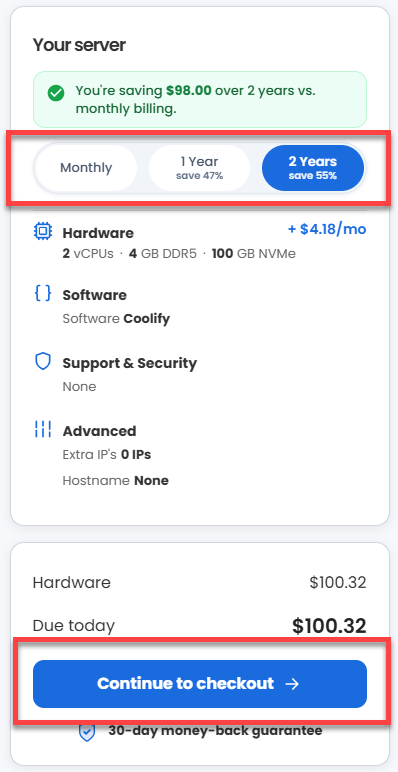
- Select your preferred billing term and view your Order Summary. Click the Continue to Checkout button to proceed.
- Do the following on the Checkout page:
If you're new with Bluehost:
- Create your Bluehost account by using your email address or by connecting with your Google, Apple, or GitHub account — whichever you prefer!

- Select your preferred payment method: credit card, Google Pay, or PayPal. Enter your billing information.

If you have an account with us, you will see your Bluehost login details when you are logged into your Bluehost Portal. If you are not logged in, please click the Log In link.

- Create your Bluehost account by using your email address or by connecting with your Google, Apple, or GitHub account — whichever you prefer!
- In the Shopping Cart section, you can still adjust your billing term if needed.
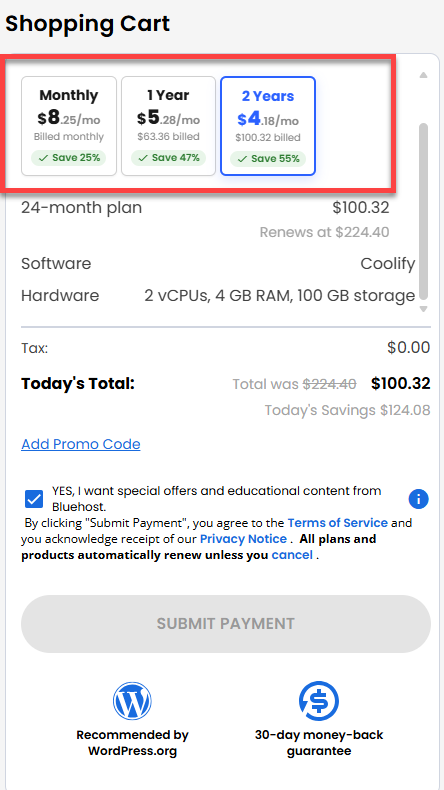
- Review the items in your cart, add a Promo Code if you have one, and then click Submit Payment to complete the purchase.
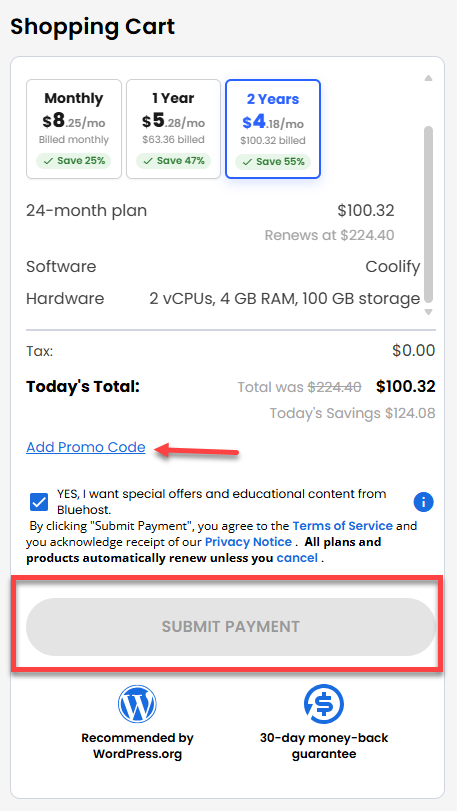
After completing the purchase, your VPS hosting will begin provisioning. You can access and manage your new VPS hosting in the Hosting tab of your Bluehost Portal.
How to Set Up Coolify
Once the installation is complete, follow the steps below to set up your application.
- Log in to your Bluehost Portal.
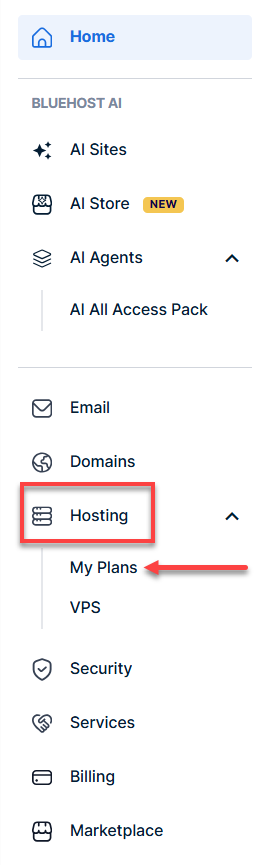
- In the left-hand menu, click Hosting, then select My Plans.
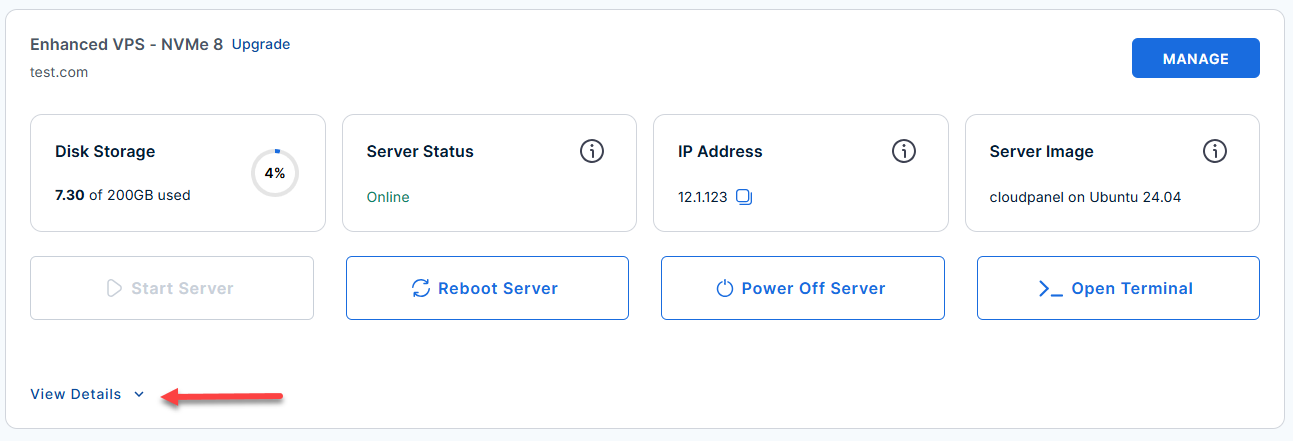
- Locate the server you want to manage, then click View Details in the bottom-left corner to expand the section and access additional server information.
- Click the Reset Password.
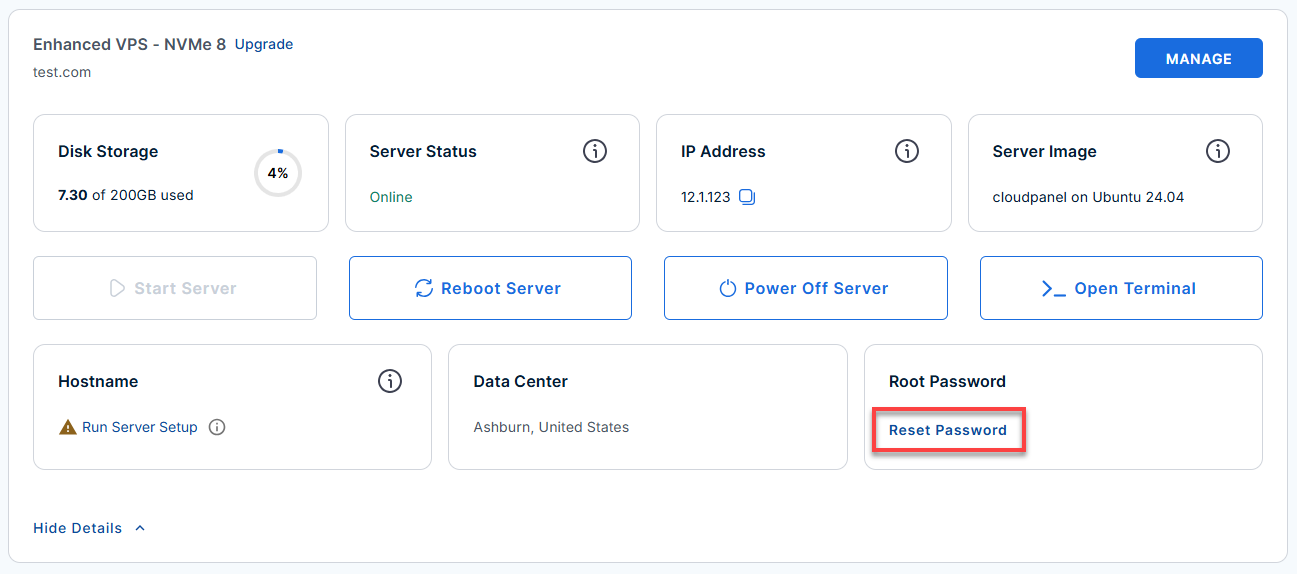
- In the pop-up window, type your new root password, then click Reset Password again to confirm and save the changes.
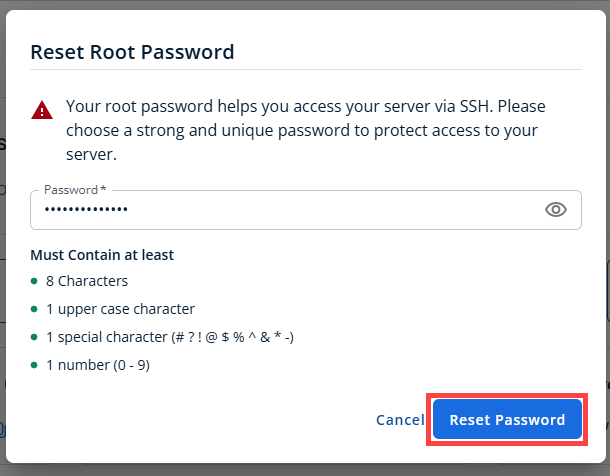
- Connect to your VPS via SSH.
Open your computer's terminal (or an SSH client like PuTTY) and run the following command to log into your server as the administrator, using your server's public IP address:Replaceyour_server_ipwith your actual server IP address.
Follow the prompts and enter the new root password you created in the step above. When you first connect, you'll see a welcome message like this:ssh root@your_server_ipWelcome to Ubuntu 24.04.4 LTS (GNU/Linux 6.8.0-117-generic x86_64) ******************************************************************************** Coolify - Self-Hosted Cloud Platform Service Status: Docker : active Coolify : Up About a minute (healthy) Traefik : not running (starts after first server is registered) Management UI : http://12.6.123.111:8000 First-time setup: 1. Open http://12.6.123.111:8000 -- fill in your details and create account 2. Click 'Let's go!' -> 'This Machine' -> 'Create My First Project' 3. Click 'Deploy Your First Resource' to start deploying If 'This Machine' validation fails, run: bash /opt/coolify/setup-localhost.sh Credentials : sudo cat /root/.app_passwords Documentation : /root/README.md Note: Traefik (ports 80/443) only starts after you register a server in the Coolify UI. That is expected behavior. - View server credentials (if needed):
Example Output:sudo cat /root/.app_passwords
COOLIFY_ADMIN_PASSWORD="test1234abcd42c1f5e3b2d1f7c4" COOLIFY_DB_PASSWORD="abc1234abcd15e4ad32e5d6bc" - Open the Coolify Management UI in your browser and create your account:
- Go to
http://<your-server-ip>:8000/Replaceyour_server_ipwith your actual server IP address. - Fill in your email, password, and other details to create your first admin account.
- Go to
- Register your server and create your first project:
- After logging in to the Coolify UI, click "Let's go!".
- Choose This Machine to register your current server and follow the prompts.
- Enter a project name and finish the wizard. You’ll see your server and project in the dashboard.
- Deploy your first resource (app, database, or service):
- Click "Deploy Your First Resource" on the dashboard.
- Select the type of resource, fill out configuration details, and click deploy.
- Coolify will provision and show deployment/logs in the UI.
- Troubleshooting validation:
Run this if Coolify UI fails to register the server, then retry server registration from the web UI.bash /opt/coolify/setup-localhost.sh
- Credentials and configuration locations:
- List credentials:
sudo cat /root/.app_passwords
- List credentials:
Additional Information and Example Documentation Output
You can run cat /root/README.md to see more information and useful commands:
Example Output:
root@server-123456:~# cat /root/README.md
# Coolify

## Description

Coolify is an open-source, self-hostable platform that lets you deploy and manage applications, databases, and services on your own VPS -- without deep DevOps expertise.

Think of it as a self-hosted Heroku or Netlify: push your code, pick a runtime, and Coolify handles containers, networking, reverse-proxying, and TLS certificates automatically via its built-in Traefik proxy.

This image ships Docker and all Coolify container images pre-pulled, so the management UI is available within about 30 seconds of first boot.
Create your admin account, click "This Machine" in the setup wizard, and you're ready to deploy.

Traffic flow:

```
Browser (HTTPS/HTTP)
        |
        v
  Traefik (ports 80, 443)   <- managed by Coolify
        |
   +------------------------------+
   |  Coolify apps / databases    |
   |  (Docker containers)         |
   +------------------------------+

Browser -> Coolify management UI:
  http://:8000  (direct -- bypasses Traefik)
```

Coolify's Traefik proxy manages SSL certificates for all deployed applications via Let's Encrypt automatically once a domain is pointed at the server.


## Services

Service             | Port(s)    | Purpose
--------------------|------------|-----------------------------------------
Coolify UI          | 8000       | Management dashboard (direct access)
Traefik proxy       | 80, 443    | App routing and automatic TLS
Traefik dashboard   | 8080       | Proxy dashboard (SSH-tunnel access only)
Coolify realtime    | 6001       | WebSocket push for live UI updates
PostgreSQL          | 5432       | Coolify internal database (Docker, local)
Redis               | 6379       | Coolify queues / caching (Docker, local)
OpenSSH             | 22         | SSH (rate-limited by UFW)

Ports are protected using UFW.  Note: Docker bypasses UFW for container-mapped ports; port 8080 (Traefik dashboard) is intentionally not opened in UFW -- access it via SSH tunnel.


## How-to-use

### Initial access

Open http://:8000 in your browser.  The registration page appears on the first visit.

1. Fill in your name, email, and password, then click **"Create Account"**.
2. A welcome screen appears -- click **"Let's go!"**.
3. On "Choose Server Type", pick the option that matches your setup:

   | Option | When to use |
   |--------|-------------|
   | **This Machine** (Quick Start) | Deploy apps on the same server running Coolify.  Good for single-server setups and testing. |
   | **Remote Server** (Recommended) | Connect Coolify to a separate server via SSH -- a cloud VPS, bare metal, or home server.  Keeps Coolify isolated from your workloads. |
   | **Hetzner Cloud** | Provision and manage Hetzner Cloud servers directly from the Coolify UI.  Requires a Hetzner API key. |

   For most users getting started: click **"This Machine"**.  Coolify validates the connection automatically.
4. On "Project Setup", click **"Create 'My First Project'"**.
5. The "Setup Complete!" screen confirms everything is ready.  Click **"Deploy Your First Resource"** to start deploying.

Credentials (if any) are stored in /root/.app_passwords:

```sh
sudo cat /root/.app_passwords
```

### Troubleshooting: "This Machine" validation fails

If the wizard shows a 504 or SSH error during validation, Coolify may have generated its own SSH key that isn't yet authorized on the host.  Run:

```sh
bash /opt/coolify/setup-localhost.sh
```

This reads all keys from /data/coolify/ssh/keys/ and adds any missing public keys to /root/.ssh/authorized_keys.  Then retry validation in the Coolify wizard.

### Enabling HTTPS for deployed apps

Coolify manages Traefik and Let's Encrypt automatically.  To enable HTTPS for an app:

1. Point a domain's DNS A record at .
2. In Coolify, open your app, go to Domains, and enter https://yourdomain.com.
3. Enable "Generate SSL Certificate" -- Coolify instructs Traefik to obtain a Let's Encrypt cert.

No manual certbot or nginx configuration is required.

### Enabling HTTPS for the Coolify management UI

By default the management UI is served over plain HTTP on port 8000.  To enable HTTPS:

1. Point a domain at the server and configure it in Coolify -> Settings -> Instance Settings.
2. Enable Wildcard / FQDN for the instance.
3. Coolify's Traefik will serve the UI over HTTPS on port 443.

### Traefik dashboard (monitoring proxy state)

The Traefik dashboard runs on port 8080 (not publicly open).  Access it via SSH tunnel:

```sh
ssh -L 8080:localhost:8080 root@
# then open http://localhost:8080 in your browser
```

### API token (for SSO / automation)

After creating your admin account:

1. Go to Profile -> API Tokens -> Create Token.
2. Copy the token and append it to /root/.app_passwords:
   COOLIFY_API_TOKEN=

The API token enables programmatic server management and can be used to build a signed-redirect SSO path.

### Managing Coolify services

```sh
# Status
systemctl status coolify
docker ps

# Restart all Coolify containers
systemctl restart coolify

# View Coolify application logs
docker logs coolify

# View first-boot log
cat /var/log/coolify/onboot.log

# Traefik logs
docker logs coolify-proxy

# Stop everything cleanly
systemctl stop coolify
```

### Updating Coolify

```sh
cd /data/coolify/source
docker compose -f docker-compose.yml -f docker-compose.prod.yml pull
systemctl restart coolify
```

### Backup and restore

Coolify stores all persistent data in Docker volumes under /data/coolify/.

```sh
# Backup
tar czf coolify-backup-$(date +%Y%m%d).tar.gz /data/coolify/

# Restore
tar xzf coolify-backup-YYYYMMDD.tar.gz -C /
systemctl restart coolify
```


## Minimum Resources

Resource | Minimum
---------|--------
vCPUs    | 2
RAM      | 2G
Disk     | 30G


## Links

Documentation: [https://coolify.io/docs](https://coolify.io/docs)

Community: [https://discord.gg/coolify](https://discord.gg/coolify)

GitHub: [https://github.com/coollabsio/coolify](https://github.com/coollabsio/coolify)

Manage: [http://{server_ip}:8000](http://{server_ip}:8000)
Summary
Coolify empowers users to efficiently manage and deploy websites, applications, and databases on their own servers. Its intuitive interface and broad compatibility make it a valuable tool for web developers and businesses seeking greater control and flexibility. By combining automated workflows with self-managed VPS hosting, Coolify offers a reliable, scalable, and cost-effective solution for modern web projects.