 ChatGPT,
  Claude,
  Gemini,
  Grok — all four for
 Purchase a Self-Managed VPS with Langflow Installation
Langflow is a powerful and user-friendly application for building and managing AI workflows on your VPS environment. With Langflow, you can easily create, configure, and deploy custom language models and automations through a secure web interface.
Why Use Langflow?
Langflow provides a secure and intuitive platform for managing your AI workflows. It allows you to perform essential tasks such as creating flows, configuring integrations, monitoring performance, and deploying models—all from a centralized dashboard.
Uses of Langflow
Langflow can be used for a variety of AI and automation tasks:
- Workflow Management: Build and manage multiple AI workflows, configure integrations, and set up triggers.
- Model Deployment: Deploy custom language models and manage their lifecycle.
- Resource Monitoring: View real-time statistics, monitor CPU, RAM, and disk usage for your AI tasks.
- Security Settings: Configure access controls, manage user permissions, and set up backups for enhanced security.
Langflow is ideal for anyone who wants a reliable, secure, and easy-to-use AI workflow management solution on their VPS.
System Requirements
Before deploying, ensure your server meets the following minimum hardware requirements. For a stable production deployment, we recommend using higher specifications than the minimum requirements.
- Do not purchase a server that only meets the minimum requirements. The minimum specifications represent the software's bare survival threshold and do not account for operating system overhead or production workloads. Running with only 2 vCPUs, 4 GB RAM, and 20 GB disk space can result in severe performance slowdowns, system freezes, or unexpected crashes during traffic spikes.
- For a stable deployment, we recommend using at least 4 vCPUs, 8 GB RAM , and 30 GB disk space. While lower specs might be sufficient for basic installation, consider allocating additional disk space if you plan to store recordings, logs, or other application data.
| Resource | Minimum | Recommended |
|---|---|---|
| CPU | 2 vCPUs | 4 vCPUs |
| RAM | 4 GB | 8 GB |
| Disk | 20 GB | 30 GB |
How to Purchase a Self-Managed VPS with Langflow Installation
To get started with Langflow on Bluehost, you first need to purchase a Self-Managed VPS plan. Follow the steps below:

New to VPS or not sure where to start? No worries! At the top of the Self-Managed VPS purchase page, you’ll see the Pre-configured Setup section. This handy feature is perfect if you’re feeling a bit unsure—just pick the type of project you want, like WordPress Site, AI Agent/Claude Code, Dev/Staging, or eCommerce Store. We’ll take care of the rest by automatically filling in the best plan, operating system, and template for you.
- Super simple for beginners or anyone who just wants a quick setup
- Instantly get the recommended settings for your project
- Skip the guesswork and save time
- You can still customize things later if you want
- In your browser, go to https://www.bluehost.com/vps-hosting.
- Click the Choose Plan button under your preferred VPS hosting plan.
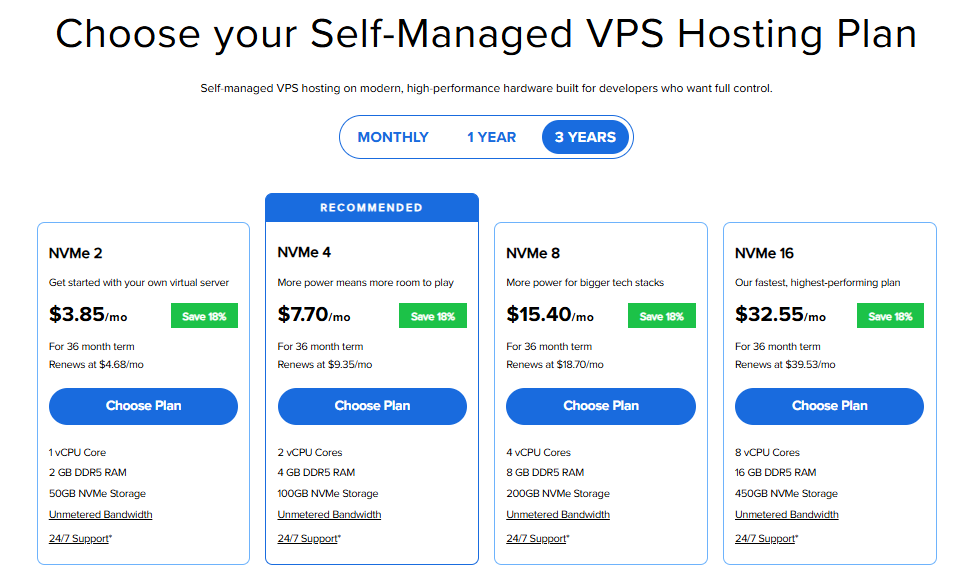
Important: Pricing is subject to change—please visit https://www.bluehost.com/vps-hosting for the current introductory/sign-up offer for Bluehost VPS Hosting. For the most up-to-date renewal pricing, visit your Bluehost Portal Renewal Center.
- Select your preferred Data Center location.

- On the Cart page, you can configure your server to fit your needs in the following section:
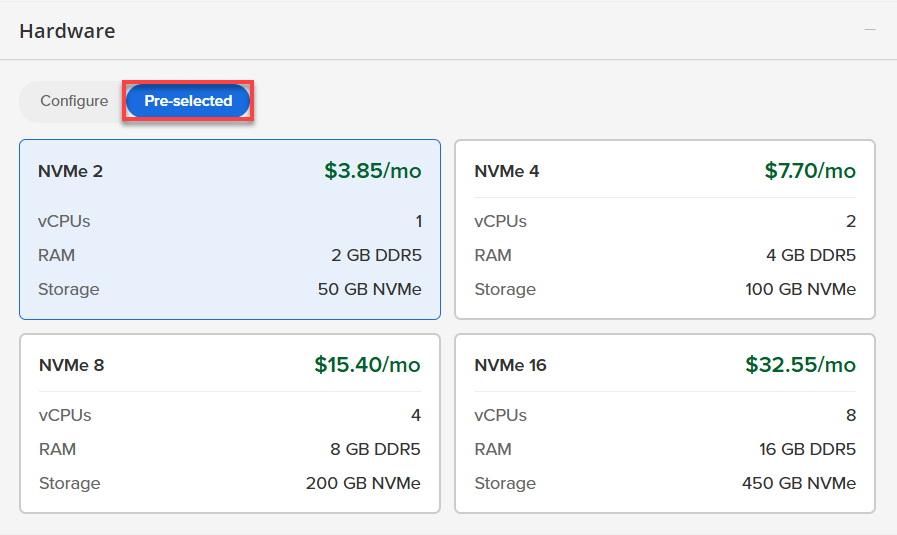
- Hardware:
- Pre-selected:
You can select a different Self-Managed VPS plan in this section.
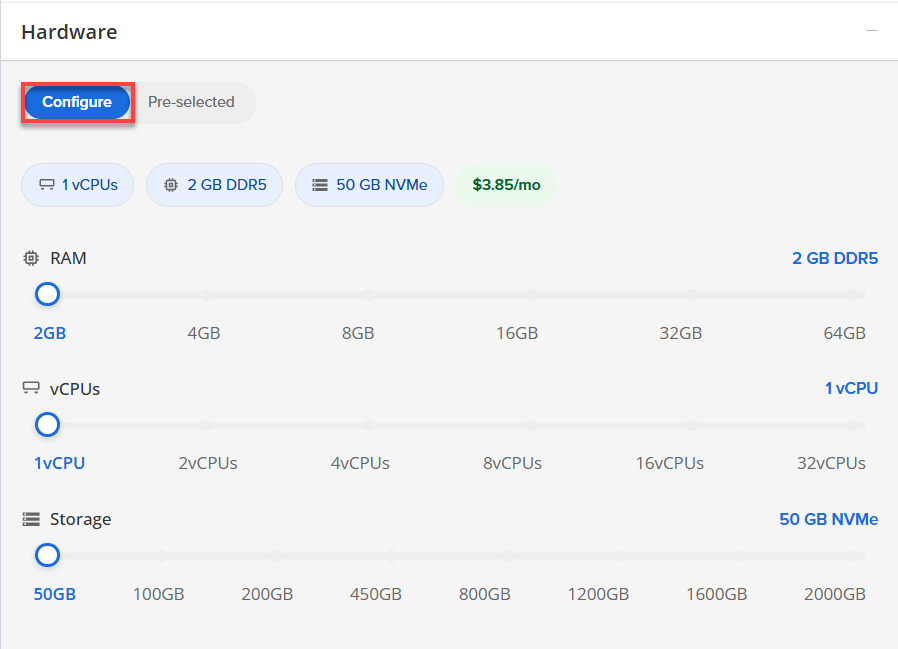
- Configure:
Click Configure to customize your package.
Note that your changes help customize your plan, and the overall cost will adjust accordingly to fit your needs.
- Pre-selected:
- Software:
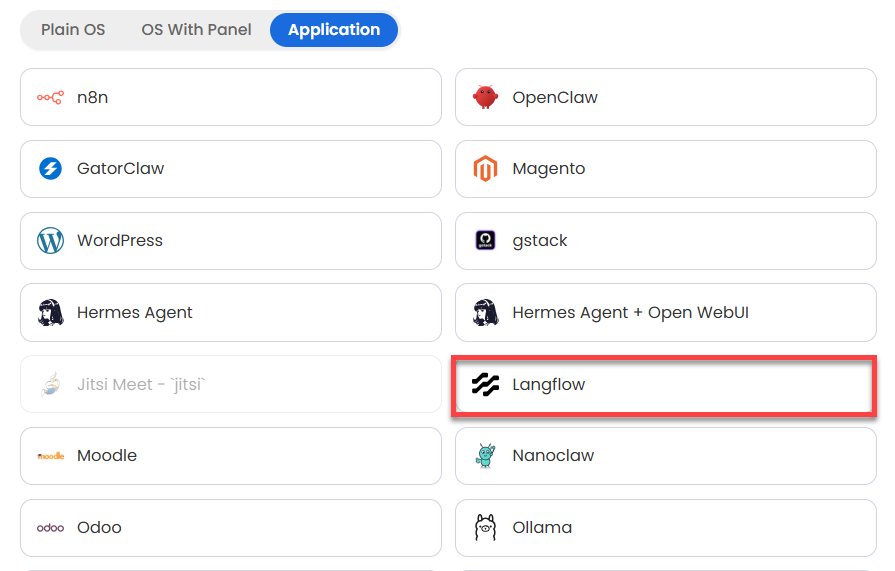
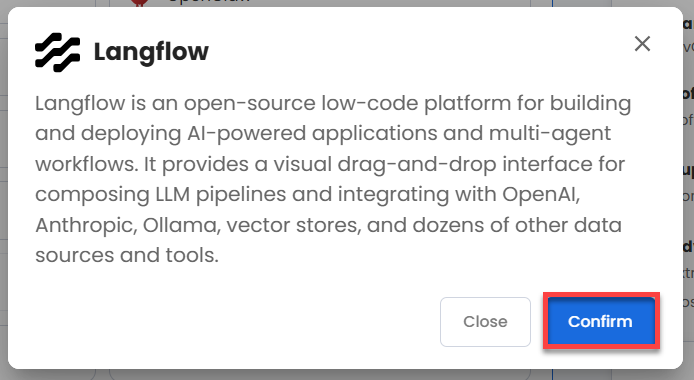
If the selected plan does not meet the app's minimum requirements, the app will be grayed out.
- Click on the Application Tab.
- Choose Langflow.
- Click Confirm to continue.
- Hardware:
- Add-Ons:
- Support & Security:
- Premium Support - Recurring:
This service provides you with priority access to our expert team for faster responses and personalized assistance whenever you need it.

- Premium Support - Recurring:
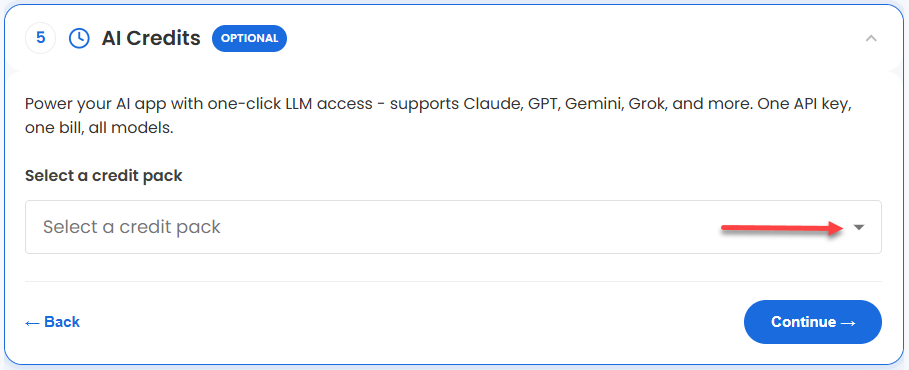
- AI Credits:
Purchase an AI credit package to effortlessly connect your application to leading LLMs through a single API key and bill. This step is optional.
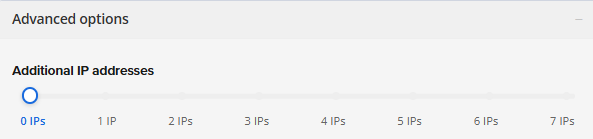
- In the Advanced options:
- Extra IP's: You can add extra IP addresses for an additional fee.
Pricing changes based on how many IPs you add. - Hostname: Assign a custom hostname to easily identify your server. This is optional.
- SSH Key: Add an SSH public key for secure, password-less access after provisioning.
- Extra IP's: You can add extra IP addresses for an additional fee.
- Support & Security:
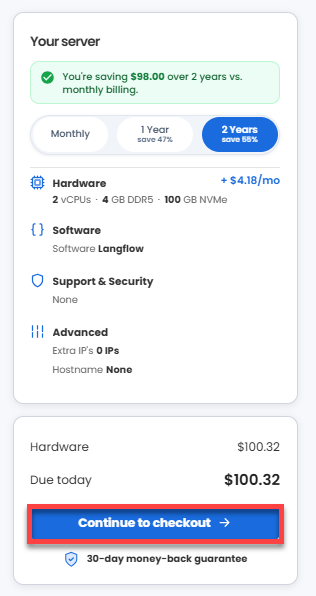
- Select your preferred billing term and view your Order Summary. Click the Continue to Checkout button to proceed.
- Do the following on the Checkout page:
If you're new with Bluehost:
- Create your Bluehost account by using your email address or by connecting with your Google, Apple, or GitHub account — whichever you prefer!

- Choose your payment method: credit card, Google Pay, or PayPal. Enter your billing information.

If you have an account with us, you will see your Bluehost login details when you are logged into your Bluehost Portal. If you are not logged in, please click the Log In link.

- Create your Bluehost account by using your email address or by connecting with your Google, Apple, or GitHub account — whichever you prefer!
- In the Shopping Cart section, you can still adjust your billing term if needed.
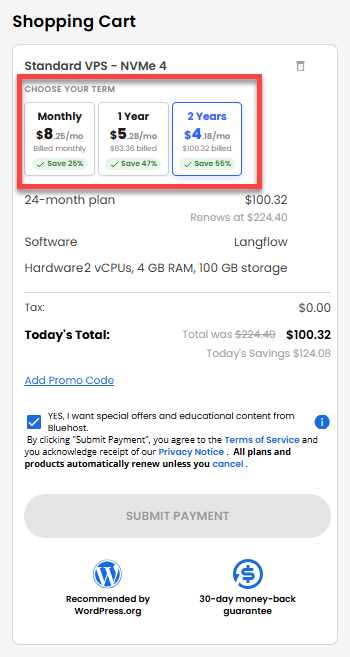
- Review the items in your cart, add a Promo Code if you have one, and then click Submit Payment to complete the purchase.
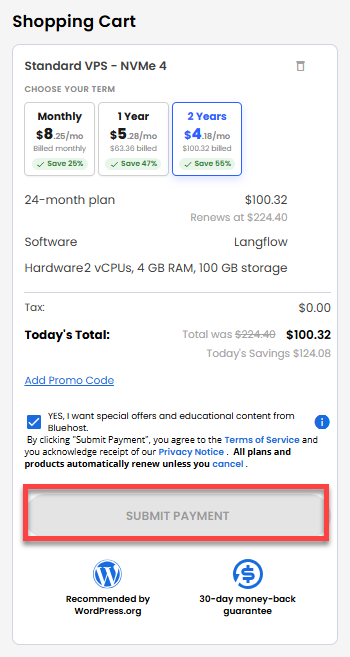
After completing the purchase, your VPS hosting will begin provisioning. You can access and manage your new VPS hosting in the Hosting tab of your Bluehost Portal.
How to Set Up and Manage a Langflow Server
Langflow is an open-source low-code platform for building and deploying AI-powered applications and multi-agent workflows. It provides a visual drag-and-drop interface for composing LLM pipelines and integrating with OpenAI, Anthropic, Ollama, vector stores, and dozens of other data sources.
This guide outlines how the server operates out of the box and the steps required to start building your AI pipelines securely.
Phase 1: The Automatic First Boot (Behind the Scenes)
Note: Initial startup takes 2-5 minutes while Langflow initializes its SQLite database and serves frontend assets. A background cloud-init script handles all initial provisioning and self-deletes to prevent re-running.
- Security Generation
The system generates a random superuser password and a secret key (LANGFLOW_SECRET_KEY) to encrypt your API keys. It writes these credentials securely to /root/.app_secrets. - HTTPS / SSL Setup
The server detects its public IP and requests a Let's Encrypt TLS certificate via Certbot so your browser shows a secure connection. If on a private network, it falls back to a self-signed certificate. Nginx is configured automatically to reverse-proxy traffic to the backend. - Application Launch
A program called Supervisor starts the Langflow backend (safely bound to 127.0.0.1:7860, so it isn't directly exposed to the internet).
Phase 2: Reset Your Root Password
- Log in to your Bluehost Portal.
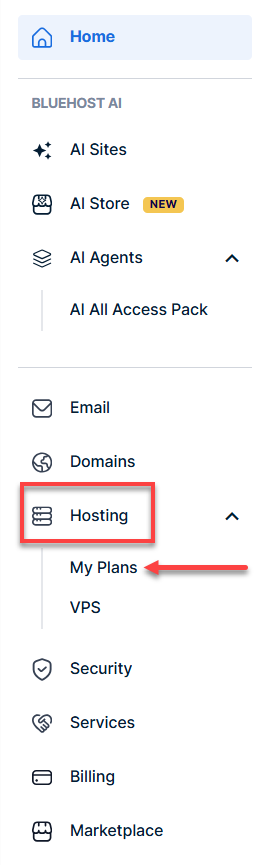
- In the left-hand menu, click Hosting, then select My Plans.
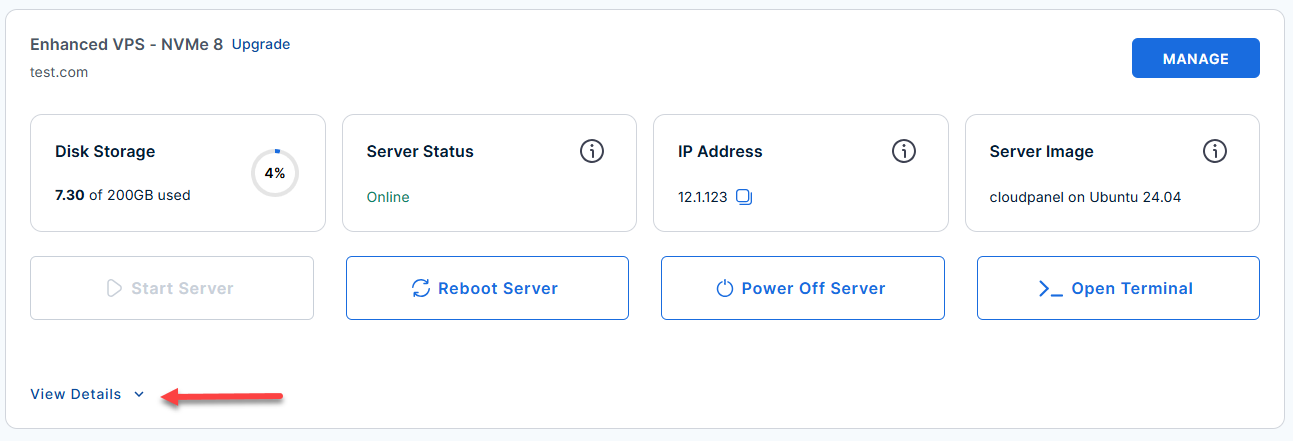
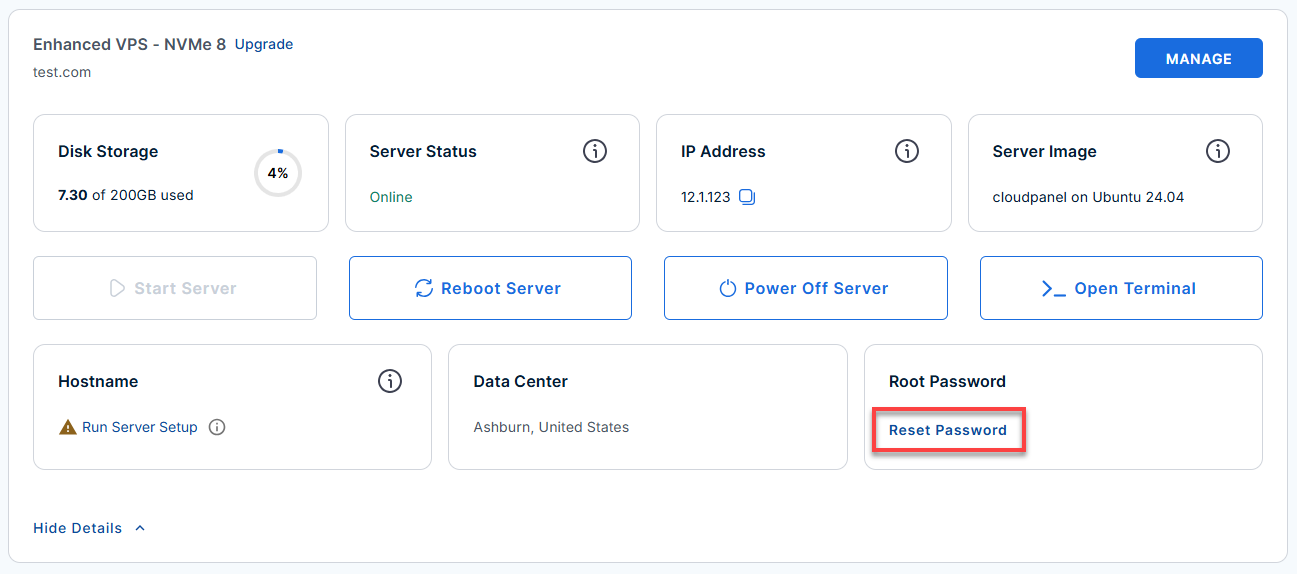
- Locate the server you want to manage, then click View Details in the bottom-left corner to expand the section and access additional server information.
- Click the Reset Password.
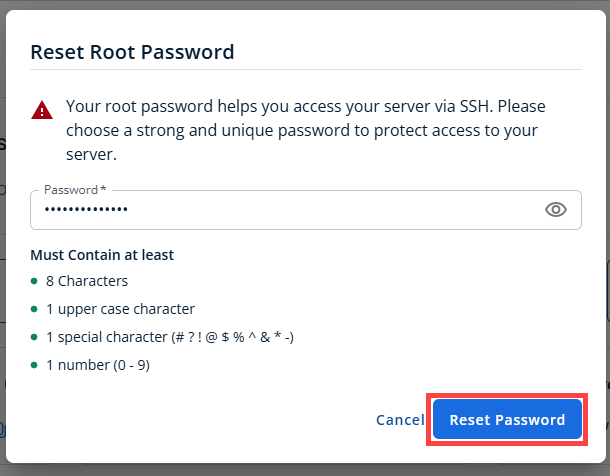
- In the pop-up window, type your new root password, then click Reset Password again to confirm and save the changes.
Phase 3: Connect To Your Server Through SSH
Now that the automated setup is complete, you can retrieve your generated credentials and log in.
- Connect to your VPS via SSH.
Open your computer's terminal (or an SSH client like PuTTY) and run the following command to log into your server as the administrator, using your server's public IP address:Replaceyour_server_ipwith your actual server IP address.
Follow the prompts and enter the new root password you created in the step above.ssh root@your_server_ip - The login credentials are shown in the MOTD (Message of the Day) each time you connect, or you can print them out by running:
cat /root/.app_secrets
Example Output:
root@server-646882:~# cat /root/.app_secrets
LANGFLOW_SUPERUSER=admin
LANGFLOW_SUPERUSER_PASSWORD=t3st159f3951a4fe47e30fe7
LANGFLOW_SECRET_KEY=T3stddab02e4360af103d65e0bd9dea300d130fa00f408bfa86af22aef9be6a6
SITE_URL=https://12.3.456.789
Phase 4: Access the Web Panel
Now, you will leave the terminal for a moment and move to your web browser.
<server-ip> with your actual server IP address.- Navigate to the panel: Open your web browser and go to https://<server-ip>. HTTP (port 80) redirects to HTTPS automatically. Note: If using a private IP with a self-signed certificate, you will need to accept your browser's security warning to proceed.
Example:
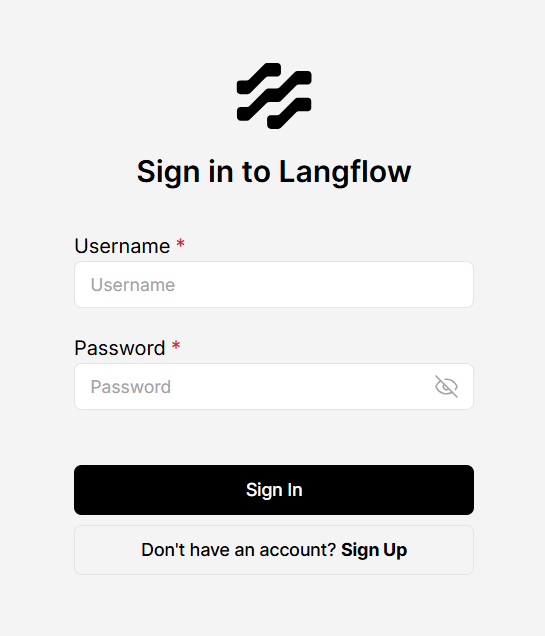
[http://12.3.456.789] (http://12.3.456.789) - Log in: Use the admin username and the password you retrieved in Phase 3, Step 2, to access your dashboard.
Phase 5: Building Flows and Connecting LLMs
- Create your first flow
Click Create first flow to start from a blank canvas, or choose a starter template from the gallery to explore the interface. Drag components from the left sidebar onto the canvas and connect their inputs and outputs.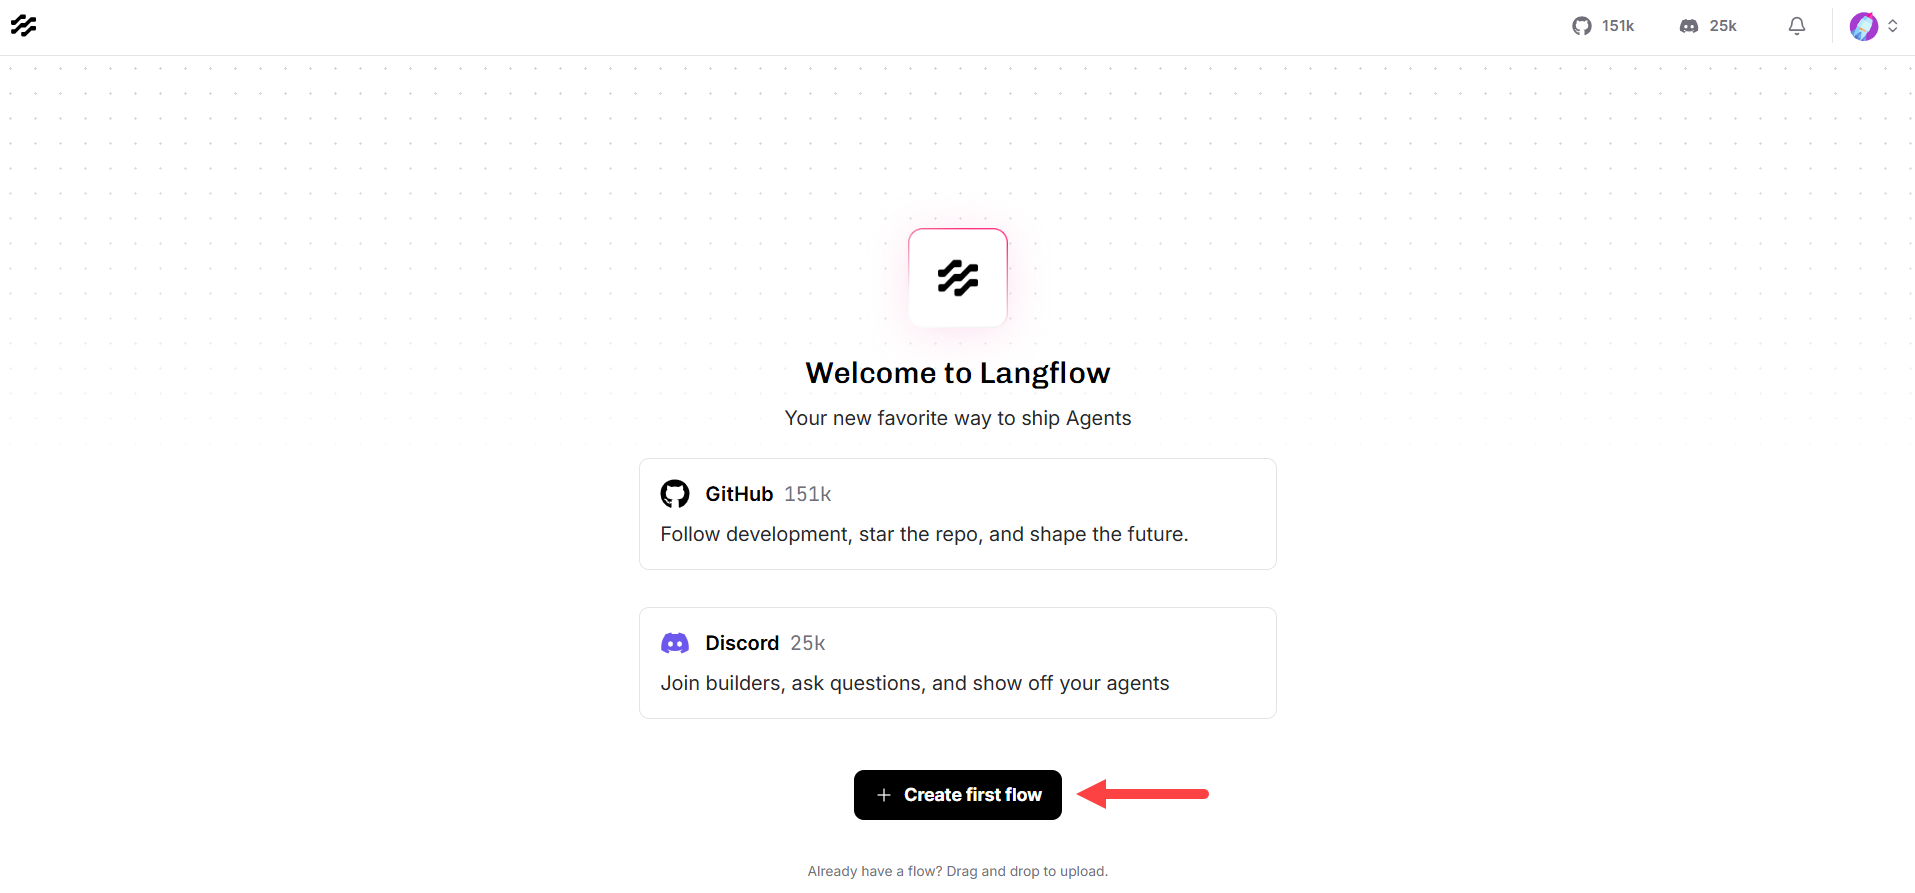
- Connect an LLM provider
Add an OpenAI, Anthropic, Ollama, or other model component to your flow by clicking the Configure Model Providers.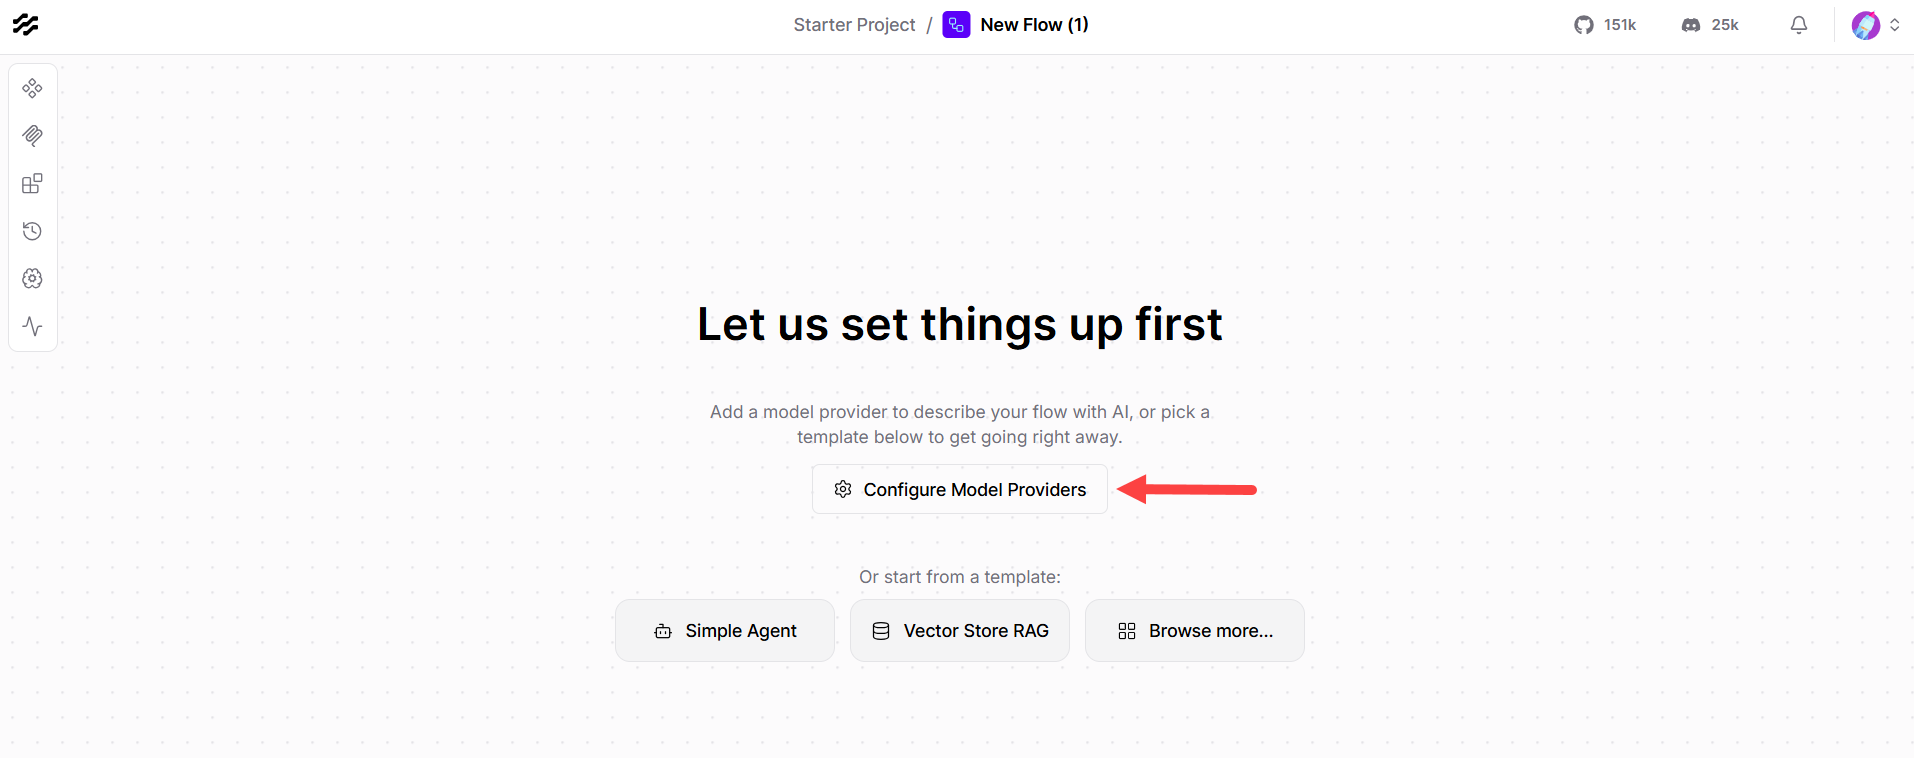
-
Enter your API keys
Paste your API key into the api_key field.Example format:
OpenAI key: sk-...
Anthropic key: sk-ant-...
Ollama base URL: http://localhost:11434  (if installed on the same host)
Phase 6: Post-Deployment Configurations
While the automated setup handles the basics, you may eventually want to update your password or manually refresh your SSL certificate.
- Change your superuser password
- Log in to your server via SSH and edit the environment file:
nano /etc/default/langflow
- Update the password value:
LANGFLOW_SUPERUSER_PASSWORD=yournewpassword - Save the file ( Ctrl + O, Enter, Ctrl + X) and restart the service:
supervisorctl restart langflow
- Log in to your server via SSH and edit the environment file:
- Manually Re-request an SSL Certificate
If you ever need to manually re-request an SSL certificate tied to a public IP after the initial deployment, run:/opt/certbot/bin/certbot certonly \ --webroot --webroot-path /var/www/letsencrypt \ -m [email protected] --agree-tos --non-interactive \ --ip-address nginx -t && systemctl reload nginx
Phase 7: Day-to-Day Management
The image also sets up tools to help you manage the server going forward. The firewall (UFW) is already configured to only allow essential traffic (Ports 22, 80, and 443), and weekly log rotations are enabled. Note: Minimum system resources recommended 4 vCPUs and 8 GB RAM for a comfortable experience.
If you ever need to troubleshoot, update, or back up the system, you can use these core commands:
- Check health status:
supervisorctl status langflow
- Reboot the application:
supervisorctl restart langflow
- View live application logs:
tail -f /var/log/langflow/langflow.log
- Upgrade Langflow to the newest version:
sudo -u langflow /opt/langflow/venv/bin/pip install --upgrade langflow supervisorctl restart langflow
- Backup your persistent data:
supervisorctl stop langflow tar -czf langflow-backup.tar.gz /opt/langflow/data /root/.app_secrets supervisorctl start langflow
Additional Information and Example Documentation Output
You can run cat /root/README.md to see more information and useful commands:
Example Output:
root@server-123456:~# cat /root/README.md
# Langflow

## Description

Langflow is an open-source low-code platform for building and deploying AI-powered applications and multi-agent workflows. It provides a visual drag-and-drop interface for composing LLM pipelines and integrating with OpenAI, Anthropic, Ollama, vector stores, and dozens of other data sources and tools.

This image ships Langflow on Ubuntu 24.04, installed in a Python virtual environment and managed by Supervisord. Nginx sits in front as a reverse proxy with automatic TLS termination. On first boot, a Let's Encrypt certificate is provisioned (or a self-signed fallback for private networks).


## Services

| Service    | Port     | Purpose                                                   |
|------------|----------|-----------------------------------------------------------|
| Langflow   | 7860     | Langflow FastAPI backend (internal only, bound to 127.0.0.1) |
| Nginx      | 80, 443  | Reverse proxy, TLS termination, WebSocket upgrade         |
| Supervisor | n/a      | Process supervisor managing the Langflow backend          |
| OpenSSH    | 22       | Remote access (UFW rate-limited)                          |


## How to Use

### 1. Access Langflow

Wait 3-5 minutes after first boot while Langflow initialises its database and serves frontend assets. Then open your browser to:

```
https://
```

HTTP (port 80) redirects to HTTPS automatically. If the server has a public IP, a Let's Encrypt certificate is issued. On private networks a self-signed certificate is used; accept the browser warning to proceed.

### 2. Log in

A superuser account is created automatically at first boot. Retrieve your credentials with:

```bash
cat /root/.app_secrets
```

The credentials are also shown in the MOTD each time you SSH in. Log in with the `admin` username and the generated password.

### 3. Create your first flow

Click **New Flow** to start from a blank canvas, or choose a starter template from the gallery to explore the interface. Drag components from the left sidebar onto the canvas and connect their inputs and outputs.

### 4. Connect an LLM provider

Add an **OpenAI**, **Anthropic**, **Ollama**, or other model component to your flow and paste your API key into the `api_key` field. Keys are encrypted at rest using `LANGFLOW_SECRET_KEY`.

```
OpenAI key     : sk-...
Anthropic key  : sk-ant-...
Ollama base URL: http://localhost:11434  (if Ollama is installed on the same host)
```

### 5. Change your password

To update the superuser password, edit `/etc/default/langflow` and set a new value:

```
LANGFLOW_SUPERUSER_PASSWORD=yournewpassword
```

Then restart the service:

```bash
supervisorctl restart langflow
```

### 6. SSL / HTTPS certificate behaviour

On first boot, TLS is provisioned automatically:

- **Public IP** - certbot requests a Let's Encrypt certificate tied to the server's public IP. No browser warning.
- **Private IP** - a self-signed certificate is generated as a fallback. HTTPS still works but browsers will warn.

To manually re-request a certificate after deployment:

```bash
/opt/certbot/bin/certbot certonly \
  --webroot --webroot-path /var/www/letsencrypt \
  -m [email protected] --agree-tos --non-interactive \
  --ip-address

nginx -t && systemctl reload nginx
```

## Useful Commands

```bash
# Service management
supervisorctl status langflow           # Check Langflow status
supervisorctl restart langflow          # Restart Langflow
supervisorctl stop langflow             # Stop Langflow
supervisorctl start langflow            # Start Langflow
systemctl restart nginx                 # Restart nginx

# Logs
tail -f /var/log/langflow/langflow.log        # Live application log
tail -f /var/log/langflow/langflow-error.log  # Live error log
tail -f /var/log/nginx/access.log             # Nginx access log
tail -f /var/log/nginx/error.log              # Nginx error log

# Health check
curl http://127.0.0.1:7860/health       # Backend health endpoint

# Upgrade Langflow
sudo -u langflow /opt/langflow/venv/bin/pip install --upgrade langflow
supervisorctl restart langflow

# Backup persistent data
supervisorctl stop langflow
tar -czf langflow-backup.tar.gz /opt/langflow/data /root/.app_secrets
supervisorctl start langflow

# Check UFW firewall rules
ufw status
```

## First Boot Behaviour

On first boot the cloud-init per-instance script `/var/lib/cloud/scripts/per-instance/001_onboot`:

1. Generates a random superuser password and secret key
2. Writes credentials to `/root/.app_secrets` (mode 0600)
3. Patches `/etc/default/langflow` with the generated values
4. Detects the server's public IP address
5. Requests a Let's Encrypt TLS certificate via certbot (falls back to self-signed if unreachable)
6. Rewrites the nginx config with the full HTTPS reverse-proxy block and reloads nginx
7. Writes the site URL to `/root/.app_secrets`
8. Starts Supervisor and brings up the Langflow backend
9. Self-deletes to prevent re-running on cloud-init reset

Initial startup takes 2-5 minutes while Langflow initialises its SQLite database and generates a secret key.


## Configuration Files Reference

| File                                           | Purpose                                         |
|------------------------------------------------|-------------------------------------------------|
| `/etc/default/langflow`                        | Environment variables (port, auth, DB, secrets) |
| `/opt/langflow/run.sh`                         | Wrapper script that loads env file and starts Langflow |
| `/etc/supervisor/conf.d/langflow.conf`         | Supervisor program definition                   |
| `/etc/nginx/sites-available/langflow`          | Nginx site config (rewritten at first boot)     |
| `/etc/logrotate.d/langflow`                    | Log rotation config (weekly, 5 backups)         |
| `/opt/langflow/data/`                          | SQLite database, flow exports, cache, secret key |
| `/root/.app_secrets`                           | Site URL written at first boot                  |
| `/var/log/langflow/langflow.log`               | Application stdout log                          |
| `/var/log/langflow/langflow-error.log`         | Application stderr log                          |


## Security Hardening

| Hardening       | Detail                                                          |
|-----------------|-----------------------------------------------------------------|
| UFW firewall    | Only ports 22, 80, 443 open - default deny inbound             |
| SSH             | Password authentication disabled, key-only access              |
| Langflow        | Bound to 127.0.0.1:7860 - not reachable directly from outside  |
| Secret key      | `LANGFLOW_SECRET_KEY` encrypts API keys stored in flows        |
| Auth            | Login required by default; superuser credentials generated at first boot |
| TLS             | HTTPS enforced; HTTP redirects to HTTPS                        |


## Image Contents

This image installs and configures:

- Langflow (latest) in a Python virtual environment at `/opt/langflow/venv`
- Supervisord managing the Langflow process as the `langflow` system user
- Nginx as a reverse proxy with HTTP -> HTTPS redirect and WebSocket support
- Certbot (via pip) for automatic Let's Encrypt TLS certificates
- UFW firewall with ports 22, 80, and 443 open
- Log rotation at `/etc/logrotate.d/langflow`
- This README at `/root/README.md`


## Minimum Resources

| Resource | Minimum  | Recommended |
|----------|----------|-------------|
| CPU      | 2 vCPUs  | 4 vCPUs     |
| RAM      | 4 GB     | 8 GB        |
| Disk     | 20 GB    | 30 GB       |

> Langflow loads a significant number of ML-related Python packages at startup. 4 GB RAM is the practical minimum for a stable instance; 8 GB is comfortable for running larger flows or multiple concurrent users.


## Links

- Manage: [https://SERVER_IP/](https://SERVER_IP/)
- Documentation: [https://docs.langflow.org](https://docs.langflow.org)
- Quickstart guide: [https://docs.langflow.org/get-started-quickstart](https://docs.langflow.org/get-started-quickstart)
- Components reference: [https://docs.langflow.org/components-overview](https://docs.langflow.org/components-overview)
- Integrations (LLM providers): [https://docs.langflow.org/integrations-langchain](https://docs.langflow.org/integrations-langchain)
- GitHub: [https://github.com/langflow-ai/langflow](https://github.com/langflow-ai/langflow)
Summary
With Langflow, you can easily manage your Self-Managed VPS hosting on Bluehost. The intuitive interface, robust features, and secure environment make it an ideal choice for developers, businesses, and anyone looking to build and deploy AI workflows. Follow this guide to purchase your VPS and set up Langflow for a seamless AI management experience.