Key highlights
- Learn why keeping your ClientExec updated improves security and overall performance.
- Know the simple steps to safely update ClientExec without losing important data.
- Understand what to check before starting the update for a smooth, error-free process.
- Explore easy ways to connect and manage ClientExec with your WordPress site.
- Get reliable hosting and expert 24/7 support for ClientExec with Bluehost Hosting.
Keeping your ClientExec software up to date is one of the easiest ways to ensure that your hosting interactions run smoothly. Each new version includes important security fixes, performance improvements and better integrate ClientExec into WordPress and cPanel.
In this blog, we’ll show you how to update ClientExec step by step, from backing up your MySQL database to running the upgrade script. You don’t need to be a tech expert to follow along.
By the end, you’ll know exactly how to keep your ClientExec hosting setup secure and up to date. Let’s dive right in.
TL;DR: Quick ClientExec update summary
- Update ClientExec (CE) to the latest version for stronger security, faster billing and smoother cPanel/WP integration.
- Prerequisites: confirm compatible PHP, note DB/config details, ensure cPanel and phpMyAdmin access and backup your data.
- Upgrade steps: download and extract the new package → upload files (don’t overwrite config.php or /uploads/) → enter your CE URL and run install.php → tick the confirmation box to proceed.
- Post-update checks: test login, verify settings, re-enable plugins and share your client portal link; confirm invoices, plans and products display correctly.
- Wondering if it’s worth it? Short answer: Yes! Routine updates reduce errors and keep clients happy.
- Hosting tip: Bluehost offers stable PHP, fast servers and 24/7 support to keep ClientExec upgrades smooth.
Why you should update ClientExec regularly
Updating ClientExec is all about keeping your website and hosting server secure and running smoothly. Each latest version of ClientExec includes important bug fixes, stronger protection against vulnerabilities and improved functionality for managing your clients.
New releases also bring better ClientExec cPanel integration, WordPress site and other plugin options you may already use. This means smoother billing automation, easier client login and a faster, more stable ClientExec installation overall.
If you skip updates, you could miss out on critical performance improvements and risk compatibility issues with newer PHP versions or server configurations. Regular updates also make it easier to back up and upload files, ensuring your database stays protected.
Prerequisites before updating ClientExec
Before starting the update, take a few minutes to ensure your ClientExec installation and hosting server are ready. Completing these quick checks will help your update go smoothly and prevent errors later.
- Verify server compatibility: Make sure your server meets the requirements for the latest version of ClientExec. It should run a compatible PHP version and have the ionCube loader enabled. If you’re not sure, contact your hosting support team to confirm.
- Check your ClientExec directory: Locate your ClientExec directory on the server and confirm you can access it through File Manager or FTP. You’ll need permission to edit or replace files during the update.
- Download the latest ClientExec package: Visit the official ClientExec website and download the newest release. Choose the ionCube-encoded package for full compatibility. You’ll upload this package later in the guide.
- Prepare a database backup: Before you make any changes, plan to back up your database and configuration files. You can do this through phpMyAdmin or your cPanel account. Don’t skip this step, as it’s the safest way to protect your data if anything goes wrong.
- Review your configuration details: Take note of your database name, hostname and login credentials. You’ll need these details to reconnect your installation after updating. This also helps ensure a smooth ClientExec cPanel integration with your website or billing tools.
- Disable third-party plugins if needed: If you’re using extra plugin options for ClientExec integrations, it’s best to temporarily disable them before updating. This prevents version conflicts and keeps your ClientExec update clean and error-free.
Completing these steps before installing ClientExec ensures a quick, safe and seamless process. Once everything is set, you can proceed to the next section to begin the actual upgrade.
How to update ClientExec: latest version upgrade guide
Now that your hosting environment is ready, let’s go through the steps to update ClientExec safely. Follow these steps carefully to ensure a smooth ClientExec installation without data loss.
- Step 1: Access phpMyAdmin in Your Hosting Account
- Step 2: Backup Your MySQL Database
- Step 3: Prepare to Update ClientExec integration
- Step 4: Upload New ClientExec Files
- Step 5: Run the Upgrade Script
Let’s get into each step in more detail.
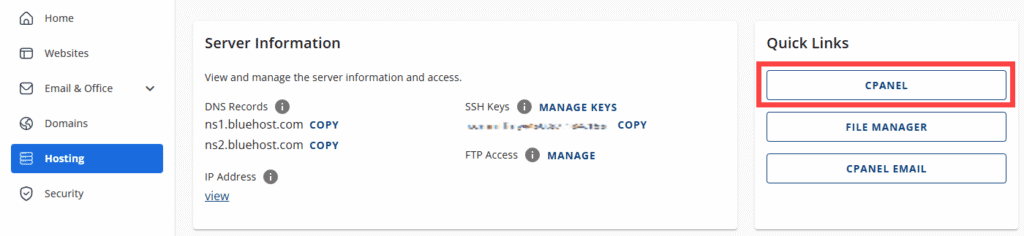
Step 1: Access phpMyAdmin in your hosting account
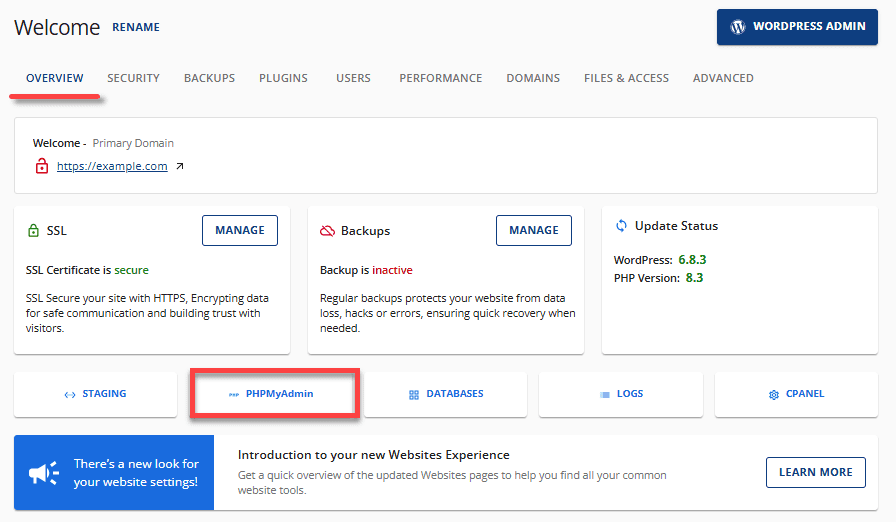
You can access phpMyAdmin from your cPanel account via the Hosting tab.
Via hosting tab
- Click “Hosting” in the left-hand menu.
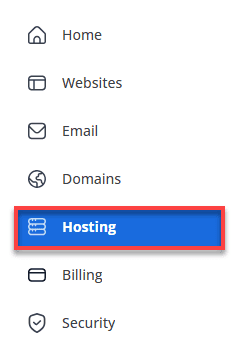
- From the Overview tab, scroll down and click the “phpMyAdmin” button to open the database page.
Via websites tab
- Log in to your Bluehost Account Manager.
- In the left-hand menu, click “Websites”.
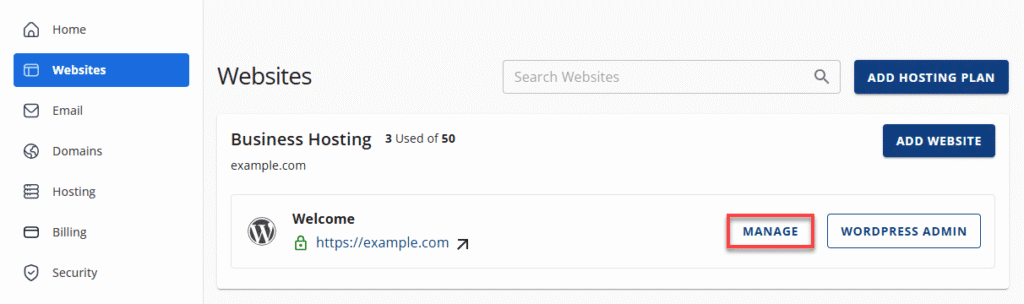
- Click the “Manage” button next to the website linked to your ClientExec installation.
- Scroll down to the Quick Links section and click “cPanel”.
- Under the Databases section, click on “phpMyAdmin”.
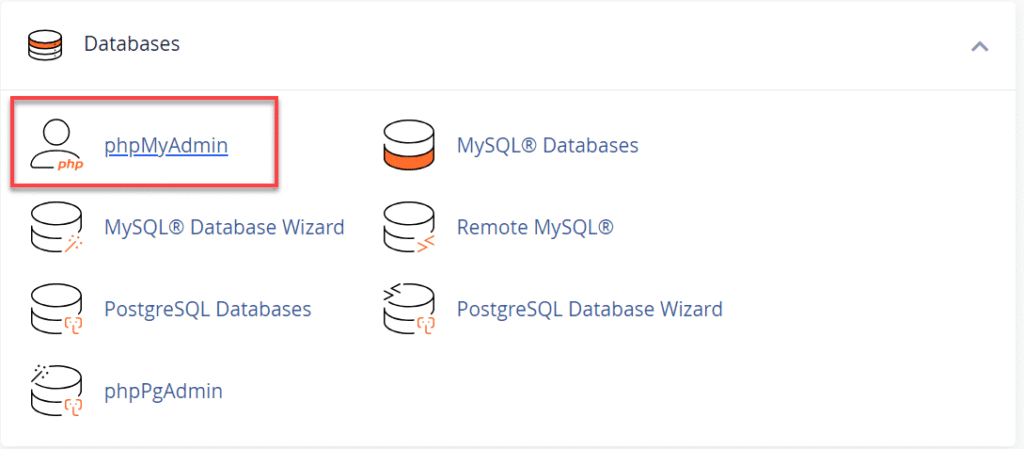
You’re now ready to locate and manage your ClientExec cPanel integration.
Step 2: Backup your MySQL database
Once you’ve opened phpMyAdmin, follow these steps to back up your database:
- From the left-hand menu, select your ClientExec database (it’s usually named something like _cxdb1).
- Click the “Export” tab at the top of the page.
- Leave the settings as default, then click the “Go” button.
This will download a complete backup of your database to your computer, an essential step before making any changes to your ClientExec files.
Step 3: Prepare to update ClientExec integration
Visit the official ClientExec download page and download the latest version (ionCube-encoded).
- Once downloaded, unzip the file.
- You should remove all files except the config.php file and the upload directory from your server.
- Upload all files except the config.php file and the uploads directory to the ClientExec directory.
Note: Make sure your PHP version is compatible with the new release. You can check and update it in your cPanel account under PHP Config if needed.
Step 4: Upload new ClientExec files
- Using File Manager in your cPanel account or an FTP client, upload all the new files from the extracted folder to your ClientExec directory.
- Be sure not to overwrite your config.php file or /uploads/ directory.
- Once uploaded, double-check file permissions to ensure everything is accessible.
When done correctly, your ClientExec installation will now have the updated files in place and be ready for the final upgrade step.
Step 5: Run the upgrade script
To complete the upgrade, open your browser and go to your ClientExec URL followed by /install.php.
(For example: https://[yourdomain].[com]/members/install.php)
- Log in using your ClientExec email/username and password.
- Agree to the license terms and confirm that you’ve already created a backup.
- Click “Continue” and wait for the upgrade to finish.
Once done, your ClientExec will automatically update to the latest version. You can verify this by logging into your admin panel and checking the version number.
Also read: How to Upgrade Outdated Script Installations in Softaculous
Integrate ClientExec into WordPress
If you manage your hosting clients through ClientExec and your main website runs on WordPress, you can connect the two for a seamless experience. A proper ClientExec WordPress integration lets users log in, manage billing and access support directly from your WordPress site without switching between platforms.
Here’s how to integrate ClientExec into WordPress step by step:
1. Access your hosting account
Log in to your cPanel account or hosting dashboard. Ensure that both your WordPress and ClientExec installations are hosted on the same server or under the same domain for seamless connection.
2. Add a billing or client area link
You can simply add a new page or menu item in WordPress that links to your ClientExec portal.
For example, add a “Client Area” or “Billing” link in your navigation menu pointing to your ClientExec URL (like https://[yourdomain].[com]/members/).
3. Use plugin options for integration
For a more advanced ClientExec WordPress integration, consider exploring plugin options that embed external content or create custom login forms within WordPress. Popular plugins like “Insert Pages” or “Iframe Embedder” can display your ClientExec portal directly inside a WordPress page.
4. Match the design
To make the user experience consistent, update your WordPress theme’s CSS or page styling so the ClientExec portal looks like part of your site. This keeps branding uniform and improves usability.
5. Test the connection
Once everything is set up, log in to your ClientExec area through WordPress to ensure everything loads correctly and client accounts work as expected. This simple setup allows you to easily manage ClientExec hosting features within your existing WordPress site.
When you connect ClientExec with WordPress, reliable hosting matters. Bluehost WordPress hosting Keep your portal fast, secure and easy to manage. You get tools that simplify updates, reduce errors and help you scale without extra work.
What you get with Bluehost WordPress hosting:
- Free domain for the first whole year.
- One-click WordPress with automatic core updates
- Free SSL and daily automated backups
- Simple cPanel management and 24/7 expert support
- Stable PHP versions and high uptime for smooth ClientExec integration
- Malware scanning and web application firewall
- Global CDN option for quicker page delivery
- SSH/SFTP and file manager for quick edits
- Easy plugin and theme management
Want a faster, safer setup with expert help on call? Get started with Bluehost WordPress hosting.
Troubleshooting common update issues
Even with careful preparation, you might face a few issues after updating ClientExec. Here are some common problems and quick ways to fix them.
1. Database connection error
If you see a “Cannot connect to database” message after the update, open your config.php file and confirm your database name, username and password are correct. Also, ensure your hosting server allows remote database access if needed.
Also read: How to Troubleshoot a Database Connection Error
2. Blank or white screen after update
A white screen usually means your PHP version or ionCube loader is outdated. Log in to your cPanel account and check your current PHP version under “Select PHP Version.” Switch to a newer version compatible with your ClientExec installation and try again.
3. Missing uploads or client files
If certain files or client data are missing, you might have accidentally overwritten the /uploads/ directory during the update. Re-upload the saved files from your backup to restore them.
4. Login issues after upgrade
If you can’t log in to your ClientExec dashboard, try clearing your browser cache and cookies first. If that doesn’t help, reset your admin password directly from the database via phpMyAdmin.
Also read: How to Manage a Database Using PhpMyAdmin
5. Error messages or layout problems
Sometimes, older templates or CSS files conflict with the new ClientExec version. Clear your cache, refresh your page or replace outdated theme files with the ones from the latest update package.
6. Plugin or integration conflicts
If you’ve enabled third-party plugin options or ClientExec WordPress integration, disable them temporarily and test again. Re-enable them one by one to identify which one causes the issue.
If you’ve tried these fixes and still face issues, reach out to Bluehost support for help. Our team can review your server settings and ensure your ClientExec update runs correctly on your hosting environment.
Also read: 17 Unique WordPress Plugins to Upgrade Speed, SEO & UX in 2026
Final thoughts
To update ClientExec, you primarily need to prepare in advance and follow each step carefully. Regular updates keep your ClientExec hosting secure, improve performance and ensure smooth ClientExec integration with tools like WordPress and cPanel.
With a recent backup, the correct PHP version and a stable hosting server, you can easily update ClientExec to the latest release without downtime or data loss.
At Bluehost, we provide the reliable infrastructure and expert support you need to keep your client management tools running smoothly. Whether you’re managing customer accounts or website automation, our optimized hosting environment ensures top performance and round-the-clock reliability.
Ready to power your hosting business with confidence? Get started with Bluehost hosting today.
FAQs
To update ClientExec on your hosting server, start by backing up your files and database. Next, download the latest version of ClientExec, upload the new files and run the upgrade script from your browser. Bluehost makes it easy to perform these updates within your cPanel account, ensuring a smooth and secure process.
A proper ClientExec integration connects your billing, support and client management tools in one dashboard. It improves functionality, saves time and keeps your client accounts organized.
Log in to your cPanel account and open phpMyAdmin to create a full backup of your ClientExec database. Click “Export” and save the file to your computer for safekeeping. This ensures you can restore your data if any issue occurs during the update ClientExec process.
If you can’t log in after an update, clear your browser cache and cookies first. Check your config.php files to confirm your database connection details and hostname. You can also reset your password directly through phpMyAdmin or contact Bluehost support for assistance.
Yes, you can easily integrate ClientExec into WordPress to manage clients directly from your website. Add a client area link or use a plugin to embed your billing page within WordPress. This ClientExec WordPress integration gives your users a unified, professional experience.
Custom fields let you add specific data points like phone numbers, plan IDs or renewal dates to your client profiles. They help tailor your ClientExec hosting setup to your business needs. You can manage or edit these fields in the admin panel for full customization.
Log in to your cPanel account and check your PHP version under “Select PHP Version.” ClientExec requires a compatible PHP setup for smooth functionality and performance. Bluehost servers are preconfigured with the latest PHP versions, so your ClientExec installation runs efficiently.
If you found missing files or data after updating, check if the /uploads/ directory was accidentally overwritten. Re-upload the saved files from your backup or extract them from your downloaded ClientExec package. Always ensure your backups are complete before applying updates.
Keep your ClientExec installation updated to the latest version, use optimized server settings and remove unused plugin options. Regular maintenance ensures faster page loading and better reliability. Bluehost’s optimized ClientExec hosting environment helps maintain peak performance around the clock.
Using ClientExec, you can manage customer accounts, invoices and subscriptions all in one place. It allows you to create, suspend or renew hosting plans directly through your dashboard. When hosted with Bluehost, ClientExec management becomes even easier with integrated support and automation tools.
If your ClientExec integration with WordPress or cPanel stops working, recheck your configuration settings and PHP version. Disable conflicting plugins and click refresh to test again. Bluehost’s support team can help you restore your setup and ensure your integrations work properly.
Bluehost hosting provides a powerful and reliable server environment optimized for ClientExec users. Our team offers 24/7 support to help you with updates, integration and performance tuning. Whether you need to update ClientExec or manage billing and automation, Bluehost gives you everything in one place.
If you have a complete backup, you can roll back the update by restoring the previous database and file set.

Write A Comment