Key highlights
- Understand what is SSLv3, why it still appears on VPS and dedicated servers and how outdated network security protocols increase exposure compared to transport layer security vs SSL.
- Learn how to disable SSLv3 across web servers, mail services, proxies and system layers to fully remove legacy protocol risks from your server environment.
- Explore practical ways to verify SSLv3 removal using command-line checks and an SSL Labs test to confirm only secure TLS protocols are enabled.
- Know how protocol misconfigurations enable downgrade attacks and why disabling SSLv3 strengthens your overall network security protocol and user trust.
- Uncover best practices for maintaining modern TLS configurations after you disable SSLv3, including ongoing monitoring and validation on VPS and dedicated servers.
A routine SSL Labs scan flags a critical issue on your server and the culprit is something you assumed was long gone: SSLv3. Despite being deprecated years ago, this legacy protocol still appears on VPS and dedicated servers, leaving many administrators asking what is SSLv3 and why it remains enabled.
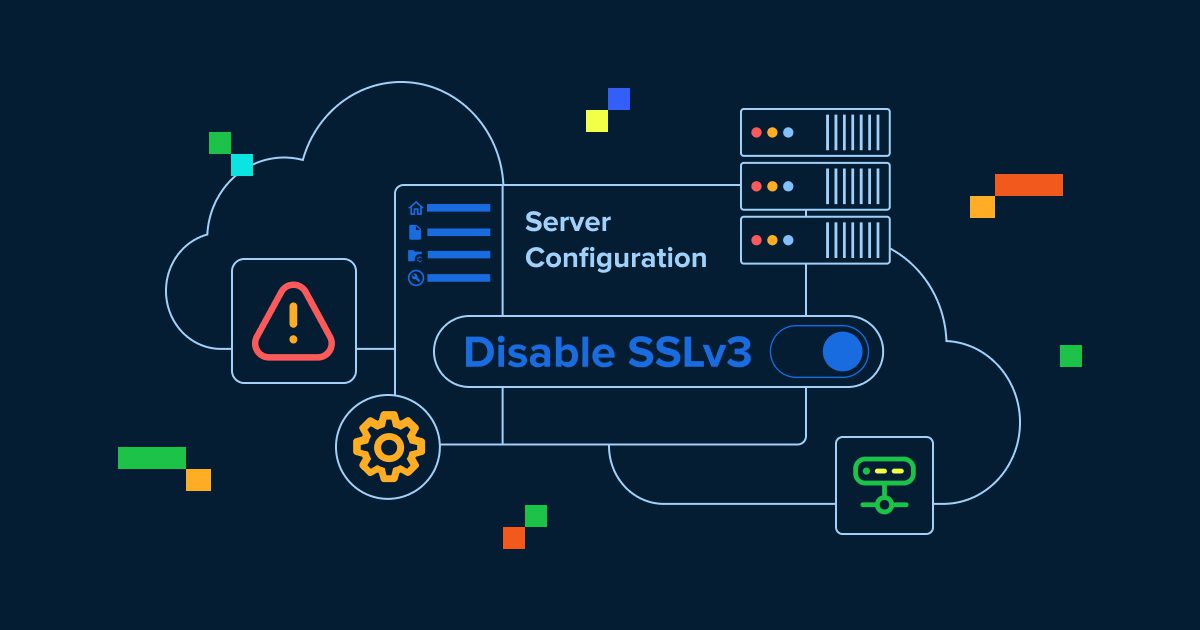
Leaving SSLv3 active weakens even the most carefully configured secure SSL protocols and exposes servers to downgrade attacks. To properly protect your infrastructure, you must fully disable SSLv3 across web servers, mail services and proxy layers. This guide shows you how to remove SSLv3 completely and lock your server into modern, trusted encryption before a forgotten setting turns into a real security problem.
What is SSLv3 and why does it still appear on servers?
SSLv3 (Secure Sockets Layer version 3) is an outdated encryption protocol from the 1990s that predates modern Transport Layer Security (TLS) standards. While newer protocols like TLS 1.2 and TLS 1.3 have replaced SSLv3 for secure communication, many servers still have SSLv3 enabled by default.
Understanding what is SSLv3 helps explain why it persists on servers. SSLv3 was designed when internet security threats were less sophisticated and backward compatibility was a primary concern. Server administrators often inherit legacy configurations where SSLv3 remains enabled alongside newer protocols, creating unnecessary security vulnerabilities.
The protocol appears on VPS and dedicated servers for several reasons. Default server configurations frequently include SSLv3 for compatibility with older systems. Many hosting providers use template configurations that haven’t been updated to remove deprecated protocols. Additionally, some legacy applications may still request SSLv3 connections, though this is increasingly rare in modern web environments.
When you understand the difference between transport layer security vs SSL, it becomes clear that TLS protocols offer superior security features. TLS includes better cipher suites, improved handshake mechanisms and protection against vulnerabilities that affect SSLv3. Modern browsers and applications no longer require SSLv3 support, making its removal both safe and necessary for optimal security.
Steps to disable SSLv3 on VPS and dedicated servers
Disabling SSLv3 is not a single toggle. It requires careful configuration changes to remove the protocol completely while keeping secure connections intact. The steps below guide you through the process from preparation to verification:
- What you need
- Open the Apache settings
- Change SSL cipher and protocol settings
- Test the configuration
1. What you need
To disable SSLv3, you need access to WHM (Web Host Manager) so you can modify the Apache configuration settings. If you have not logged into WHM before, refer to the article How to log in to WHM for step-by-step guidance.
If this is your first time accessing WHM, you may see the Feature Showcase page. Simply scroll to the bottom and click Exit to WHM to continue.
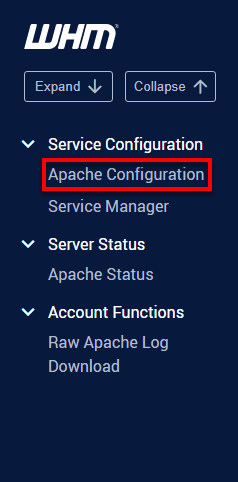
2. Open the Apache settings
Once you’re logged into WHM, follow these steps to open Apache settings:
- In the search bar at the top left of WHM, type Apache.
- In the search results, click on Apache Configuration.
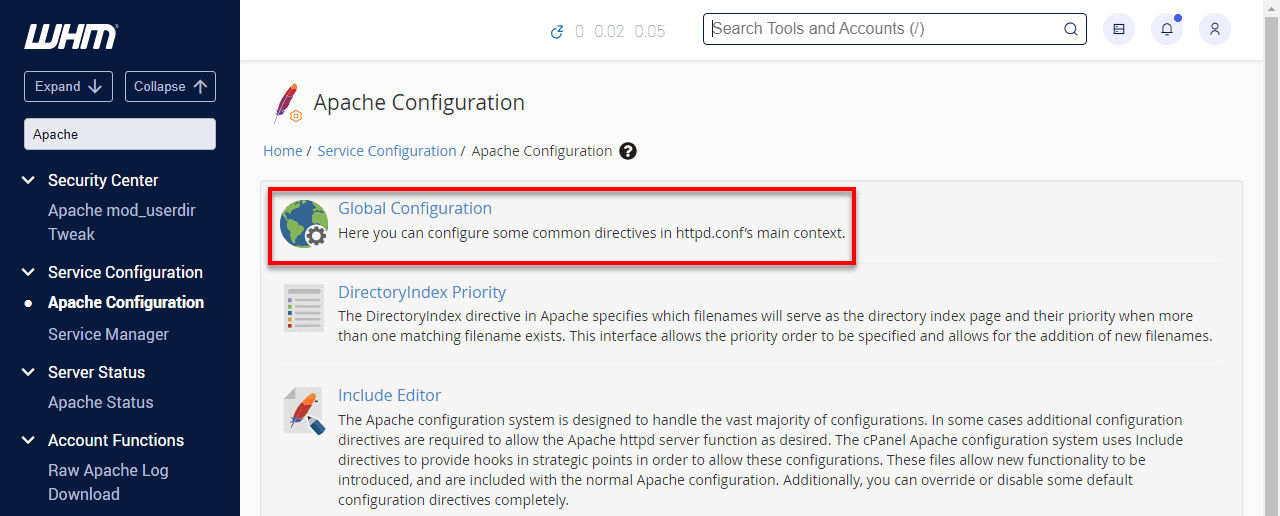
3. Change SSL Cipher and Protocol Settings
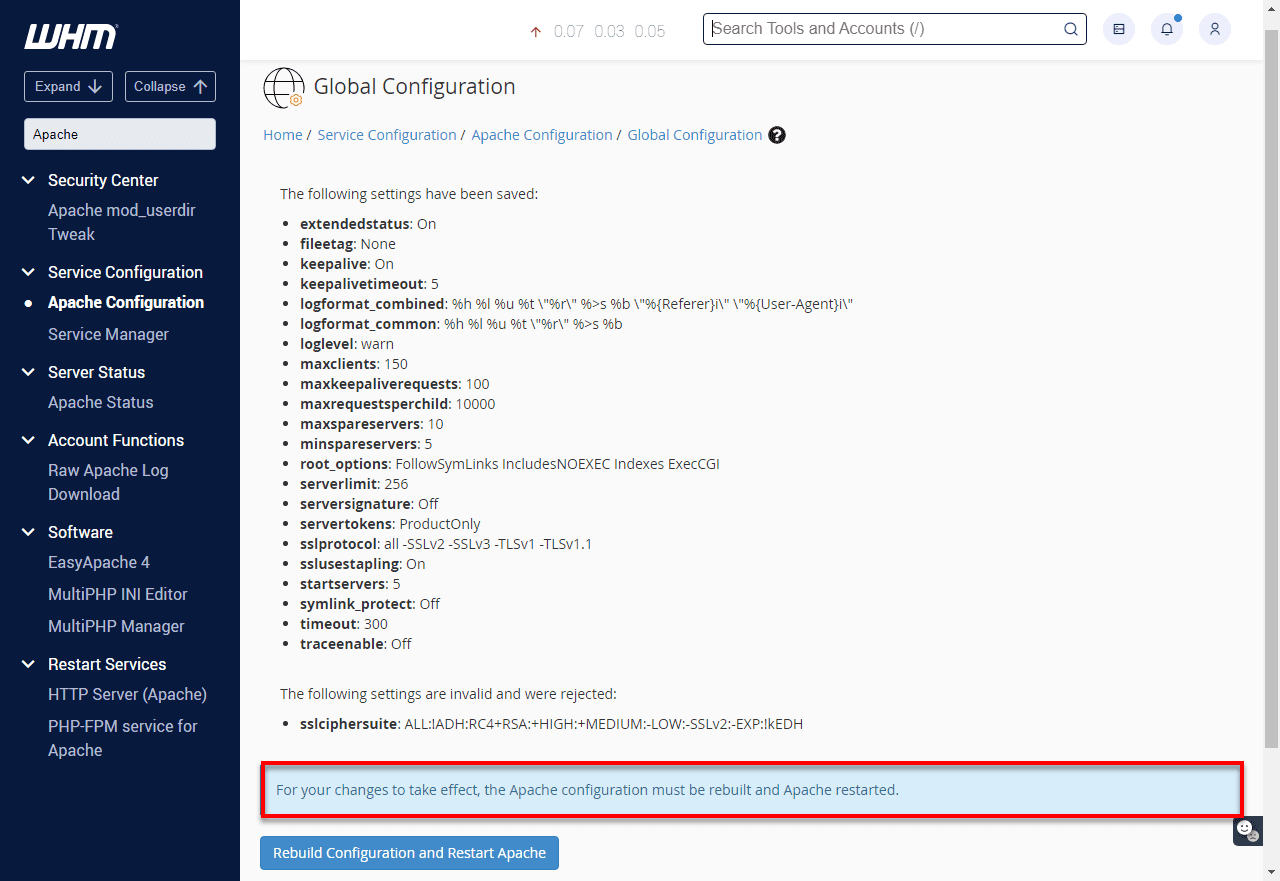
On the Apache Configuration page, click on Global Configuration.
Under SSL Cipher Suite, select the second option. Then, copy and paste the following configuration:ALL:!ADH:RC4+RSA:+HIGH:+MEDIUM:-LOW:-SSLv2:-EXP:!kEDH
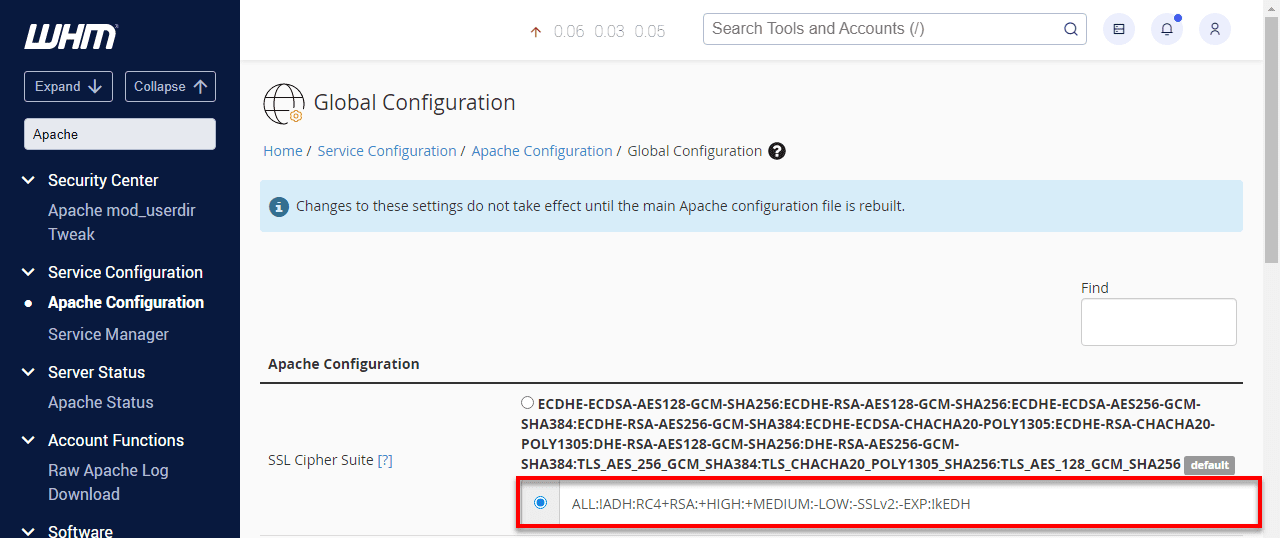
Under SSL/TLS Protocols, ensure the default setting is selected: All -SSLv2 -SSLv3.
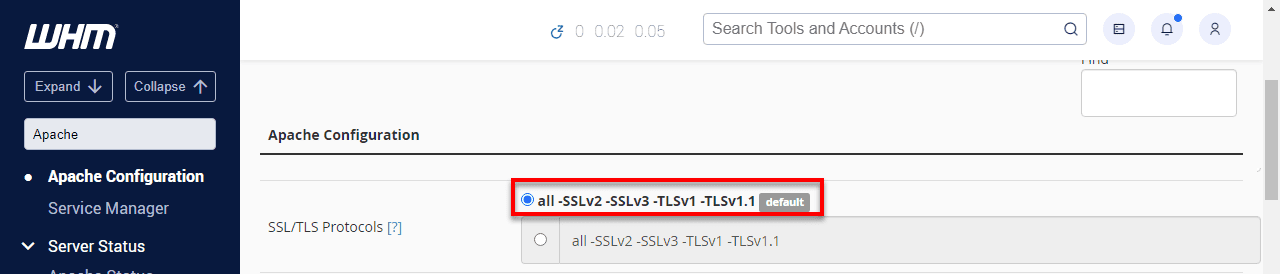
Scroll to the bottom of the page and click Save.
Next, click Rebuild Configuration and Restart Apache to apply the changes.
4. Test configuration
After disabling SSLV3, it’s essential to test the configuration to ensure it has been successfully disabled. Run this command to check:
curl -IL –sslv3 https://domain.comNote: Replace [domain].com with the domain for your site.
If SSLV3 has been successfully disabled, you will see an error message like this:
curl: (35) error:14094410:SSL routines:SSL3_READ_BYTES:sslV3 alert handshake failure
This indicates that SSLV3 is no longer supported on your server.
Important: In some cases, you might need to add the following line to your .htaccess file to prevent issues with URL redirection:
Options +FollowSymLinksNow that SSLv3 has been fully disabled and verified on your server, it is important to understand why removing this legacy protocol is a critical step in strengthening your overall security posture.
Why is it crucial to disable SSLv3 for security?
To understand why it is critical to disable SSLv3, you first need to understand what is SSLv3 and why it is no longer safe. SSLv3 is an outdated encryption protocol that cannot meet modern security standards. Keeping it enabled introduces risks that directly weaken secure SSL protocols across your server.
The sections below explain the real-world threats caused by SSLv3 and how its presence impacts your network security, user trust and compliance posture.
Known vulnerabilities and modern attack risks
SSLv3 contains serious design flaws that make it inherently insecure. The most widely known example is the POODLE attack, which allows attackers to decrypt SSLv3 traffic by exploiting predictable padding behavior.
POODLE attacks work by forcing a downgrade from modern protocols to SSLv3. Once downgraded, attackers can extract sensitive information such as cookies, session tokens and authentication data. This vulnerability cannot be patched, which is why the only safe solution is to disable SSLv3 entirely.
SSLv3 also lacks many protections found in secure SSL protocols, including strong cipher suites, forward secrecy and proper defenses against man-in-the-middle attacks. These limitations make SSLv3 an easy target for interception and manipulation.
Attackers actively scan servers for SSLv3 support, often using automated tools and SSL lab tests to identify vulnerable systems. Learning how to disable SSLv3 removes a known and frequently exploited attack vector.
Many compliance standards now require a minimum of TLS 1.2. Supporting SSLv3 is increasingly treated as a security violation and can lead to audit failures or regulatory penalties.
Impact on your network security protocol and user trust
Leaving SSLv3 enabled undermines your entire network security protocol, even if newer encryption methods are available. The presence of SSLv3 allows downgrade attacks that bypass otherwise secure configurations.
Modern browsers and security tools flag deprecated protocols during SSL lab tests, which can trigger warnings for users. These warnings reduce trust and may cause visitors to abandon your site.
Search engines also evaluate the quality of SSL configuration. Sites that rely only on secure SSL protocols perform better than those that still support legacy options like SSLv3, making it important to disable SSLv3 for both security and visibility.
Security assessments and penetration tests consistently flag SSLv3 as a high-risk issue. Understanding how to disable SSLv3 helps prevent costly remediation work during audits.
Disabling SSLv3 is not only about fixing a single vulnerability. It requires knowing where this legacy protocol still exists across your infrastructure. To fully protect against SSLv3, you must identify every service, system and layer where SSLv3 may still be active and remove it completely. This takes us to the next section where we explore when and where do we disable SSLv3.
When and where do you need to disable SSLv3?
Disabling SSLv3 is not limited to a single service or setting. To fully remove this legacy protocol, you need to understand where SSLv3 may still be enabled and how it impacts secure SSL protocols across your infrastructure. Knowing what is SSLv3 and where it persists helps ensure no hidden entry points remain.
1. VPS and dedicated server use cases
On VPS and dedicated servers, administrators are fully responsible for SSL security. Unlike shared hosting, there is no provider-managed layer automatically handling protocol restrictions, which makes it essential to disable SSLv3 across all services.
Web servers must have SSLv3 disabled to protect public websites and administrative interfaces. Backend panels and internal tools often use separate SSL configurations that also need review.
Mail services on VPS and dedicated servers must reject SSLv3 for both inbound and outbound connections. This prevents downgrade attacks that could expose email content and authentication data.
Database services that support SSL connections should be configured to block SSLv3 to protect data in transit, especially when databases are accessed remotely.
Administrative tools, control panels and monitoring services frequently run on non-standard ports and maintain their own SSL settings. These services are commonly overlooked during SSL hardening.
Development and staging environments should match production security settings. This ensures testing reflects real-world conditions and prevents accidental deployment of SSLv3-enabled services.
Also read: VPS & Dedicated Hosting – Manage Login SSL Certificates
VPS and dedicated server use cases
On VPS and dedicated servers, SSL security is fully the administrator’s responsibility. Unlike shared hosting, there are no platform-level restrictions automatically blocking outdated protocols. You must explicitly control which SSL and TLS protocols are allowed across all services.
This control is required to fully disable SSLv3. Root access is needed to update system-level SSL libraries. WHM access is required to manage Apache and mail services. Each web server, email service and SSL-enabled application must be configured individually. Without this level of access, SSLv3 can remain enabled even when newer TLS protocols are available.
At Bluehost, our VPS hosting and dedicated hosting environments provide the administrative access needed to manage SSL security correctly. Full root access and WHM allow administrators to disable SSLv3 at the web server level, restrict protocols for mail services and enforce modern TLS standards across the entire server.
To learn more about hosting environments that provide this level of server control and SSL management, explore our hosting plans.
2. Common services affected by SSLv3
Many services can independently support SSLv3, which means disabling it in one place does not guarantee complete removal. Web servers such as Apache and Nginx are only the starting point.
Mail servers like Postfix, Dovecot and Exim often maintain separate SSL settings for SMTP, IMAP and POP3. These services may still allow SSLv3 even after web server changes.
File transfer services, including FTP and FTPS, may support SSL-based encryption that falls back to SSLv3 if not explicitly restricted.
Database systems such as MySQL and PostgreSQL can accept SSL connections and must be checked to ensure they do not negotiate SSLv3 with client applications.
Monitoring tools, backup systems and management dashboards frequently expose web interfaces with independent SSL configurations that are not covered by main server settings.
Application servers and runtimes, including Node.js, Java-based servers and PHP-FPM, may handle SSL termination internally. These applications require specific configuration to refuse SSLv3 connections.
3. Multiple layers where SSLv3 may still be active
SSLv3 can remain active across multiple layers, even after initial hardening. Understanding these layers is critical when learning how to disable SSLv3 completely.
At the operating system level, SSL libraries may enable SSLv3 by default unless explicitly restricted. Applications often inherit these defaults.
Network components such as load balancers, firewalls and CDN services may terminate SSL connections before traffic reaches your server. These systems have their own protocol settings that must be reviewed.
Application frameworks and custom software can override system-level SSL configurations. If SSL handling is implemented at the application level, code or framework updates may be required.
Containerized and virtualized environments introduce additional configuration layers. Docker containers and virtual machines may maintain SSL settings that do not inherit from the host.
Outbound connections also matter. While you cannot control external services, your server should be configured to refuse SSLv3 when acting as a client, reducing exposure during integrations and API calls.
Once you know where SSLv3 may still be active, the next step is preparation. Let us look at the prerequisites for disabling SSLv3.
What you need before you begin to disable SSLv3?
Before you disable SSLv3, preparation is essential. Understanding what is SSLv3 and how it interacts with your server helps prevent misconfigurations that could disrupt secure SSL protocols. Proper access, permissions and backups ensure the process is safe, controlled and reversible.
1. Server access and permission requirements
To disable SSLv3 successfully, you must have root or administrative access to your VPS or dedicated server. These privileges are required to modify SSL configuration files and restart critical services.
Confirm that SSH access is working before you begin. Because SSL changes can affect connectivity, make sure you also have console access through your hosting provider as a fallback.
Verify that your user account has sudo privileges or access to the root password. Many steps involved in how to disable SSLv3 require elevated permissions.
Identify which services handle SSL connections on your server. Tools like netstat -tlnp or ss -tlnp help determine which ports and processes rely on SSL.
Familiarize yourself with your server’s directory structure and configuration file locations. Paths vary by operating system and hosting environment and knowing them in advance reduces errors.
2. Backup and rollback considerations
Backing up your server is critical before making any SSL changes. Incorrect SSL settings can disrupt secure SSL protocols or make services unreachable, making rollback planning essential.
Create backups of all SSL-related configuration files, including web server configs, certificate files and service-specific SSL settings. Store these backups separately from the active configuration.
If available, take a full VPS or dedicated server snapshot. This provides a fast recovery option if multiple issues arise during the process to disable SSLv3.
Document your current SSL state by running SSL lab tests and command-line checks. These results help you confirm that SSLv3 has been removed and that no secure protocols were affected.
Plan your rollback steps before making changes. Know which files to restore and which services to restart to return to a working state.
Schedule SSL updates during low-traffic periods. This minimizes user impact and allows time to safely test changes if rollback becomes necessary.
Now that we have learned what we need to disable SSLv3, let us now look at how to verify if the SSLv3 is properly disabled.
How to verify SSLv3 is fully disabled?
After you disable SSLv3, verification is critical. Proper testing confirms that SSLv3 is no longer supported and that secure SSL protocols like TLS 1.2 and TLS 1.3 continue to work as expected. Use a combination of command-line checks and SSL Labs tests to validate your configuration.
Check enabled protocols before and after configuration changes
Begin by documenting your SSL protocol state before making changes. This baseline helps you confirm that SSLv3 has been fully removed.
Use OpenSSL to test direct protocol support. Attempting an SSLv3 connection should fail if SSLv3 is disabled:
openssl s_client -connect yourdomain.com:443 -ssl3
Verify that modern protocols still work:
openssl s_client -connect yourdomain.com:443 -tls1_2
openssl s_client -connect yourdomain.com:443 -tls1_3
Test every hosted domain and subdomain individually. Virtual hosts can have separate SSL configurations.
Check any SSL-enabled services running on non-standard ports. These often use separate settings and are commonly overlooked.
Create a checklist covering all SSL-enabled services, including web servers, mail services, FTP and custom applications, to ensure complete SSLv3 removal.
Using SSL Labs tests to confirm protocol status
SSL Labs tests provide a comprehensive external view of your SSL configuration. Run a full scan using the SSL Labs server test to validate protocol support and overall security.
Review the Protocols section of the results. A secure configuration should list TLS 1.2 and TLS 1.3 as supported, with SSLv3 marked as not supported.
Check the overall SSL Labs grade. Servers that support SSLv3 receive lower scores due to known vulnerabilities. After disabling SSLv3, your grade should improve if other settings are correct.
Pay close attention to downgrade warnings. SSL Labs tests identify whether your server is vulnerable to forced protocol downgrades.
Run SSL Labs tests for all domains and subdomains. Save results before and after changes to document improvements and confirm consistency.
Verifying from the command line
Command-line tools provide precise control when validating SSL behavior.
Use nmap to enumerate supported protocols and ciphers:
nmap --script ssl-enum-ciphers -p 443 yourdomain.com
Test SSLv3 rejection with curl:
curl -v --sslv3 https://yourdomain.com
Confirm secure protocol support:
curl -v --tlsv1.2 https://yourdomain.com
If your infrastructure uses internal SSL connections, test communication between services, APIs and databases to ensure SSLv3 is rejected everywhere.
Monitor SSL-related logs after changes. Rejected SSLv3 handshake attempts confirm that the protocol is no longer accepted.
Automate these checks where possible. Regular testing ensures SSLv3 does not reappear after updates, migrations or configuration changes.
Let us now look at the common issues that persist after disabling SSLv3. We will also learn how to fix them.
Common issues after disabling SSLv3 and how to fix them
Disabling SSLv3 improves security, but it can expose compatibility and configuration issues if not handled carefully. The sections below cover the most common problems and how to resolve them without weakening secure SSL protocols.
Legacy client compatibility problems
Removing SSLv3 may prevent very old browsers and applications from connecting. These clients do not support modern TLS versions and pose significant security risks.
Identify affected clients by monitoring server logs for SSL handshake failures or protocol mismatch errors that appear after you disable SSLv3.
Legacy browsers such as Internet Explorer 6 and earlier, outdated mobile browsers and old application libraries commonly fail without SSLv3. In most cases, these connections should be rejected to maintain strong security.
If legacy support is unavoidable, isolate it on a separate subdomain or service with clearly documented security limitations. Keep this environment separated from production systems.
Display clear upgrade messages to users with outdated clients. Explain why the connection failed and provide guidance for switching to modern browsers that support secure SSL protocols.
Document any legacy exceptions and review them regularly. Set a clear timeline to remove outdated support as security requirements evolve.
Cipher mismatch and configuration errors
After disabling SSLv3, some clients may fail to connect due to cipher suite mismatches rather than protocol issues.
Review your cipher configuration if modern clients experience connection failures. Overly restrictive cipher lists can block valid TLS connections. Use recommended, well-tested cipher combinations.
Check for syntax errors in SSL configuration files. Minor formatting mistakes can cause handshake failures or inconsistent behavior.
Confirm that SSL certificates are still valid and correctly configured. Protocol changes can sometimes expose certificate or chain issues.
Monitor server performance and SSL connection handling after changes. Configuration updates can affect resource usage, especially during high traffic.
Test connections across different browsers, operating systems and devices. Client behavior varies and may require fine-tuning of cipher and protocol settings.
Keep detailed records of configuration changes and their results. Clear documentation simplifies troubleshooting and supports long-term SSL management.
Once these common issues are resolved, the next step is to follow proven best practices for secure SSL and TLS configuration to ensure long-term stability, performance and protection.
Now, we look at the best practices that must be followed to ensure SSL and TLS configuration are secure.
Best practices for secure SSL and TLS configuration
Once you disable SSLv3, maintaining secure SSL protocols requires ongoing configuration and monitoring. Understanding what is SSLv3 and why it must remain disabled helps ensure your environment stays aligned with modern TLS standards. Strong protocol choices, careful cipher selection and continuous testing are essential for long-term security.
Recommended TLS versions and ciphers
Modern SSL security should be built on TLS 1.2 and TLS 1.3 only. Older protocols, including SSLv3, must remain disabled to prevent downgrade attacks and encryption weaknesses.
Configure TLS 1.2 as the minimum supported version to ensure broad compatibility with browsers and applications. Enable TLS 1.3 wherever possible to benefit from improved performance and stronger security defaults.
Select cipher suites that prioritize forward secrecy and modern encryption algorithms. A commonly recommended cipher configuration is:
ECDHE+AESGCM:ECDHE+AES256:ECDHE+AES128:!aNULL:!MD5:!DSS:!3DES
Enable server-side cipher preference so your server selects the strongest available option. This prevents clients from negotiating weaker encryption.
Review cipher and protocol settings regularly. As cryptographic standards evolve, keeping configurations up to date is critical for maintaining secure SSL protocols.
Implement HTTP Strict Transport Security (HSTS) to enforce HTTPS and block protocol downgrade attempts. Use the header
Strict-Transport-Security: max-age=31536000; includeSubDomains; preload
to strengthen connection security.
Add Certificate Authority Authorization (CAA) DNS records to restrict which certificate authorities can issue certificates for your domain. This reduces the risk of unauthorized or fraudulent certificates.
Ongoing monitoring and security updates
SSL and TLS security is not a one-time task. Continuous monitoring ensures SSLv3 does not reappear and that secure configurations remain effective.
Run regular SSL Labs tests to monitor your SSL posture and detect misconfigurations early. Automated scans help identify weaknesses and confirm that deprecated protocols remain disabled.
Subscribe to security advisories from trusted sources to stay informed about SSL and TLS vulnerabilities. Vendor bulletins and vulnerability databases provide timely guidance on required updates.
Monitor logs for SSL-related errors and handshake failures. These signals can indicate attempted downgrade attacks or configuration issues.
Review SSL configurations across all services on a regular schedule. Quarterly audits help maintain consistency as infrastructure and applications change.
Keep an updated inventory of all SSL-enabled services and their configurations. This documentation makes it easier to apply security changes across your environment.
Automate SSL certificate renewal and management to prevent security lapses. Tools like Let’s Encrypt simplify certificate handling while ensuring compatibility with modern, secure SSL protocols.
Final thoughts
Successfully learning how to disable SSLv3 on VPS and dedicated servers is essential for maintaining modern security standards. This approach protects your infrastructure from known vulnerabilities while ensuring compatibility with current browsers and applications.
The process involves multiple layers of configuration, from web servers to mail services, each requiring specific attention to ensure SSLv3 is completely removed. Regular testing using SSL Labs tests and command-line tools helps confirm that these security improvements are effective and consistent across the server.
SSL security is an ongoing responsibility that depends on both correct configuration and a reliable server environment. At Bluehost, our VPS and dedicated hosting platforms provide the administrative access needed to manage encryption protocols. Additionally, it also allows for applying security updates and maintaining modern TLS configurations over time.
Clearly, choosing the right server foundation ensures these security best practices remain sustainable as your infrastructure grows and standards continue to evolve.
FAQs
Having HTTPS enabled doesn’t automatically protect against SSLv3 vulnerabilities. If SSLv3 is still available as a protocol option, attackers can force connections to downgrade from secure TLS to vulnerable SSLv3 through downgrade attacks like POODLE. Disabling SSLv3 completely eliminates this attack vector and ensures all SSL connections use secure protocols only.
Visit https://www.ssllabs.com/ssltest/ and enter your domain name. The SSL Labs test analyzes your server’s SSL configuration and clearly displays which protocols are supported. In the test results, look for the “Protocols” section. If SSLv3 appears as supported, you need to disable it. A properly secured server should only show TLS 1.2 and TLS 1.3 as supported protocols.
The process depends on your web server software. For Apache, modify the SSLProtocol directive to exclude SSLv3 (use “SSLProtocol all -SSLv2 -SSLv3” or “SSLProtocol TLSv1.2 TLSv1.3”). For Nginx, update the ssl_protocols directive to “ssl_protocols TLSv1.2 TLSv1.3;”. After making changes, restart your web server and verify the configuration using OpenSSL commands or SSL Labs tests.
SSL (Secure Sockets Layer) refers to older protocols including SSLv3, while TLS (Transport Layer Security) represents the modern, secure versions that replaced SSL. When you disable SSLv3, you’re removing the outdated SSL protocol while maintaining support for TLS protocols like TLS 1.2 and TLS 1.3. TLS provides better security features, stronger encryption and protection against vulnerabilities that affect SSLv3.
Yes, updating Apache or Nginx doesn’t automatically disable SSLv3. The protocol support is determined by configuration files, not the software version. You must explicitly modify the SSL protocol configuration to exclude SSLv3. Additionally, other services like mail servers, FTP services or applications may maintain separate SSL configurations that require individual updates to completely disable SSLv3 across your entire server.
Disabling SSLv3 will prevent very old browsers and applications from connecting to your server. This includes extremely outdated browsers like Internet Explorer 6 and legacy applications with old SSL libraries. However, modern security practices prioritize protecting against known vulnerabilities over supporting obsolete clients. Any system still requiring SSLv3 represents a significant security risk and should be updated to support current TLS protocols.


Write A Comment