Key highlights
- Learn how to generate a Certificate Signing Request (CSR) in cPanel for purchasing your SSL certificate.
- Understand the complete process for uploading and activating third-party SSL certificates on shared hosting.
- Discover which essential files (KEY, CRT, CA Bundle) you need for successful SSL installation.
- Know when to contact support versus handling installation steps independently.
- Explore best practices for backing up your SSL certificate files for future use.
Ever stared at your cPanel dashboard, SSL certificate files in hand, wondering if you’re about to break something? We get that. Learning how to install third party SSL certificate in cPanel can feel intimidating at first. But it’s actually pretty straightforward once you know the steps.
Whether you’re adding a certificate from a provider like Let’s Encrypt or want to install a Comodo SSL certificate in cPanel, this guide walks you through the entire process on how to install third party SSL certificate in cPanel without the tech jargon headaches.
We’ll cover everything you need from generating your Certificate Signing Request (CSR) to troubleshooting those annoying errors that pop up when you least expect them. This tutorial is built specifically for anyone using cPanel hosting environments, including VPS and dedicated servers. By the time you’re done reading, you’ll feel confident handling SSL installations on your own.
TL;DR: How to install third-party SSL certificate?
- Visit your chosen third party SSL certificate provider’s website.
- Select the appropriate certificate type for your needs (Domain Validated, Organization Validated or Extended Validation).
- Paste your generated CSR into the provider’s certificate request form.
- Complete the domain verification process required by your certificate authority.
- Pay for your certificate and wait for the provider to process your request.
- Download your certificate files once approved (typically includes .crt, .ca-bundle and .key files).
2 things to do before installing a third-party SSL
Proper preparation prevents common installation errors and ensures a smooth SSL certificate deployment. Before you begin the installation process, gather all necessary information and verify your system requirements.
You’ll need administrative access to your cPanel account, your domain’s DNS management panel and the SSL certificate files from your third-party provider. Additionally, ensure your website is fully functional and accessible before starting the SSL installation process.
1. Domain access and DNS requirements
Verify that you have complete control over the domain where you’re installing the SSL certificate. This includes access to your domain registrar’s control panel and the ability to modify DNS records if necessary.
Your domain should be properly configured and pointing to your hosting account. Any DNS changes should be completed at least 24 hours before SSL installation to ensure proper propagation. If you’re using a Content Delivery Network (CDN) like Cloudflare, you may need to temporarily disable it during the installation process.
For WordPress sites hosted on cPanel, ensure your site’s URL configuration matches the domain where you’re installing the certificate. Mismatched domains are one of the most common causes of SSL certificate errors.
2. Understanding CSR and private key
A Certificate Signing Request (CSR) is a text file containing your website’s information that you submit to the certificate authority. The CSR includes your domain name, organization details and a public key that pairs with a private key stored on your server.
The private key is a secret file that must remain secure and accessible on your hosting server. Never share your private key with anyone, as it’s essential for SSL certificate functionality. If you lose your private key, you’ll need to generate a new CSR and reissue your SSL certificate.
When you generate a CSR in cPanel, the system automatically creates the corresponding private key. Keep both files safe, as you’ll need them throughout the SSL installation process.
How to generate a CSR?
Generating a Certificate Signing Request is the first technical step in obtaining your third-party SSL certificate. The CSR contains encrypted information about your website and organization that the certificate authority uses to create your SSL certificate.
Here are two ways you can generate CSR:
- Generate CSR in cPanel
- Generate CSR using CSR Generator
Let’s look at both methods in detail:
Method 1: Steps to generate CSR in cPanel
1. Access cPanel.
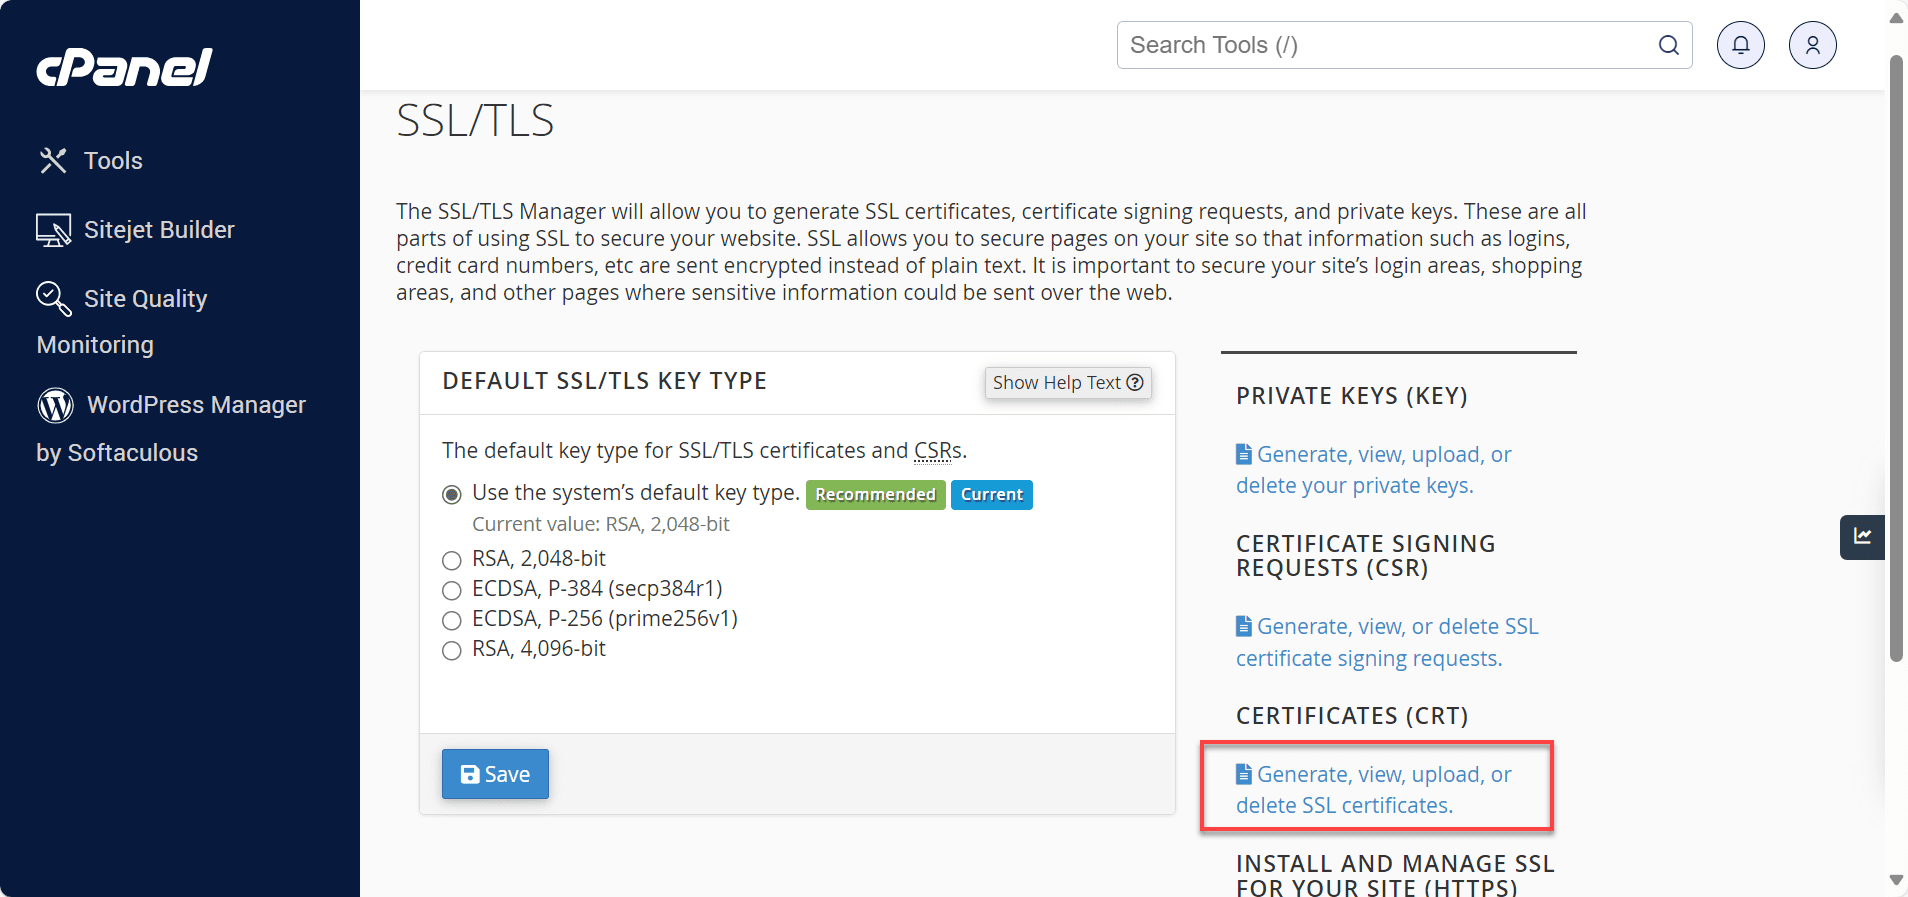
2. Within cPanel, go to the Security section and click SSL/TLS to open the SSL/TLS Manager.
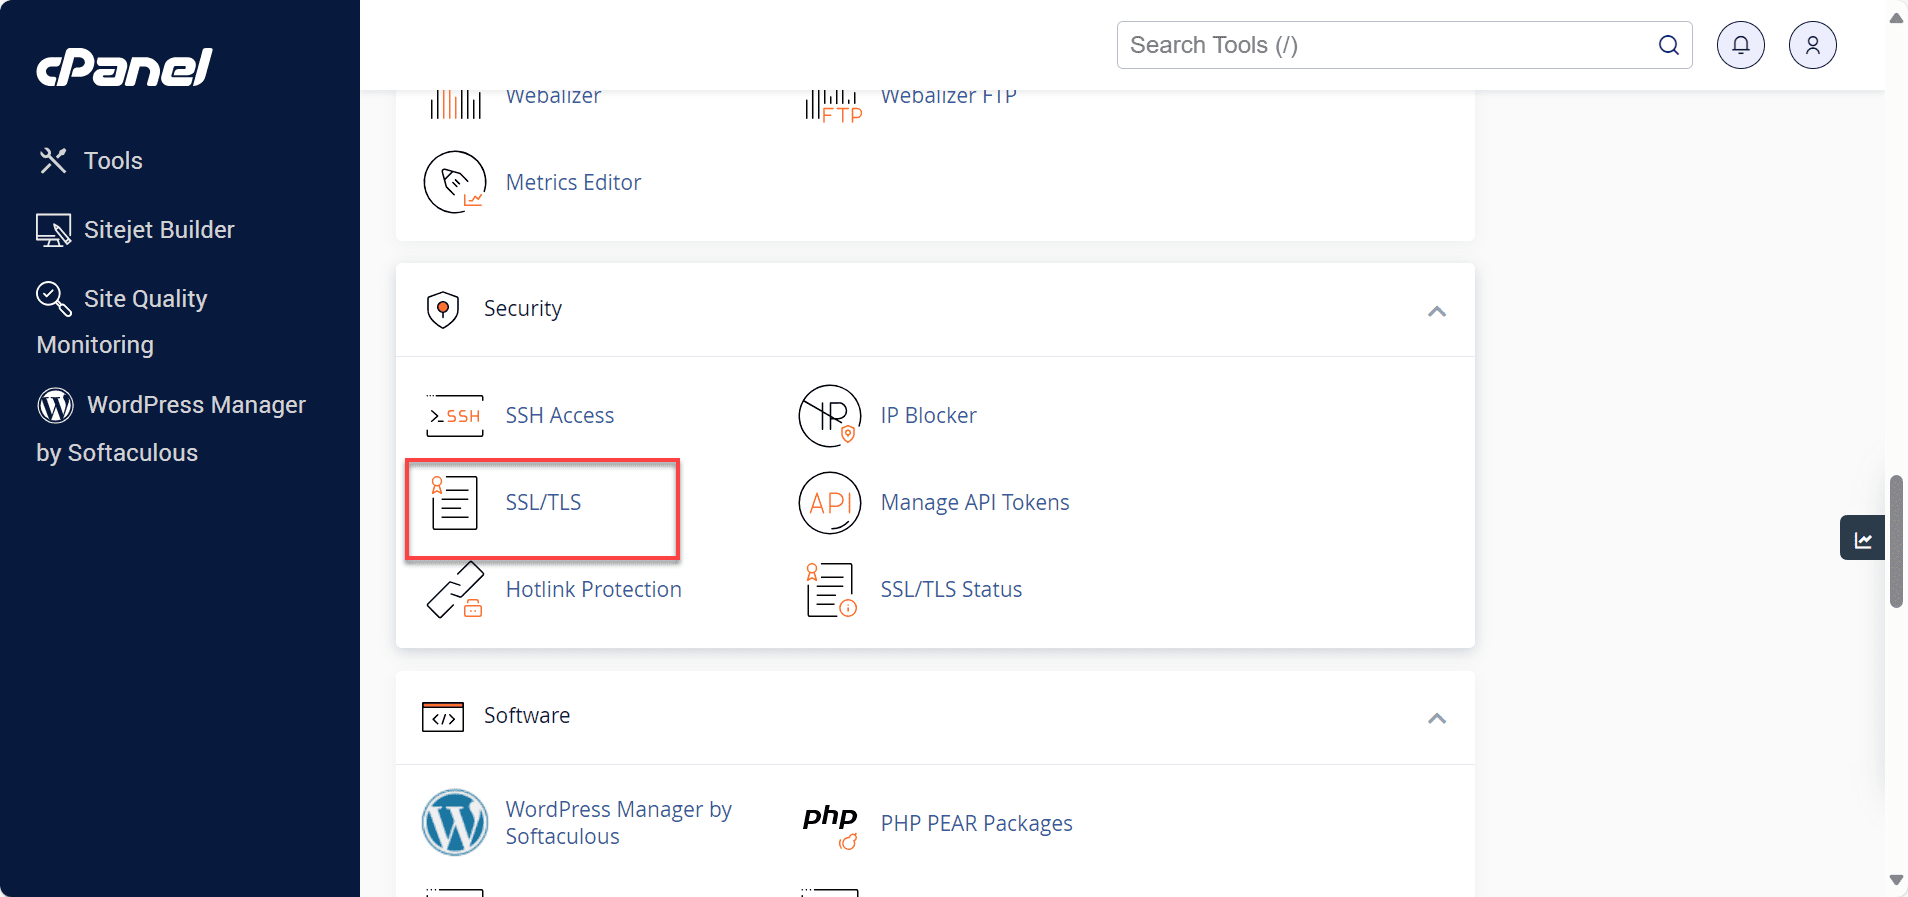
3. Under Certificate Signing Requests (CSR), click the Generate, view or delete SSL certificate signing requests link.
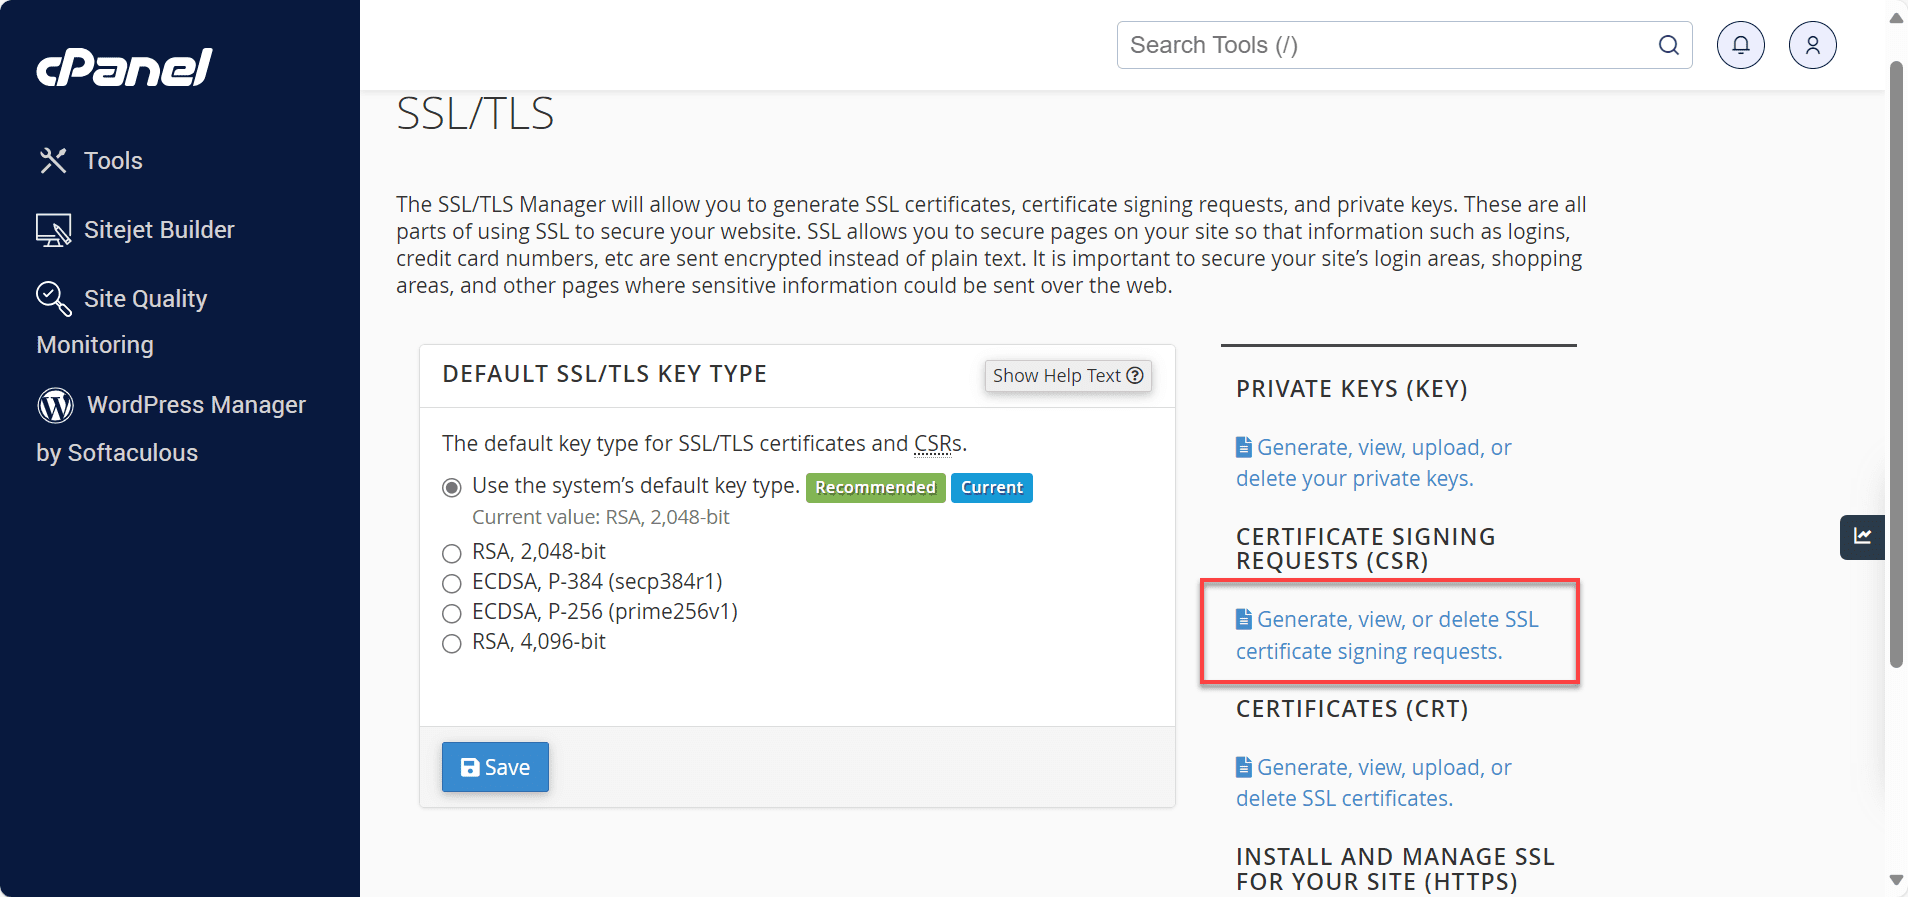
4. Fill out the required fields (*). Each field will have a description to serve as your guide. Select Generate a New 2048-bit key to generate a new key. If you have already generated a key, you can choose it from the drop-down.

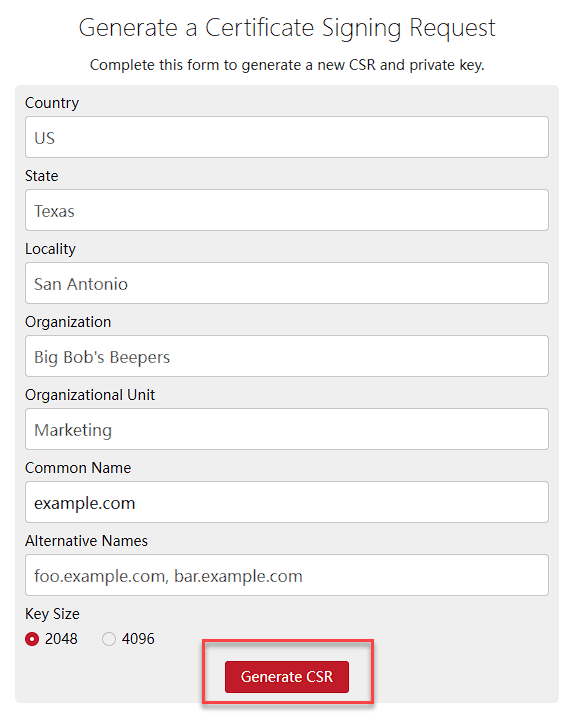
5. Click the Generate button.
6. Your code has been generated. Provide the CSR code to your SSL provider, and they will exchange it for a CRT file.
Note: Always include “—–BEGIN CERTIFICATE REQUEST—–” and “—–END CERTIFICATE REQUEST—–” when you submit your CSR code to your CA or SSL certificate provider.
Method 2: Steps to generate CSR using CSR Generator
1. Go to csrgenerator.com in your web browser.
2. Enter the required information:
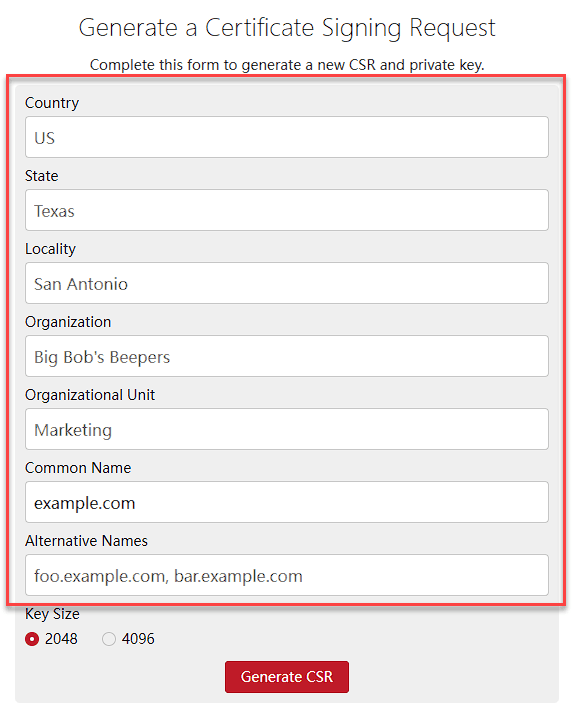
- Country: Use your two-letter country code (for example, US).
- State/Province: Type the full name of your state or province.
- City/Locality: Your city name.
- Organization: Your company or business name.
- Organizational Unit: Department name, such as IT or Web.
- Common Name: The domain name you want to secure (like www.[example].com).
- Alternative Names (SANs): Add other domains if you’d like (optional).
3. Select 2048-bit (recommended) or 4096-bit encryption.
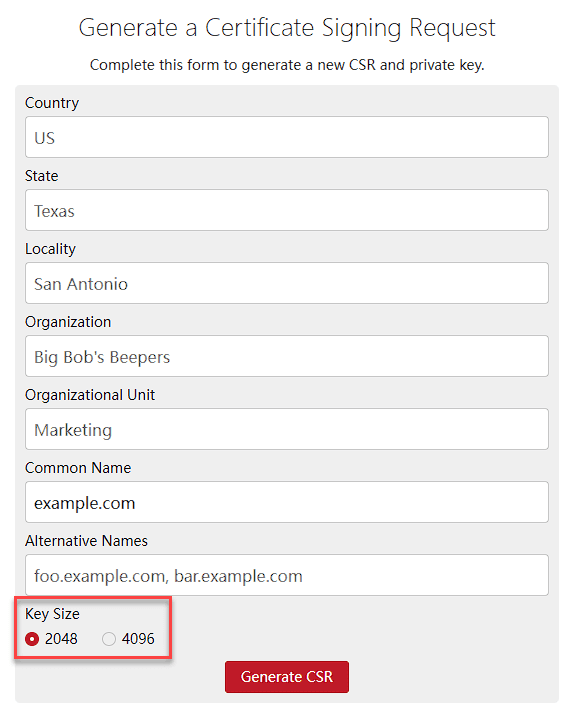
4. Click Generate CSR. The tool will instantly create both your CSR and your private key.
5. Save both the CSR and private key to your computer.
Note: Keep your private key safe! You’ll need it later when you install the SSL, and it can’t be recovered if lost.

6. Provide the CSR file to your SSL provider or Certificate Authority when you purchase or renew your SSL.
How to install a third-party SSL certificate in cPanel?
Once you receive your SSL certificate files from your third-party provider, you can proceed with the installation. Most providers will send you multiple files, including the main certificate file (.crt), intermediate certificate bundle (.ca-bundle) and sometimes a root certificate.
To install or upload your SSL certificate in cPanel, follow the steps below:
1. Within the SSL/TLS Manager, click the Generate, view, upload or delete SSL certificates link.
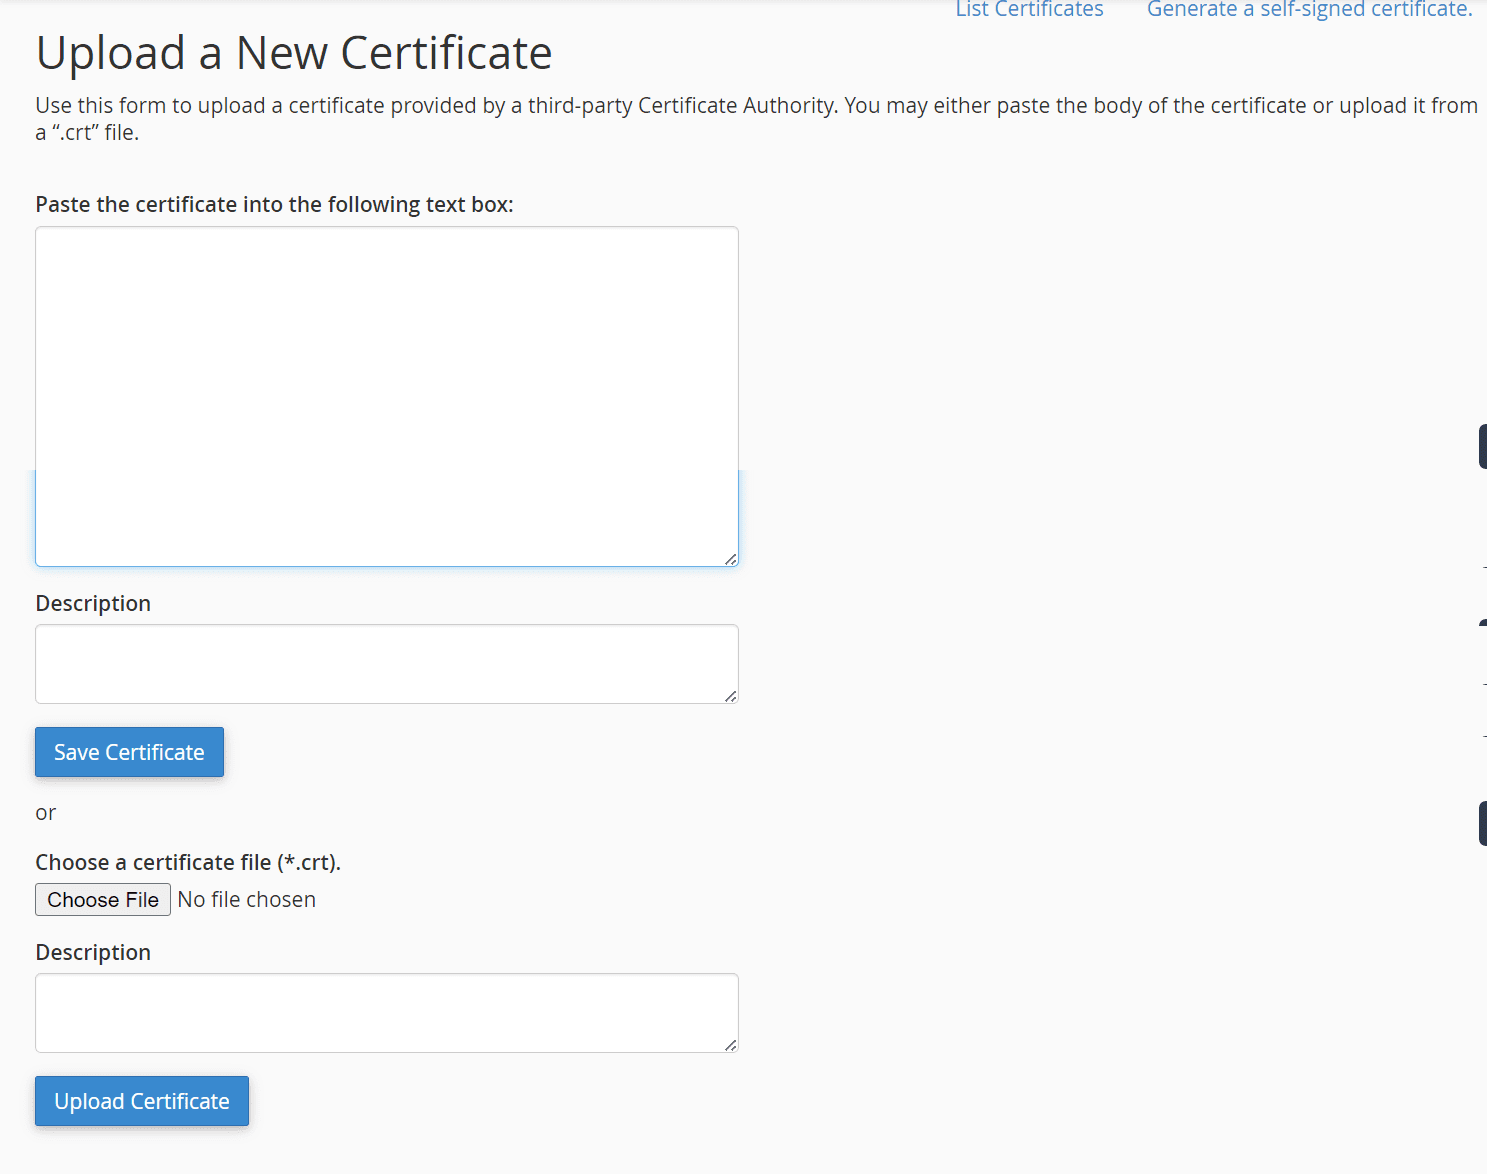
2. Paste the provided CRT file or Browse your computer for the .crt file. Repeat for the CA Bundle file if received as well.
3. Contact us via phone or live chat to request your KEY and CRT be installed on the server.
The KEY and the CRT will be required when we install your certificate on the server (and a CA Bundle if provided by the SSL vendor). Keeping a backup copy of each of these is recommended, as they may be used with any host for this particular domain name.
If you are seeking a simpler path to website security, Bluehost Premium SSL certificates (from Sectigo) eliminate the complexity of manual installation. With instant activation, automatic renewal and seamless integration with your hosting dashboard, you can secure your site in minutes rather than hours.
Backed by 24/7 expert support and built-in security features, Bluehost Premium SSL certificates provide enterprise-grade protection without the technical hassle. So, you can focus on growing your website while maintaining the trust and security your visitors expect.
Activate and verify the SSL certificate
Installing the certificate files is only part of the process. You also need to ensure that your website properly uses the SSL certificate and redirects visitors to the secure HTTPS version of your site.
How to force HTTPS after SSL installation?
To ensure all visitors access your site securely, you should redirect HTTP traffic to HTTPS. In cPanel, look for the “Force HTTPS Redirect” option in the SSL/TLS Manager, which automatically redirects all HTTP requests to HTTPS.
For WordPress sites, you may also need to update your site URL in the WordPress dashboard. Go to Settings > General and change both the “WordPress Address (URL)” and “Site Address (URL)” to use HTTPS instead of HTTP.

Additionally, you can force HTTPS in .htaccess file to include redirect rules if the automatic redirect option isn’t available. This ensures that search engines and visitors always access the secure version of your site.
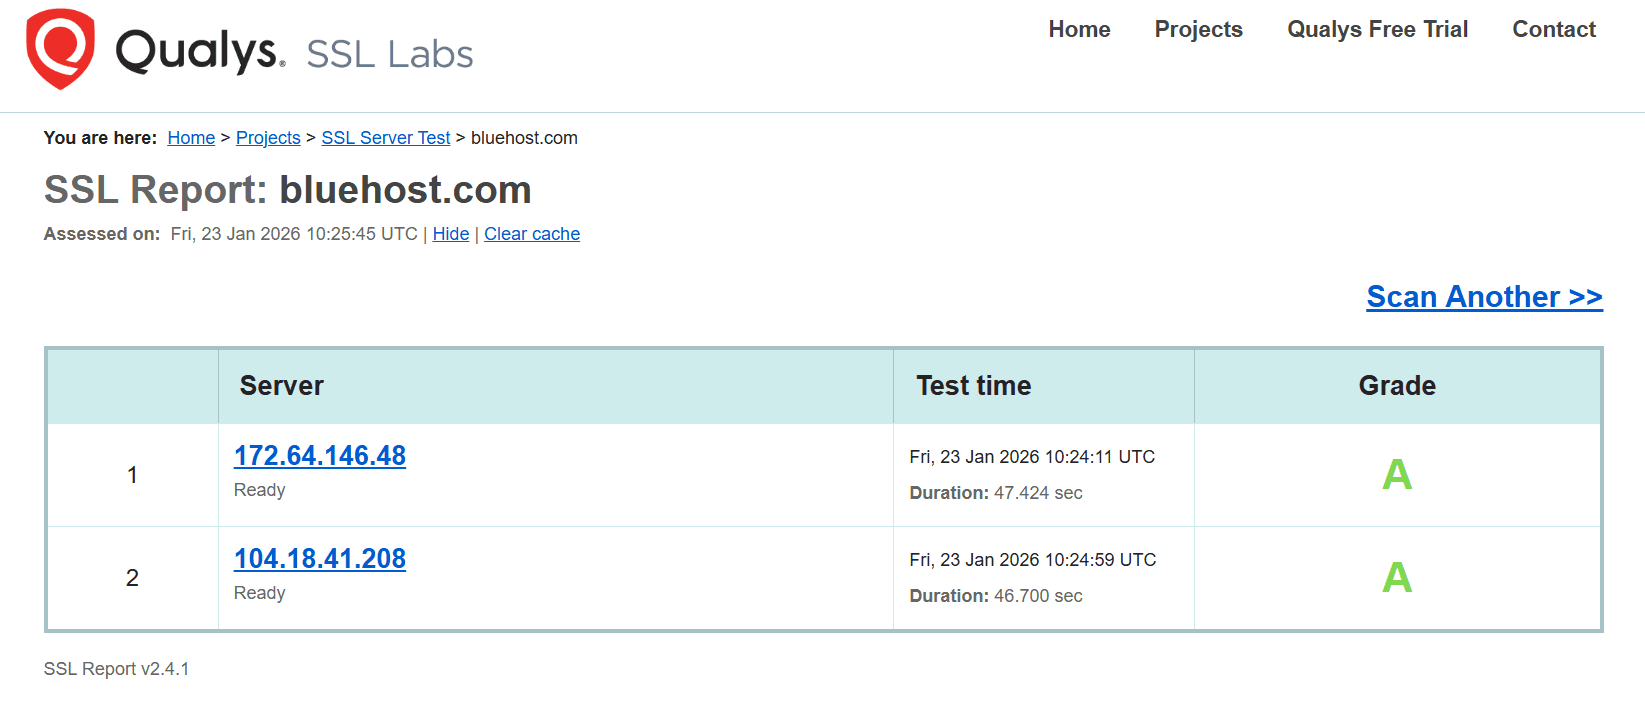
How to check if the SSL is working correctly?
After installation, test your SSL certificate using multiple methods to ensure everything is working correctly. Start by visiting your website using HTTPS and checking for the lock icon in your browser’s address bar.
Use online SSL testing tools like SSL Labs’ SSL Server Test to get a comprehensive analysis of your certificate installation. This tool checks for common issues like incomplete certificate chains, weak encryption or configuration problems.
Test your website from different browsers and devices to ensure compatibility. Pay special attention to any mixed content warnings, which occur when secure pages load insecure resources like images or scripts.
Common issues after installing a third-party SSL
Even with careful installation, you might encounter issues with your SSL certificate. Understanding common problems and their solutions helps you quickly resolve any issues and maintain your website’s security.
1. SSL installed but site shows not secure
If your SSL certificate is installed but browsers still show security warnings, you likely have mixed content issues. This occurs when your HTTPS pages load HTTP resources like images, stylesheets or JavaScript files.
For WordPress sites, install a plugin like “SSL Insecure Content Fixer” to automatically convert HTTP links to HTTPS. Alternatively, manually update your theme and content to use relative URLs or HTTPS links.

Clear your browser cache and any caching plugins after making changes. Sometimes browsers cache the insecure version of your site, making it appear that the SSL certificate isn’t working properly.
2. SSL certificate mismatch or invalid errors
Certificate mismatch errors occur when the domain name in your SSL certificate doesn’t match the domain you’re accessing. Double-check that your certificate was issued for the correct domain, including any www prefix.
If you’re seeing invalid certificate errors, verify that you’ve installed the complete certificate chain including the CA bundle. Missing intermediate certificates are a common cause of validation errors.
Check your certificate’s expiration date, as expired certificates will trigger browser warnings. If your certificate has expired, you’ll need to renew it through your third-party provider and reinstall the new certificate files.
Special SSL scenarios you should know about
Certain types of SSL certificates require special consideration during installation and configuration. Understanding these scenarios helps you choose and install the right certificate type for your specific needs.
Whether you’re dealing with multiple subdomains, several websites or complex hosting configurations, there are SSL solutions designed to meet your specific requirements.
1. Installing a Wildcard SSL certificate
Wildcard SSL certificates secure your main domain and unlimited subdomains with a single certificate. When generating your CSR for a wildcard certificate, enter your domain name as “[*].[yourdomain].com” to indicate subdomain coverage.
After installation, you can use the same wildcard certificate for any subdomain without generating additional certificates. This is particularly useful for websites with multiple subdomains like blog.[yourdomain].com, shop.[yourdomain].com or support.[yourdomain].com.
Configure each subdomain to use the wildcard certificate through the SSL/TLS Manager. The installation process is identical to regular certificates, but you have the flexibility to secure multiple subdomains simultaneously.
2. Using multi-domain (SAN) SSL certificates
Subject Alternative Name (SAN) certificates allow you to secure multiple different domains with a single certificate. This is useful when you manage several related websites or need to secure both www and non-www versions of your domain.
When generating the CSR for a SAN certificate, include all domains in the certificate request. Your third-party provider will specify how to format the CSR for multiple domains during the ordering process.
Install the SAN certificate using the same process as regular certificates, but configure each covered domain to use the shared certificate. This approach simplifies certificate management while providing comprehensive coverage.
Final thoughts
Installing a third-party SSL certificate in cPanel requires careful attention to detail but follows a straightforward process. Begin by generating your CSR and private key through the ssl the CSR to your chosen ssl certificate generator or provider, then install the returned certificate files through cPanel’s certificate management interface.
Bluehost offers Premium SSL certificates from Sectigo with features like instant SSL activation, easy management and seamless integration with our hosting platform. Bluehost emphasizes streamlined SSL setup and management, backed by 24/7 expert support, which suggests that users can manage SSL certificates through their hosting dashboard or cPanel interface.
Ready to experience hassle-free protection? Secure your website today with Bluehost Premium SSL certificate today.
FAQs
A third-party SSL certificate is one you purchase from an external Certificate Authority like Sectigo, DigiCert or Let’s Encrypt rather than using your host’s default SSL. You’ll need to manually install these through cPanel’s SSL/TLS manager.
Log into cPanel and navigate to the SSL/TLS section. Click “Manage SSL sites,” then paste your certificate, private key and CA bundle into the designated fields. Save changes and your SSL will activate within minutes.
If you lose your private key, your SSL certificate will stop working. You’ll need to generate a new CSR and private key, then request a reissue of your certificate from your third-party provider.
Access your domain’s DNS management panel and look for CAA records that restrict which certificate authorities can issue certificates for your domain. Remove or modify these records to allow your chosen certificate authority.
Most modern cPanel hosting providers support third-party SSL certificate installation on shared hosting plans. However, some budget hosting providers may restrict this feature to VPS or dedicated hosting accounts.
Before your current certificate expires, purchase a renewal from your provider, generate a new CSR (or reuse your existing one) and follow the same installation process to replace the expiring certificate.
Yes, Comodo (now Sectigo) certificates install like any third-party SSL. You’ll copy the certificate files from your provider, paste them into cPanel’s SSL manager and assign the certificate to your domain. It’s straightforward once you have the files.
Find the SSL/TLS icon in your cPanel dashboard. Click “Manage SSL sites” under Install and Manage SSL. You’ll see text boxes for the certificate (CRT), private key and certificate authority bundle. Paste each file there.
The technical installation process typically takes 15-30 minutes. However, certificate issuance from your provider can take anywhere from a few minutes to several days, depending on the validation level required.
Yes, SSL certificates positively impact SEO rankings. Google considers HTTPS a ranking signal, and websites with SSL certificates typically rank higher than non-secure sites. Additionally, browsers display security warnings for non-HTTPS sites, which can increase bounce rates.
Common causes include mixed content (HTTP resources on HTTPS pages), certificate chain issues or browser caching. Clear your cache, check for non-HTTPS internal links and verify your certificate installation is complete with all intermediate certificates.
This depends on your certificate type. Standard SSL certificates only work for one domain. Wildcard certificates cover subdomains of a single domain. Multi-domain (SAN) certificates can secure multiple different domains, but you must specify all domains during the purchase process.
Not anymore. Modern servers support SNI (Server Name Indication), which allows multiple SSL certificates on shared IPs. Most hosting providers enable this by default, so you can install SSL without upgrading to dedicated hosting.


Write A Comment