Key highlights:
- Verify domain registration status and contact information accuracy to ensure your domain is properly activated
- Test domain accessibility across different devices and networks to identify local connectivity issues
- Check DNS settings and nameserver configurations to resolve domain resolution problems
- Monitor DNS propagation status to understand timing delays in domain activation
- Validate hosting account setup and website file deployment for complete functionality
- Contact your hosting provider’s support team when technical issues persist beyond basic troubleshooting
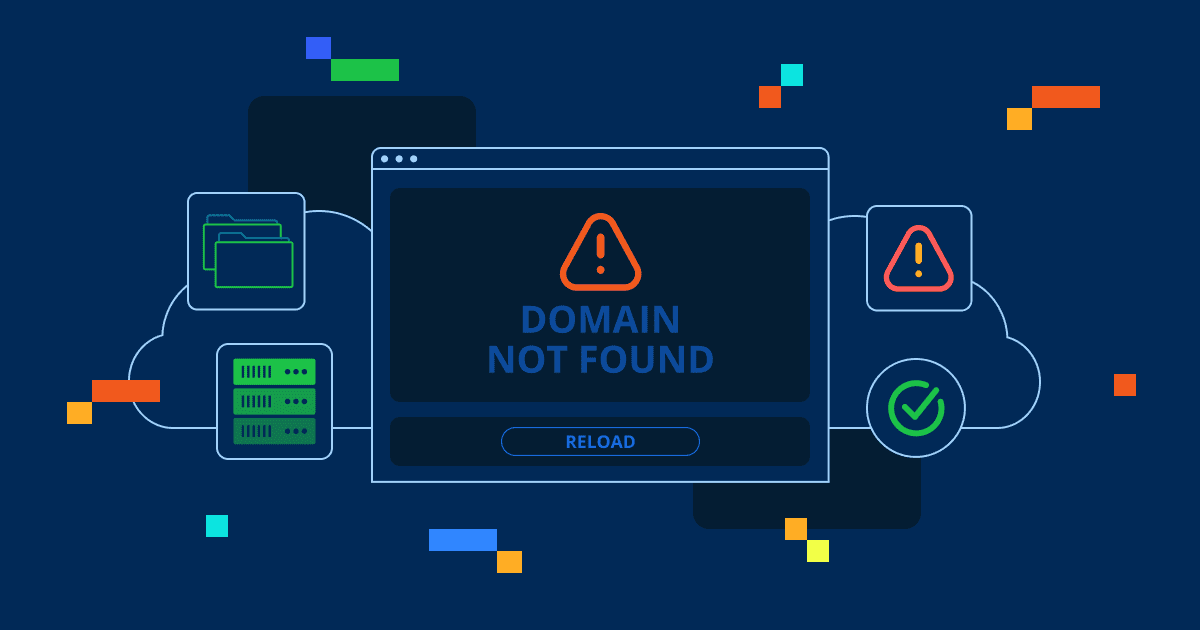
Purchasing a new domain should mark the beginning of your online journey, but when it doesn’t work as expected, frustration quickly sets in. Whether you’re seeing “domain not found” errors, DNS_probe_finished_nxdomain messages or your site simply refuses to load, these issues can halt your website launch plans completely. Understanding why your domain is not working and knowing how to systematically troubleshoot the problem is essential for getting your website online quickly and efficiently.
Domain-related issues affect millions of website owners annually, with new domain registrations being particularly susceptible to configuration problems, propagation delays and setup oversights. This comprehensive troubleshooting guide will walk you through every step needed to diagnose and resolve domain issues, from basic connectivity checks to advanced DNS troubleshooting techniques.
What does the term “domain not working” really mean?
When users report that their domain is not working, the underlying issues can vary significantly in both cause and complexity. Understanding the specific symptoms, you’re experiencing helps narrow down the root cause and guides your troubleshooting approach more effectively.
When your domain isn’t working, it’s usually due to one of these common problems.
1. Domain doesn’t resolve (DNS lookup fails)
The most common scenario is a complete DNS resolution failure, where your domain name cannot be resolved to an IP address. Visitors attempting to access your website encounter “This site can’t be reached” errors or “DNS_probe_finished_nxdomain” messages. These errors typically indicate that nameservers aren’t properly configured, DNS records are missing or your domain hasn’t fully propagated across global DNS servers.
DNS lookup failures often stem from recent nameserver changes that haven’t propagated, incorrect nameserver settings at your domain registrar or missing essential DNS records, such as A records pointing to your hosting server’s IP address.
However, there are situations in which your domain resolves successfully but displays something unexpected.
2. Loads the wrong site or error page
Sometimes your domain resolves successfully but displays unexpected content such as parked domain pages, registrar placeholder content or completely unrelated websites. This situation usually indicates that DNS records point to incorrect IP addresses or that your hosting provider hasn’t properly configured your domain in their system.
Parked domain pages are particularly common with newly registered domains, appearing when DNS points to your registrar’s default servers rather than your hosting provider’s nameservers.
After confirming that your domain points to the correct location, the next step is to ensure it loads securely for everyone who visits.
3. Security warnings
Your domain might load correctly over HTTP but display security warnings when accessed via HTTPS. These SSL certificate errors prevent secure connections and can severely impact user trust and search engine rankings. Common causes include missing SSL certificates, certificate configuration errors or Content Security Policy conflicts.
Modern browsers increasingly favor HTTPS connections, making SSL-related issues a critical concern for website accessibility and professional credibility. However, having the right security measures in place doesn’t automatically resolve all access problems. Even with proper DNS configuration and SSL certificates in place, inconsistent accessibility patterns can create confusion when troubleshooting domain functionality.
4. Local vs global connectivity discrepancies
Perhaps most confusing are situations where your domain works perfectly in some locations or networks but fails in others. These discrepancies often result from DNS caching issues, regional propagation delays or ISP-specific DNS resolution problems.
Understanding these varied manifestations helps you pinpoint where the problem lies and which type of solution you need. Now that you’ve identified the problems, the next step is to understand the core configuration settings that control your domain’s connectivity and ensure it is properly directing visitors to your website.
Quick Domain Troubleshooting Steps
When your newly registered domain isn’t working as expected, it can be frustrating. The good news is that most domain issues can be resolved with a few simple diagnostic steps. Let’s walk through the essential actions you can take right now to identify and fix common domain problems.
Step 1: Start with quick checks (5 minutes)
Before diving into complex technical diagnostics, performing quick preliminary checks can often identify obvious issues and save considerable troubleshooting time. These rapid assessments help establish whether problems are domain-specific, browser-related or network-dependent.
Let’s walk through each of these essential checks to rule out common causes.
Confirm domain registration is active
Domain expiration is surprisingly common and immediately explains DNS resolution failures. Taking a few moments to verify your domain’s current status can save hours of troubleshooting later.
Use a WHOIS lookup tool to verify these critical domain registration details when your domain is not working:
- Registration status (should show as “active” or “registered”)
- Expiration date (must be a future date)
- Current registrar information
- Auto-renewal settings and their status
- Payment method validity on file
Expired domains often display warning indicators like “pending delete” or similar status messages. Even with auto-renewal enabled, expired payment information can cause renewal failures, leaving your domain vulnerable to expiration.
Once you’ve confirmed your domain registration is valid, the next logical step is to check whether verification requirements might be preventing proper resolution.
Verify the domain contact
New domain registrations require email verification to comply with ICANN regulations. Without completing this crucial step, your domain may experience resolution restrictions or complete suspension.
Here’s what you need to do:
- Check your email inbox for verification messages from your registrar
- Review spam or junk folders if the message isn’t immediately visible
- Click the confirmation link within the specified timeframe (typically 15 days)
- Verify that confirmation was successful
Failing to complete verification within the required timeframe can result in domain suspension, regardless of how perfectly you’ve configured everything else. With both registration and verification confirmed, you’re ready to eliminate browser-side issues that could be masking the real problem.
Load the domain in incognito/private mode
Browser caching can mask DNS changes and create inconsistent loading behavior across different sessions. Testing your domain in incognito or private browsing mode eliminates these cached elements and provides a cleaner test environment.
What this test reveals:
- Whether cached DNS information is causing the issue
- If browser-stored data is interfering with resolution
- Whether the problem exists beyond your regular browsing session
If your domain works perfectly in incognito mode but fails in regular browsing, the issue likely involves browser cache or stored DNS information that needs to be cleared. This points to a local issue rather than a broader problem with your domain. Beyond browser-level testing, checking from completely different network environments reveals whether the problem extends beyond your current connection.
Test on a different network/device
Network-specific issues can create misleading troubleshooting scenarios where everything appears broken on your end while working perfectly for everyone else. Testing from different environments helps identify whether problems are localized to your specific setup or affect your domain globally.
Try accessing your domain from:
- A different device (smartphone, tablet or another computer)
- An alternative network (mobile data instead of WiFi)
- A completely different location, if possible
Several factors can impact domain accessibility without indicating actual domain problems, including ISP DNS caching, corporate firewall restrictions and local network configurations. Testing across multiple environments helps isolate whether the issue stems from your network or represents a genuine domain problem.
With checks complete and key domain information gathered, proceed with targeted troubleshooting based on your specific errors.
Step 2: Identify the problem based on the error you see
Different error messages indicate distinct underlying issues that require targeted troubleshooting approaches. Accurately identifying the specific error messages and symptoms you’re experiencing guides you toward the most relevant solutions and prevents wasted effort on unrelated fixes.
Below are the most common error types and what they reveal about your domain configuration.
Domain not found or DNS error messages
DNS resolution failures occur when your domain name cannot be translated into an IP address that browsers can use to connect to your website. This fundamental breakdown prevents any connection attempt from succeeding.
Typical causes include:
- Incorrect nameserver configuration at your registrar
- Missing or misconfigured DNS records
- Nameservers are not properly responding to queries
- Recent DNS changes are still propagating
- Domain registration issues or suspensions
You can start the troubleshooting process by using command-line tools such as nslookup or dig to query your domain’s DNS records directly. If you prefer a graphical interface, online DNS checkers allow you to verify resolution from multiple global locations simultaneously.
Using these diagnostic resources helps reveal whether your nameservers are responding correctly and confirms which DNS records are currently published. This detailed information is crucial for distinguishing between incorrect configuration settings and standard propagation delays.
While many DNS issues result in the site not being found at all, it is also possible that your domain resolves successfully but displays unexpected content.
Website loads the wrong page or a parked page
When DNS resolution succeeds but your website displays incorrect content, several configuration issues may be at play. Understanding these common causes helps you pinpoint the problem quickly:
- DNS records pointing to incorrect IP addresses.
- Configuration issues with hosting are preventing proper content delivery.
- Parked pages from registrars appear when domains use the default nameservers instead of the hosting provider’s nameservers.
- Old DNS records are lingering due to incomplete propagation, causing the temporary display of previous website content or placeholder pages while new configurations take effect globally.
While content display issues can be frustrating, they’re often straightforward to resolve. However, security-related errors present a different challenge and require immediate attention to protect your visitors.
HTTPS/SSL warnings
SSL certificate issues prevent secure connections and display browser security warnings that can deter visitors. These warnings typically stem from several common issues:
- Missing certificates when hosting providers haven’t installed SSL certificates for your domain
- Misconfigured certificates installed for different domains or containing expired validity periods
- Certificate Authority Authorization (CAA) record conflicts are preventing SSL certificate issuance
These ongoing HTTPS accessibility problems can persist even when other domain functions work correctly, making them particularly challenging to diagnose.
In contrast to security warnings that prevent access entirely, some errors indicate that your domain connection works perfectly, but content delivery fails at the final step.
Page loads but shows a 404 error
404 errors indicate successful domain resolution and server connection, but missing website content or configuration. This scenario suggests that the DNS settings are correct, but the hosting setup or website files require attention.
Understanding these distinct error patterns helps you focus troubleshooting efforts on the most relevant configuration areas and avoid unnecessary diagnostic steps. Now that you’ve identified which error category applies to your situation, the next logical step is to verify your domain’s registration details and current status with your registrar.
Step 3: Check the domain status at the registrar
Your domain registrar maintains authoritative information about your domain’s status, configuration and renewal settings. Registrar-level issues can prevent domain functionality regardless of hosting or DNS configurations, making registrar verification an essential troubleshooting step.
To ensure your domain foundation remains solid, three critical registrar-level checks need to be verified.
Confirm active registration and renewal status
Your domain’s registration status is the foundation of all its functionality. When a domain expires, it stops resolving to your website immediately. Even domains approaching their expiration date may experience reduced functionality as registrars begin implementing expiration warnings.
To verify your domain’s current status, log into your registrar’s control panel and check the following:
- Current registration status and expiration date
- Auto-renewal configuration settings
- Payment method validity and expiration
- Renewal notification preferences
Once you’ve confirmed that your registration is active, the next step is to ensure your domain’s contact information meets the verification requirements.
Check if WHOIS/contact verification is completed
ICANN’s WHOIS Accuracy Program mandates verification of all domain contact information, with particular emphasis on email addresses. Until these verification requirements are met, your domain may face functionality restrictions or even complete suspension.
Verification emails are typically sent immediately upon domain registration and must be confirmed within specified timeframes. Make sure to check:
- All email accounts associated with your domain registration
- Administrative contact email inbox
- Technical contact email inbox
- Billing contact email inbox
While verification ensures regulatory compliance, certain protective security measures may unintentionally create barriers during troubleshooting.
Registrar lock or pending holds
Registrar locks serve as essential security features to prevent unauthorized domain transfers, but they can also interfere with legitimate configuration changes. Some registrars automatically apply these locks, requiring manual removal before DNS modifications can take effect.
Additionally, pending holds may stem from several issues that require resolution:
- Outstanding payment issues
- Incomplete verification processes
- Compliance concerns or policy violations
Verifying your domain’s registrar-level health ensures a solid foundation before investigating more technical configuration aspects. With these basics confirmed, you can confidently move on to examine where your DNS records are actually managed.
Step 4: Confirm where your DNS is managed
DNS management responsibility can rest with your registrar, hosting provider or third-party DNS service and configuration changes must be made in the correct location to take effect. Misunderstanding DNS management responsibilities leads to configuration changes in the wrong systems that never affect actual domain resolution.
To begin addressing DNS management issues, you need to first know which service controls your domain’s nameserver settings.
Check current nameserver settings
Your domain’s nameserver settings control which DNS servers handle queries for your domain. To troubleshoot a domain that isn’t working, start by verifying these settings are configured correctly.
To identify your current nameserver configuration, you can:
- Use whois lookup tools to check your domain’s DNS records.
- Access your registrar’s control panel and review the nameserver assignments.
- Look for common configurations like registrar defaults, hosting provider nameservers or third-party DNS services.
Once you’ve identified where your nameservers are currently pointing, the next step is verifying whether this configuration matches your intended DNS management platform.
Update nameservers if they point to the wrong provider
If your nameservers are pointing to your registrar’s defaults but you want to use your hosting provider’s DNS management, you’ll need to update these settings at the registrar level. This change ensures that DNS queries are redirected to the correct servers that host your hosting provider’s DNS records.
Keep in mind that nameserver changes require time to take effect globally:
- Full propagation typically takes 24-48 hours
- During this period, domain resolution may appear inconsistent
- Different DNS servers update their records at different times, which is completely normal
With your nameservers now pointing to the correct DNS management system, propagation timing becomes the key factor determining when your changes will fully take effect.
Allow time after a recent nameserver change
Recent nameserver modifications need sufficient time to propagate throughout the global DNS infrastructure. During this propagation period, different users may see different configurations. Few of them may look at the old settings while others may see the new ones. This in turn creates temporary inconsistencies in website accessibility.
To ensure successful propagation:
- Avoid making additional nameserver changes during the propagation window
- Be patient and allow the full 24-48 hours for changes to complete
- Understand that multiple changes can extend resolution delays and create more complex troubleshooting scenarios
Understanding where your DNS is managed ensures that any configuration changes you make will actually take effect and successfully resolve domain issues.
After allowing sufficient time for nameserver propagation and confirming your DNS management location, the next logical step is to examine the DNS records themselves. Now that you’ve verified where your DNS is managed and allowed for proper propagation, you should check that your DNS records contain accurate information and follow best practices for optimal performance.
Step 5: Review DNS records for common mistakes
DNS records form the foundation of domain functionality, translating human-readable domain names into IP addresses that browsers can use to connect to web servers. Even minor errors in DNS record configuration can completely prevent website accessibility or cause intermittent connectivity issues.
To effectively troubleshoot why your domain is not working, systematically verify the configurations listed below in your DNS settings.
Check the A record for the root domain
A records are the foundation of your domain’s DNS configuration. They map your root domain ([example].com) directly to your hosting server’s IP address, making them essential for anyone to access your website.
To ensure your A record is properly configured, verify the following:
- Confirm your A record points to the correct IP address provided by your hosting provider
- If using multiple A records for redundancy, ensure all IP addresses are valid and respond to web requests
- Test that your root domain resolves correctly from different locations
With your root domain properly mapped, the next critical step is ensuring your “www” subdomain works seamlessly alongside it.CNAME records handle your www subdomain (www.[example].com), ensuring visitors can access your site regardless of whether they type “www” or not. Even when your root domain works perfectly, incorrect CNAME configuration can prevent access to www.
Check the CNAME record for “www”
With your root domain properly mapped, the next critical step is ensuring your “www” subdomain works seamlessly alongside it.CNAME records handle your www subdomain (www.[example].com), ensuring visitors can access your site regardless of whether they type “www” or not. Even when your root domain works perfectly, incorrect CNAME configuration can prevent access to www.
Your www CNAME record should typically:
- Point to your root domain
- Follow your hosting provider’s specific requirements
- Match the configuration standards for optimal performance
After confirming your domain and subdomain mappings are correct, the next priority is cleaning up your DNS zone file to prevent conflicting information.
Remove duplicate or conflicting DNS records
Duplicate or conflicting DNS records can cause unpredictable behavior and prevent reliable access to websites. Different DNS servers may return different record sets for the same query, leaving visitors unable to consistently reach your site.
Review your DNS configuration carefully for these common issues:
- Multiple A records pointing to different IP addresses
- Conflicting CNAME and A records for the same hostname
- Outdated records from previous hosting migrations that should have been removed
All in all, by systematically verifying each of these DNS records, you eliminate the most common technical causes of domain resolution failures and ensure reliable website accessibility for all visitors. With your DNS records now correctly configured, you’re ready to explore why your changes might not appear immediately due to propagation delays.
Step 6: Understand DNS propagation and caching delays
DNS propagation is the time required for DNS changes to spread across the global DNS infrastructure, affecting billions of DNS servers worldwide. Understanding propagation timelines and caching behavior helps set realistic expectations and prevents premature troubleshooting efforts during normal update periods.
With a basic understanding of the process, let’s look at the typical timelines involved in these updates.
How long does DNS propagation usually take?
DNS propagation typically completes within 24-48 hours for most DNS record changes, though some updates may be visible within minutes while others require the full timeframe. Nameserver changes generally take longer to propagate than simple record updates within existing nameservers.
Factors affecting propagation speed include:
- Geographic location and ISP DNS caching policies
- Time-to-live (TTL) values set on previous DNS records
- Type of DNS change (record update vs nameserver change)
- DNS infrastructure efficiency of the involved providers
These influential factors often lead to confusing situations in which the site loads for some visitors but not for others.
Why does the domain work for some users but not others?
During DNS propagation, your domain experiences inconsistent accessibility for different users. This happens because DNS servers worldwide update their cached records at different times, creating scenarios where your domain works perfectly for some visitors while remaining inaccessible for others. This inconsistency is completely normal during propagation and doesn’t indicate any configuration errors on your end.
Several factors contribute to these varying propagation times:
- ISP DNS caching policies vary significantly, with some providers updating records quickly while others maintain cached information for extended periods.
- Corporate networks and public WiFi systems often implement additional DNS caching layers that can extend apparent propagation times.
- Geographic location affects when different DNS servers receive and process the updates.
Rather than guessing when these updates will complete, you can use specific tools to track exactly where your DNS changes have taken effect.
How to check DNS propagation status?
Online DNS propagation checkers query DNS servers worldwide to show the current resolution status from multiple geographic locations. These tools provide real-time visibility into propagation progress and help identify regions where updates haven’t yet taken effect.
Command-line tools like dig and nslookup can query specific DNS servers to verify propagation status and identify servers still returning old information. This targeted approach helps troubleshoot region-specific connectivity issues.
Understanding propagation mechanics prevents unnecessary troubleshooting during normal DNS update periods and provides realistic timelines for restoring domain functionality. After verifying that DNS is propagating as expected, the next logical step is to check your server configuration.
Step 7: Confirm hosting and website setup
Successful DNS resolution doesn’t guarantee complete website functionality, as hosting account configuration and website file deployment create additional requirements for full site accessibility. Even perfectly configured DNS settings will fail to deliver working websites without a proper hosting setup.
To ensure the server is actually ready to receive visitors, we need to inspect the account status and configuration details.
Make sure the hosting account is active
Your hosting account status directly impacts website availability, regardless of how accurately your DNS is configured. Even when DNS resolution works perfectly, your site won’t be accessible if your account faces any of these issues:
- Suspended accounts due to billing problems
- Resource limit violations
- Policy violations
To resolve these potential issues, log into your hosting provider’s control panel and verify your account status, billing currency and resource utilization. Make sure to address any outstanding issues that might be causing account limitations or suspensions.
Once your account is cleared and active, the next step is to verify that the hosting system properly recognizes your specific domain.
Confirm the domain is added to the hosting account
Most hosting providers require explicit domain assignment within their systems before websites will respond to requests for those domains. This crucial configuration step connects your domain to specific hosting resources and website files.
To ensure proper setup, verify the following in your hosting account’s domain management section:
- Your domain appears in the domain list
- It’s configured for web hosting (not just DNS management or email services)
- The domain settings are active and properly saved
However, simply associating the domain with your hosting account isn’t enough. The server also requires actual content files to display to your visitors.
Check that the website files or the site is published
Hosting accounts require actual website files or content management system installations before domains can display websites. Without proper content, empty hosting accounts may display generic “coming soon” pages or advertisements from the hosting provider.
Make sure your website setup includes the following essential components:
- Website files uploaded to the correct directory (typically public_html or www)
- Proper directory structure as expected by your hosting provider
- Complete installation for content management systems like WordPress (beyond simple file uploads)
- All necessary configuration files are in place
Completing these hosting configuration verifications ensures that successful DNS resolution will connect your visitors to functional website content rather than error pages or placeholder content.
Once you’ve confirmed the presence of these files and completed the server-side verification process, your domain should be working properly. If the site remains inaccessible despite passing all these checks, the issue may lie within your own local network settings or require further investigation into DNS propagation timing.
Step 8: Rule out local and network-level issues
Local connectivity issues can cause symptoms identical to domain problems, even though they have completely different underlying causes. Systematic elimination of local factors prevents wasted troubleshooting effort on domain configurations that may already be working correctly.
Before diving into complex DNS settings, address the most common local culprits.
Clear DNS cache on device router
Local DNS caching on devices and network equipment can preserve outdated domain information long after DNS changes have taken effect globally. Clearing local caches forces fresh DNS queries that reflect current configurations.
Device-level cache clearing procedures vary by operating system:
- Windows: Run “ipconfig /flushdns” in the command prompt
- macOS: Use “sudo dscacheutil -flushcache” in the terminal
- Linux: Service network-manager restart or systemd-resolve –flush-caches
Router DNS caches may require a router restart or administrative cache clearing through the router’s configuration interfaces. Once you’ve cleared these local caches, the next step is to test with a different DNS infrastructure.
Use alternative DNS resolvers
ISP DNS servers sometimes experience technical issues or maintain outdated cached records, which can affect domain resolution. Temporarily switching to public DNS resolvers such as Cloudflare (1.1.1.1) or Google (8.8.8.8) can bypass ISP-specific DNS issues.
Public DNS resolvers often update more quickly and reliably than ISP alternatives, providing cleaner test environments for domain troubleshooting. If domains work with alternative resolvers but not the default ISP DNS, the issue lies with the local DNS infrastructure rather than the domain configuration.
Eliminating local factors ensures that remaining troubleshooting efforts focus on actual domain and hosting configuration issues rather than local connectivity problems.
With local issues ruled out, you’re now ready to verify your hosting-specific configurations. Having completed these fundamental troubleshooting steps, the final phase involves examining platform-specific settings that could affect your domain’s functionality.
A quick Bluehost-specific checklist
If you’re a Bluehost customer, you have access to specialized tools and support resources that can help you quickly identify and resolve domain issues. By leveraging Bluehost-specific features and understanding how to navigate your account, you can troubleshoot problems more efficiently and get your domain up and running faster.
Let’s walk through the essential checks you should perform within your Bluehost account to diagnose and fix common domain issues.
Check and update your domain contact information
If your domain is not active after purchase, it’s likely because your contact information is incomplete. Your domain registration requires accurate details, including your name, email address and physical address. To fix this issue, you need to verify and update your information through your Bluehost control panel.
- Log in to your Bluehost Account Manager.
- Click the Domains tab from the side navigation menu on the left.
- Select the domain name you’re working with and click the Contacts tab.

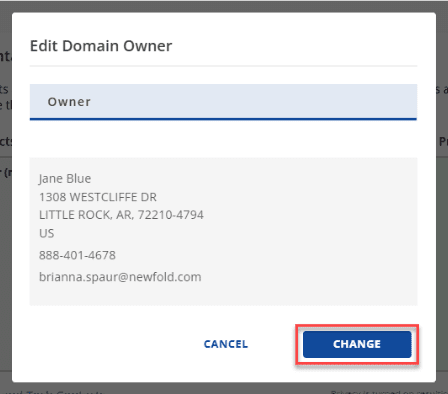
4. Click EDIT to update the Domain Owner information.
5. To change the Domain Owner details, click the EDIT button. Once the pop-up menu appears, click the CHANGE button.
6. Enter the new details in the fields provided. Once done, click CONTINUE.
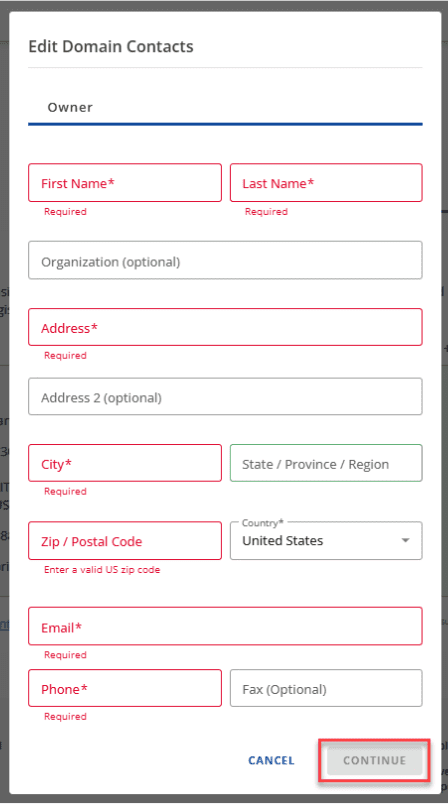
7. Verify that all domain registration details are complete and accurate, including a valid name, email and physical address.
Even when DNS settings appear correct, incomplete domain contact information within Bluehost’s systems can prevent your domain from activating properly. Missing or inaccurate contact details may delay domain activation and prevent your website from functioning as expected. Make sure all required fields are completed before saving your changes.
With your contact information verified and updated, the next step is ensuring your domain’s technical settings are properly configured.
Verify Bluehost nameservers and DNS records
For optimal integration with Bluehost hosting services, your domain should typically use Bluehost nameservers. Here’s what to check:
- Confirm your domain is pointing to ns1.bluehost.com and ns2.bluehost.com
- Verify nameserver settings match both in your Bluehost account and at your domain registrar (if different)
- Check that A records, CNAME records and other DNS entries are configured correctly
- Use Bluehost’s DNS management tools to review and update settings as needed
These DNS configurations are critical for directing visitors to your website. If nameservers or DNS records are misconfigured, your domain won’t resolve properly even if everything else is set up correctly.
Beyond technical DNS configurations, you’ll also want to confirm your domain’s status within your Bluehost hosting account.
Check domain assignment and site status
Bluehost’s control panel provides domain status information that can help you quickly identify account-level configuration issues. To check your domain status:
- Access your Bluehost control panel
- Review the domain status indicator for your website
- Verify the domain is properly assigned to your hosting account
- Confirm the domain is configured for active websites
Your domain should display an “active” or “live” status. If you see designations like “parked,” “pending,” or “suspended,” this indicates incomplete setup or potential account issues that need to be addressed before your site can function properly.
Sometimes, despite checking all these settings, you may encounter situations that require professional assistance to resolve.
When to contact Bluehost support?
While many domain issues can be resolved through self-service troubleshooting, there are situations where contacting Bluehost support is the most efficient way to resolve them. Reach out to the support team when:
- DNS settings appear correct, but your domain still doesn’t resolve after 48 hours
- Error messages reference server-side issues or hosting account problems
- Your domain worked previously, but stopped functioning without any configuration changes on your end
- SSL certificate installation or configuration requires the hosting provider’s intervention
If your domain issues persist after trying basic troubleshooting steps, don’t worry; Bluehost’s 24/7 support team is here to help. Our experts have direct access to your account details and to the hosting infrastructure that isn’t available through self-service tools, enabling faster diagnosis and resolution of complex domain issues. Contact Bluehost support now for personalized assistance with your domain.
Final thoughts
Domain troubleshooting requires systematic evaluation of registration, DNS configuration, hosting setup and connectivity factors. Following structured diagnostic procedures reveals specific problems with targeted solutions.
Most domain problems stem from configuration oversights rather than technical failures. Missing DNS records, incomplete verification or propagation delays cause most accessibility issues. Understanding common causes enables efficient troubleshooting.
Domain troubleshooting involves timing considerations around DNS propagation and verification. Patience during propagation prevents unnecessary changes that complicate resolution. When systematic troubleshooting fails, professional support from your hosting provider or registrar offers account-specific diagnostic capabilities.
Need a reliable domain and hosting solution? Bluehost offers seamless domain registration with 24/7 expert support to help you avoid common domain issues. Get started with Bluehost today for hassle-free domain management.
FAQs
Your domain can stop working for several reasons. The most common causes include expired domain registration, failed payment renewals, suspended hosting accounts, changes to DNS settings or an expired SSL certificate. To troubleshoot, first check if your domain registration and hosting account are active. Then review any recent changes you made to your DNS or domain configuration.
Custom domains often fail due to incorrect DNS settings, incomplete domain verification or missing nameserver updates. To fix this, make sure your DNS records point to the correct IP addresses for your hosting provider and that your nameservers are configured correctly. You’ll also need to configure an SSL certificate to enable HTTPS on your custom domain.
DNS changes usually take 24 to 48 hours to fully propagate worldwide, although you might see changes within minutes in some locations. Changes to nameservers typically take longer than updates to individual DNS records. How quickly your changes appear depends on several factors, including TTL settings, your ISP’s caching policies and your geographic location.
If your domain works on one network but not another, it’s usually because of DNS caching differences, ISP-specific DNS issues or propagation delays affecting regions at different times. Some networks hold onto old DNS information longer than others and corporate or public networks may filter DNS queries. To determine if the issue is widespread or limited to specific networks, test your domain from multiple locations.
Fixing domain issues depends on the cause, but the general approach is straightforward. First, verify your domain registration is active and your DNS configuration is correct. Then confirm your hosting account is properly set up and allow time for DNS changes to propagate. Start with basic connectivity tests, then move on to DNS diagnostics. For complex technical issues beyond basic troubleshooting, contact your hosting provider’s support team for assistance.


Write A Comment