Key highlights
- Learn how to access your WordPress site before DNS propagation completes using temporary URLs.
- Discover how temporary URLs enable safe staging site setup for testing changes without affecting your live website.
- Understand the methods to prevent website downtime during migration by utilizing temporary URL access.
- Master the techniques to efficiently change and update temporary URLs in your WordPress configuration.
- Explore practical workflows that streamline your website management process through strategic temporary URL usage.
Managing a WordPress website often requires working with temporary URLs, whether you’re setting up a staging site, migrating your website or accessing your site before DNS propagation completes. Understanding how to use and change temporary URL with WordPress can save you time, prevent downtime and streamline your website management process.
This comprehensive guide will walk you through everything you need to know about WordPress temporary URLs, from accessing your site through your hosting control panel to updating database settings for seamless migration. Whether you’re a beginner or an experienced website owner, you’ll discover practical solutions for common URL-related challenges.
What is a temporary URL in WordPress?
A temporary URL in WordPress is a system-generated web address provided by the hosting provider that lets you access your website before your primary domain is fully connected. It’s commonly used during site migration, development or testing to preview your website without affecting the live domain.
Common formats for temporary URLs include:
- [yourdomain].tempurl.host
- temp.[hostingprovider].com/[username]
- [serverip]/~[username]
- [accountname].temp.domains
When do you need temporary URLs?
Temporary URLs become necessary in several scenarios:
- Setting up a new WordPress site before domain propagation completes
- Creating a WordPress staging site for testing changes
- Migrating websites between hosting providers
- Accessing your site when DNS settings are being updated
- Working on website development before launching
- Troubleshooting issues without affecting your live site
Temporary URL vs domain URL (What’s the difference?)
| Feature | Temporary URL | Domain URL |
|---|---|---|
| Purpose | Used for testing, migration and staging | Used for live, public access |
| Provided by | Hosting provider | Domain registrar / hosting setup |
| DNS required | No | Yes |
| SEO-friendly | Should not be indexed | Yes |
| Typical use case | Site setup, troubleshooting, preview | Production website |
| Example | box123.temp.domains/~user | https://example.com |
Temporary URL for addon domains and subdomains
Addon domains and subdomains function differently from primary sites because they share your main hosting account’s file structure. Instead of a unique root address, their URL typically follows a directory path format like http://[server-ip]/~[username]/[addon-folder]/. This allows you to manage multiple websites or test changes before fully propagating. To access this via the Bluehost control panel, locate your primary temporary URL under the ‘Websites’ tab and append the specific folder name where your addon domain files reside. If you encounter broken layouts or missing assets during testing, you likely need to update WordPress URL entries in your database to match this specific subdirectory path.
Importance of a temporary URL during WordPress migration
A temporary URL plays a critical role when migrating or setting up a WordPress site.
Here’s why it matters:
- Check functionality: Test themes, plugins and site features before changing DNS records.
- Avoid downtime: Verify everything works correctly before pointing your domain to a new server.
- Troubleshoot safely: Identify and fix issues in a separate environment without affecting your live website.
Using a temporary domain during migration gives you full control and reduces the risk of errors when your site goes live.
WordPress URL migration and domain changes
Migrating your WordPress site requires careful URL management to maintain functionality and SEO rankings.
Pre-migration preparation
- Create full backups of website files and database
- Document current WordPress site URL settings
- Note any plugins referencing URLs
- Plan your temporary URL strategy during migration
Step-by-step migration process
- Set up hosting at your new provider
- Access the new hosting account using the temporary URL
- Upload WordPress files to the new server
- Create and import the database
- Update WordPress URLs to the temporary domain
- Test functionality using the temporary URL
- Update DNS settings to point to your new hosting
- Change URLs back to the permanent domain after DNS propagation
Managing URL changes during migration
- Original site URLs: Current live website addresses
- Temporary URLs: Provided by new hosting provider
- Final URLs: Permanent domain on new hosting
Use search-and-replace tools carefully to avoid broken internal links.
When and why, you need to change a WordPress temporary URL
There are specific situations where you may need to update your WordPress temporary URL:
- Your DNS records are still propagating
- The domain is not properly connected to the new hosting server
- You’re unable to access the WordPress admin panel
- Your site URL looks like
http://domain.com/addondomain/due to incorrect setup - WordPress was installed on an addon domain, requiring database URL updates
In these cases, changing or configuring the temporary URL ensures WordPress loads correctly.
How to access your WordPress site using temporary URLs
Different hosting providers offer various methods to access your site through temporary URLs. Here’s how to find and use your temporary URL across popular hosting platforms.
Finding your temporary URL in hosting control panels
Most hosting providers display your temporary URL prominently in their control panel. Look for sections labeled “Temporary URL,” “Preview Site,” or “Site Access” in your hosting dashboard.
For popular hosting providers:
- Shared hosting accounts: Navigate to your hosting control panel and look for the temporary URL section.
- WordPress hosting plans: Check the WordPress dashboard or hosting-specific control panel.
- VPS and dedicated servers: Use the server IP address followed by your account username.
Accessing WordPress admin through temporary URLs
Once you have your temporary URL, accessing your WordPress admin dashboard is straightforward:
- Open your web browser and navigate to your temporary URL.
- Add “/wp-admin” to the end of the temporary URL.
- Enter your WordPress username and password.
- You’ll now have full access to your WordPress admin dashboard.
If you encounter login issues, verify that your WordPress database contains the correct temporary URL settings.
Configure WordPress to use a temporary URL
There are various ways to configure your WordPress site to use a temporary URL, among them through the WordPress dashboard or phpMyAdmin.
Note: The steps below are not applicable to Cloud hosting. Contact your hosting provider for help if needed.
Within the WordPress dashboard
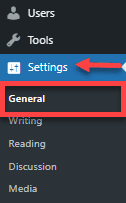
- Log in to your WordPress Dashboard and click Settings on the left menu, then select General.
2. Under General Settings, update both the:
- WordPress Address (URL)
- Site Address (URL) fields with your temporary URL
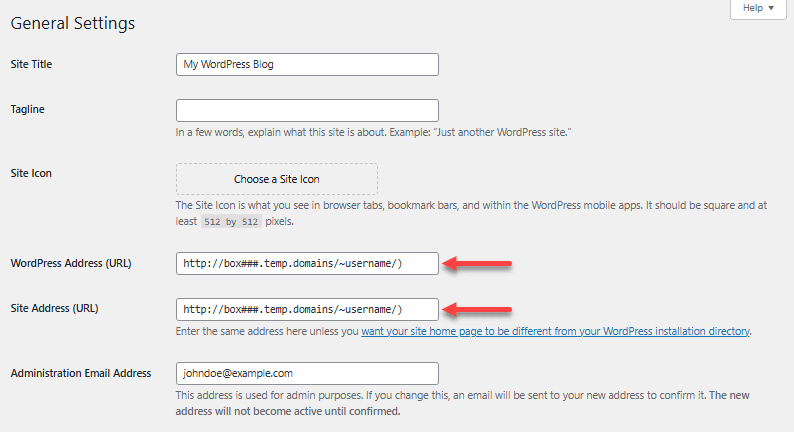
3. Scroll down and click Save Changes.
Note: Once the migration is done and your domain is pointed to your hosting server, you can change your temporary URL back to your domain.
Within phpMyAdmin
If you cannot access your WordPress Admin Dashboard, you can configure your site to use the temporary URL through the database.
Step 1: Identify your WordPress database name
- Navigate to your site’s document root and open
wp-config.phpusing File Manager or FTP - Locate the database name
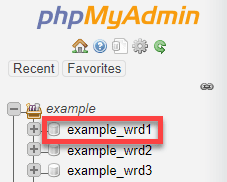
Step 2: Access your Database via phpMyAdmin
- Log in to your hosting control panel
- Open phpMyAdmin
- Click your site’s database name in the left pane
Step 3: Modify your home and SiteURL
- In the right pane, click the table name
wp_options(or use Browse)
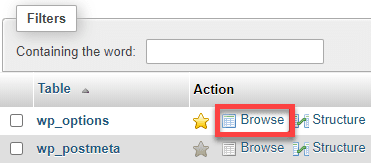
2. Locate siteurl and home under the option_name column.

3. Double-click the option_value field and replace it with your temporary URL (example: http://box###.temp.domains/~username/). Save changes by clicking Go.
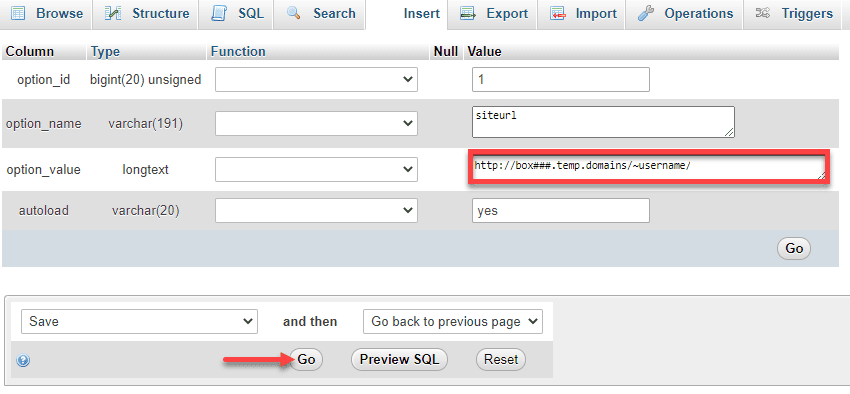
4. Repeat the process for the home row
Step 4: Check the updates
- Visit the temporary URL to ensure your site loads correctly, including images and content
Note: After migration, update these URLs back to your permanent domain.
What are the common mistakes to avoid when changing a temporary URL?
- Updating only the Site Address but not the WordPress Address
- Forgetting to revert the temporary URL after DNS propagation
- Allowing search engines to index temporary URLs
- Hardcoding the temporary URL in themes or plugins
Setting up WordPress staging sites with temporary URLs
Creating a WordPress staging site allows you to test updates, redesigns and new features safely before pushing them live. A staging site works on a temporary URL, so your visitors never see unfinished changes.
If you’re using Bluehost WordPress hosting, setting up a staging environment is straightforward. We include a one-click staging tool with many of our WordPress hosting plans, which automatically creates a copy of your live site along with a temporary URL for testing.
This makes it easy to experiment, troubleshoot issues or validate updates without risking downtime on your main website.
1. Create a staging environment with Bluehost (one-click)
If you’re a Bluehost user, you can create a staging site directly from your dashboard – no manual configuration required.
Here’s how it works:
- Log in to your Bluehost Account Manager.
- Go to Websites and Click the WordPress Admin button located next to the website you want to manage.
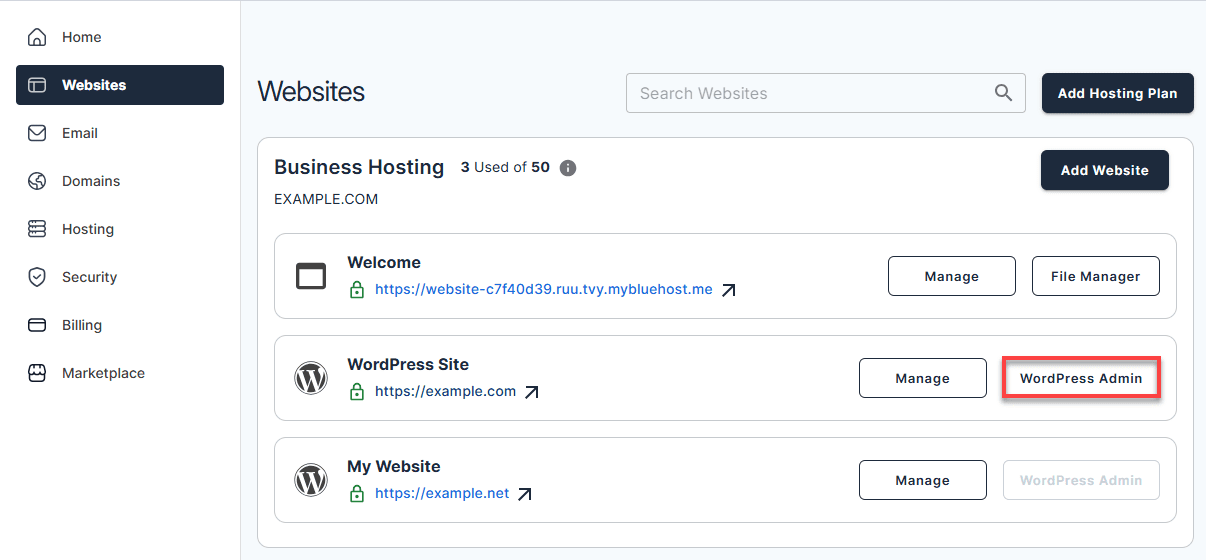
- You’ll be redirected to your ‘Managed WordPress’ tab. Scroll to the ‘Staging’ section and click ‘Create staging site’.
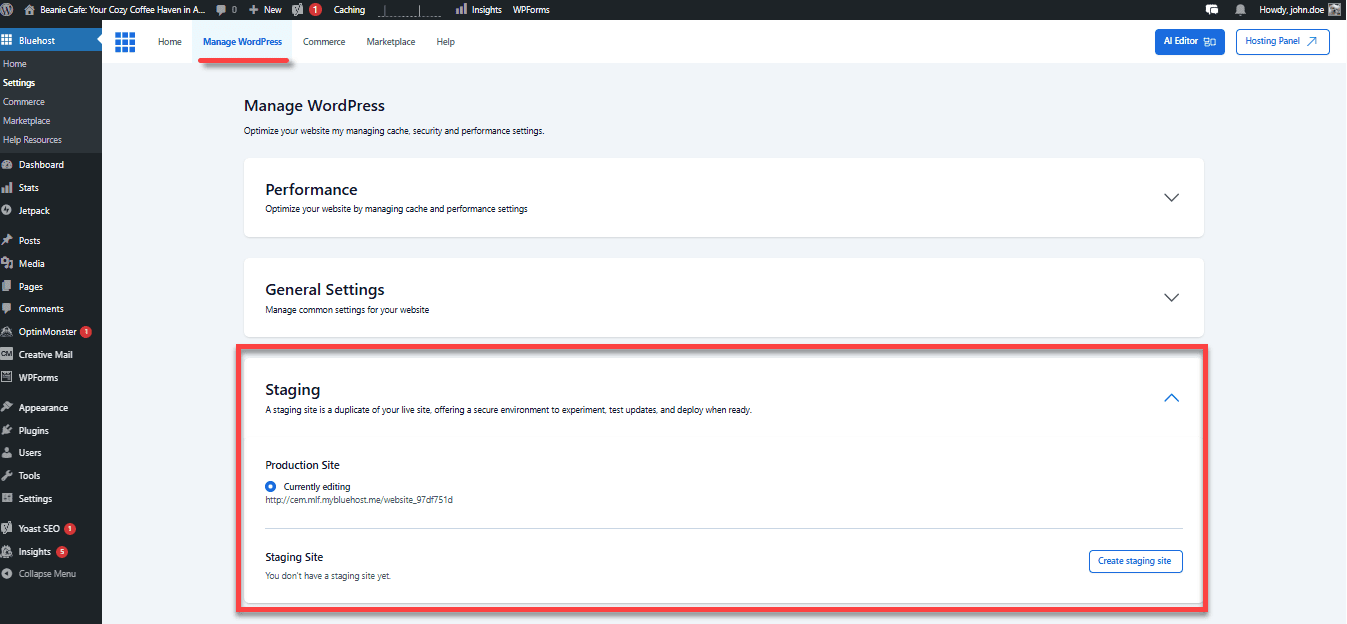
- After a few minutes, your staging site will be ready. Production site is your actual website.
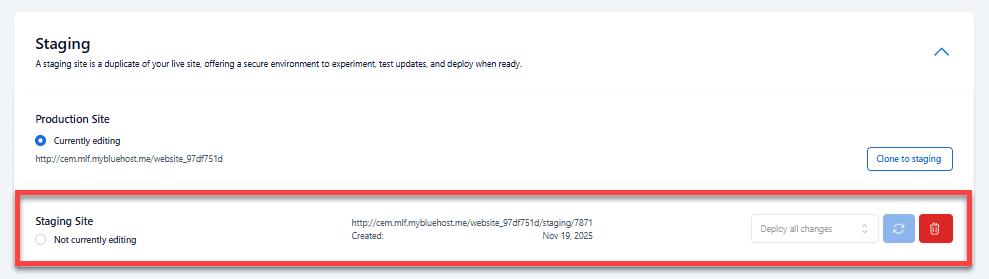
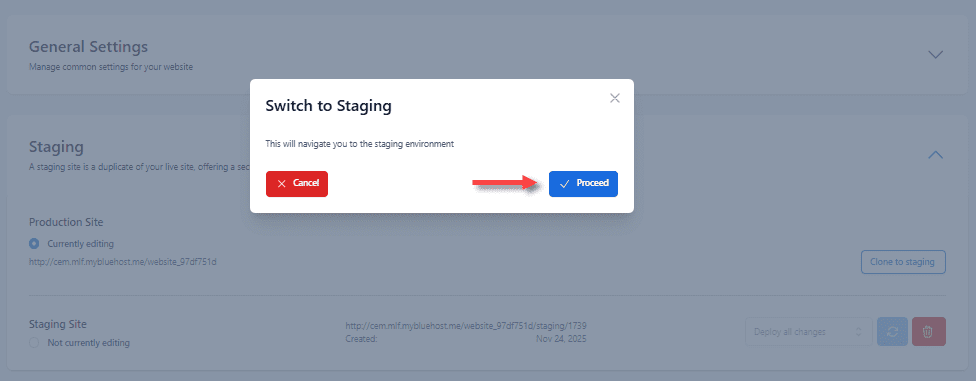
- Select the ‘Not currently editing’ option under the ‘Staging Site’ section to switch to the staging environment.

- In the pop-up, click Proceed.
Once created, we automatically:
- Clone your live WordPress site
- Assign a temporary staging URL
- Keep the staging environment separate from your production site
You can now access the staging site, log in to WordPress and safely test:
- Theme changes and redesigns
- Plugin installations or updates
- WordPress core updates
- Custom code or layout adjustments
With Bluehost WordPress hosting, you get a one-click staging site ready in minutes – perfect for testing changes without risking downtime.

When everything looks good, you can deploy the changes back to your live site with just a few clicks.
Why this helps: You don’t need to manually update URLs, create databases or manage file copies – everything is handled for you.
Also read: How to Create a Staging Site in WordPress
2. Manual staging site setup
If your hosting provider doesn’t offer one-click staging:
- Create a subdirectory in your hosting account (e.g.,
/staging/) - Copy your WordPress files to the staging directory
- Create a separate database for staging
- Import your live site’s database
- Update the staging database URLs to point to the temporary domain
- Test your staging site thoroughly
3. Protecting staging sites from search engines
- Enable “Discourage search engines” in Settings → Reading
- Add password protection via your hosting control panel
- Use
robots.txtto block crawlers - Consider IP restrictions for added security
This ensures your temporary domain or staging site does not impact SEO.
Troubleshooting common temporary URL issues
Working with temporary URLs can present various challenges. Here are solutions to the most common problems.
1. Site not found or access denied errors
If you see “Site not found, why am I seeing this?” messages:
- Verify you’re using the correct temporary URL format
- Check that your hosting account is properly activated
- Ensure WordPress files are uploaded to the correct directory
- Confirm your hosting provider has finished setting up the temporary domain
Also read: Most Common WordPress Issues and Their Solutions in 2026
2. WordPress admin access problems
When you can’t access your WordPress admin through temporary URLs:
- Clear your browser cache and cookies
- Verify the wp-config.php file contains correct database information
- Check that the wp_options table has the right temporary URL values
- Ensure file permissions are set correctly
- Try accessing through [temporary-url]/wp-login.php instead
Also read: How to Find and Access WordPress Error Logs (Step-by-Step)
3. Mixed content and broken links
Temporary URLs often cause mixed content issues:
- Use search and replace tools to update hardcoded URLs
- Update image paths and internal links
- Check theme customization settings
- Review plugin configurations for hardcoded domain references
Also read: How to Fix “The Link You Followed Has Expired” WordPress Error
Final thoughts
Mastering how to change temporary URLs with WordPress empowers you to confidently manage your website during migrations, testing and development phases. Whether you’re switching hosts or running staging environments, understanding WordPress temporary URL management ensures your site remains accessible and functional. By following these comprehensive guidelines and best practices, you’re now prepared to handle any temporary URL scenario in your WordPress journey. Remember to maintain regular backups and document your changes for smooth website management.
Ready to elevate your WordPress experience? Get started with Bluehost WordPress hosting today for reliable performance, expert 24/7 support and seamless tools that make managing your WordPress site effortless.
FAQs
How long do temporary URLs remain active?
Most hosting providers keep temporary URLs active throughout your hosting subscription. However, some may deactivate them once your primary domain is properly configured. Check with your hosting provider for specific policies.
Can I use temporary URLs for eCommerce sites?
Yes, but exercise caution with payment processing and customer data. Ensure SSL certificates work properly with temporary URLs and avoid processing real transactions on temporary domains.
Do temporary URLs affect SEO?
Temporary URLs shouldn’t impact your main site’s SEO if used properly. Always block search engines from indexing temporary versions and ensure proper redirects are in place when switching to your permanent domain.
What happens if my temporary URL stops working?
Contact your hosting provider immediately if your temporary URL becomes inaccessible. They can provide alternative access methods or restore temporary URL functionality.
Can I customize my temporary URL?
Most hosting providers assign temporary URLs automatically, but some allow customization through their control panel. Check your hosting dashboard for temporary URL management options.


Write A Comment