
Key highlights
- Understand what robots.txt Disallow, robots.txt Disallow all truly do and how they impact SEO, crawling and indexing.
- Learn how to safely configure your robots.txt file to block unwanted bots without accidentally deindexing your entire site.
- Explore real-world examples and wildcard patterns to target crawl restrictions efficiently and avoid common mistakes.
- Uncover the hidden risks of using Disallow: / on live environments and how to reverse crawl-blocking errors.
- Know when to use robots.txt vs. meta robots tags or HTTP headers for better privacy, crawl control and content protection.
It’s one of the smallest plain text files on your website, and one of the easiest to get wrong. The robots.txt file controls what search engines can and can’t crawl on your site. When used right, it helps you protect sensitive folders, focus on your crawl budget and clean up low-value pages from search results.
But when used carelessly, like adding robots.txt Disallow all directive, it can block Google’s crawler entirely and wipe your site off the map.
If you’ve launched a site and wondering why it’s not showing up in search, your robots.txt file may be to blame. In this guide, we’ll break down exactly what robots txt Disallow means, when to use it and when not to. We’ll also explore how to configure robots txt file without risking visibility, rankings or control.
TL;DR: What does robots.txt Disallow All do?
- robots.txt controls what search engine bots can crawl on your site.
- The Disallow: / directive blocks all bots from accessing any page.
- Useful for staging sites or testing, but dangerous on live sites. It can deindex your entire site.
- Use meta tags like noindex, password protection or authentication to truly hide content.
- Always test your robots.txt file using tools like Google Search Console or technicalseo.com.
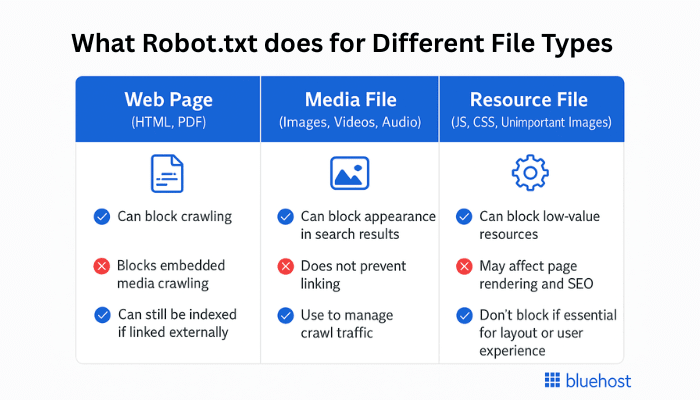
What is a robots.txt file and what does ‘Disallow’ do?
A robots.txt file is a simple text file placed in your website’s root domain that tells search engine bots which pages or sections of your website they can or cannot crawl. The robots.txt Disallow directive is used to block specific URLs from being accessed by search engine crawlers.
A robots.txt file is located in your website’s root domain directory and follows the Robots Exclusion Protocol(REP). It’s a set of guidelines that different search engines follow when crawling websites.
Role of Disallow directive
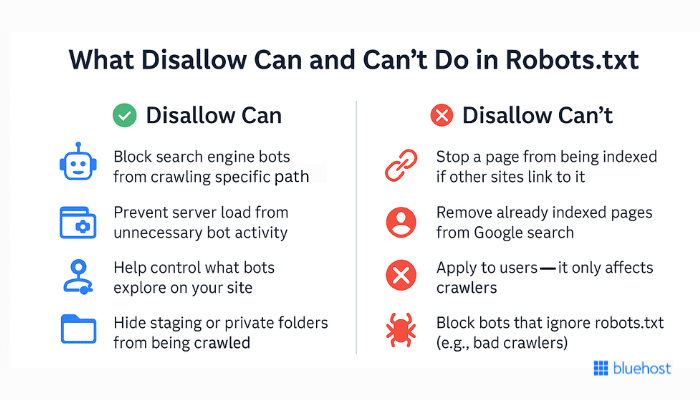
The Disallow directive in the robots.txt file instructs search engines on what not to crawl. When you use this command, you’re essentially placing a ‘Do Not Enter’ sign on specific areas of your website.
For example, adding ‘Disallow: /private-folder/’ tells search engines to avoid crawling anything within that folder. This can help keep sensitive or irrelevant sections out of search results.
But Disallow doesn’t stop indexing if the content is linked elsewhere. That’s why it’s not a reliable method for protecting private data, only for managing crawler access.
How do Google search engines interpret robots.txt?
Without a well-configured robots txt file, Google bots can roam freely, indexing everything. It may include pages you don’t want to appear in search results, such as admin pages, duplicate content or test environments.
If you mistakenly use robots.txt Disallow all directive (Disallow: / for all user agents), it blocks search engine crawlers from accessing any part of your website. This can wipe your entire site from Google search results and cause a critical SEO error.
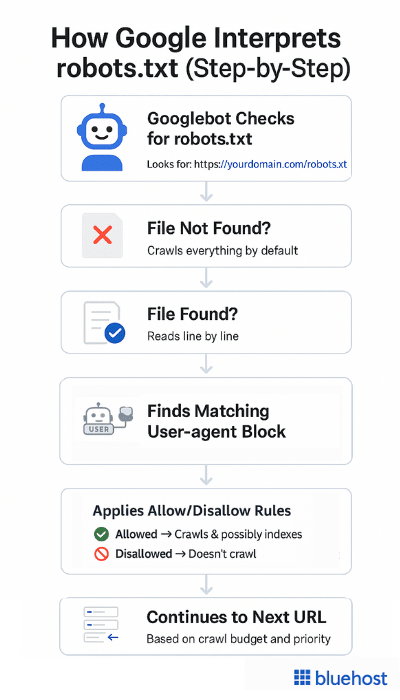
Note: Google enforces a 500 KiB size limit for robots.txt files. Any content exceeding the maximum file size is ignored. The robots.txt file is not a mechanism for keeping a web page out of Google. To prevent a page from appearing in search results, you need to use a noindex directive.
You can create a robots.txt file manually through web server files or use tools like the Yoast SEO plugin. For example, publishers sometimes add a Googlebot news disallow rule to prevent Google News from crawling certain sections of their site. Platforms like Google Search Console also let you test and troubleshoot your file to ensure everything works as expected.
Also read: How to Exclude Google from Indexing Add to Cart WordPress Page using Yoast SEO
robots.txt syntax: Syntax and examples for robots.txt directives
Managing how search engines interact with your website starts with understanding the core rules in a robots.txt file. This quick robots.txt syntax guide explains the exact rules and examples you should follow. Let’s look at the six key syntax rules, including how the Disallow directive works:
6 core robots.txt syntax
Understanding robots.txt is easier when you are familiar with its basic rules. These simple rules help manage how search engine bots work with your website. Each directive should be written on a separate line, paying attention to case sensitive elements like directory name and forward slash placement:
- User-agent: This rule tells which bot or crawler the following guidelines are for.
- Disallow: This rule tells bots not to visit specific files, folders or pages on your site that may include certain regular expressions.
- Allow: This rule allows bots to crawl specific files, folders or pages.
- Sitemap: This rule directs search engines to your website’s XML sitemap location.
- Crawl-delay: This rule asks bots to crawl your site more slowly. However, not all search engines follow this rule.
- Noindex: This rule requests bots not to index some pages or parts of your site. Yet, Google’s support for noindex rule in robots.txt is inconsistent.
To help you compare these core directives at a glance, here’s a quick breakdown of how each one works:
| Metric | User-agent | Disallow | Allow | Sitemap | Crawl-delay | Noindex |
|---|---|---|---|---|---|---|
| Function | Targets specific bots | Blocks crawling of paths | Allows access to files | Points to XML sitemap | Sets crawl rate (in sec) | Prevents indexing (deprecated) |
| Example | User-agent: * | Disallow: /admin/ | Allow: /public/logo.png | Sitemap: https://example.com/sitemap.xml | Crawl-delay: 10 | Noindex: /temp/ |
| Google support | ✅ Yes | ✅ Yes | ✅ Yes | ✅ Yes | ❌ No | ❌ No (use meta or header) |
| Use case | Apply rules to all/specific bots | Hide private or duplicate pages | Make exceptions in blocked folders | Help bots discover key pages | Reduce load from bots | Use safer alternatives |
Each directive plays a specific role in managing how bots interact with your site. Let’s now look at them in more detail:
1. User-agent directive
The ‘User-agent’ rule is important for your robots.txt file. It shows which bot or crawler the rules apply to. Each search engine has a specific user agent name. For example, Google’s web crawler calls itself ‘Googlebot’.
If you want to target a specific user agent, such as Googlebot only, write:
User-agent: GooglebotYou can type different user agents separately, each with their own rules. You can also use the wildcard ‘*’ to make the rules apply to all user agents.
2. Disallow robots.txt directive
The robots.txt ‘Disallow’ rule is very important for deciding which parts of your website should be hidden from search engines. This rule instructs search engine bots not to access specific path components, such as folders, file types or individual URLs, on your site.
Blocking a directory
For example, you can use the ‘Disallow’ rule to stop bots from entering the admin area of your website:
User-agent: *
Disallow: /admin/
This will prevent all URLs starting with ‘/admin/’ from being indexed by search engine bots.
Using wildcards
User-agent: *
Disallow: /*.pdf$
With the wildcard ‘*’, you can block all PDF files on your website. Remember to check your robots.txt file after making changes to make sure you don’t block any important parts of the site.
3. Allow directive
‘Disallow’ blocks access to certain areas of a website, whereas the ‘Allow’ directive can make exceptions in these blocked areas. It works together with ‘Disallow’ to allow specific files or pages to be accessed even when a whole directory is blocked.
Think about a directory that has images. If you want Google Images to see one special image in that directory, here’s how you can do it:
User-agent: Googlebot-Image
Allow: /images/featured-image.jpg
User-agent: *
Disallow: /images/
In this case, you are first letting Googlebot-Image access ‘featured-image.jpg’. Then, block all other bots from seeing the ‘/images/’ directory.
4. Sitemap directive
The ‘Sitemap’ directive instructs search engines on where to locate your XML sitemap. An XML sitemap is a file that shows all the key pages on your site. This makes it easier for search engines to crawl and index your content.
Adding your sitemap to your robots.txt file is easy:
Sitemap: https://www.[yourwebsitename].com/sitemap.xmlMake sure to change ‘https://www.[yourwebsitename].com/sitemap.xml’ to your real sitemap URL. You can submit your sitemap using Google Search Console. However, placing it in your robots.txt file ensures that all search engines can index it.
Also read: How to Verify Website Owners on Google Search Console
5. Crawl-delay directive
The ‘Crawl-delay’ directive controls how fast search engines crawl your website. Its main goal is to prevent your web server from becoming too busy when many bots attempt to access pages simultaneously.
The ‘Crawl-delay’ time is measured in seconds. For example, you can pair a Bingbot disallow directive with crawl delay like this:
User-agent: Bingbot
Crawl-delay: 10
Be cautious when setting crawl delays. A prolonged delay can harm your website’s indexing and ranking. This is especially true if your site has a large number of pages and is frequently updated.
Note: Google’s crawler, Googlebot, doesn’t follow this directive. But you can adjust the crawl rate through Google Search Console to avoid web server overload.
6. Noindex directive
The ‘noindex’ command prevents search engines from indexing specific pages on your website. However, Google no longer officially supports this rule.
Some tests indicate that ‘noindex’ in robots.txt can still be effective. However, it isn’t a good idea to rely solely on this method. Instead, you can use meta robots tags or the X-Robots-Tag HTTP header for better control over indexing.
Real-world disallow examples
Robots.txt has different rules depending on how much access you want to give search engine bots. Here are a few common examples:
Example 1: Allowing all bots to access the entire website
User-agent: *
Disallow:
What it does:
- The ‘User-agent: *’ means all search engine bots (Googlebot, Bingbot, etc.) can access the site.
- The ‘empty Disallow’ field means no restrictions, and bots can crawl everything.
When to use it: If you want full search engine visibility for your entire website.
Example 2: Disallowing all bots from accessing specific file or directory
User-agent: *
Disallow: /private-directory/
What it does: Blocks all search engine bots (such as Googlebot disallow)from accessing anything inside ‘/private-directory/’.
When to use it: This prevents search engines (Googlebot disallow and Bingbot disallow) from accessing confidential data. It may include a staging site, backup folder or any other separate directory that shouldn’t be crawled.
Example 3: Allowing Googlebot while disallowing others from a directory
User-agent: Googlebot
Disallow: /images/
User-agent: *
Disallow: /private-directory/
What it does:
- Googlebot cannot access the /images/ directory.
- All other bots cannot access /private-directory/.
When to use it: If you want to control access for specific bots, such as allowing Google to crawl certain parts of your site while blocking others (such as Bingbot disallow).
Example 4: Specifying the location of your XML Sitemap
User-agent: *
Disallow:
Sitemap: https://www.[yourwebsitename].com/sitemap.xml
What it does:
- Allows full access to search engine bots.
- Tells search engines where to find the XML Sitemap, helping them index web pages efficiently.
When to use it: If you want search engines to easily find and crawl your sitemap.
Also read: How to Create a WordPress sitemap
Wildcard pattern matching examples
Wildcards in the robots.txt file let you create flexible rules for blocking or allowing multiple URLs that follow a similar pattern. This is especially useful for filter parameters, file types or dynamically generated web pages that don’t need to be crawled.
Example 1: Block URLs with specific query parameters
Disallow: /*?filter=*This tells bots (like Googlebot disallow) to avoid crawling any URL that contains ‘?filter=’, no matter what value follows. It’s helpful for eCommerce or blog filters that can create dozens of crawlable variations.
Example 2: Block all PDF files
Disallow: /*.pdf$The ‘*’ wildcard matches any path, and the ‘$’ ensures only URLs that end with .pdf are blocked. This prevents search engines from wasting crawl budgets on downloadable documents that don’t need to be indexed.
Using wildcards to match URLs or entire directory names helps you manage multiple groups of pages at once, rather than blocking only one group manually. It also keeps low-value or duplicate content out of Google search results. Always test your rules before deploying them to avoid over-blocking important URLs.
Difference between robots.txt vs. meta robots tag vs. X-Robots-Tag
To truly control how search engines handle your website, you need to understand the difference between three tools: robots.txt, meta robots tags and X-Robots-Tag headers.
Each one handles crawling and indexing differently and choosing the right one depends on what you’re trying to achieve.
- Robots.txt: Lets you disallow search engines (such as Googlebot disallow) from crawling content, though indexing may still occur via external links.
- Meta robots tag: Directly influences indexing and crawling of individual web pages.
- X-Robots-Tag: Controls indexing of non-HTML files like PDFs, images and videos.
Here’s a quick side-by-side comparison to help you decide which directive works best for your use case:
| Feature | Robots.txt | Meta robots tags | X-Robots-Tag |
| Location | Root directory (/robots.txt) | <head> section of a webpage | HTTP header response |
| Controls | Entire sections of a site | Indexing and crawling of specific pages | Indexing of non-HTML files |
| Example | Disallow: /private/ | <meta name=”robots” content=”noindex”> | X-Robots-Tag: noindex |
| Impact on SEO | Stops bots from crawling, but does not prevent indexing if linked elsewhere | Prevents a page from being indexed and appearing in search results | Ensures non-HTML files are not indexed |
| Best use case | Block search engines from entire directories | Prevent specific pages from appearing in search results | Control indexing of PDFs, images and other files |
As you can see, robots.txt is ideal for managing crawl access across sections of your site, but it doesn’t guarantee those pages won’t get indexed. If you need stricter control, especially for individual URLs or non-HTML files, meta robots tags and X-Robots-Tag headers offer more precision.
In many cases, a combined strategy works best. Use robots.txt to manage crawl budget and server load, and pair it with meta or header-level tags to handle indexing control.
Why is robots.txt important for SEO?
Robots.txt plays a crucial role in how search engines interact with your website. When used strategically, it helps improve SEO performance by guiding bots on what to crawl and what to skip. Here’s how it contributes:
- Optimize crawl budget
- Block duplicate and non-public pages
- Hide resources (with caution)
Now, let’s dive deeper into each of these SEO benefits and learn how to use robots.txt settings more effectively.
1. Optimize crawl budget
The crawl budget is the number of pages that Googlebot will index on your website within a specific time frame. If you optimize your crawl budget effectively, Google will prioritize your essential content.
You can use robots.txt to block Google from visiting unnecessary pages and spend more time on your valuable content.
2. Block duplicate and non-public pages
Duplicate content is a common issue that can negatively impact your SEO. It confuses search engines and weakens your website’s authority.
Using robots.txt, you can block access to duplicate pages, like PDF versions or older content. This way, search engines can focus on the original and most important versions of your pages.
Also read: What is Duplicate Content: How to Spot and Prevent It
3. Hide resources
Hiding CSS or JavaScript files from search engines may sound like a good idea for managing your website’s crawl budget. But it’s not.
Search engines use these files to properly display your pages and understand how your website works. If you block these files, search engines may struggle to evaluate your website’s user experience. This hurts your search rankings.
Want to make sure your site is optimized for search? Try our free SEO Checker tool. We scan your website for common SEO issues like broken links, slow load times, missing meta tags and more. You’ll get a detailed report along with actionable tips to boost your site’s visibility at no cost.
How to configure robots.txt Disallow rules to safely control search engine access?
You can check your site’s robots.txt file by simply adding ‘robots.txt’ at the end of a URL. For example, https://www.bluehost.com/robots.txt. Let’s check how you can configure the robots.txt file using Bluehost File Manager. To configure these rules, simply add the following code in your robots.txt file, making sure each directive appears on its own line.
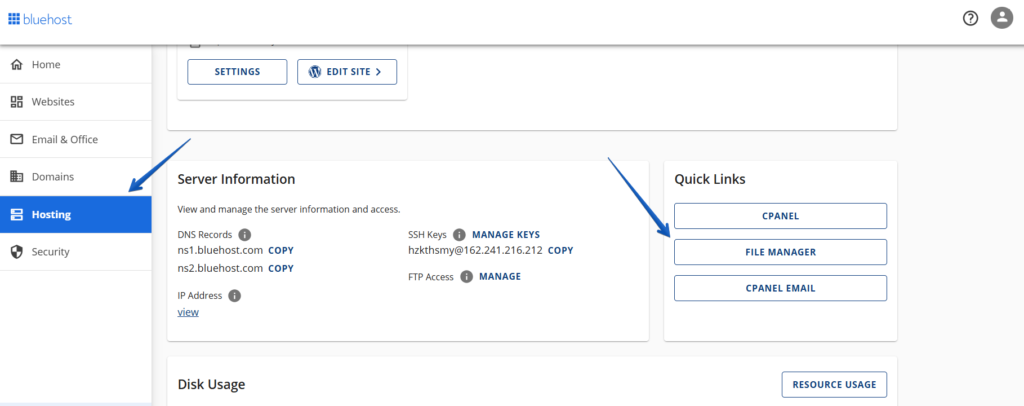
1. Access the File Manager
a. Log in to your Bluehost account manager.
b. Navigate to the ‘Hosting’ tab in the left-hand menu.
c. Click on ‘File Manager’ under the ‘Quick Links’ section.
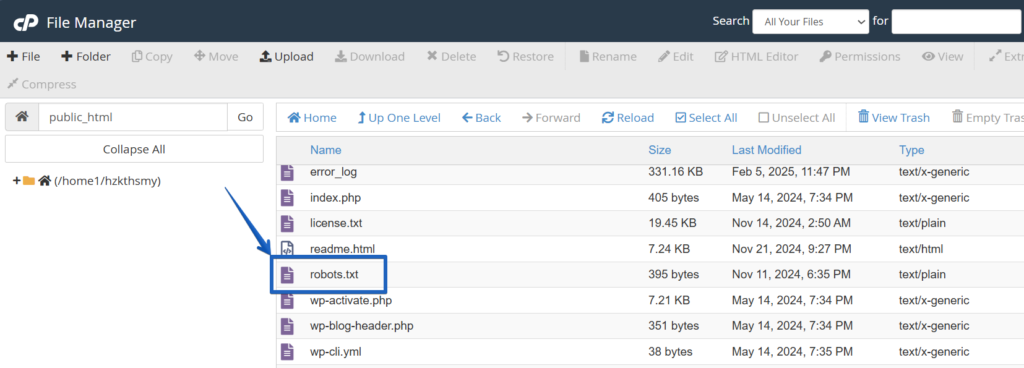
2. Locate the robots.txt file
d. In the ‘File Manager’, open the ‘public_html’ directory, which contains your website’s files.

e. Look for the ‘robots.txt’ filename in this directory.
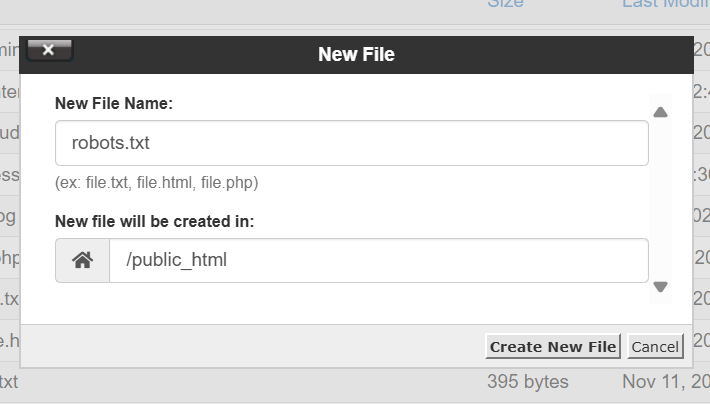
3. Create a robots.txt file (if it doesn’t exist)
If the robots.txt file is not present, you can create it. Here’s how to create a robots.txt file:
f. Click on the ‘+ File’ button at the top-left corner.

g. Name the new file ‘robots.txt’. Ensure it is placed in the ‘/public_html’ directory.
4. Edit the robots.txt file
h. Right-click on the ‘robots.txt’ file and select ‘Edit’.
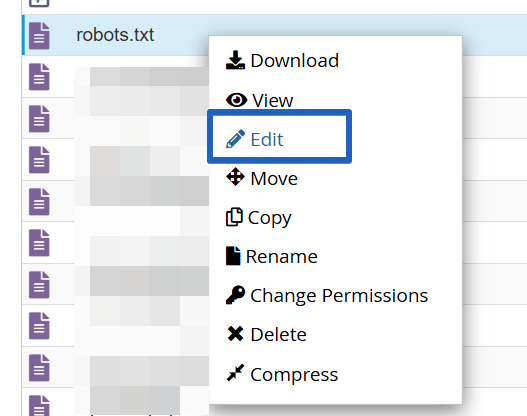
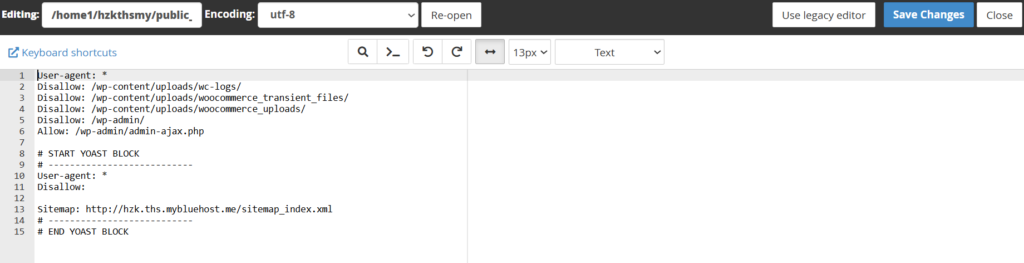
i. A text file editor will open, allowing you to add or modify directives.
Also read: How to Optimize Content for SEO on WordPress
5. Configure robots.txt to disallow search engines
To control how search engines interact with your site, you can add specific directives to the robots.txt file. Here are some common configurations:
- ‘Disallow all’ search engines from accessing the entire site: To prevent all search engine bots from crawling any part of your site, add the following lines:
User-agent: *
Disallow: /
This tells all user agents (denoted by the asterisk *) not to access any pages on your site.
- Disallow specific search engines from a specific folder: If you want to disallow search engine’s specific bot (Googlebot disallow) from crawling a specific directory, specify the bot’s user-agent and the directory. For example, Bingbot disallow:
User-agent: Bingbot
Disallow: /example-subfolder/
This example blocks Google’s bot from accessing the /example-subfolder/ directory.
- ‘Disallow all’ bots from specific directories: To block all bots from certain directories, list them as follows:
User-agent: *
Disallow: /cgi-bin/
Disallow: /tmp/
Disallow: /junk/
This configuration prevents all user agents from accessing the /cgi-bin/, /tmp/ and /junk/ directories.
Ready to take control of your site’s SEO? Start optimizing your site with Bluehost web hosting plans. We allow you to edit your robots.txt file, manage crawl rules and block unwanted bots using a single dashboard.
Robots.txt Disallow All: What it means and why to avoid it on live sites
The robots.txt disallow all directive is written as:
User-agent: *
Disallow: /
This tells all bots not to crawl any part of your site. It’s useful for staging environments, site migrations or development versions of your website where you don’t want search engines indexing content prematurely.
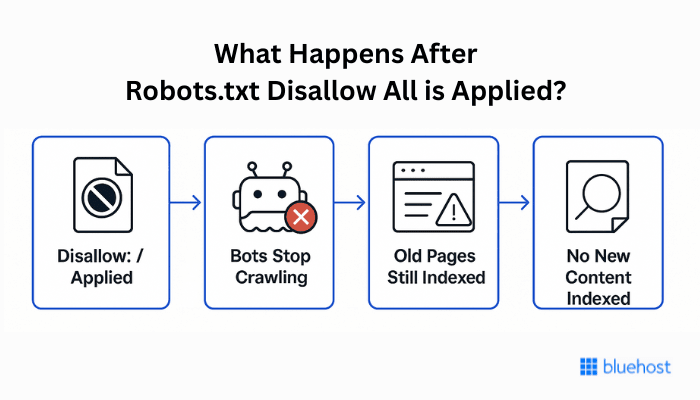
What happens when you Disallow All?
Imagine applying a robots txt Disallow all rule on a staging version of your website. Within a few days, Google Search Console will show a noticeable change:
- Crawled URLs drop to zero, which means bots are no longer allowed to fetch content.
- If your pages were already indexed, they may still appear in search results, often with outdated titles or meta descriptions.
- No new content is discovered, and existing content won’t refresh.
This proves that Disallow: / blocks crawling but not indexing, unless the content is removed or deindexed through other methods.
Why is this risky on live sites?
If you accidentally apply robots.txt Disallow: / on your live site:
- Google won’t crawl new content or updates.
- Existing indexed pages may become stale.
- Over time, your visibility will drop.
- Search snippets may show outdated information or disappear altogether.
Pro tip: Combine Disallow: / with noindex meta tags only on staging or test environments and always remove the block before going live.
How to test and validate your robots.txt file?
Even small errors in your robots.txt file can block critical pages or mislead search engine bots. That’s why it’s essential to test and validate your file regularly, especially after making changes.
Tools to use
Several reliable tools can help you check if your robots.txt directives are working as expected:
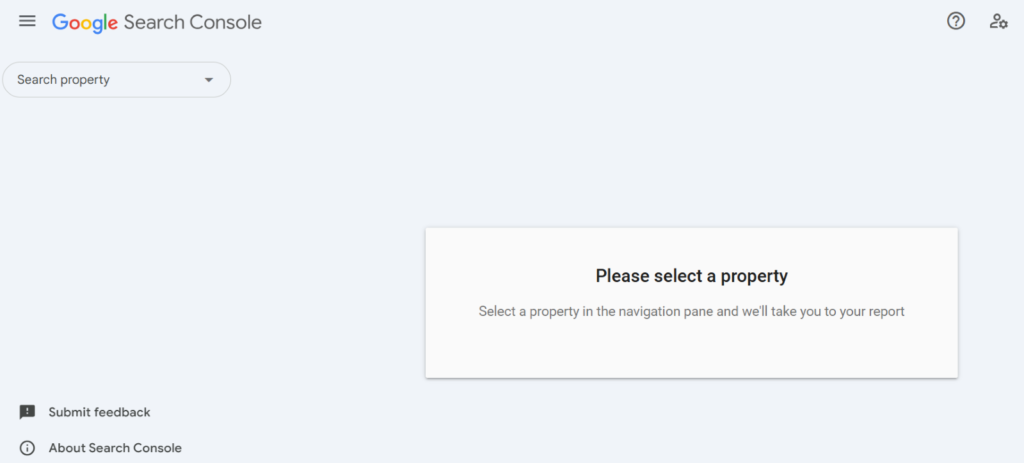
- Google Search Console
Use the ‘robots.txt Tester’ under the Legacy Tools and Reports section. It shows whether your file is accessible and whether specific URLs are blocked or allowed by your current rules.
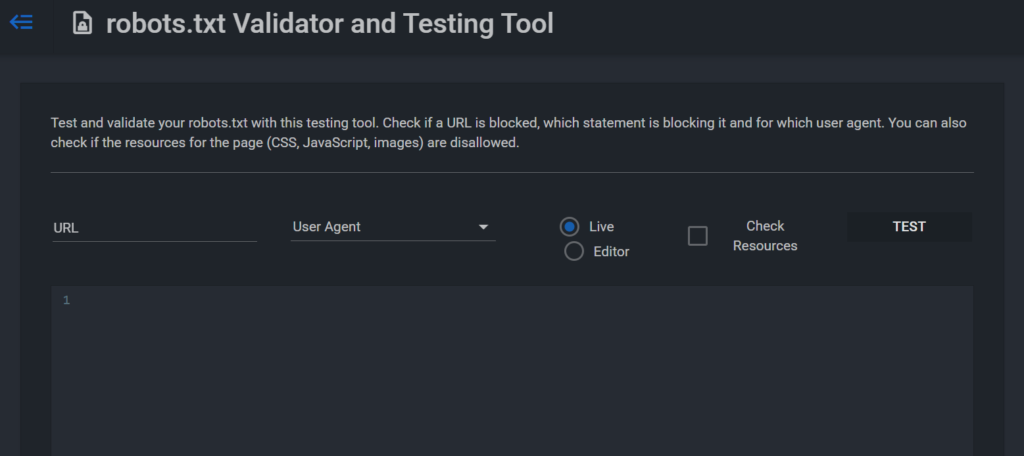
- technicalseo.com Robots.txt Tester
A free online tool for testing various User-agent and Disallow combinations. Great for quick checks without logging in.
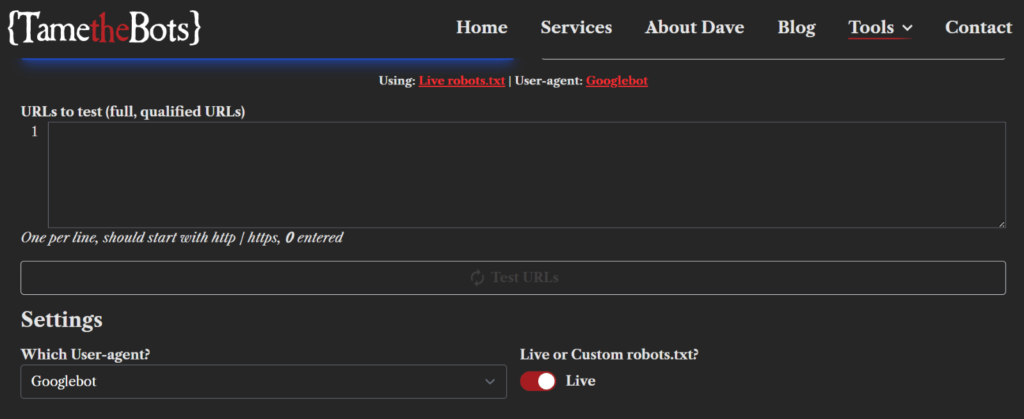
- TametheBot’s robots.txt testing tool
This tool offers an interactive way to simulate how different bots interpret your robots.txt file. You can test multiple user-agents, preview how rules are applied and validate syntax with real-time feedback.
Advanced SEO audit tools for robots.txt analysis
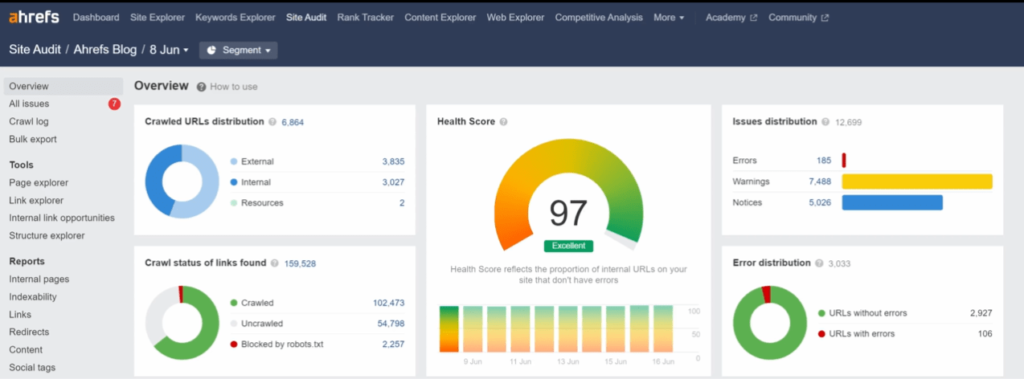
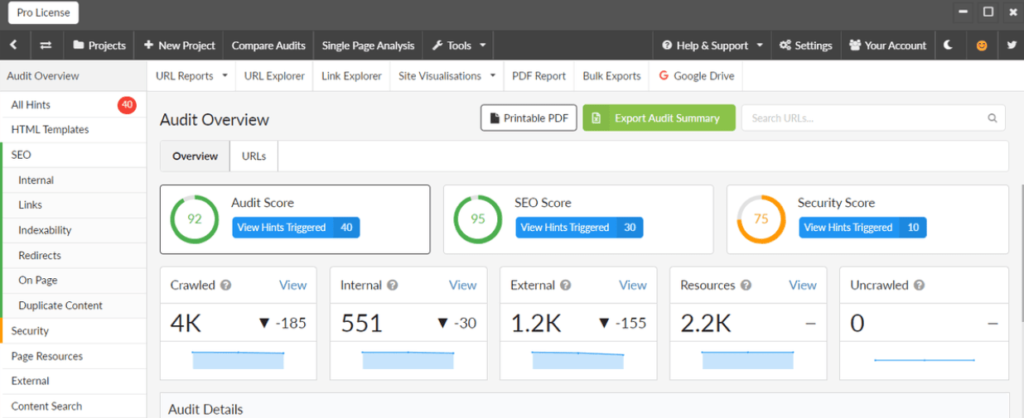
If you want to go deeper into technical audits, tools like Screaming Frog, Ahrefs and Sitebulb offer advanced insights:
- Screaming Frog SEO Spider: Helps identify blocked URLs, crawl errors and how your robots.txt is affecting indexability.

- Ahrefs Site Audit: Detects crawl issues, reports on disallowed pages and flags affected internal links.
- Sitebulb: Visualizes crawl paths and highlights robots.txt conflicts with dynamic JavaScript or server logic.
These tools are especially useful after large-scale site changes, WordPress migrations, or if you’re troubleshooting crawl budget issues.
Common errors to watch out for
When testing your robots.txt file, be on the lookout for these common mistakes:
- File not found: If your robots.txt file isn’t located in the root directory (for example, [yourwebsite].com/robots.txt), search engines won’t see it and may assume full access.
- Syntax errors: Even a missing colon or slash can break a directive. Use validators or testing tools to catch typos before they go live.
- Misplaced directives: Rules must be placed under the correct User-agent line. A Disallow without an associated User-agent will be ignored.
Top robots.txt Disallow best practices to avoid SEO mistakes
A small mistake in your robots.txt file can lead to big SEO consequences. Follow these robots.txt best practices to prevent accidental deindexing, make your crawl budget work for your most important pages and manage crawler behavior safely:
1. Place robots.txt in the correct file location
Your robots.txt file must be in the top level directory of your website (for example, https://www.[example].com/robots.txt). If placed elsewhere, search engines won’t find it and may assume full crawl access.
2. Avoid blocking important pages
Never block high-value URLs like /blog/, /services/ or product categories unless absolutely necessary. Doing so can prevent them from being indexed, leading to traffic loss.
Instead of blocking entire sections, use specific Disallow rules:
Disallow: /category/private-subpage/3. Use wildcards for efficient targeting
Wildcards help you block patterns like filtered URLs or file types:
Disallow: /*?filter=*
Disallow: /*.pdf$
This improves crawl efficiency and prevents duplicate or low-value content from being indexed.
4. Don’t block CSS or JS files
Blocking CSS or JavaScript can stop Google from rendering your pages correctly. This affects how your site appears in search results and may reduce rankings.
Allow bots to access essential assets to maintain good Core Web Vitals.
5. Link your XML sitemap
Add a Sitemap: directive in your robots.txt file to help search engine crawlers find all your key pages:
Sitemap: https://www.example.com/sitemap.xmlThis boost indexing efficiency, especially on larger sites.
6. Use robots.txt for crawl budget optimization
If your site has thousands of low-priority pages (for example, tag pages and filtered archives), blocking them allows bots to focus on your most important content, like product or service pages.
7. Don’t use robots txt for sensitive content
Robots.txt only blocks crawling, not indexing. Sensitive pages may still appear in searches if other sites link to them. Use password protection or authentication when restricting access to sensitive content, not just robots.txt.
8. Validate your file regularly
Use tools like Google Search Console, technicalseo.com or TametheBot’s robots.txt testing tool to catch errors like:
- Missing file or wrong location
- Syntax issues (for example, misplaced colons, wildcards)
- Broken Disallow rules
Also check whether your robots.txt file is hosted on the same host as your main site, otherwise search engines may ignore it. A mismatch can lead to bots crawling other pages or even the whole site unintentionally.
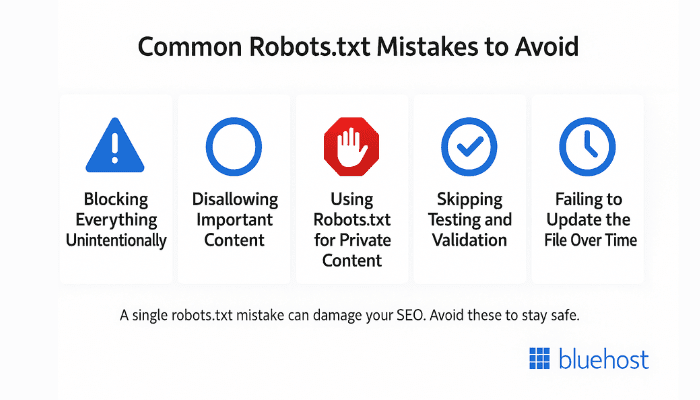
5 costly robots.txt Disallow errors (and how to fix them)
Creating a robots.txt file is simple, but one wrong directive can damage your SEO or accidentally expose your site. Here are the most frequent errors to watch out for:
- Blocking everything unintentionally
- Disallowing important content
- Using robots.txt for private content
- Skipping testing and validation
- Failing to update the file as your site evolves
Let’s break down how to use robots.txt more effectively without making these common SEO-damaging mistakes.
1. Blocking everything unintentionally
Using this directive ‘User-agent: * Disallow: /’ will stop all bots from crawling your entire site. This mistake is often described as “robots.txt disallow everything” or “robots.txt deny all”; both mean `User-agent: *` + `Disallow: /`. Unless you’re working on a staging or test environment, this can wipe out your entire site from search engine results.
2. Disallowing important content
Blocking directories like /blog/, /products/ or /services/ can prevent your best content from being indexed. Always check your Disallow rules carefully, especially during migrations or redesigns, to avoid hiding high-value pages.
3. Using robots.txt for private content
Robots.txt only tells bots not to crawl; it doesn’t stop them from indexing pages if those URLs are linked elsewhere. For private or sensitive content, use authentication, noindex meta tags or HTTP headers instead.
4. Skipping testing and validation
Even a small typo (like a missing slash or colon) can break your file. Use tools like Google’s robots.txt Tester, technicalseo.com or TametheBot’s robots.txt testing tool to catch errors before they go live.
5. Failing to update the file as your site evolves
During a WordPress migration, forgetting to update your robots.txt file is a common and critical oversight. If the Disallow: / directive was used to block bots during development, and not removed after launch, your entire site can remain invisible to search engines.
That’s why WordPress migration and robots.txt settings must be reviewed together; especially before relaunching or submitting your XML sitemap.
How to block AI bots and bad web crawlers using robots.txt?
As AI tools become more widespread, AI crawlers like GPTBot, CCBot and ClaudeBot are actively scanning websites for content to use in training data. If you want to control whether your content is accessed by these bots, robots.txt gives you a starting point.
Blocking AI bots using robots.txt
Just like with search engine bots, you can target AI bots by their unique user agent names. Here’s how to block them:
User-agent: GPTBot
Disallow: /

User-agent: CCBot
Disallow: /

User-agent: ClaudeBot
Disallow:

User-agent: Applebot-Extended
Disallow: /
Pro Tip: Keep track of new AI crawler user agents (for example, PerplexityBot, MistralAI-User). Many publishers update robots.txt regularly to manage AI access in response to evolving bot behavior.
If you only want to block specific folders (like your blog or learning resources), use path-based Googlebot disallow rules:
User-agent: GPTBot
Disallow: /blog/
Disallow: /learn/
You can also use pattern matching to block all AI-related user agents, though this may not catch every variation:
User-agent: *AI*
Disallow: /
Note: There’s no guarantee that all AI bots will respect your robots.txt file. Remember, disallowed pages can still be indexed if they are publicly accessible and linked by external sites.
Should you block AI bots?
Whether you block AI crawlers depends on your content strategy. Many news publishers and original content creators are taking a stance to protect their intellectual property. Others prefer allowing AI tools for broader content reach and experimentation.
If you’re unsure, consider blocking only high-value or sensitive sections while leaving general resources accessible.
For full control: Combine Disallow rules with noindex meta tags or authentication to keep pages out of both training sets and search result pages.
Final thoughts
A well-structured robots txt file gives you control over how search engines interact with your website. But with great power comes great responsibility.
Using directives like robots.txt Disallow all can be useful for staging sites or temporary blocks. But applying them incorrectly on a live site can wipe your visibility from Google in a matter of hours. That’s why testing, validating and auditing your file regularly is important.
Whether you’re blocking duplicate pages, guiding AI bots or fine-tuning your crawl budget, treat your robots.txt file as a critical part of your SEO strategy. You can also use the built-in SEO tools available in Bluehost’s dashboard to optimize crawl behavior.
Not sure if your site has SEO issues? Use our free SEO Checker tool to scan your website and get a full SEO audit report with actionable tips to improve your ranking.
FAQs
Robots.txt helps web crawlers understand which pages to index. This affects your visibility on Google Search and your rankings.
Using robots.txt Disallow all can remove your pages from search results, causing traffic loss and SEO damage that takes time to recover from.
Yes, you can block specific bots by targeting their user-agent names in your robots.txt file. For example, if you want to block Bing’s crawler, add a Bingbot Disallow rule like: User-agent: Bingbot Disallow: /private-directory/ Bingbot disallow tells that bot not to crawl your site. Just remember: not all bots will obey the rules.
No, robots.txt is not legally enforceable and follows Robots Exclusion Protocol. While most reputable bots adhere to it, malicious or unauthorized bots can completely disregard it.
Disallow does not equal noindex. Pages blocked via robots.txt can still be indexed if externally linked. Use both ‘Disallow’ and ‘noindex’ when you want control over both crawling and indexing.
“Disallow all” in robots.txt blocks all search engine bots from crawling any part of your site.
Yes, using ‘Disallow all’ can hurt your SEO. It can make your site hard to find on Google and affect your visibility in Google Search Console.
To reverse the ‘Disallow all’ directive:
1. Remove ‘Disallow: /’ from the robots.txt file.
2. Submit the updated robots.txt file in Google Search Console.
3. Resubmit the XML sitemap to help search engines rediscover your pages more quickly.
4. Monitor Google Search Console for crawl errors.
No, robots.txt Disallow all is not a good way to keep private content safe. It is advisable to use robust security measures, such as passwords, for sensitive information.
Check and update your robots.txt file after redesigning your website, moving content or making significant changes to your site layout. Ensure it aligns with your current SEO strategy and that your XML sitemap is linked correctly.
Disallow prevents crawling; noindex prevents indexing. Use both for complete control over visibility.
No. If those pages are linked elsewhere, they might still appear in search results—just not crawled.
Use Google Search Console’s robots.txt tester or external tools like TametheBot or technicalseo.com.
After redesigns, content migrations, or structural SEO changes. Regular reviews help catch mistakes early.
Yes. Each directive (such as Disallow or Allow) must be written on a separate line. Otherwise, crawlers may misinterpret your instructions.
Yes. Robots.txt is case sensitive, which means /Images/ and /images/ are treated as different directory names.
Yes. You can target only one group of pages by specifying their directory name or pattern. For example, blocking /private/ while allowing other pages to be crawled.
Yes. The robots.txt file must live on the same host as your website’s home page. If it’s missing, crawlers may assume the whole site is open to indexing.
The phrase robots.txt deny all is a plain-language way to describe the Disallow: / rule (for example User-agent: * + Disallow: /). It blocks crawlers from crawling the entire site and should only be used on staging or private sites.

Write A Comment