Key highlights
- Connect your WooCommerce store to Google Merchant Center for free product visibility.
- Install the Google for WooCommerce plugin to automate product feed synchronization.
- Configure your WooCommerce Merchant Center feed with accurate product data.
- Optimize product listings to appear in Google Shopping and search results.
- Launch Google Shopping WooCommerce campaigns to maximize sales.
Want to build an eCommerce website to grow your business, but unsure where to start?
A great option for building an online store is WooCommerce, one of the most popular eCommerce plugins for WordPress with approx. 6 million live websites.
Once your new WooCommerce store is up and running, you can drive traffic and sales by integrating it with the Google Merchant Center tool.
This free tool makes creating and managing your product ads even easier. It also allows your Google Shopping feed to show up on Google websites and apps.
In this guide, you’ll learn how to integrate Google Merchant Center with WooCommerce store to create ad campaigns and Google product listings.
What is Google Merchant Center?
Google Merchant Center (GMC) is Google’s free product management platform. It distributes product listings across Google Search, Shopping, YouTube and Maps. Critically, it is the only platform through which you can run Google Shopping Ads via Google Ads. It differs from Google Business Profile, which manages business identity and not product inventory.
Even better, Google Merchant Center allows you to do all this for free. If a customer searches for your product on any of Google’s websites or apps, they’ll find it as long as the product entry is in Merchant Center.
Google Merchant Center is also the only way to create paid advertising campaigns on Google Ads (formerly Google AdWords), the number one online advertising platform.
One thing to note is Google Merchant Center differs from Google Business Profile. Google Business Profile (formerly Google My Business) is a free service to create online profiles for any business type. Merchant Center showcases the products and services of online and offline retail companies.
Benefits of integrating Google Merchant Center with WooCommerce
Integrating Google Merchant Center with WooCommerce provides access to 85% of the global search market, enables real-time product updates and automates review synchronization. This connection streamlines Google Ads management directly from the WordPress dashboard while providing performance analytics for conversion rates, impressions and click-through rates (CTR).
| Benefit | Key impact & data point |
| Market visibility | Reach customers across Google’s 85%+ market share (Search, YouTube and Maps). |
| Customer analysis | Sync product reviews and detailed attributes to help shoppers evaluate items instantly. |
| Campaign efficiency | Manage Google Ads and shopping campaigns directly within your website interface. |
| Performance data | Monitor conversion rates, impressions and click-through rates (CTR) in Merchant Center. |
Find your perfect plan
📋 View PlansPrerequisites for Google Merchant Center and WooCommerce integration
To successfully launch your product listings on Google, your website must adhere to specific merchant guidelines that ensure a safe and consistent experience for shoppers. Establishing a robust WooCommerce google merchant center integration depends on a comprehensive two-phase readiness check.
This involves securing your store environment with SSL and transparent consumer policies, followed by a technical account configuration. Failure to meet these requirements can result in product disapprovals or account suspension.
The table below outlines the mandatory criteria and technical specifications required to verify your store and synchronize your data effectively.
| Requirement | Technical specification |
| Security & identity | Active SSL certificate (HTTPS) and prominently displayed contact details. |
| Legal compliance | Publicly accessible pages for Return, Refund and Shipping policies. |
| Data integrity | Accurate product titles, pricing, high-quality images and real-time stock status. |
| Verification | Proof of domain ownership via HTML tag, file upload, Google Analytics, or GTM. |
| Localization | Configuration of Country of Sale, primary language and tax/shipping zones. |
| Ads linkage | (Optional) Linking a Google Ads account to enable automated Shopping campaigns. |
Once you have addressed the specifications listed in the table above, your store will be properly positioned for the verification phase. Completing these foundational steps ensures that your product feed remains healthy and that your marketing efforts are not hindered by policy violations.
With these prerequisites confirmed, you can now move into the specific technical steps for setting up your WooCommerce environment.
1. A functional WooCommerce store
Your store should have products listed with complete information, including titles, descriptions, images, prices and inventory status. A well-maintained WooCommerce store ensures seamless synchronization with Google Merchant Center.
Key requirements
- SSL certificate: You must have an SSL certificate installed to secure customer data. An SSL certificate encrypts data exchanged between your website and visitors, providing security for transactions and protecting sensitive information.
- Updated product information: Ensure all product details, such as prices, descriptions and stock levels, are accurate and up-to-date. Google Merchant Center relies on this information to display your products correctly.
- Professional design and branding: Your store should have a professional appearance with clear branding, intuitive navigation and a user-friendly checkout process.
- Comprehensive policies: Display important policies, such as your return policy, refund policy, shipping policy and terms of service. These policies must be easily accessible on your website.
- Easy-to-find contact details: Display your contact information prominently, either in the footer or on a Contact Us page.
If you want to streamline your WooCommerce experience, you should consider using Bluehost WooCommerce hosting. Bluehost offers optimized hosting specifically designed for WooCommerce stores, which ensures fast loading times, enhanced security and seamless scalability.
The built-in WooCommerce features simplify store setup and management, which makes integration with Google Merchant Center even smoother.
2. Creating a Google Merchant account
Google Merchant Center serves as a hub for managing your product data, which allows you to promote your WooCommerce store’s products on platforms like Google Shopping and Google Search.
Below is a detailed guide on how to create your Google Merchant Center account and properly set up your business details.
Step 1: Sign in with your Google account
To begin, navigate to the Google Merchant Center website. Click the “Sign up” button and sign in using an existing Google account. If you do not already have a Google account, you will need to create one before proceeding.
Step 2: Provide your business information
After signing in, you will be prompted to provide basic business details:
- Country of sale: Select the primary country where your products are sold.
- Language: Choose the language that will be used for your Merchant Center account.
- Store name: Enter the name of your online store as you want it to appear to customers.
- Website URL: Provide the full URL of your WooCommerce store (for example, https://www.[yourstore].com). Make sure the URL is correct to prevent any verification issues later.
Step 3: Accept the terms and conditions
Carefully review Google Merchant Center’s terms of service. Once you read them and agree, check the box to accept the terms and conditions.
Step 4: Choose how you want to manage your products
You will be asked to select how you prefer to manage your product information in Merchant Center. Here are the options:
- Upload a product feed: Create and upload a product data feed, usually in XML or CSV format. This is the most common choice for WooCommerce users, as it allows you to manage the details of each product manually.
- Use an eCommerce platform: For stores on platforms like Shopify that integrate directly with Merchant Center, this option allows for automatic product syncing. WooCommerce users can also achieve this through specific plugins.
- Connect using content API: For more advanced users, connecting via content API allows you to manage and sync product data programmatically.
Also read: WooCommerce vs. Shopify: Which eCommerce Solution Is Right for You
Step 5: Verify and claim your website URL
To verify that you own the provided website, you must follow Google’s verification steps:
- HTML tag: Add a meta tag to your WooCommerce store’s homepage.
- HTML file upload: Upload an HTML file to the root directory of your website.
- Google Analytics: Link your Google Analytics account to your Merchant Center (ensure you are using the same Google account for both).
- Google Tag Manager: Use a Google Tag Manager container snippet to verify your website.
Choose the method that is easiest for you and follow Google’s instructions to complete the verification process.
Step 6: Set up shipping and tax settings
Properly configuring your shipping and tax settings ensures that your customers receive accurate information about delivery and pricing. Follow these steps:
- Shipping: Set up shipping zones and rates that match your WooCommerce store settings. Include any shipping options offered, such as free shipping or expedited services.
- Tax: Specify how you handle sales tax for your products. You can either configure the tax settings manually or use Google’s automatic tax calculation to streamline the process.
Step 7: Link your Google Ads account (optional but recommended)
If you plan on running Google Shopping ads, linking your Google Ads account to Merchant Center is highly recommended. This lets you to create shopping campaigns and promote your products directly within Google Shopping and search results, increasing visibility and driving sales.
Get expert guidance in a 5-minute call
📞 Call 888-401-4678Step 8: Review and submit your account
Once you are done with the necessary setup steps, carefully review all the provided information. Ensure that your business details, website URL and product settings are correct. Once reviewed, submit your account for Google to verify and approve. Google will review your account to make sure it meets their guidelines, which usually takes a few days.
Also read: Top 8 Benefits of Google Ads for Business Growth in 2026
How to integrate Google Merchant Center with WooCommerce?
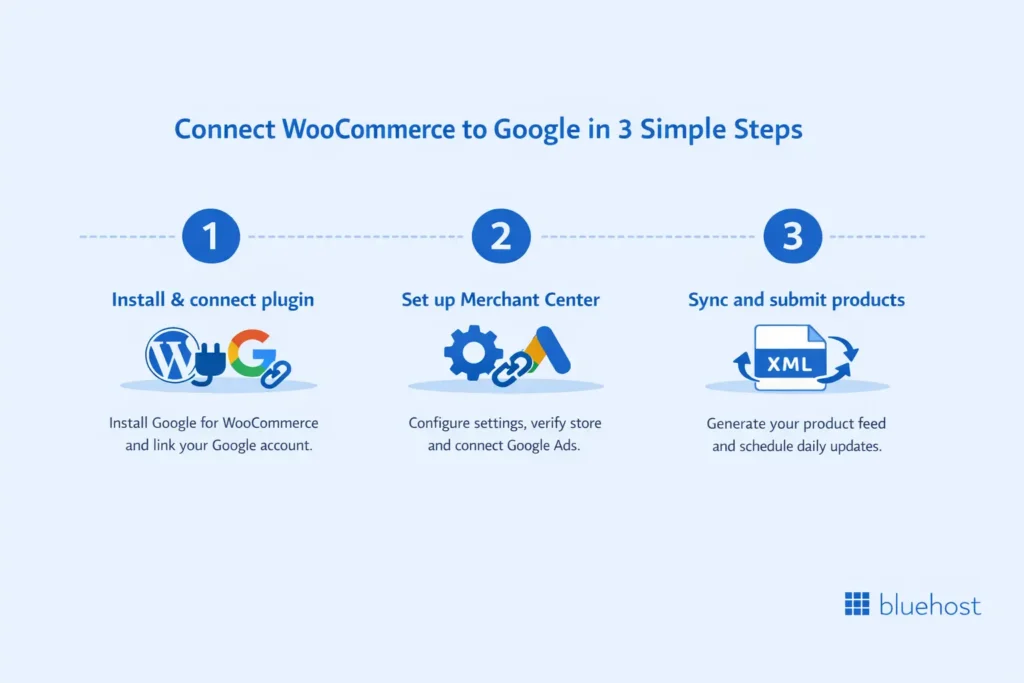
The integration process involves installing the official Google for WooCommerce plugin, configuring your settings and syncing your product catalog. Follow these steps to complete your WooCommerce Google Merchant Center integration and start displaying your products across Google’s platform.
1. Install and configure Google for WooCommerce plugin
Download and install
- Go to your WordPress dashboard.
- Navigate to Plugins > Add New.
- In the search bar, type “Google for WooCommerce”(the official Google for WooCommerce plugin for seamless integration).
- Click Install Now and then Activate.
Connect your Google account
- After activation, a new Google for WooCommerce section will appear in your WordPress dashboard under Marketing.
- Click on this section and follow the prompts to connect your Google account. Make sure to use the same Google account that you used to set up Google Merchant Center.
- The Google Merchant WooCommerce plugin will request certain permissions to access your Google account. Grant these permissions to enable integration between WooCommerce and Google Merchant Center.
Link to Merchant Center
- The Google for WooCommerce plugin will automatically detect if you have an existing Google Merchant Center account linked to your Google account. If an account exists, it will prompt you to link it.

- If there is no existing Merchant Center account, you can create one directly through the plugin by following the setup prompts.
Configure plugin settings
- Target country: Choose the country where you intend to sell your products. This helps ensure that your listings comply with regional standards and regulations.
- Shipping and tax settings: Configure the shipping zones, methods and tax settings to match those already defined in your WooCommerce store. This ensures consistency in product listings and prevents listing issues.

2. Setting up Google Merchant Center
Link to Google Ads
- While optional, it is highly recommended to link your Google Ads account with Google Merchant Center, especially if you intend to run Google Shopping WooCommerce ads to maximize your product visibility.
- In your Google Merchant Center account, navigate to Tools & settings > Linked accounts.
- Click Link under Google Ads and follow the prompts to connect your accounts. This connection allows you to promote your products through Google Shopping campaigns, increasing visibility.
Meet Google’s requirements
To successfully list your products on Google, ensure your store meets Google’s requirements:
- Website accessibility: Make sure your website is accessible to Googlebot. Your robots.txt file should allow Google to crawl your site, and no critical pages should be blocked.
- Complete checkout process: The checkout process must be fully functional and secure. Also, make sure your customers can complete their purchases without errors or redirects.
- Return policy: Display your store’s return policy clearly on your website. Google prefers transparency for users, and having a visible return policy helps in building customer trust.
- Contact information: Provide easily accessible and accurate contact information on your website. This is another critical requirement to ensure compliance with Google Merchant Center standards.
3. Creating and submitting product feeds
Generate product feed
The Google for WooCommerce plugin automates XML product feed generation, mapping 10 essential attributes including GTIN, MPN, Availability and Price. To maintain data accuracy, users must configure a Scheduled Fetch (typically daily) within Merchant Center to synchronize WooCommerce inventory changes with Google’s listings automatically.
| Mandatory attribute | Description & requirement |
| id | A unique identifier for every product in your store. |
| title | Descriptive product name (ideal length: 60-150 characters). |
| description | Detailed informative text highlighting key features and benefits. |
| link / image_link | Direct URLs for the product page and the primary high-quality image. |
| availability | Current status: In stock, Out of stock, or Preorder. |
| price | The product’s price, formatted in the correct local currency. |
| brand / gtin | The manufacturer name and Global Trade Item Number (UPC/EAN). |
| mpn | The Manufacturer Part Number (required if GTIN is unavailable). |
Optimize attributes
- Accurate and detailed information: Ensure that all attributes are filled out accurately. Inaccurate information can lead to product disapprovals or a poor customer experience.
- Keywords: Use relevant keywords in your product titles and descriptions to increase searchability within Google Shopping. However, avoid keyword stuffing, as it can lead to penalties.
- Google product category: Choose the most suitable Google Product Category for each of your products. This helps Google match your products with user queries more effectively.
Submit your feed
- In your Google Merchant Center account, navigate to Products > Feeds.
- Click the + button to add a new feed.
- Select Scheduled fetch as the input method, then provide the Google product feed URL generated by the plugin.
- Set a fetch schedule (for example, daily) to ensure that any changes in your WooCommerce store are reflected in Google Merchant Center promptly.
Also read: 32 Best WooCommerce Plugins for Your Store & Their Benefits
Best practices for successful WooCommerce Google Merchant Center integration
Once you’ve integrated your WooCommerce store with Google Merchant Center, you must follow best practices to optimize product listings and maximize their visibility on Google Shopping.
Below, we cover critical aspects of optimizing product data and adding schema markup to enhance search visibility.
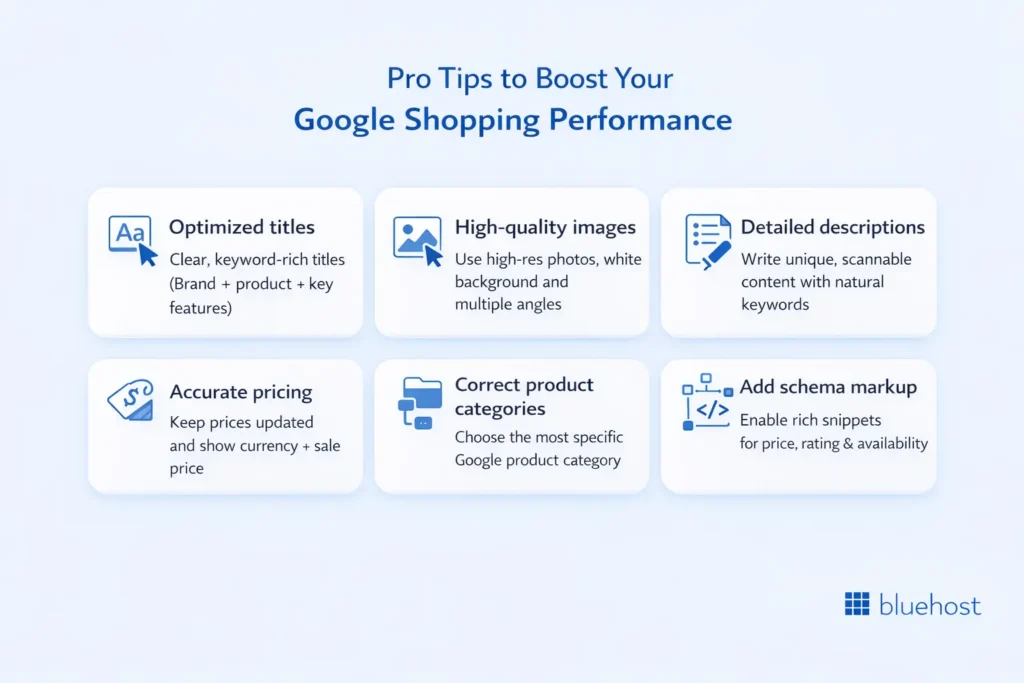
1. Optimizing product data
Google relies heavily on your product data to determine relevance and display your products in the most suitable search results. Optimizing product data is key to driving traffic, attracting clicks and converting leads into sales.
Product titles
- Accuracy: Use product titles that clearly and accurately describe what you are selling. Avoid using abbreviations or vague descriptions.
- Brevity: Keep titles concise but informative, ideally between 60-150 characters. Include key details that consumers are likely to search for.
- Keywords: Include relevant keywords naturally within the product title. Think about what potential customers might search for when looking for your product.
- Structure: Follow a consistent structure for titles, such as “Brand + Product Name + Key Features.” This makes your listings more recognizable and helps customers quickly find what they are looking for.
- Example: Instead of using a generic title like “Cool Shoes,” use something more descriptive like “Nike Air Max 90 Running Shoes for Men – Black/White.”
Product images
- High-resolution: Use high-quality images that are well-lit and have a plain white background. This helps the product stand out and makes it more appealing to potential buyers.
- Multiple angles: Provide multiple images that showcase the product from different angles. Including close-up images of any important features or textures is highly recommended.
- No watermarks or logos: Avoid using watermarked images or including promotional text. This is against Google’s image guidelines and may lead to product disapproval.
- Zoom functionality: Enable zoom functionality for product images. This allows customers to see the finer details, which can be a deciding factor when making a purchase.
Product descriptions
- Detailed and informative: Write clear and detailed descriptions that highlight the key features, benefits and uses of the product. Include essential details such as material, dimensions and compatibility.
- Keywords: Naturally incorporate relevant keywords throughout the description. This can improve the product’s search ranking.
- Unique content: Ensure each product description is unique. Avoid copying manufacturer descriptions, as duplicate content may hurt search visibility.
- Formatting: Use headings and bullet points to break up text and make it easier for customers to read. Highlight key features or benefits using bullet points to improve scannability.
Pricing
- Accuracy: Make sure your prices are accurate and updated regularly. Incorrect pricing may lead to product disapproval or customer dissatisfaction.
- Currency: Clearly display the currency alongside the price. This ensures transparency, particularly if you serve international customers.
- Sale prices: If products are on sale, display both the original and discounted prices. Google allows you to highlight promotional pricing, which can attract more buyers.
Google product category
- Accurate categorization: Choose the most relevant Google Product Category for each product. Proper categorization ensures that Google can accurately understand and display your products in the right search results.
- Specificity: Be as specific as possible when selecting categories. For example, instead of selecting “Clothing,” choose “Men’s Clothing > Shirts > T-Shirts.” This specificity helps target the right audience.
- Google’s taxonomy: Refer to Google’s Product Category taxonomy available in Google Merchant Center to identify the most appropriate categories for your products.
2. Adding schema markup to enhance visibility
Schema markup is a type of structured data that helps search engines understand your website’s content. Adding Google Merchant schema to your WooCommerce product pages can significantly enhance your product’s visibility on both Google Search and Google Shopping.
Using plugins to add schema markup
- Schema plugins: There are several dedicated schema markup plugins available in the WordPress plugin directory. These plugins offer customization options for structured data, allowing you to optimize different product attributes. Examples include Schema & Structured Data for WP & AMP and WP SEO Structured Data Schema.
Benefits of schema markup
- Rich snippets: Adding schema markup enables rich snippets to appear in search results, displaying additional information such as price, availability and ratings. These snippets make your product listings stand out and can increase click-through rates.
- Improved visibility: Schema markup helps Google better understand the details of your product data, which can improve search ranking and the visibility of your listings.
- Enhanced shopping ads: Schema markup also improves your Google Shopping ads, making them more informative by providing key product details at a glance. This can make your ads more appealing and effective at converting potential customers.
Final thoughts
Integrating your WooCommerce store with Google Merchant Center unlocks new opportunities to expand your reach and boost sales. Connecting your store, optimizing product listings and leveraging Google Shopping will help elevate your online business to the next level.
Key takeaways to remember: accurate product data, the right plugin and an optimized Google Merchant Center profile are essential for success. No matter if you start with free listings or launch paid campaigns, Google Merchant Center helps you connect with eager customers across Google’s extensive network.
Ready to transform your WooCommerce store into a successful online marketplace?
Take the next step: Check out Bluehost WooCommerce Hosting plans, designed to deliver the speed, security and support needed to succeed in the competitive eCommerce world.
FAQs
Google Shopping product listings are free. Merchant costs only apply when launching Google Shopping ads (paid campaigns) to increase reach. Organic listings appear across the Shopping tab, Search and Google Lens without a monthly subscription fee or per-listing charge.
Google Merchant Center product disapprovals typically stem from missing identifiers (GTIN, MPN), policy violations regarding prohibited content and technical website issues. Incorrect product data, price/availability mismatches, or a non-functional checkout process will also trigger automated account suspensions.
Improve Google Shopping visibility by optimizing product titles (60-150 characters) and using high-resolution images with plain white backgrounds. Implementing schema markup (JSON-LD) for price and availability, along with precise Google Product Category mapping, ensures products appear for relevant high-intent user queries.
Technical support for WooCommerce integration is available through the Google Merchant Center Help Center and official support channels. For plugin-specific issues, contact the Google for WooCommerce developers. Advanced troubleshooting may require a certified WooCommerce expert or specialized hosting support.
The Google Merchant Center review process typically takes 3–5 business days for initial account approval. Once an account is active, individual product updates or inventory changes from your WooCommerce feed generally synchronize within 24 hours. Maintaining a stable robots.txt file ensures Google can crawl your site without delays during this window.
Google Shopping images must be at least 100 x 100 pixels for standard items and 250 x 250 pixels for apparel. All images must feature a solid white background and be free of watermarks, promotional text, or brand logos. High-resolution, multi-angle photos are recommended to improve click-through rates (CTR) and ensure compliance with Google Image Guidelines.

Write A Comment