Key highlights
- Increasing the WordPress memory limit can help prevent PHP memory-related errors and improve overall site performance.
- Common methods for increasing the memory limit include editing the wp-config.php, .htaccess and php.ini files.
- Upgrading to a high-performance hosting plan ensures better memory management, allowing for improved performance and scalability of your site.
- Always back up your site before making changes to configuration files to avoid potential data loss or disruptions to your website.
Introduction
You’re working on your website or installing a new plugin and suddenly, you see the “Allowed memory size exhausted” error appear. As a result, your site slows down, key features stop working and frustration sets in. Sound familiar? This common issue often happens due to the WordPress memory limit a problem faced by many users.
In 2025, WordPress websites are becoming increasingly resource intensive. With the rise of high-performance themes, feature-rich plugins and growing eCommerce demands, the default memory limit often isn’t enough.
As your site grows and becomes more complex, the memory allocation that once worked fine may no longer suffice. This can lead to performance problems like lagging, crashes or error messages.
Luckily, increasing the WordPress memory limit is often a simple and effective solution. By expanding the available memory, you can prevent issues from cropping up and ensure that your website runs smoothly, quickly and efficiently.
This guide explains WordPress memory limits, how to check them and step-by-step methods to increase them for better site performance. Let’s dive in!
What is the WordPress memory limit?
The WordPress memory limit is the maximum amount of server memory that WordPress can use to run your website. If your site exceeds this limit due to plugins, themes, or scripts, it may trigger errors like “Allowed memory size exhausted”.
Understanding server memory and WordPress performance
To fully understand why memory limits matter, it’s important to understand how WordPress PHP memory limit affects your site’s ability to process data and run efficiently.
The role of memory in WordPress operations
Memory is responsible for executing PHP scripts, running plugins and managing site requests. When a WordPress site requires more server memory than allocated, it can trigger memory limit issues that slow down performance or cause site failures.
Default WordPress memory limit settings in 2025
By default, WordPress sets a predefined memory limit to balance performance and stability. However, as websites become more complex, the default memory limit may no longer be sufficient. Knowing your server settings and hosting limitations can help you determine if an upgrade is necessary.
How low memory affects your website
If your WordPress memory limit is too low, you may start experiencing noticeable issues that impact both functionality and user experience.
Common symptoms of low memory issues
A memory exhausted error often results in fatal errors, plugin malfunctions or the dreaded “Allowed memory size exhausted” message. If your site frequently crashes or fails to update, it’s likely time to increase the WP memory limit.
Impact on site speed, plugins and WooCommerce
Insufficient memory doesn’t just affect stability, it can slow down your entire website. WooCommerce sites require more memory to handle transactions and product listings. Without enough PHP memory, essential processes may fail, reducing site performance and affecting user experience.
Also read: How to Make My WordPress Site Faster
How to check your current WordPress memory limit?
Before increasing the WordPress memory limit, it’s important to check how much memory is currently allocated to your site. WordPress provides multiple ways to check this, depending on your level of access and technical comfort.
Below are three effective methods:
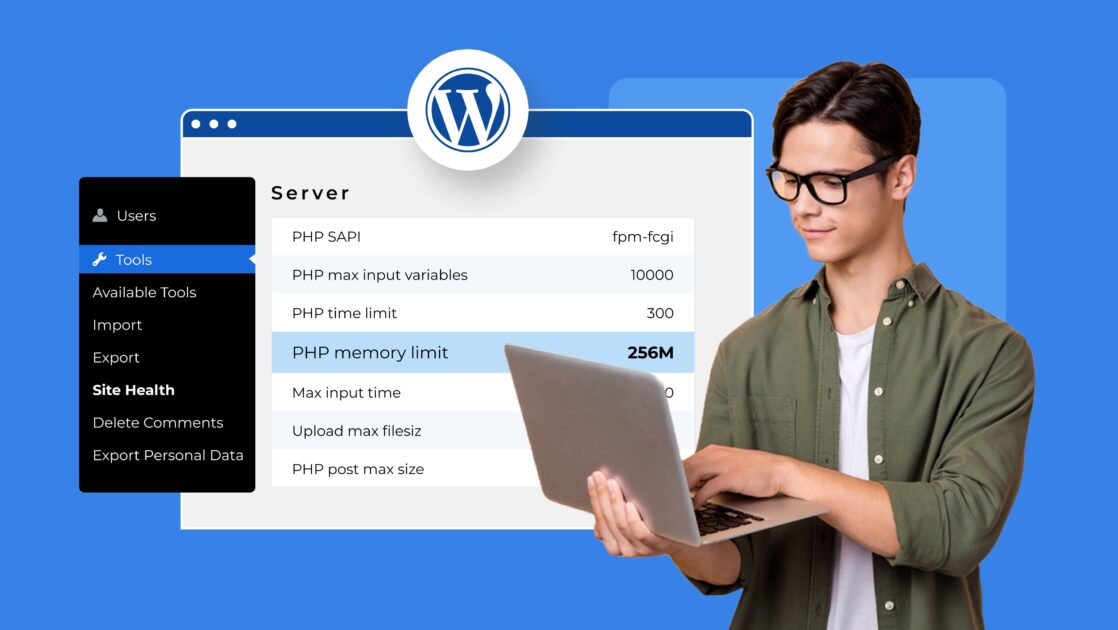
Method 1 – Using the WordPress site health tool
The easiest way to check your PHP memory limit is through the WordPress dashboard.
- Access site health: Log in to your WordPress website and navigate to Tools > Site Health.

- View server info: Click on the Info tab at the top of the page.
- Check the memory limit: Scroll down to the Server section and look for the PHP memory limit entry. This value represents the maximum memory allocated for PHP scripts running on your site.

Method 2 – Using a phpinfo.php file
If you prefer a direct server-side approach, you can create a phpinfo.php file to retrieve detailed server settings.
1. Create the phpinfo.php file
- Open a text editor and create a new file named phpinfo.php.
- Insert the following WordPress code into the file:
PHP <?php phpinfo(); ?>- Save the file.
2. Upload to your server
- Use an FTP client or your hosting provider’s file manager to upload the file to your website’s root directory.
3. Access and view memory limit
- Open a browser and visit: http://[yourdomain].com/phpinfo.php.
- Search for the memory_limit directive to find your current PHP memory allocation.
Security reminder: After checking the memory limit, delete the phpinfo.php file to prevent unauthorized access to your server settings.
Method 3 – Checking wp-config.php or server settings
For those comfortable with editing WordPress files, checking wp-config.php can provide direct insight into the WP memory limit settings.
1. Access the wp-config.php file
- Connect to your site via FTP or use your hosting provider’s file manager.
- Locate the wp-config.php file in the root folder of your WordPress installation.
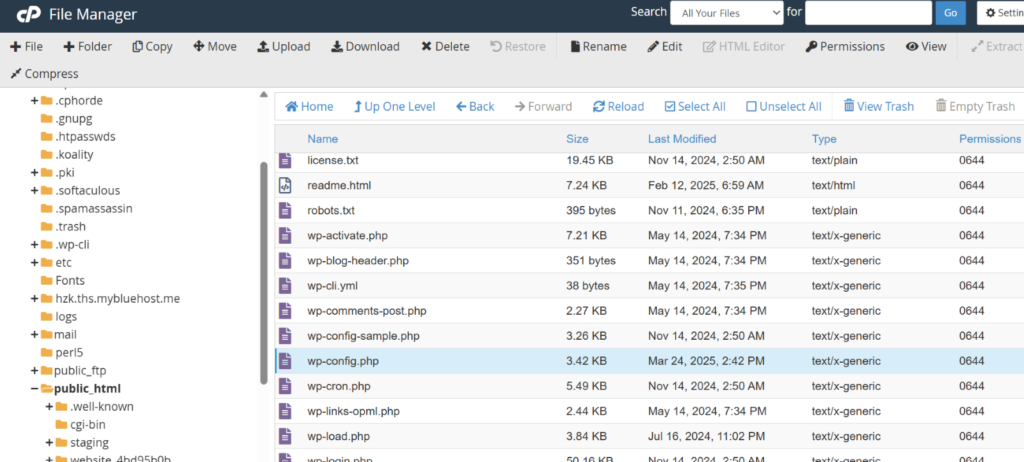
- Download and open the file with a text editor.
2. Check for memory limit definition
- Look for this code snippet inside wp-config.php:
PHP define('WP_MEMORY_LIMIT', '256M');- If this line is present, it indicates the current memory limit in WordPress. If missing, WordPress defaults to the server’s PHP memory limit.
3. Review server settings
If the memory size isn’t defined in wp-config.php, check these server files:
- php.ini: Look for the memory_limit directive.
- .htaccess file: Find a line like:
Apache php_value memory_limit 256MDepending on your hosting company, you may need to adjust these settings through the hosting control panel.
By using these methods, you can determine how much memory WordPress is currently using and whether an increase is necessary to improve site performance.
How to increase your WordPress memory limit?
If your WordPress site hits memory limits, increasing the PHP memory can boost performance and prevent errors like “Allowed memory size exhausted”.
Below are four effective methods to raise your WordPress memory limit.
Method 1 – Edit the wp-config.php file
The wp-config file is a core WordPress configuration file that allows you to manually set the WP memory limit.
Step-by-step instructions
1. Access your WordPress files
- Use an FTP client like FileZilla or your hosting provider’s file manager.
- Navigate to your site’s root directory (typically named public_html or www).
2. Locate and edit the wp-config.php file
- Find the wp-config.php file in the root folder.
- Before making changes, download a backup copy to your computer.
- Open the file with a text editor such as Notepad++ or Sublime Text.
3. Modify the memory limit
- Locate the line:
php /* That's all, stop editing! Happy publishing. */ - Just above this line, add the following code:
Php define('WP_MEMORY_LIMIT', '256M'); - This increases the memory limit to 256 MB. You can adjust the value based on your needs.
4. Save and upload
- Save your changes. Then, upload the updated file back to your server, replacing the original.
Important note: Ensure that the memory limit does not exceed the maximum allowed by your hosting provider.
Recommended memory limit values for 2025
Refer to the table below for recommended memory limits based on your WordPress site’s needs
| Website type | Recommended memory limit |
| Basic blog or small site | 64 MB |
| Medium business website | 128 MB |
| WooCommerce or eCommerce | 256 MB |
| Large or high-traffic site | 512 MB or more |
Adjusting your memory limit according to these recommendations can help ensure your site runs smoothly and efficiently.
These are general guidelines. If you’re unsure, check with your hosting provider for the best settings.
Method 2 – Modify the php.ini file
The php.ini file controls various server settings, including PHP memory allocation. If you have access to this file, you can manually increase the WordPress memory limit.
Where to find and edit php.ini
1. Locate the php.ini file
- The php.ini file is usually found in the root directory or within the php folder. The exact location depends on your hosting provider.
- If it’s missing, you can create a new file named php.ini in the root directory.
2. Edit the php.ini file
- Open php.ini with a text editor.
- Search for the line:
ini memory_limit = 128M - Change it to:
ini memory_limit = 256M - If this line does not exist, add it manually.
3. Save and restart
- Save the changes to php.ini.
- Restart your web server to apply the new settings.
Note: On shared hosting plans, access to php.ini may be restricted. If you can’t modify this file, try using the .htaccess method or contact your hosting company.
Recommended code example
To set the WordPress PHP memory limit to 256MB, ensure the php.ini file includes:
ini memory_limit = 256M Adjust the value based on your WordPress website’s needs and server settings.
Method 3 – Update the .htaccess file
The .htaccess file is a configuration file used by Apache servers to manage server settings. You can use it to increase the PHP memory limit if other methods don’t work.
How to edit the .htaccess file
1. Access the .htaccess file
- Use FTP or your hosting provider’s file manager.
- Locate the .htaccess file in your site’s root directory.
- If the file is missing, create a new file named .htaccess.
2. Modify the .htaccess file
- Open the file using a text editor and insert the following line.
Apache php_value memory_limit 256M - This increases the PHP memory allocation to 256MB. Adjust as needed.
3. Save and upload
- Save your changes and upload the updated file back to the server.
Also read: How to Locate, Create or Edit the WordPress .htaccess File
When to use this method
This method is helpful if:
- You don’t have access to the php.ini file.
- Your hosting provider allows overrides in the .htaccess file.
- Previous methods did not successfully increase the memory limit.
Note: Some hosting providers may restrict .htaccess modifications. If you run into issues, contact your hosting support team.
Method 4 – Ask your hosting provider
If you have tried increasing your WordPress memory limit through wp-config.php, .htaccess or php.ini without success, your hosting provider may have imposed server-level restrictions.
In such cases, reaching out to your hosting support is the best option.
Hosting-level limitations you can’t change manually
Many hosting providers enforce memory limits at the server level, particularly in shared hosting environments, to ensure fair resource distribution among users. Here’s why you may not be able to manually increase the memory limit:
- Server-wide restrictions: Some shared hosting providers cap PHP memory allocation to prevent excessive resource usage.
- Global PHP configurations: Even if you modify configuration files, the provider’s default settings may override them.
- Security and performance controls: Hosting companies often impose memory limits to prevent poorly optimized sites from affecting server performance.
If you’re on a shared hosting plan, the maximum limit allowed by your provider may already be in effect and further increases may require a hosting plan upgrade.
Also read: Increase the PHP Memory Limit
Why managed hosting solutions offer more flexibility
If your site requires more resources than your current hosting plan allows, managed hosting solutions provide greater flexibility in configuring server settings. Here’s why they are beneficial:
- Higher resource limits: Managed hosting plans offer increased PHP memory limits, often starting at 256MB or higher.
- Custom server configurations: Hosting providers optimize server environments for WordPress, ensuring better performance.
- Expert support: With a managed plan, support teams can manually adjust memory limits, allocate additional resources and fine-tune your hosting settings.
At Bluehost, we provide powerful VPS, dedicated, and managed WordPress hosting solutions to eliminate memory issues and keep your high-traffic site running smoothly.
How to troubleshoot persistent memory issues in WordPress?
If you’ve increased your WordPress memory limit but are still experiencing issues, additional troubleshooting may be required.
Identifying plugin or theme conflicts
Poorly coded or resource-intensive plugins and themes can consume excessive memory, leading to performance problems.
Checking for high-memory usage plugins
1. Use diagnostic tools:
- Query monitor: Helps detect plugins that are consuming too many resources by tracking database queries, PHP errors and performance.
- Code profiler: Provides insights into plugins’ resource consumption, helping you pinpoint problematic ones.
2. Manual testing:
- Deactivate all plugins: Temporarily disable all plugins and check if the issue persists.
- Reactivate one by one: Enable each plugin individually and monitor performance to identify the cause.
Testing for theme-related issues
- Switch to a default WordPress theme (e.g., Twenty Twenty-Five).
- If the issue disappears, the original theme may be the cause. Consider updating it or switching to a better-optimized theme.
Fixing errors that persist after increasing memory
If the problem continues despite raising the memory limit, other factors may be involved.
Server-level restrictions
Some hosting providers enforce memory limits that override manual configurations. If changes to wp-config.php, .htaccess or php.ini haven’t worked, contact your hosting provider to check if server restrictions apply and request an increase.
Clearing cache and restarting services
Cached data can sometimes prevent changes from taking effect.
Clear cache:
- WordPress cache: If using caching plugins like WP Super Cache or W3 Total Cache, clear the cache.
- Browser cache: Ask users to refresh their browser cache to ensure they see the latest updates.
Restart web services:
- If you have server access, restarting Apache, Nginx or PHP services can help apply changes properly.
By following these troubleshooting steps, you can resolve persistent memory issues and optimize your WordPress site’s performance.
How does Bluehost optimize your WordPress memory limits?
At Bluehost, we understand that optimizing memory limits is key to keeping your WordPress site running smoothly. Our hosting solutions ensure smooth performance, whether you are running a blog, a plugin-heavy site or a WooCommerce store.

Scalable hosting with higher resource thresholds
We offer scalable hosting plans with increased PHP memory limits, ensuring your site won’t struggle with resource demands. Whether you’re adding new plugins, handling more traffic or expanding your online store, we provide the memory capacity you need to keep things running seamlessly.
Also read: How to Choose the Most Scalable WordPress Hosting Plans
Built-in support for plugin-heavy or WooCommerce sites
If your site relies on multiple plugins or WooCommerce for business transactions, we’ve got you covered. Our servers are optimized to prevent memory exhaustion errors and keep your site operating at peak performance even under heavy loads.
When you should reach out to us
If you’ve tried increasing your memory limit through wp-config.php, .htaccess or php.ini and still face issues, our expert support team is available 24/7. We’re here to help with troubleshooting, server adjustments and personalized hosting recommendations to ensure your site runs efficiently.
Performance tools and features we provide
Beyond increasing memory limits, we equip you with powerful performance-enhancing tools, including:
- Integrated caching solutions to speed up your site.
- PHP version management for better compatibility.
- Automatic updates to enhance security and efficiency.
When you host with us, you don’t just get a server; you get a fully optimized WordPress experience, expert support, high memory limits and the flexibility to scale as your site grows.
What are the best practices to maintain a high-performance WordPress site?
Keeping your WordPress site running smoothly requires ongoing optimization and smart resource management. Here’s how you can maintain peak performance and prevent memory-related issues.
1. Monitor resource usage regularly
Staying on top of your site’s memory and CPU usage helps you catch potential issues before they slow down your site. Use tools like Query Monitor or your hosting provider’s dashboard to track resource consumption. If you notice consistent spikes, it may be time to optimize or upgrade your hosting plan.
2. Optimize plugins and themes
Not all plugins and themes are created equal. Poorly coded or outdated ones can consume excessive resources, causing performance bottlenecks. Regularly audit your installed plugins, deactivate unnecessary ones and update themes to ensure they are lightweight and efficient.
3. Use a caching solution and CDN
A caching plugin like WP Super Cache or W3 Total Cache can significantly reduce load times by storing static versions of your pages. Use a CDN to distribute content globally, reducing latency and improving site speed.
4. Choose a hosting plan that grow with your site
As your site expands, so do its resource needs. A scalable hosting plan ensures you have enough memory, processing power and bandwidth to support your growth. At Bluehost, we offer scalable hosting solutions with higher memory limits, built-in performance optimizations and 24/7 expert support, so your site never outgrows its hosting.
Also read: The Four Most Popular Types of Web Hosting and How to Choose the Right Plan
Final thoughts
If you’re encountering a WordPress memory exhaust error, simply increasing the WP memory limit might not always resolve the issue completely. A proactive approach ensures your WordPress site runs smoothly without hitting a fatal error or displaying an error message due to low PHP memory.
Regularly monitoring server settings, optimizing PHP scripts and properly configuring htaccess, wp-config.php and php.ini can help prevent memory errors.
Upgrading your WordPress hosting provider can also help if you’ve maxed out your default memory limit. With Bluehost’s advanced hosting services, you get higher PHP memory limits, expert support and scalable solutions tailored for WordPress websites.
Our hosting plans are optimized to handle increased memory demands, ensuring your site remains fast and reliable even as it grows. Pick the perfect Bluehost WordPress Hosting plan now.
FAQs
The recommended WP memory limit for WordPress websites in 2025 depends on your site type. Small sites can function with 128MB, while WooCommerce and large content-heavy sites may need 256MB or more. Check your current PHP memory limit in your server settings to ensure optimal performance.
Most hosting providers allow users to increase WP memory limit on shared plans, but there may be a maximum memory limit imposed. If modifications to wp-config.php, htaccess file or php.ini don’t work, you may need to upgrade your plan.
WP_MEMORY_LIMIT sets the PHP memory limit for standard operations, while WP_MAX_MEMORY_LIMIT applies to admin processes requiring more memory, such as backups or imports. Both can be adjusted in the wp-config.php file.
No, increasing the WordPress PHP memory limit does not directly impact security. However, modifying core WordPress code without proper knowledge can expose your site to vulnerabilities. Always back up your root folder and test changes carefully.
This error message appears when a PHP script exceeds the allocated memory size. It often happens due to resource-intensive plugins, themes or low default memory limits set by your hosting provider.
Signs include slow performance, frequent memory exhausted errors, failed updates or plugin malfunctions. Checking your server settings and increasing the WP memory limit can resolve these issues.
Yes, the maximum memory limit depends on your hosting plan. Bluehost offers scalable hosting solutions where you can upgrade your WordPress site to handle more resource-intensive operations smoothly.

Write A Comment