
Key highlights
- WordPress logs reveal exactly what’s causing your website problems.
- You can enable WordPress debug mode with a few simple code additions.
- WordPress error logs show you which plugins or themes are causing conflicts.
- Access logs help you identify suspicious activity and potential security threats.
- Proper log management saves hours of troubleshooting time and prevents storage issues.
Introduction
Have you ever had your WordPress site suddenly crash? That moment when you face a blank white screen with no error message to guide you. We’ve all been there, and it’s incredibly frustrating.
When WordPress problems strike, most beginners resort to random fixes – deactivating all plugins, switching themes or even reinstalling WordPress. These shotgun approaches waste time and often make things worse.
What if you could see exactly what’s happening behind the scenes? That’s where WordPress logs come in. These hidden text files record everything going on with your site, showing you precisely what went wrong and where.
In this guide, you’ll learn how to unlock these powerful diagnostic tools. I’ll show you how to find WordPress logs, understand what they’re telling you and use that information to fix problems quickly. No more guesswork – just targeted solutions that get your site back online fast.
What are WordPress logs and why are they important?
WordPress logs are text files that record activities and errors on your website. They capture details about visitors, system operations and errors that occur. You can think of WordPress logs as your website’s flight recorder or black box.
These logs become your most valuable tool when problems arise. They show you exact error messages with timestamps and contextual information. You avoid guesswork about what caused your white screen of death or sudden site crash. The logs tell you exactly what happened and when.
WordPress logs deliver the below listed critical benefits to you as a site owner:
- Problem identification: Logs pinpoint exactly where and when errors occur.
- Faster troubleshooting: You save time with specific error messages to research.
- Security monitoring: Unusual activity patterns may indicate hack attempts.
- Performance tracking: Logs help identify slow-loading resources or processes.
- Developer communication: You can share exact error details with support teams.
Also read: What do Error Pages Mean?
What types of WordPress logs should you know about?
Your WordPress site creates multiple types of logs for different purposes. Each log type captures specific information to help you maintain and troubleshoot your site effectively.
1. Error logs
WordPress error logs record all PHP issues that occur during site operation. These logs capture errors, warnings and notices when code fails to run correctly. You get the exact error message, file location and line number where each problem occurred.
WordPress error logs become essential when:
- Your site displays the dreaded white screen of death
- Specific pages or functions refuse to load properly
- Plugins or themes conflict with each other
- Custom code breaks unexpectedly
- Your site crashes during specific actions
These logs speak a technical language that reveals exactly what went wrong. They transform vague problems into specific issues you can search for solutions.
2. Debug logs
WordPress debug mode generates comprehensive logs with enhanced details about code execution. These specialized logs capture additional notices, warnings and deprecated function usage. You receive much more context than standard error logs provide.
WordPress debug mode requires specific configuration settings in your wp-config.php file. This system lets you record issues privately without showing them to your visitors. You can investigate problems thoroughly while maintaining a seamless user experience on your live site.
Also read: Most Common WordPress Issues and Their Solutions – Bluehost Blog
Many developers enable WordPress debug mode during development phases. They can catch potential issues before they affect real users. This proactive approach prevents many common WordPress problems.
3. Access logs
Access logs document every single request made to your WordPress website. They store visitor IP addresses, viewed pages, HTTP response codes and precise timestamps. These logs help you track traffic patterns and spot suspicious activities quickly.
Most quality hosting providers automatically maintain server-level access logs. You can view these through your hosting control panel or FTP access. Access logs help you identify:
- Brute force login attempts against your admin area
- Sudden or unusual traffic spikes
- Frequent 404 errors from missing resources
- Suspicious access patterns that might indicate attacks
These logs provide valuable security insights and performance data that other logs don’t capture.
How do you enable and view WordPress logs?
Now that you understand what WordPress logs do, you need to know how to activate and find them. Different log types require different setup approaches.
1. Enabling WordPress debug mode
You must modify your WordPress configuration to enable error logging and detailed debugging. Follow these steps to activate WordPress debug mode:
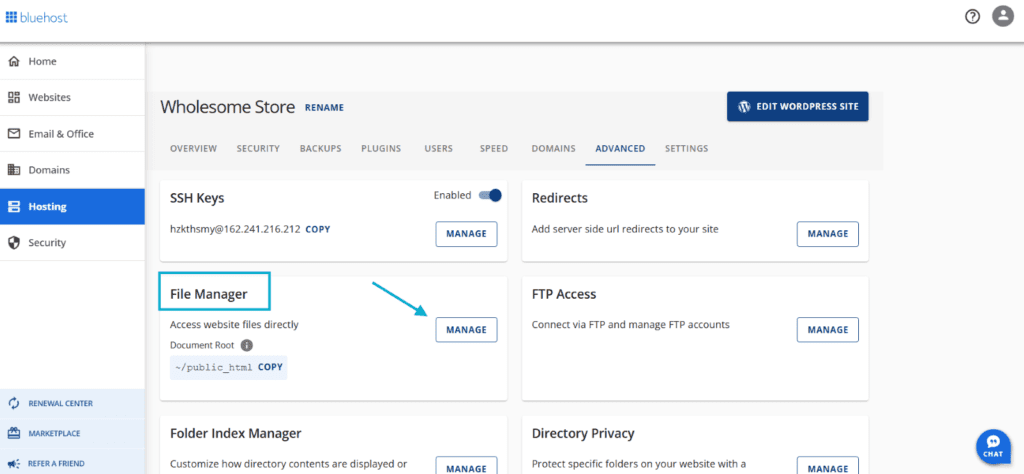
- Access your WordPress site files through FTP or your hosting file manager.
- Locate the wp-config.php file in your root directory.
- Find the line that says /* That’s all, stop editing! */
- Add the following code right before that line:
// Enable debugging
define( 'WP_DEBUG', true );
define( 'WP_DEBUG_LOG', true );
define( 'WP_DEBUG_DISPLAY', false );
This configuration turns on WordPress debug mode but hides errors from your visitors. All errors save to a log file instead of displaying publicly on your site. This setup keeps your site looking professional while you investigate issues.
2. Locating WordPress error logs
After you enable debugging, WordPress stores error information in a specific file. You can access WordPress error logs in one of these locations:
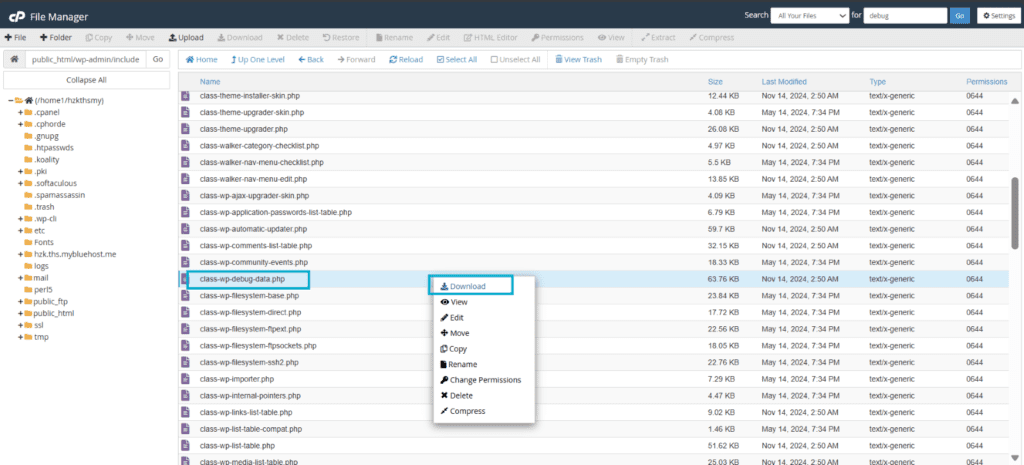
- The /wp-content/ directory as a file named “debug.log.”
- Your server’s main error log directory (location varies by host).
- A custom location you specify in your wp-config.php file.
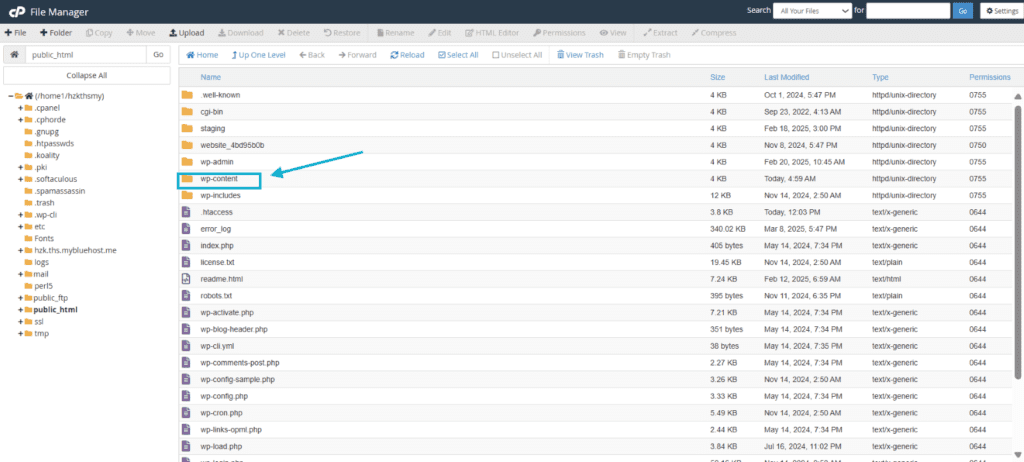
To check if WordPress error logs exist, connect to your site via FTP or use your hosting file manager. Navigate to the /wp-content/ folder and look for debug.log. If this file doesn’t appear, your system might not have logged any errors yet.
For a custom log location, add this line to your wp-config.php file:
define( 'WP_DEBUG_LOG', '/path/to/custom/debug.log' );
Replace the path with your preferred location. Ensure this directory exists and has proper write permissions. Custom locations help you organize logs for multiple sites or secure them in non-public directories.
3. Checking server logs
WordPress error logs capture PHP errors, but server logs provide additional information. You access server logs through your hosting control panel.
Many WordPress users rely on Bluehost for their website hosting needs. If you’re among them, you can easily access your server logs through our well-organized control panel.
Remember that log access methods differ between hosting providers. While these steps work for Bluehost, you should consult your specific hosting provider’s documentation or support team for precise instructions on accessing server logs.
- Log in to your Bluehost account.
- Look for the “Hosting” tab in your control panel.
- Select your website and click “Settings.”

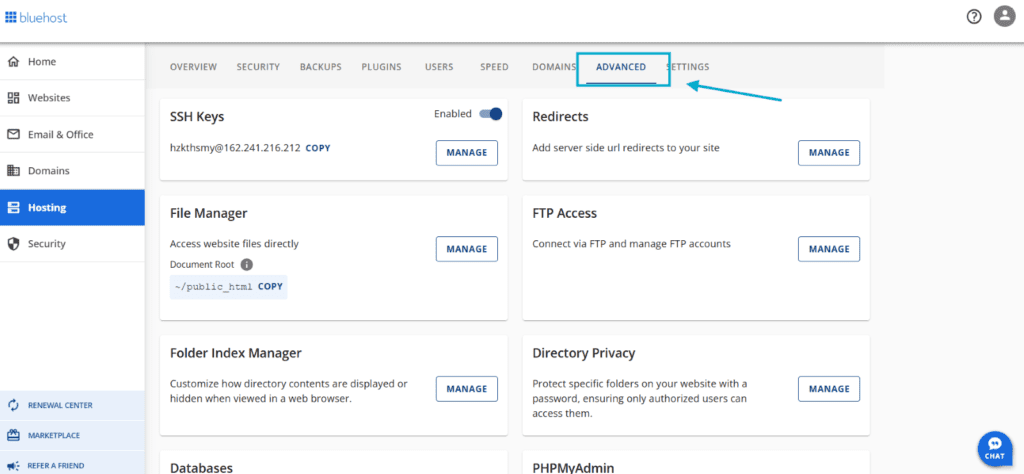
- Navigate to the “Advanced” tab and scroll down.
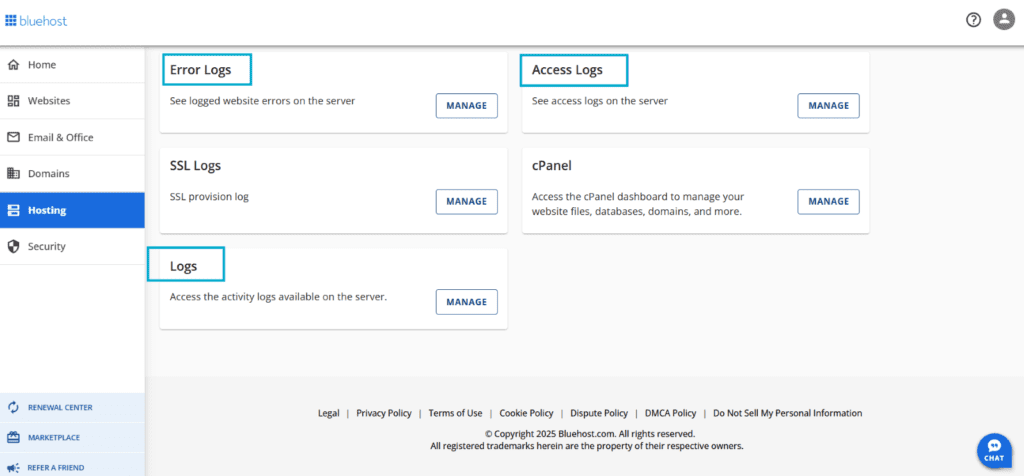
- Choose “Error Log” to view recent server errors.
- Choose “Access Log” to view visitor traffic.
Bluehost organizes logs by domain if you host multiple sites. Select the specific domain to view its logs. These server logs complement WordPress error logs with additional server-level information.
How can you manage and analyze WordPress logs?
Finding logs is just the first step. You need to understand what they mean and how to use them effectively.
1. Understanding log entries and common errors
WordPress logs follow a specific format that contains crucial information. Each log entry typically includes:
- A timestamp showing exactly when the error occurred
- The error type that categorizes the issue (Error, Warning, Notice)
- An error message with error code that describes what went wrong
- The file path and line number pointing to the problem’s exact location
Here’s an example of a typical WordPress error log entry:
[12-Mar-2025 15:42:13 UTC] PHP Fatal error: Uncaught Error: Call to undefined function get_header() in /public_html/wp-content/themes/mytheme/index.php:10
This entry reveals:
- When the error happened (March 12, 2025, at 15:42:13 UTC)
- The error type (PHP Fatal error)
- The specific error message (Uncaught Error: Call to undefined function get_header())
- The exact location (line 10 of the index.php file in the mytheme folder)
You’ll encounter several common error types in your WordPress logs. They are:
- Fatal errors: These completely crash your site and need immediate attention.
- Parse errors: These show syntax problems in your code like missing semicolons.
- Warning messages: These don’t crash your site but signal potential issues.
- Notice messages: These indicate minor issues or inefficient code practices.
- Deprecated function warnings: These alert you when code uses outdated functions.
Learning to recognize these patterns in your WordPress error log file helps you prioritize which issues need immediate attention.
2. Cleaning up and rotating logs
WordPress logs grow larger over time and can consume significant storage space. Left unmanaged, these files can fill your hosting storage quota and potentially slow down your site. You should manage log files regularly to prevent these issues.
Your hosting provider plays a crucial role in log management. If you’re using Bluehost, you’ll benefit from their WordPress-optimized solutions for log handling. Bluehost automatically rotates server logs to prevent excessive storage usage without any manual intervention needed from you. This automatic rotation keeps your server-level logs manageable without your constant attention.
For best results with any host, follow these essential log management practices:
- Download and archive old logs before deletion for future reference.
- Clear logs after you resolve specific issues to start fresh.
- Implement log rotation to automatically manage file sizes.
- Disable debugging on live sites when not actively troubleshooting.
While Bluehost handles server logs automatically, you’ll need to manage WordPress debug logs manually or through plugins like WP Activity Log. Here’s how to manually clear a WordPress debug log:
- Connect to your site via FTP or your Bluehost file manager.
- Navigate to the log location (usually /wp-content/).
- Download the debug.log file for your records.
- Delete or empty the file to start fresh.
Remember to disable WordPress debug mode on your production site after completing your troubleshooting. Simply return to your wp-config.php file and change WP_DEBUG to false.
This practice improves both security and performance while reducing unnecessary log growth on your Bluehost server.
How do you troubleshoot common issues using WordPress logs?
WordPress logs help you diagnose and fix website problems with precision. Let’s walk through exactly how to use these logs for specific issues you’ll encounter.
1. Fixing plugin and theme conflicts
Plugin and theme conflicts cause most WordPress headaches. Here’s how to identify and fix the exact source of conflicts:
- Enable WordPress debug mode by adding these lines to your wp config file (wp-config.php):
define('WP_DEBUG', true);
define('WP_DEBUG_LOG', true);
define('WP_DEBUG_DISPLAY', false);
- Visit the page where your error occurs to trigger the issue.
- Access your site via FTP or file manager and open the debug.log file in wp-content folder.
- Look for recent entries that contain plugin or theme folder names, like this:
[29-Feb-2023 09:15:22 UTC] PHP Fatal error: Uncaught Error in /public_html/wp-content/plugins/problem-plugin/main.php:25
- Log in to your WordPress admin and navigate to Plugins > Installed Plugins.
- Deactivate the identified plugin (in this example, “problem-plugin”).
- Check if your issue is resolved by reloading the problematic page.
- If the issue persists, reactivate that plugin and repeat the process with other suspect plugins.
This methodical approach eliminates random deactivation. You can then either seek an alternative plugin, contact the developer with your specific error information or try updating the problematic plugin.
Also read: How Many WordPress Plugins Are Too Many? Am I Using Too Many WP Plugins?
2. Resolving PHP errors and server issues
When WordPress logs show server-level problems, follow these specific solutions:
For memory limit errors like Allowed memory size of 33554432 bytes exhausted:
- Open wp-config.php via FTP or file manager.
- Add this line before “That’s all, stop editing!”: define(‘WP_MEMORY_LIMIT’, ‘256M’);
- Save the file and reload your site.
For timeout errors like Maximum execution time of 30 seconds exceeded:
- Create or edit a php.ini file in your site’s root directory.
- Add this line: max_execution_time = 300
- If that doesn’t work, contact Bluehost support to increase this limit for your account.
Read more: How to Resolve ERR_CONNECTION_TIMED_OUT: Quick Tips & Tricks (2025) – Bluehost Blog
For php file permission problems like “Failed to open stream: Permission denied” that appear in your php error log:
- Connect to your site via FTP.
- Navigate to the file mentioned in the error log.
- Right-click the file and select “File Permissions” or equivalent.
- Set numeric value to 644 for files or 755 for folders.
- Select “Apply to enclosed files” if fixing a folder.
For database connection errors like Error establishing a database connection:
- Open wp-config.php via FTP.
- Verify these lines match your database credentials:
define('DB_NAME', 'your_database_name');define('DB_USER', 'your_database_username');define('DB_PASSWORD', 'your_database_password');define('DB_HOST', 'localhost'); - If credentials are correct but issues persist, contact Bluehost support to check database server status.
Also read: How to Fix the Error Establishing a Database Connection in WordPress – Bluehost Blog
Final thoughts
WordPress logs provide invaluable insights into your website’s operation. They transform troubleshooting from frustrating guesswork into a systematic, efficient process. You now know how to enable, locate and interpret various WordPress logs to solve problems quickly.
Remember to make checking logs your first step whenever you encounter a WordPress issue. This practice saves you hours of trial-and-error and helps you communicate more effectively with developers or support teams.
Bluehost customers enjoy additional benefits through optimized WordPress environments and easily accessible server logs. These tools perfectly complement WordPress’s internal logging capabilities for comprehensive troubleshooting.
Get started with Bluehost WordPress hosting today for a seamlessly optimized environment.
FAQs
WordPress error logs typically reside in the /wp-content/ directory as a file named debug.log. This location applies when you’ve enabled WP_DEBUG_LOG in your wp-config.php file. If you don’t find the file there, check your server’s main error log or a custom location specified in your configuration.
No, you should disable WordPress debug mode on live websites after troubleshooting. Debug mode creates detailed logs that consume disk space and might expose sensitive information. Enable debugging only when actively investigating issues, then turn it off when finished.
You should check your WordPress logs weekly for a healthy site. For websites with active development or recent changes, check logs daily. After installing new plugins or themes, always review logs for potential conflicts or errors.
Yes, WordPress logs can reveal signs of security breaches. Look for unexpected file modifications, unusual access patterns or injection attempts in your logs. Access logs show suspicious IP addresses or strange request patterns. Error logs might show evidence of malicious code execution.
WP_DEBUG enables WordPress’s debug mode to record all notices, warnings and errors. When set to true, errors might display on your site. WP_DEBUG_LOG specifically tells WordPress to save these messages to a log file instead of displaying them. Use both together to record errors without showing them to visitors.

Write A Comment