
Key highlights
- Discover five methods to protect your WordPress website from cyber-attacks and data loss.
- Master multiple backup techniques, including automated hosting solutions and manual methods.
- Understand optimal backup timing and storage locations for maximum protection.
- Explore real-world case studies showing how proper backups saved businesses from complete data loss.
Let’s be honest – when was the last time you backed up your WordPress site? If you’re unsure or the answer is “never,” you’re not alone. But here’s the reality: websites can break without warning. A theme update might go wrong, a plugin could misfire or worse, you could get hacked and loose your entire site. In that moment, having a WordPress website backup isn’t just helpful – it’s a lifesaver.
Hence, before things ever go sideways, let’s talk about the top 5 smart and simple ways to back up your WordPress site – and protect everything you’ve worked so hard to build.
In this guide, you’ll learn about the complete full site backup system that protects your WordPress site from possible disasters. We’ll reveal the exact methods, tools and strategies that keep websites running successfully.
Want to ensure your website stays safe and recoverable? Let’s dive in.
What is a website backup?
A website backup is essentially a complete copy of your WordPress site that you can use to restore your website if something goes wrong. Think of it as taking a snapshot of your entire website at a specific moment in time. A full website backup typically includes three critical components: your site files (themes, plugins, images, and content), your database (posts, pages, comments, and settings), and key configuration files that tell your website how to function.
Website backups are your safety net against common disasters that can strike without warning. Security incidents like hacking attempts, failed WordPress or plugin updates, human errors during site maintenance, and hosting server issues can all compromise or completely destroy your website. Without a recent backup, you could lose months or years of hard work in minutes. That’s why having reliable backup protection gives you the confidence to manage and grow your website knowing you can recover from any setback.
You’ll encounter two main types of backups when protecting your WordPress site. Full backups capture everything – your complete website files, database, and configuration settings, giving you total restoration capability. Partial or content-only backups (like WordPress’s built-in export feature) only save your posts, pages, and comments as XML files, but won’t restore your themes, plugins, or site appearance. Understanding this difference helps you choose the right backup method for your specific protection needs.
WordPress backups are complete copies of your website that capture three essential components: your site files (including themes, plugins, images, and media), your database (containing posts, pages, comments, user data, and settings), and configuration files that control how your website functions. Think of it as taking a snapshot of everything that makes your WordPress site work.
You’ll encounter two main backup types when protecting your WordPress site. Full backups capture your entire website – every file, database entry, and configuration setting – giving you complete restoration capability. Partial backups (like WordPress’s built-in content export) only save your posts, pages, and comments as XML files, but won’t restore your site’s appearance, functionality, or custom settings. WordPress-specific backups matter because your site faces unique risks from plugin updates, theme changes, security incidents, and hosting server issues that can break functionality or compromise data.
Before relying on any backup method, confirm it includes:
- Complete wp-content folder (themes, plugins, uploads)
- Full WordPress database with all tables
- Configuration files (wp-config.php, .htaccess)
- Custom code modifications and media files
- Automated scheduling and off-site storage options
Quick start guide: Choose your WordPress website backup method
Not sure which backup approach fits your website? This comparison table breaks down the five main WordPress backup methods by difficulty, time investment and ideal use cases. Choose based on your technical comfort level and specific requirements.
| Method | Best for | Setup time (approximate) | Pros | Cons |
| Bluehost native backup | Bluehost customers | 2 minutes | One-click restore, automatic daily backups, no plugins needed | None |
| Backup plugins | Most users | 5 minutes | Flexible scheduling, multiple storage options | Can slow site, plugin conflicts may occur |
| Manual backup | Advance users | 15 minutes | Complete control, no dependencies, | Time-consuming, technical knowledge needed |
| Cloud storage | Automation seekers | 10 minutes | Off-site storage, automatic sync, version history | Storage costs, internet dependent |
| Local backup | Developers | 20 minutes | Fast restoration, complete privacy | Not off-site, manual process |
Now you might be thinking, “which backup method should I actually use for my site?” Don’t worry, we’ve got you covered. In the following section we’ll walk through each backup method in detail so that you can find the perfect solution.
How to back up a WordPress site
Creating a WordPress backup doesn’t have to be complicated when you follow a simple, systematic approach. Whether you’re a small business owner or content creator, establishing a reliable backup workflow protects your site from data loss, security threats and unexpected crashes. The key is understanding what needs protection and choosing the right method for your specific situation.
Every effective WordPress backup strategy follows five essential steps: First, decide what to back up – your website files, database and media content all need protection. Second, choose your backup method from hosting solutions, plugins, manual processes, cloud storage or local options. Third, establish a backup schedule and retention policy that matches your site’s update frequency. Fourth, store backups off-site to protect against server failures or security breaches. Finally, test your backup restoration process regularly to ensure everything works when you need it most.
The beauty of this workflow is its flexibility – you can adapt it whether you prefer Bluehost’s automated daily backups, powerful plugins like UpdraftPlus, or hands-on manual control. Each method in our comparison table above addresses these five steps differently, giving you options that match your technical comfort level and specific requirements. Let’s explore each backup method in detail so you can choose the perfect solution for your WordPress site.
Creating a comprehensive WordPress backup requires protecting three essential components: your website files (themes, plugins, media uploads), your database (posts, pages, settings), and your configuration files (wp-config.php). Store backups in multiple secure locations – combine cloud storage with local copies for maximum protection. Establish a backup frequency that matches your site’s activity level: daily for active sites, weekly for standard business sites, and always before major changes like plugin updates, theme switches, or WordPress upgrades.
Verify your WordPress backup strategy by regularly testing restore procedures on a staging environment – never test on your live site. Confirm backup integrity by checking file sizes, ensuring no corruption errors, and verifying that both database and file components are included. Set up automated email notifications to monitor backup completion and establish retention policies to manage storage space effectively. Remember: a backup is only valuable if you can successfully restore from it when needed.
Method 1: Backup WordPress using Bluehost
If you’re wondering ‘does Bluehost backup my site?’ – the answer is yes. Bluehost backup WordPress solution provides automatic daily backups for all WordPress hosting accounts, making site protection effortless. You can access and restore these backups through your hosting control panel without technical expertise.
Already hosting your site with Bluehost? Great- you’re halfway there. If not, choose Bluehost to get automated backups every day!
In addition to daily automated backups, you can back up your WordPress website data anytime you want with just a few clicks. Here’s how:
- Step 1: Access the Bluehost WordPress backup panel by logging into the Bluehost Control Panel. Next, click on the Hosting tab in the left menu.
- Step 2: If you have more than one site, you will see an overview of all of your sites here. Click on the Settings button for the website you want to create a backup of.

- Step 3: You will see an overview of your site. There are multiple tabs you can click on, but you need the one that says “Backups.”

- Step 4: In this Backups tab, you can create a new backup, simply by clicking on the blue button Create New Backup.

- Step 5: You can also restore your site by using restore tool on one of the previous backups. You will find the option when you click on the three dots on the right.
With the optimum backup strategy up your sleeve, you’re all ready to safeguard your WordPress website.
Restoring backup with Bluehost
Restoring your WordPress site from a Bluehost backup is just as simple as creating one. When disaster strikes, you’ll appreciate having this straightforward recovery process can save you hours of work.
Here’s how to restore your site using Bluehost WordPress backup:
- Step 1: Log into your Bluehost Control Panel and navigate to the Backups tab for your affected website.
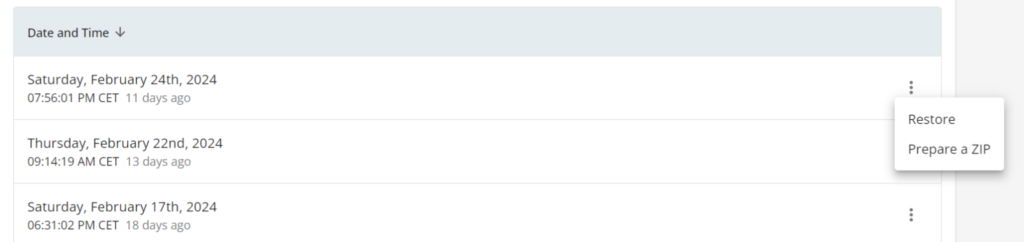
- Step 2: Review the list of available backups and select the one you want to restore from. Each backup shows the date and time it was created, helping you choose the right version.
- Step 3: Click the three dots next to your chosen backup and select “Restore.” Bluehost will ask you to confirm this action since it will overwrite your current site.
- Step 4: The restore process typically takes 5-15 minutes depending on your site size. You’ll receive email notifications when the process starts and is complete.
- Step 5: Once restored, check your website to ensure everything is working correctly. Test key functionality like contact forms, e-commerce features and user logins.
At a glance:
- Built-in daily automatic backups for all WordPress hosting accounts
- One-click backup creation and restoration through control panel
- No plugins or technical knowledge required
- Works exclusively with Bluehost hosting customers
- 2-minute setup time with professional-grade reliability
The Bluehost backup WordPress system is simple and entirely suitable for non-technical people who manage their own website.
If you’d like some more control over your backups, you can always use plugins for the same. Let’s see how.
Method 2: Backup WordPress with plugins

WordPress backup plugins automate the backup process while giving you more control over hosting solutions. These plugins create scheduled backups and store them in multiple locations for maximum protection.
Let’s look at a quick comparison of three useful WordPress backup plugins available in market.
| Plugin | Storage options | Restore method |
| CodeGuard | Cloud-based | Automatic |
| UpdraftPlus | 7+ options | One-click |
| BackWPup | 6+ options | Manual |
| Jetpack | Jetpack servers | One-clcik |
| Duplicator | 5+ options | Migration tool |
We’ll now explore the plugins in detail so that you can choose the one that best suits you.
1. CodeGuard
Key features:
- Real-time website monitoring and change detection
- Automatic daily backups with instant notifications
- One-click restore functionality with staging options
- Website security scanning and malware detection
- Cloud-based storage with unlimited backup history
CodeGuard Restoration Process:
- Step 1: Log into your CodeGuard account
- Step 2: Browse your backup history and select the specific date and time you want to restore from.
- Step 3: Choose between direct restore or staging restore.
- Step 4: Select the components you want to restore.
- Step 5: Initiate the restoration and monitor progress.
- Step 6: If you used staging, test thoroughly before pushing changes.
Best for: Business websites requiring professional-grade monitoring, automated protection and comprehensive security features.
Also read: CodeGuard: How to Protect Your Website
2. UpdraftPlus
Key features:
- Daily, weekly or monthly backup schedules available
- Multiple storage destinations including Google Drive, Dropbox, Amazon S3
- Selective backup options for files, database, themes, plugins
- Email notifications for backup completion status
Restoration process:
- Step 1: Navigate to Settings > UpdraftPlus Backups in your WordPress dashboard and click the “Restore” button next to your chosen backup.
- Step 2: Choose what to restore – you can select all components (files, database, themes, plugins) or restore specific elements only.
- Step 3: Click “Restore” and wait for the process to complete. UpdraftPlus will show a progress bar and notify you when finished.
Best for: Use UpdraftPlus WordPress backup plugin for daily backups essential for active websites with frequent content updates.
3. BackWPup
Key features:
- Granular control over backup components and scheduling
- Multiple storage destinations for enhanced redundancy
- Separate backup jobs for files and databases
- Email alerts for successful completion and error notifications
Restoration process:
- Step 1: Access your backup storage location and download the backup files to your computer.
- Step 2: Use FTP to upload site files back to your server’s public_html directory.
- Step 3: Click phpmyadmin or use your hosting cpanel’s database tools to import the database backup.
Best for: Users wanting detailed customization options and technical control over backup processes.
4. Jetpack
Key features:
- Automatic daily backups stored on WordPress.com servers
- Real-time backup for high-priority changes (posts, pages, themes)
- One-click restore with activity log showing detailed changes
- Integrated with WordPress.com infrastructure for reliability
- Security scanning and brute force attack protection included
Restoration process:
- Step 1: Navigate to Jetpack > Backup in your WordPress admin.
- Step 2: Choose from available backup dates and times.
- Step 3: Select between restoring to the current site or downloading backup files.
- Step 4: Test your restored site to ensure all features work correctly.
Best for: WordPress.com users and site owners wanting integrated backup, security and performance features in a single plugin from Automattic (WordPress creators).
Also read: Jetpack Account Setup: Account Creation, Purchase and More
5. Duplicator
Key features:
- Complete site packages for migration and cloning
- Cross-platform compatibility works with any hosting provider
- Staging site creation for development and testing
- One-file restoration simplifies complex migrations
Restoration process:
- Upload installer files: Upload the installer.php and archive.zip files to your website’s root directory.
- Run the installer: Visit yoursite.com/installer.php in your browser and follow the guided restoration process.
- Complete setup: Enter your database credentials and let Duplicator reconstruct your website automatically.
When you need to restore your WordPress site using backup plugins, the process varies slightly depending on which plugin you’re using. However, the core principles remain consistent across all major backup solutions.
At a glance:
- Flexible scheduling options with multiple storage destinations
- Works with any hosting provider and WordPress installation
- Free and pro version options available (UpdraftPlus, Jetpack, BackWPup, etc.)
- 5-minute setup with customizable automation features
- Best balance of ease-of-use and advanced functionality
Moving beyond plugin solutions, let’s explore how manual backup methods can give you even greater control over your WordPress site’s protection strategy.
Also read: The 12 best WordPress backup plugins for 2025
Method 3: Backup WordPress manually
Manual WordPress backups give you complete control but require technical knowledge. Best suited for developers and advanced users needing custom solutions.
First, let’s quickly understand the advantages and disadvantages of the manual backup process.
| Advantages | Disadvantages |
| Complete control over timing and content | Technical expertise required |
| No plugin dependencies | Time-intensive process |
| Custom automation possible | Higher error probability |
Core requirements:
- FTP client software (FileZilla, WinSCP)
- Hosting control panel access
- Database credentials
- Local storage space
Let’s break down the different ways in which you can perform manual backup.
1. Downloading website files (FTP Method)
Backup process:
- Connect to hosting server using FTP credentials.
- Navigate to WordPress directory (usually public_html).
- Download the entire WordPress folder to the local computer.
- Compress files into ZIP file archives for organization.
Restoration process:
- Access your hosting control panel and put your site in maintenance mode.
- Navigate to your website’s root directory and upload your backed-up files.
- Ensure all uploaded files have correct permissions to maintain security.
2. Exporting from database (phpMyAdmin)
Backup process:
- Access phpMyAdmin through hosting cpanel.
- Select your WordPress database.
- Choose Export tab → Quick export method.
- Download SQL file containing complete database.
Restoration process:
- Log into your hosting control panel and open the database management tool.
- Create a new database or select your existing WordPress database.
- Use the Import tab on the next page to upload your SQL backup file.
- Modify your wp-config.php file if database credentials have changed during the restoration process.
3. Through content-only export (WordPress Dashboard)
Backup process:
- Navigate to Tools > Click export to export in WordPress admin.
- Select “All content” for posts, pages and media.
- Download XML file.
Restoration process:
- Navigate to Tools > Import in your WordPress dashboard
- Choose your XML backup file and assign content
- Select the option to download and import file attachments.
Manual backup methods suit developers, agencies and advanced users who need custom solutions. However, most website owners benefit more from an automated plugin or hosting solutions.
If you’re using Bluehost’s WordPress hosting, then your backups are automated and you can restore them with a single click. We provide the most straightforward WordPress backup experience.
Post-restoration checklist:
- Test all website functionalities including forms, user logins and e-commerce features
- Update any hardcoded URLs that may have changed
- Clear any caching plugins and regenerate permalinks
- Verify that all plugins and themes are functioning correctly
- Remove maintenance mode and monitor for any issues
Manual restoration provides complete control over every aspect of your website recovery, making it invaluable for complex migrations.
At a glance:
- Complete control over backup timing, content and storage location
- Requires FTP access, database management and technical expertise
- No plugin dependencies or third-party services needed
- 15-20 minute setup with custom automation possibilities
- Ideal for developers and advanced users needing tailored solutions
You can further ensure the robustness of your backup process by utilizing cloud-based technology. Understanding cloud storage integration will enhance your backup strategy by providing reliable off-site storage solutions.
How to Backup Your Website Without a Plugin
Backing up your WordPress website without plugins requires advanced technical skills but offers complete control over the process. This comprehensive approach involves three essential steps: exporting your database through phpMyAdmin (containing all posts, settings, and user data), downloading your website files via FTP/SFTP (including themes, plugins, uploads, and WordPress core files), and documenting your configuration details like database credentials and server settings needed for restoration.
Best suited for developers and advanced users, this method requires FTP/SFTP access, database management knowledge, and adequate local storage space. To avoid critical mistakes, label each backup with clear dates, verify file integrity before storing, and maintain off-site copies on external drives or cloud storage. While time-intensive compared to automated solutions, manual backups provide unmatched flexibility and ensure you maintain complete ownership of your backup process without depending on third-party plugins or services.
Method 4: Backup WordPress to cloud storage
Cloud storage solutions provide reliable off-site backup storage that protects your WordPress site even if your hosting server fails. This method combines the convenience of automated backups with the security of remote storage.
Popular cloud storage options for WordPress:
| Provider | Free storage | Key features | Integration | Best for |
| Google Drive | 15GB | Automatic synchronization, version history, universal device access | Seamless plugin integration | General users, small businesses |
| Dropbox Business | Limited | Advanced sharing, file versioning, enhanced security | Robust API with WordPress tools | Team collaboration, business sites |
| Amazon S3 | 12 months free tier | Highly scalable, enterprise reliability, advanced security | UpdraftPlus and major plugins | High-traffic sites, enterprises |
| Microsoft OneDrive | 5GB | Microsoft ecosystem integration, business compliance, collaboration tools | Automatic scheduling, notifications | Microsoft users, corporate environments |
Setup process for cloud backup:
- Step 1: Select a cloud service based on your storage needs, budget and existing tool ecosystem.
- Step 2: Install a backup plugin that supports your chosen cloud provider and enter your account credentials.
- Step 3: Configure automated backups to run during low-traffic hours, typically daily or weekly depending on your update frequency.
- Step 4: Run a test backup to ensure files are properly uploaded to your cloud storage and can be accessed when needed.
- Step 5: Regularly check your cloud storage usage to ensure you have adequate space and adjust retention policies as needed.
Cloud backup best practices:
- Use folder organization to separate different backup types.
- Enable notifications to alert you of successful or failed backup uploads.
- Implement retention policies to automatically delete old backups and manage storage costs.
- Test restoration processes periodically to ensure backups are viable.
Restoring backup from cloud
Cloud storage restoration allows you to recover your WordPress site from anywhere. This makes it invaluable for emergency situations when you can’t access your hosting server directly.
Restoration steps for cloud-stored backups:
- Access your cloud storage: Log into your cloud storage account and navigate to your WordPress backup folder.
- Download backup files: Select the backup date you want to restore from and download the complete backup package to your local computer.
- Prepare restoration environment: Access your hosting control panel or FTP client to prepare for file upload and database restoration.
- Upload and restore files: Extract the downloaded backup and upload files to your web server using FTP or file manager tools.
- Restore database: Import mysql databases from your backup through phpMyAdmin or your hosting provider’s database management interface.
- Update configurations: Verify wp-config.php settings and update any URLs or paths that may have changed during restoration.
Troubleshooting cloud restoration issues:
- Slow download speeds: Use download managers for large backup files or restore during off-peak hours.
- File corruption: Verify file integrity using checksum verification before attempting restoration.
- Authentication errors: Refresh cloud storage API credentials if access tokens have expired.
- Incomplete uploads: Check cloud storage logs to identify any files that failed to backup properly.
Cloud storage restoration provides the ultimate flexibility for disaster recovery, allowing you to rebuild your website from any location with reliable internet access.
At a glance:
- Off-site storage protection with access-anywhere facility
- Integration with Google Drive, Dropbox, Amazon S3 and OneDrive
- Automatic synchronization and version history features
- 10-minute setup with subscription-based pricing models
- Perfect for users prioritizing accessibility and disaster recovery
Cloud storage is the ultimate off-site protection for your website backup. While you might still prefer other options, local backup has its own advantage. Let’s take a detailed look.
Method 5: Local WordPress backups
Local backups store your WordPress site data directly on physical devices or local servers, providing fast access and complete privacy control. This method works perfectly for developers, staging environments and situations where internet connectivity is limited.
Local backup storage options
Let’s look at the different types of storage options you can use for creating local backups.
External hard drives
- Large storage capacity at affordable prices
- Complete offline storage for maximum security
- Fast transfer speeds for large backup files
- Physical control over your data location
Network attached storage
- Automated backup scheduling capabilities
- Multiple device access within local network
- RAID configurations for redundancy protection
- Scalable storage expansion options
Local development servers
- Perfect for staging and testing environments
- Instant backup and restoration capabilities
- Complete development workflow integration
- No external dependencies or costs
USB flash drives
- Portable backup solution for small sites
- Quick emergency backup creation
- Ideal for traveling developers
- Low-cost option for basic protection needs
Setting up local backup systems
- Configure backup destination: Set up your local storage device and create organized folder structures for different backup types and dates.
- Automate backup process: Use backup plugins that support local storage or create custom scripts for automatic local backup creation.
- Implement rotation policies: Establish rules for keeping recent backups while removing older files to manage storage space efficiently.
- Test backup integrity: Regularly verify that your local backups are complete and can be successfully restored when needed.
- Secure storage location: Protect your backup devices from physical damage, theft or environmental hazards that could compromise your data.
Restoring from local backup
Local backup restoration offers the fastest recovery speeds and most reliable access to your backup data, making it ideal for development environments and situations where quick restoration is critical.
Local restoration process:
- Step 1: Navigate to your local storage device and identify the specific backup date you want to restore from.
- Step 2: Access your hosting environment or local development server and prepare the target directory for restoration.
- Step 3: Uncompress your backup archive and verify all files are present and intact before beginning restoration.
- Step 4: Copy files directly to your web server directory using file transfer methods appropriate for your setup (local copy, FTP or rsync).
- Step 5: Use database management tools to import your backed-up database, ensuring all table structures and data are properly restored.
- Step 6: Modify wp-config.php and any hardcoded URLs to match your current environment setup.
The local backup method provides unmatched speed and reliability, making it an essential component of any WordPress backup strategy, for development and testing scenarios.
At a glance:
- Physical storage on external drives, NAS systems, or development servers
- Fastest restoration speeds with complete privacy and data control
- No monthly fees or internet dependency for backup access
- 20-minute setup with manual management requirements
- Best for developers, staging environments and offline workflows
With all major backup methods covered, proper scheduling becomes crucial for maintaining consistent protection without overwhelming your server resources or storage capacity.
Backup scheduling guide
You should backup your WordPress website before making any changes and maintain regular automated schedules based on your content update frequency. Critical backup timing prevents data loss during vulnerable periods.
The frequency of WordPress backups depends on the dynamic nature of your website and the extent of its updates. Timing your backups correctly ensures you always have recent, clean restore points available.
Poor backup timing leaves gaps that can result in significant data loss. Let’s look at a quick breakdown of the ideal backup frequency for your use case. Here’s an overview of when you should create backups.
| Website type | Update frequency | Recommended backup | Storage duration |
| eCommerce | Multiple daily | Daily | 90 days |
| News/Blog | Daily posts | Daily | 60 days |
| Business | Weekly updates | Weekly | 45 days |
| Portfolio | Monthly changes | Weekly | 30 days |
| Brochure | Rarely updated | Monthly | 30 days |
The above table gives an overall idea of how frequently you should back up your website. However, knowing the key backup trigger points will prevent you from unwanted loss of data.
Before making major changes to your website:
- WordPress core updates and version upgrades
- Plugin installations, updates or configuration changes
- Theme switches, customizations or major design modifications
- Content additions like product launches or campaign pages
- Security scans, malware removal or cleanup attempts
Before performing technical operations on your website:
- Website migrations when moving to a new host
- Domain name changes or URL structure modifications
- Database optimization or cleanup procedures
- Server configurations or hosting plan upgrades
- Third-party integrations or API connections
Quick tip: Follow the backup trigger checklist before making any changes to your website. This ensures you have recent, tested backups available if something goes wrong.
Proper backup timing creates a safety net that protects your website during vulnerable periods while maintaining reasonable storage costs and server performance.
Where to keep your backup files?
You should store WordPress backup files in multiple secure locations to ensure access during various disaster scenarios. Diversified storage protects against single points of failure that could eliminate all your backups.
Different storage locations offer unique advantages and face different risks. Smart backup strategies combine multiple storage types for maximum protection. Here’s an overview of all file storage types.
| Website type | Primary storage | Secondary storage | Emergency storage | Access speed |
| eCommerce | Cloud service | Local drive | Different cloud | Instant |
| Business | Hosting provider | Cloud service | Local backup | Fast |
| Blog | Cloud service | Hosting provider | USB drive | Medium |
| Portfolio | Hosting provider | Cloud service | Not needed | Medium |
Our WordPress hosting plans include automatic daily backups and one-click restoration capabilities. You’ll never worry about backup creation or management – it’s all handled automatically with enterprise-grade security and reliability.
Get started with Bluehost today and protect your website with professional-grade backup solutions.
Quick tip: Never rely on single storage locations for critical backups. Diversified storage creates multiple recovery paths while balancing costs and accessibility requirements.
Diversified backup storage like hard drive and cloud storage services create multiple recovery paths. This protects against various disaster scenarios while balancing costs and accessibility needs.
Let’s explore the common problems that you might encounter while creating and restoring backups and how to deal with them.
Download a backup of your site
Downloading a local copy of your backup files provides an essential safety layer beyond automated backup systems. You should download backups before major website changes like theme updates, plugin installations or content migrations, during emergency situations when your hosting server is inaccessible, and when moving your site to a new hosting provider. This practice ensures you have immediate access to your website data regardless of hosting provider issues or internet connectivity problems.
After downloading your backup files, verify several critical elements to ensure usability when needed. Check that all backup components are present and complete, including both website files and database exports. Confirm the backup date matches your intended restore point, and ensure any password-protected archives use passwords you can access later. Store downloaded backups in multiple secure locations, such as external drives and cloud storage, with clear labeling that includes the backup date and website version.
Backup verification checklist:
- All backup files downloaded successfully without corruption errors
- Database and file backups are both included and accessible
- Backup date clearly labeled and matches your restoration needs
- Password protection (if used) is documented and accessible
- Files stored in at least two different secure locations
- Test file extraction to confirm backup integrity before you need it
Fix common backup problems
While backing up your WordPress site is crucial, it’s not uncommon to encounter issues during the process. From incomplete backups to plugin conflicts, several factors can prevent backups from running smoothly. Here are the most common backup issues and how to troubleshoot them:
Why your backup might fail?
There are a few reasons why your WordPress backup may fail. Here are the most common causes:
- Storage limitations: Files for backup can be large, especially for sites with a lot of media or content. If your hosting account or backup destination (like cloud storage) has limited space, the backup process might not be complete.
Solution: Check the available storage space on your hosting plan or backup destination. If you’re nearing your limit, you may need to upgrade your storage or delete unnecessary files.
- Server timeouts: Some backups take a long time to complete and if your hosting provider has strict server time limits, the backup process may be cut off before it finishes.
Solution: Try breaking your backup into smaller parts (e.g., backup your files first, then your database). Alternatively, you could schedule backups during off-peak hours to avoid server timeouts.
- Plugin conflicts: Certain WordPress plugins, especially those that deal with caching or security, can interfere with backup processes. Conflicts between plugins can cause incomplete backups or even crashes during the backup process.
Solution: Disable non-essential plugins temporarily while you run a backup. If you identify a conflicting plugin, check for updates or consult the plugin developer for a solution. In some cases, using a different WordPress plugin might resolve the issue.
- Corrupt database: If your website database has errors or corrupt tables, the backup may fail, especially if you’re using a plugin that attempts to back up the entire database at once.
Solution: Use a database repair tool, like the one built into WordPress (navigate to wp-admin/maint/repair.php) to fix the database before attempting a backup.
- Memory limits: WordPress may have insufficient PHP memory allocated for running a backup, particularly on shared hosting plans with limited resources.
Solution: Increase your PHP memory limit by adding the following line to your wp-config.php file: define (‘WP_MEMORY_LIMIT’, ‘256M’);
If you’re on shared hosting and unable to change server settings, reach out to your hosting provider to request a memory increase.
How to resolve plugin conflicts during backups?
Sometimes, even the best WordPress backup plugins can interfere with your backup process. This is particularly common when using security, caching or optimization plugins. Here’s how you can handle plugin conflicts during backups:
- Disable all plugins: Temporarily deactivate all plugins before running a backup to check if any of them are causing conflicts. If the backup works fine after deactivating all plugins, you can activate them one by one to identify the culprit.
- Update your plugins: Outdated plugins can sometimes conflict with backup processes. Make sure all your plugins are up to date. If the issue persists, check the plugin developer’s site for known issues or contact support.
- Use an alternative backup plugin: If you find a plugin conflict that can’t be resolved, consider switching to a different backup plugin. Popular backup plugins like UpdraftPlus, BackupBuddy or Jetpack are known for being compatible with most WordPress sites.
- Check for caching issues: Some caching plugins (e.g., W3 Total Cache or WP Super Cache) might cache data during backups, causing the backup process to freeze or fail. Temporarily disable caching while performing the backup, then re-enable it once the process is complete.
Need expert help with your WordPress backup issues? Bluehost’s WordPress specialists are available 24/7 to assist with backup problems, plugin conflicts and restoration challenges.
Our support team can diagnose backup failures, optimize your backup strategy and ensure your site stays protected. Contact Bluehost WordPress Support Service for personalized WordPress assistance tailored to your specific hosting environment.
Having covered the common challenges you might face, let’s now establish a comprehensive set of best practices that will ensure a reliable backup strategy.
WordPress website backup best practices checklist
Proper management of your WordPress backups is essential for ensuring that you can quickly restore your site in case of issues. Following this checklist of best practices can help you avoid common pitfalls.
| Category | Action item | Frequency | Priority |
| Storage setup | Configure cloud storage destination | One-time setup | High |
| Set up local backup location | One-time setup | Medium | |
| Test backup file accessibility | Monthly | High | |
| Review storage space usage | Monthly | Medium | |
| Scheduling | Set automated backup schedule | One-time setup | High |
| Backup before major updates | Before each update | High | |
| Review backup frequency needs | Quarterly | Medium | |
| Clean up old backup files | Monthly | Low | |
| Monitoring | Enable email notifications | One-time setup | High |
| Test backup restoration process | Quarterly | High | |
| Verify backup file integrity | Monthly | Medium | |
| Document backup procedures | One-time setup | Medium | |
| Security | Encrypt sensitive backup data | One-time setup | High |
| Use secure transfer protocols | One-time setup | Medium | |
| Limit backup access permissions | One-time setup | Medium | |
| Monitor unauthorized access | Monthly | Medium |
Quick implementation tips:
- Start with automated plugin solutions before attempting manual backups
- Test your restoration process with non-critical sites first
- Keep backup documentation updated with current passwords and procedures
- Set calendar reminders for quarterly backup system reviews
Many popular WordPress backup plugins like UpdraftPlus and Jetpack have built-in email notifications, so you don’t need to manually set up anything. If you’re using a third-party backup service, check if they offer SMS or email notifications to keep you updated.
Final thoughts
Your WordPress website represents countless hours of work and investment. One security breach, server crash or human error can destroy everything in seconds.
Don’t wait until disaster strikes to implement backup protection. Every day without backups puts your entire website at risk of permanent loss. Start with simple automated solutions and build comprehensive backup systems that match your website’s importance.
Bluehost WordPress Hosting includes daily automatic backups, one-click restoration and 24/7 expert support.
Ready to protect your WordPress site? Choose Bluehost WordPress Hosting today!
FAQs
Regular backups ensure protection against data loss caused by hacks, server issues or human errors. It allows you to restore your site quickly, preserving content and functionality in case of emergencies.
No, WordPress core doesn’t include built-in backup functionality. While WordPress has an export feature under Tools > Export, this only saves your content (posts, pages, comments) as an XML file and doesn’t include themes, plugins, media files, or database settings.
Regular backups ensure protection against data loss caused by hacks, server issues or human errors. It allows you to restore your site quickly, preserving content and functionality in case of emergencies. The Bluehost backup website solution automatically backs up all your files so that you don’t have to.
Yes, backup plugins like CodeGuard, Jetpack and UpdraftPlus offer user-friendly interfaces for automated backups. They allow you to schedule regular backups and store them locally or in cloud storage.
Aim for daily backups, especially for active websites. eCommerce sites and frequently updated blogs might benefit from more frequent backups. The frequency depends on your content and update frequency.
Opt for remote storage solutions like cloud services (Google Drive, Dropbox), dedicated backup services or an offsite server. Their Unlimited backup storage ensures data redundancy and protection against server failures.
Access your backup plugin, navigate to the restore section, select the backup you want to restore and follow the prompts. It’s crucial to follow the plugin’s instructions to avoid errors.
You can ensure this by scheduling backups during low traffic hours. Use backup plugins with minimal impact on server resources. Also, consider using incremental backups to reduce server load during the backup process.
Yes, Bluehost backup website service ensures that your website gets backed up automatically every day. With Bluehost you don’t have to manually backup your site. Whenever required you can just select the most recent backup and restore your website.
You can back up your WordPress website using hosting provider built-in systems like Bluehost backup website solution or backup plugins such as UpdraftPlus. You can also perform manual backups through FTP and database export, cloud storage integration with services like Google Drive and Dropbox or local storage devices. For beginners, hosting provider backups or user-friendly plugins offer the easiest setup and most reliable protection.


Write A Comment