 ChatGPT,
  Claude,
  Gemini,
  Grok — all four for
 Reimage Your Server for WebAdmin Installation
Reimaging your Bluehost Self-Managed VPS or Virtual Dedicated Server (VDS) is like giving your server a clean slate. It completely resets your server—removing your current operating system, applications, configurations, and data—and installs the WebAdmin Application in a fresh, new environment.
When you reimage your server, we automatically install the newest version of WebAdmin and the best operating system for it. Just keep in mind that, unlike the first time you set up your server, you won't be able to pick a specific operating system version this time.
When Should I Reimage My Server?
Reimaging is often the fastest and most effective way to resolve major server issues or prepare your VPS or VDS for an entirely new purpose. You might want to consider reimaging if:
- You are experiencing persistent errors or complex configuration issues.
- You need to thoroughly remove malware or recover from a security event.
- You have noticed a significant decline in overall server performance.
- You are starting a brand-new project and want an untouched environment.
- Your current server setup simply no longer fits your needs.
Benefits of Reimaging with the WebAdmin Application
Installing your application via a server reimage offers several great benefits:
- A Clean Environment: Clears out old files, unused applications, and misconfigurations.
- Improved Performance: Starts you off with a fresh, highly optimized installation.
- Enhanced Security: Eliminates potential vulnerabilities and unwanted software.
- Simplified Deployment: Automatically handles the installation of the application and the best OS for it.
- Latest Features: Ensures you are running the most up-to-date version available.
How to Reimage Your Server for WebAdmin Installation
This guide walks you through installing and setting up WebAdmin using the Bluehost Portal.
This applies to both VPS and VDS.
- You can install only one application using the one-click installer.
- To change or delete your application, follow the guide: How to Change and Delete an Application. Create a backup of your existing applications or templates.
- To keep your current template, install the new application manually using SSH. Follow the same steps for both Self-Managed VPS and Virtual Dedicated Server (VDS). The system automatically selects the recommended operating system for WebAdmin.
- Log in to your Bluehost Portal.
- In the left-hand menu, click Hosting, then select My Plans.
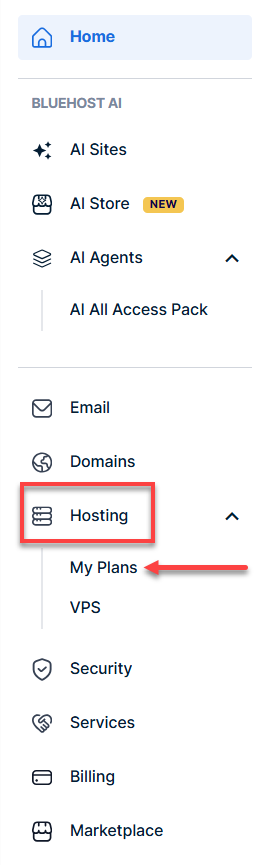
- Click the Manage button on the hosting package you want to reimage.

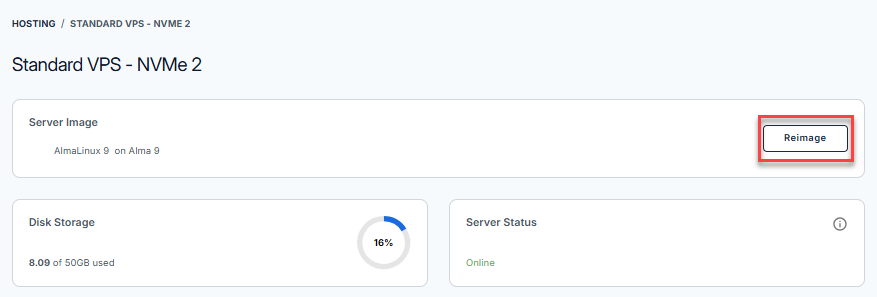
- Click the Reimage button.
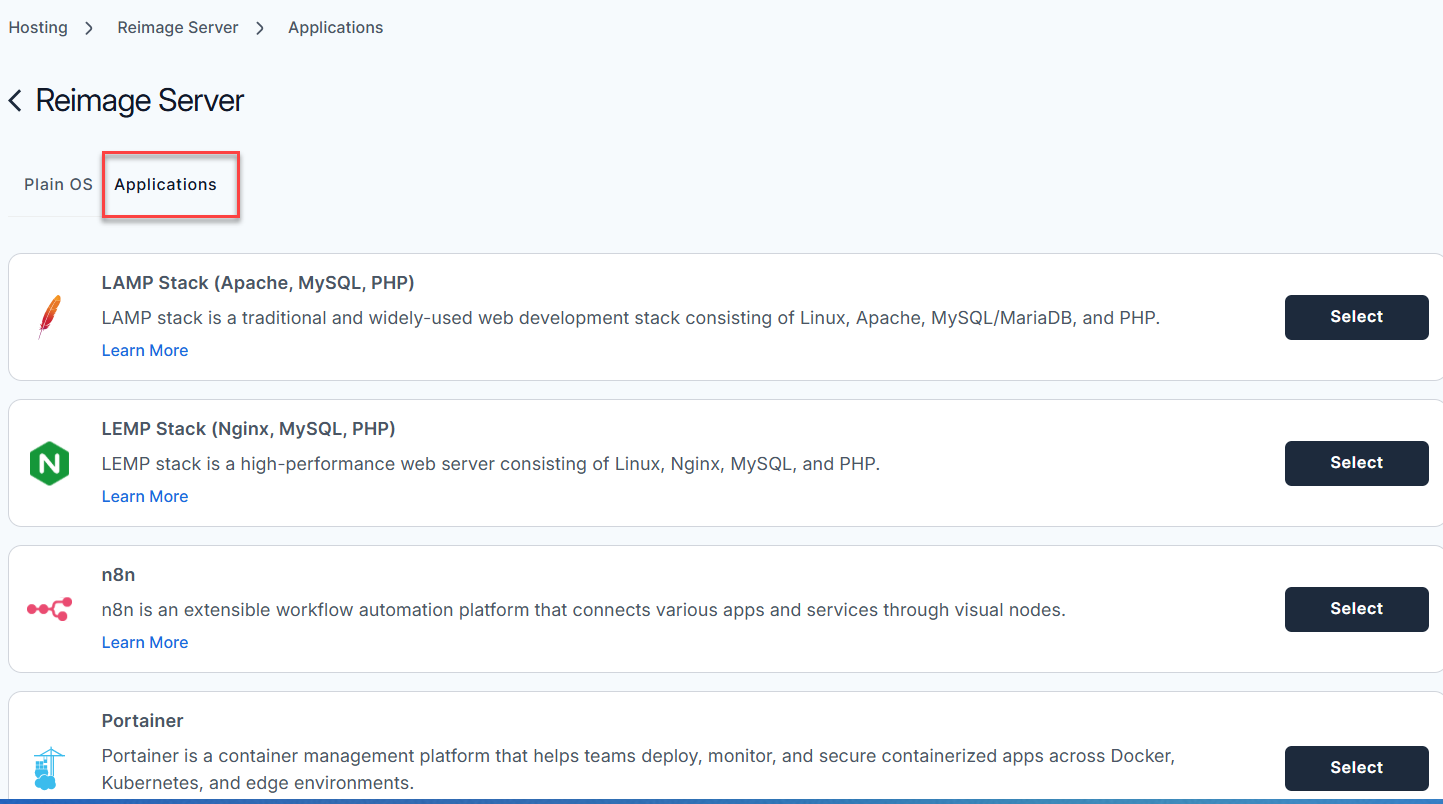
- Select the Applications tab.
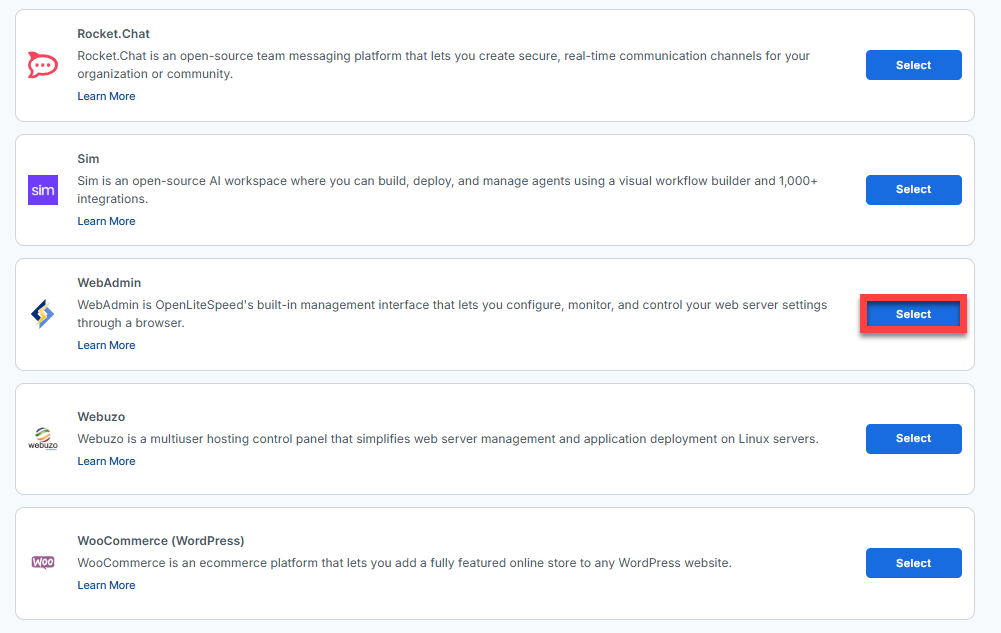
- From the list, locate WebAdmin and click Select.
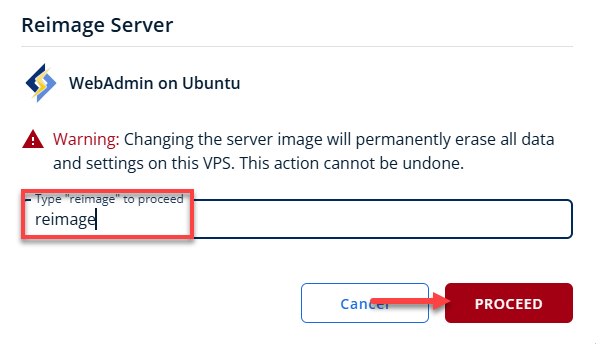
- To confirm, type "reimage" and then click Proceed to start the process.
- Wait a few minutes while the installation completes.

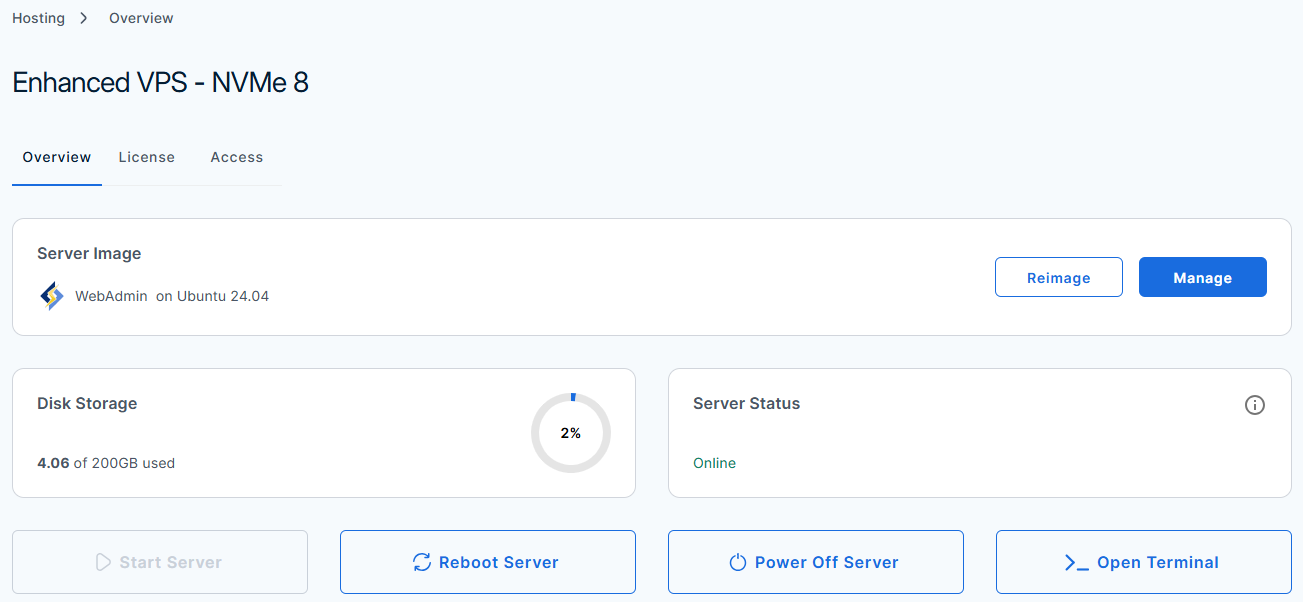
- Once completed, you will see WebAdmin listed in the Server Image section.
Setting Up and Managing Your OpenLiteSpeed WebAdmin
Here is your step-by-step walkthrough to access, log in, and manage your WebAdmin console.
Step 1: Access your WebAdmin Dashboard
After installation completes:
- Log in to your Bluehost Portal.
- In the left-hand menu, click Hosting, then select My Plans.
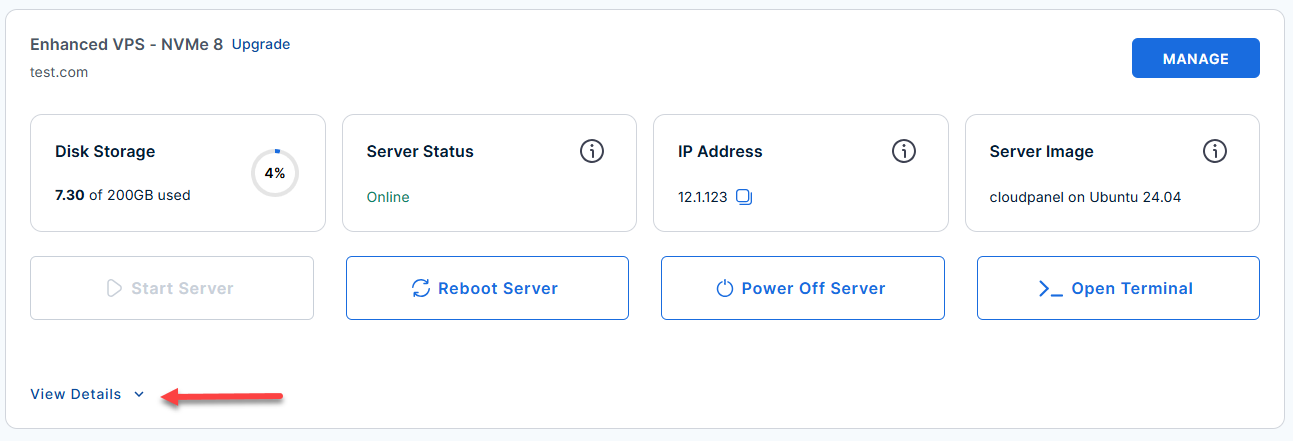
- Locate the server you want to manage, then click View Details in the bottom-left corner to expand the section and access additional server information.
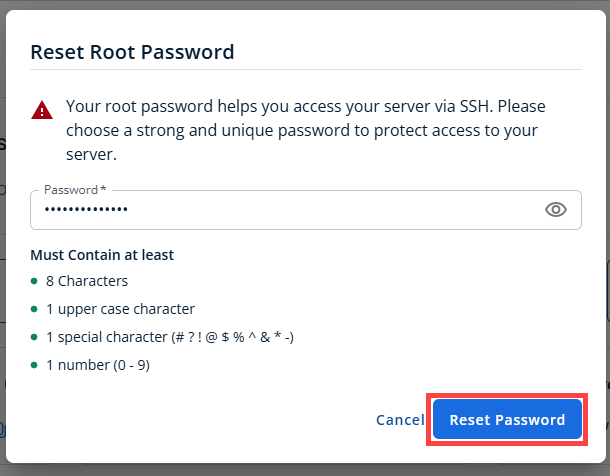
- Click the Reset Password.
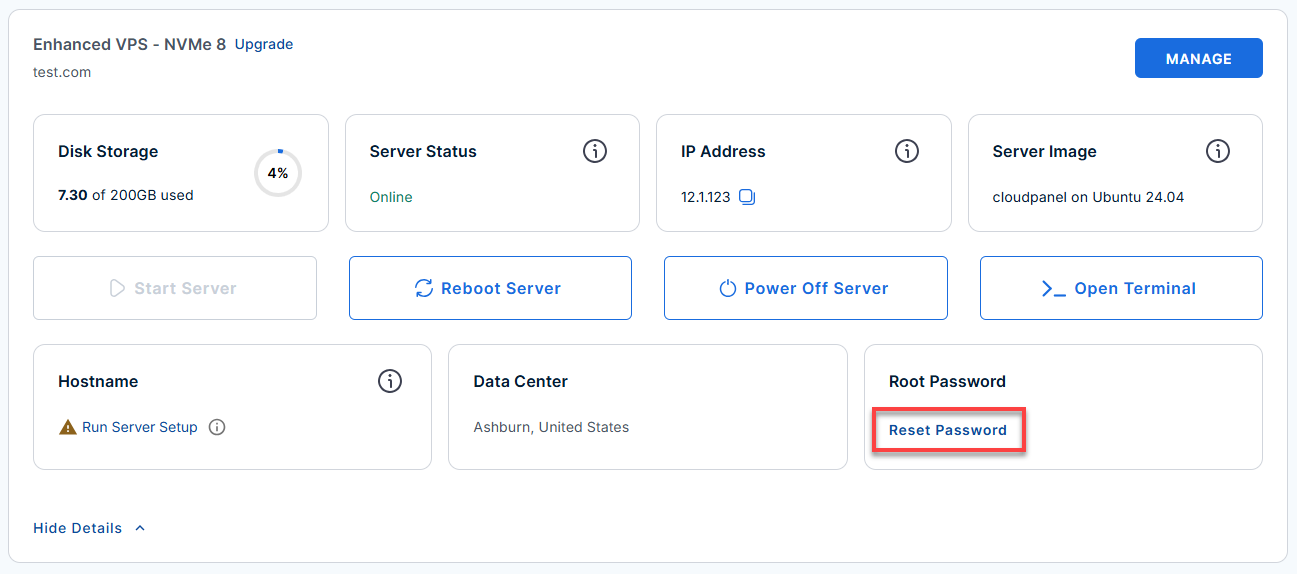
- In the pop-up window, type your new root password, then click Reset Password again to confirm and save the changes.
- Connect to your server via SSH.
Use your server's IP and credentials with an SSH client, follow the prompts, and enter your root password when asked:Replaceyour_server_ipwith your actual server IP address.ssh root@your_server_ipExample Output:
Welcome to Ubuntu 24.04.4 LTS (GNU/Linux 6.8.0-124-generic x86_64) ******************************************************************************** OpenLiteSpeed WebAdmin URL: https://12.1.111.12:7080 Username: admin Password:7APJMXJxGPmkQQAuXrCp2odx Firewall: ports 22, 80, 443, 7080 open (all others blocked) Key paths: Config: /usr/local/lsws/conf/httpd_config.conf Passwords: /root/.app_passwords Readme: /root/README.md Useful commands: systemctl status lshttpd # Check service status systemctl restart lshttpd # Restart OpenLiteSpeed grep WEBADMIN_PASSWORD /root/.app_passwords To remove this message: rm -f /etc/update-motd.d/99-webadmin ******************************************************************************** - If you ever need to quickly review the system's deployment notes directly inside your server terminal, you can print out the original README file by running:
cat /root/README.md
Step 2: Retrieve Your Admin Password
Your temporary administrator password generates randomly during the server's first boot to ensure security. You can find this password in one of two ways:
- Option A: Log into your server via SSH. The login message (MOTD) automatically displays your password on the screen.
- Option B: Run the following command in your terminal to view the password file:
grep WEBADMIN_PASSWORD /root/.app_passwords
Example Output:
root@11-1-111-11:~# grep WEBADMIN_PASSWORD /root/.app_passwords
WEBADMIN_PASSWORD=7APJMXJxGPmkQQAuXrCp2odx
Step 3: Verify OpenLiteSpeed is Running
Before trying to load the web interface, make sure the OpenLiteSpeed service (lshttpd) is active and listening.
Run this status check:
- If it is active (running): You are good to go!
Example Output:
root@11-1-111-11:~# systemctl status lshttpd ● lshttpd.service - OpenLiteSpeed HTTP Server Loaded: loaded (/etc/systemd/system/lshttpd.service; enabled; preset: enabled) Active: active (running) since Fri 2026-07-10 17:30:15 UTC; 53min ago Process: 1033 ExecStart=/usr/local/lsws/bin/lswsctrl start (code=exited, status=0/SUCCESS) Main PID: 1047 (litespeed) CGroup: /system.slice/lshttpd.service ├─1047 "openlitespeed (lshttpd - main)" ├─1048 "openlitespeed (lscgid)" ├─1049 "openlitespeed (lshttpd - #01)" └─1050 "openlitespeed (lshttpd - #02)" Jul 10 17:30:12 11-1-111-11.bluehost.com systemd[1]: Starting lshttpd.service - OpenLiteSpeed HTTP Server... Jul 10 17:30:12 11-1-111-11.bluehost.com lswsctrl[1033]: [OK] Send SIGUSR1 to 763 Jul 10 17:30:15 11-1-111-11.bluehost.com systemd[1]: Started lshttpd.service - OpenLiteSpeed HTTP Server. - If it is inactive or failed: Start it up using:
systemctl start lshttpd
If WebAdmin still won't load: Run the first-boot initialization script manually to make sure everything is configured properly:
Step 4: Log Into the WebAdmin Console
Once you have your password, you can access the management interface.
- Open your web browser.
- Navigate to your server's IP address on port 7080 using HTTPS:
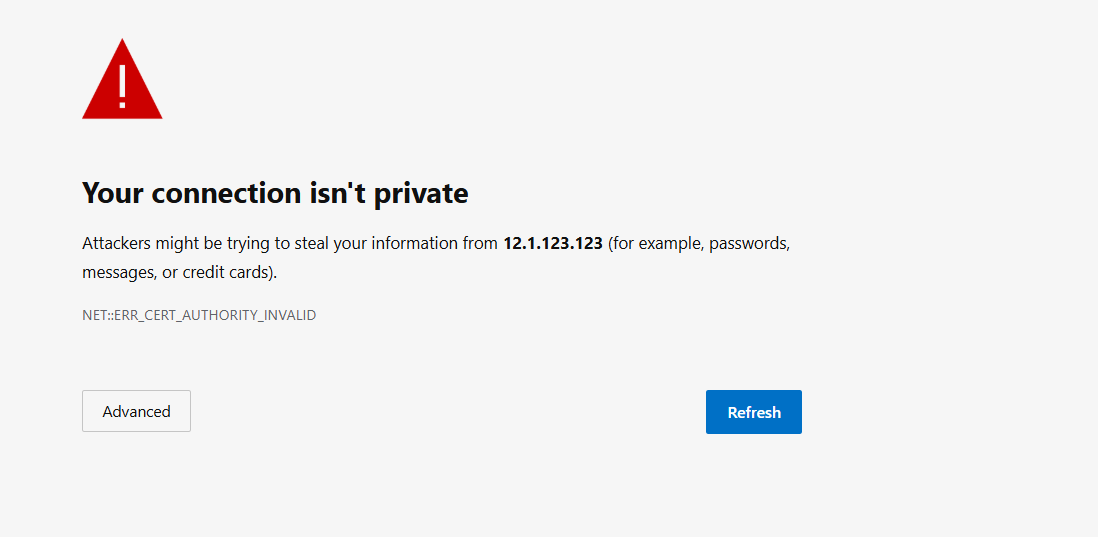
https://<your-server-ip>:7080 - Your browser will display a warning about a "self-signed certificate." You can safely bypass this warning and proceed to the site.
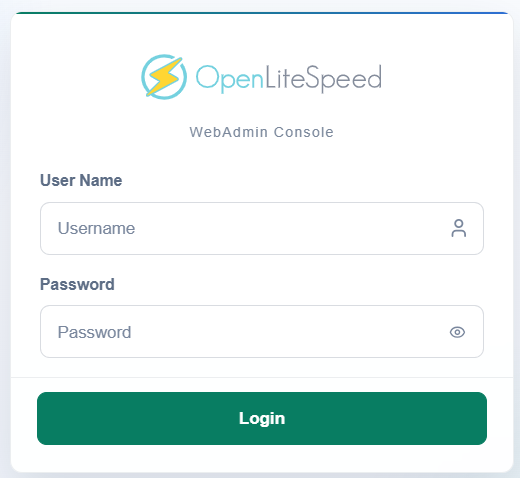
- Log in using the following credentials:
- Username: admin
- Password: (The password you retrieved in Step 2)
Step 5: Reset Your Password
If you ever need to reset your WebAdmin console password, run this script and follow the on-screen prompts:
Example Output:
root@11-1-111-11:~# /usr/local/lsws/admin/misc/admpass.sh

Please specify the user name of administrator.
This is the user name required to login the administration Web interface.

User name [admin]: JC

Please specify the administrator's password.
This is the password required to login the administration Web interface.

Password:
Retype password:
Administrator's username/password is updated successfully!
Post-Setup and Best Practices (Recommended)
Now that you are in, here are a few quick housekeeping tasks to secure your environment:
Monitor Live Logs
Track server errors and application behavior in real-time with these commands:
- View server errors:
- View WebAdmin traffic:
Check your firewall rules
Ensure UFW (Uncomplicated Firewall) is active and protecting your ports by running:
(Your setup should restrict access to ports 22, 80, 443, and 7080 while blocking the rest by default).
Clean up your login banner
Once you have saved your password securely, you can delete the SSH login MOTD banner so your credentials aren't exposed every time you log in via SSH:
Additional Information and Example Documentation Output
You can run cat /root/README.md to see more information and useful commands:
root@11-1-111-11:~# cat /root/README.md
# WebAdmin

## Description

WebAdmin is OpenLiteSpeed's built-in management interface that lets you configure, monitor, and control your web server settings through a browser.

It provides access to virtual host configuration, SSL management, rewrite rules, and real-time performance statistics, making it easier to administer your OpenLiteSpeed server without editing configuration files manually.

---

## Services

| Service | Port | Purpose |
|---------|------|---------|
| WebAdmin UI | 7080 | Management console (HTTPS) |
| OpenSSH | 22 | Remote access |

Ports are protected using UFW.

---

## How-to-use

### 1. Get your password

```bash
grep WEBADMIN_PASSWORD /root/.app_passwords
```

The password is also shown automatically in the SSH login MOTD.

### 2. Open WebAdmin

After the instance boots, open your browser and go to:

| URL | Purpose |
|-----|---------|
| `https://server-ip:7080` | WebAdmin management console |

Login with **username:** `admin` and the password retrieved above. Accept the self-signed certificate warning.

### 3. If WebAdmin is not accessible after boot

Run the first-boot script manually:

```bash
sudo bash /var/lib/cloud/scripts/per-instance/001_onboot
```

---

## Manage

### OpenLiteSpeed service

```bash
systemctl status lshttpd
systemctl restart lshttpd
systemctl stop lshttpd
```

### Reset WebAdmin password

```bash
/usr/local/lsws/admin/misc/admpass.sh
```

### UFW Firewall

```bash
ufw status verbose
```

### Logs

```bash
tail -f /usr/local/lsws/logs/error.log
tail -f /var/log/webadmin/webadmin.log
journalctl -u lshttpd -f
cat /var/log/cloud-init-output.log
```

---

## Security hardening

| Hardening | Detail |
|-----------|--------|
| UFW firewall | Ports 22, 80, 443, 7080 open. Default deny all incoming |
| SSH rate limiting | Port 22 set to LIMIT - brute force protection |
| Admin password | Never baked into image - generated randomly at first boot |
| Credentials file | `/root/.app_passwords` mode `0600` - root read only |
| WebAdmin TLS | Console served over HTTPS on port 7080 |

---

## Configuration files reference

| File | Purpose | Permissions |
|------|---------|-------------|
| `/usr/local/lsws/conf/httpd_config.conf` | OpenLiteSpeed main config | `0644` |
| `/root/.app_passwords` | Generated admin credentials | `0600` |
| `/var/lib/cloud/scripts/per-instance/001_onboot` | First-boot script | `0755` |
| `/etc/update-motd.d/99-webadmin` | MOTD with credentials on login | `0755` |
| `/etc/logrotate.d/webadmin` | Log rotation config | `0644` |

---

## Notes

- Admin password is never baked into the image - generated fresh on first boot and saved to `/root/.app_passwords`.
- WebAdmin uses a self-signed TLS certificate by default - replace with a valid cert for production.
- Configure HTTP (port 80) and HTTPS (port 443) listeners inside WebAdmin for production use.
- Remove the MOTD once no longer needed: `rm -f /etc/update-motd.d/99-webadmin`

---

## Links

- Manage: [Manage](https://localhost:7080/)
- OpenLiteSpeed Documentation: [https://openlitespeed.org/kb/](https://openlitespeed.org/kb/)
- WebAdmin Console Guide: [https://openlitespeed.org/kb/admin-console/](https://openlitespeed.org/kb/admin-console/)
- Ubuntu 24.04 LTS Release Notes: [https://wiki.ubuntu.com/NobleNumbat/ReleaseNotes](https://wiki.ubuntu.com/NobleNumbat
Summary
Resetting your server with the WebAdmin Application is a great way to start completely fresh. Because this process permanently deletes everything on your server, please make sure to save your settings and back up your important files before you begin!