 ChatGPT,
  Claude,
  Gemini,
  Grok — all four for
Purchase a Virtual Dedicated Server with cPanel Installation
Managing a Virtual Dedicated Server gives you ultimate freedom, but handling manual configurations like databases, email, and security can quickly become overwhelming. Adding cPanel to your Bluehost VDS provides a widely used control panel that eliminates complex server commands and technical code. With its clean, visual interface, you can effortlessly control your site, streamline your workflow, and maximize your server’s performance in just a few clicks.
This article explains how to purchase a Bluehost Virtual Dedicated Server (VDS) hosting plan and set up and manage your cPanel installation.
Why Choose cPanel?
Choosing cPanel for your Virtual Dedicated Server (VDS) combines dedicated hardware performance with one of the most widely adopted server management dashboards. It replaces complex terminal commands with a clear visual interface, letting you effortlessly manage websites, databases, email accounts, and security settings in just a few clicks. With built-in automation for SSL certificates, backups, and WebHost Manager (WHM) access, cPanel streamlines server administration so you can focus entirely on growing your business.
Uses of cPanel
With cPanel on your VDS, you have a comprehensive suite of tools right at your fingertips:
- Host Multiple Websites: Manage multiple domains, subdomains, and sites on your VDS from one cohesive dashboard.
- Manage Email Accounts: Easily create professional email addresses and manage mail settings for all your domains.
- Control Databases: Effortlessly create and manage MySQL databases, users, and permissions.
- One-Click Application Deployment: Deploy popular CMS platforms and applications in seconds.
- Secure Your Presence: Manage and install SSL certificates to ensure your site is secure and your customer data is protected.
- Manage Domains & DNS: Quickly configure DNS zones, redirects, and domain settings.
- File Management: Upload, organize, and edit your website files using an intuitive built-in File Manager.
- Protect Your Data: Create and manage automated backups of your files, databases, and account settings.
- Monitor Performance: Keep an eye on your VDS's resource usage to ensure your hosting environment stays optimized.
With cPanel, you get root-level control over your VDS without ever having to touch the command line.
How to Purchase a Virtual Dedicated Server with cPanel Installation
cPanel can be installed on a Bluehost Virtual Dedicated Server (VDS). You can choose to have cPanel installed during the initial VDS purchase or install it manually at a later time.
- In your browser, go to https://www.bluehost.com.
- Click Hosting in the top menu, then select Virtual Dedicated Server.

You can also go to this link directly: https://www.bluehost.com/vds-hosting.
- On the Virtual Dedicated Server Hosting page, click Explore Plans. You can also scroll down to the hosting plans section.

- Choose a plan from either tab — Standard or High Performance — by clicking Choose Plan.

Pricing is subject to change. Please visit https://www.bluehost.com/vds-hosting for the current introductory/sign-up offer for the Bluehost Virtual Dedicated Server hosting. For the most up-to-date renewal pricing, visit your Bluehost Portal's Renewal Center. - On the next page, configure your VDS hosting to meet your requirements. The configuration options are divided into the following sections:
- Location: Select your data center in this section.

- Hardware: This section shows your pre-selected plan. You can also switch to another Virtual Dedicated Server plan in this section.

- Software:
If the selected plan does not meet the app's minimum requirements, the app will be grayed out.
- Under the OS With Panel tab, click on cPanel.
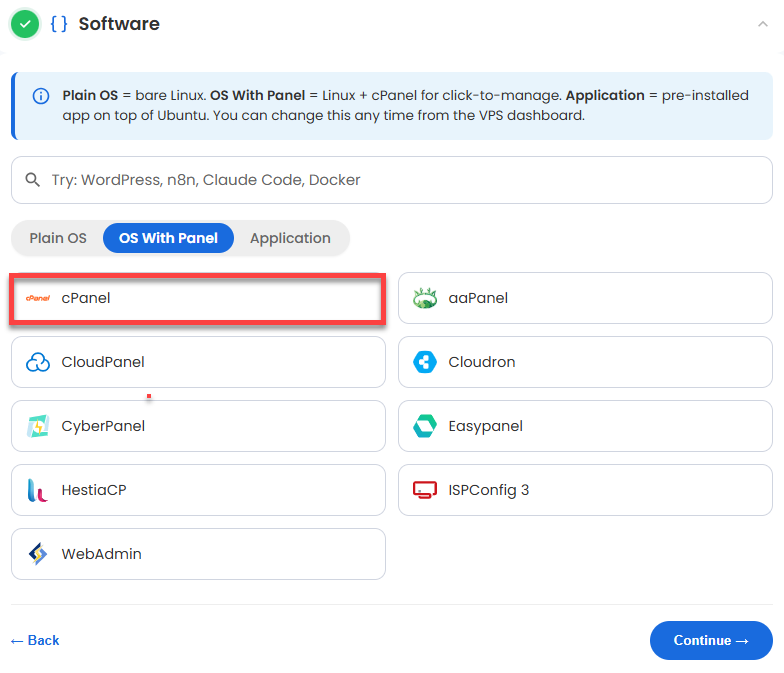 You can install only one application per purchase; the system will automatically select the best operating system for it.
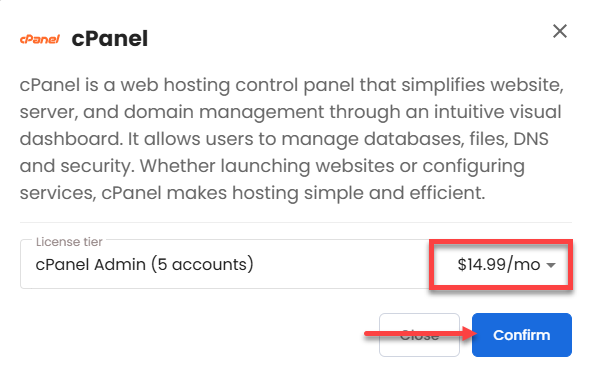
 - In the pop-up, choose the number of license tier you need, then click Confirm.
- Under the OS With Panel tab, click on cPanel.
- Support & Security: You can add Premium Support - Recurring, which provides priority access to expert assistance and faster response times.

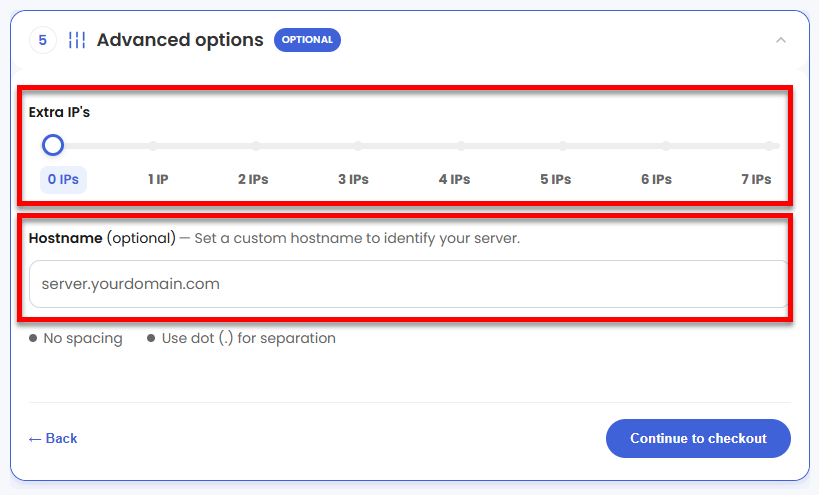
- Advanced Options:
- Extra IP's: You can add IP addresses for an additional fee. Pricing changes based on how many IPs you add.
- Hostname: Assign a custom hostname to identify your server. This is optional.
- Location: Select your data center in this section.
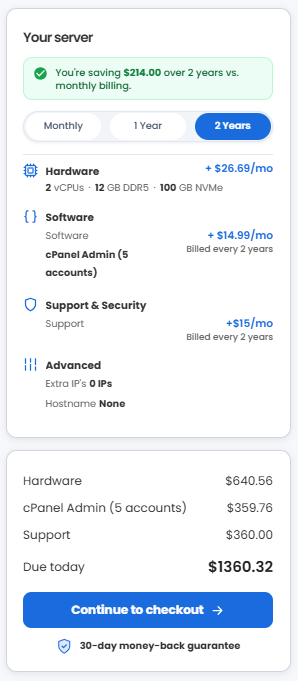
- Select your billing term and review your selected items on the right pane, along with the summarized total cost.
- Click Continue to checkout.
- Do the following on the Checkout page:
If you're new to Bluehost:- Create your Bluehost account by using your email address or by connecting with your Google, Apple, or GitHub account — whichever you prefer!

- Select your preferred payment method: credit card, Google Pay, or PayPal. Enter your billing information.

If you have an account with us, you will see your Bluehost login details when you are logged into your Bluehost Portal. If you are not logged in, please click the Log In link.

- Create your Bluehost account by using your email address or by connecting with your Google, Apple, or GitHub account — whichever you prefer!
- In the Shopping Cart, choose your billing term if you did not choose one on the previous page.
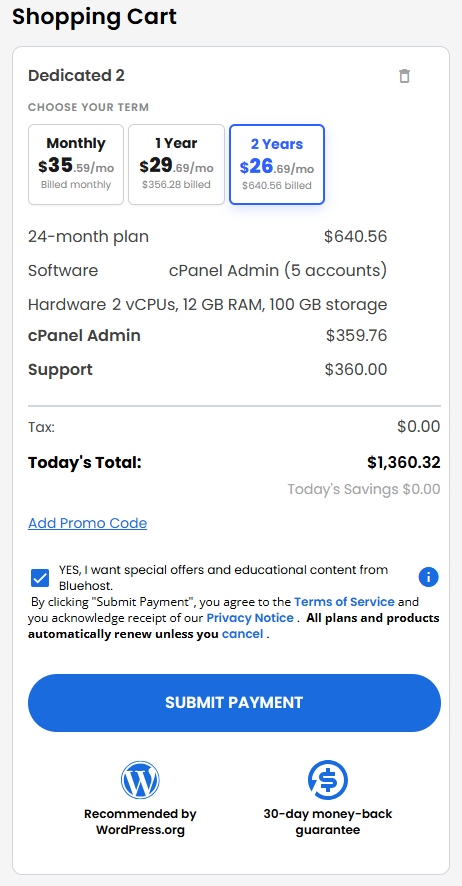
- Add a Promo code if you have one, and then click Submit Payment to complete your purchase.
After completing the purchase, your VDS hosting will begin provisioning. You can access and manage your new VDS hosting in the Hosting tab of your Bluehost Portal.
How to Access Your cPanel Dashboard
After installation completes, follow these steps to log into your server and complete your initial configuration. Make sure you have your account login credentials ready before proceeding.
Step 1: Reset Your Root Password
Before you begin, set your root password so you can log into your server.
- Log in to your Bluehost Portal.
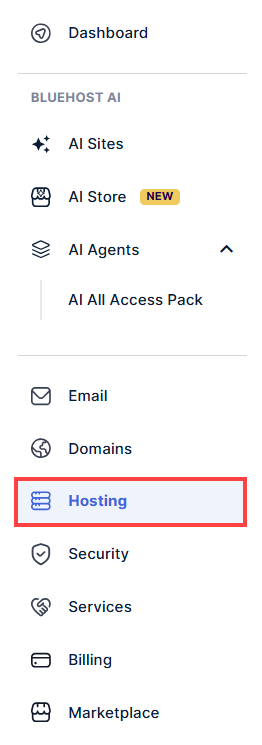
- In the left-hand menu, click the Hosting tab.
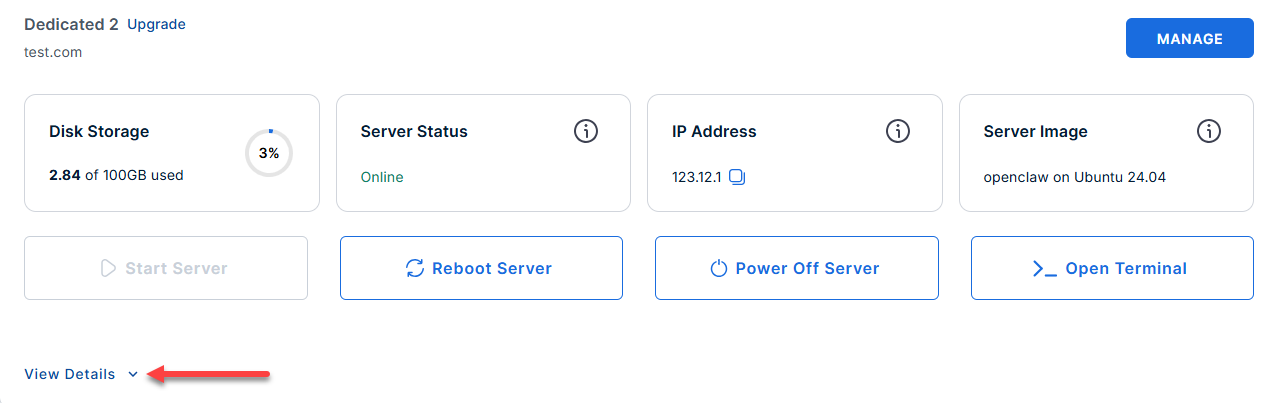
- Locate the server you want to manage, then click View Details in the bottom-left corner to expand the section and access additional server information.
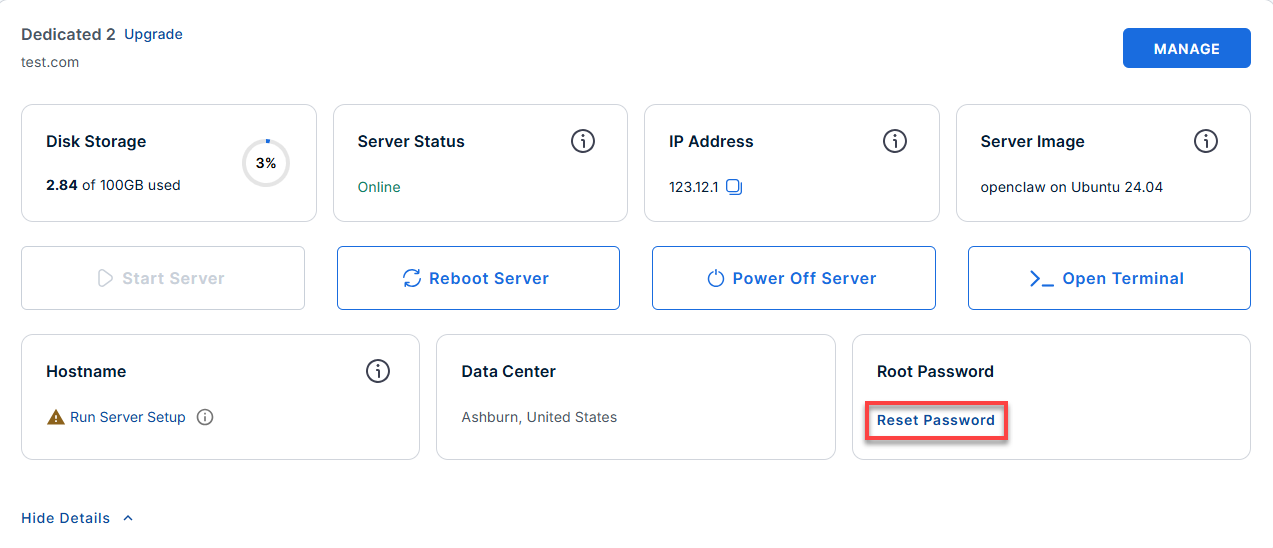
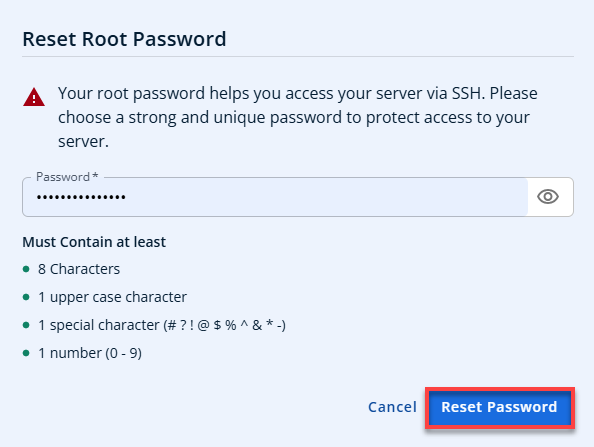
- Click the Reset Password.
- In the pop-up window, type your new root password, then click Reset Password again to confirm and save the changes.
Step 2: Set up Your cPanel
Once your password is set, you can access your account dashboard to begin configuring cPanel.
- Log in to your Bluehost Portal.
- In the left-hand menu, click the Hosting tab.
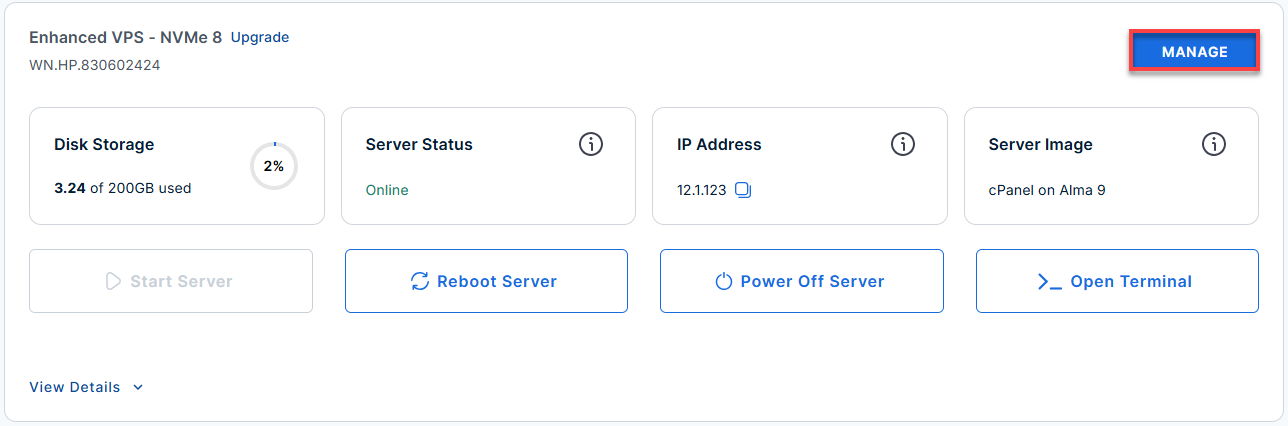
- Select the package where cPanel is installed, and click Manage.
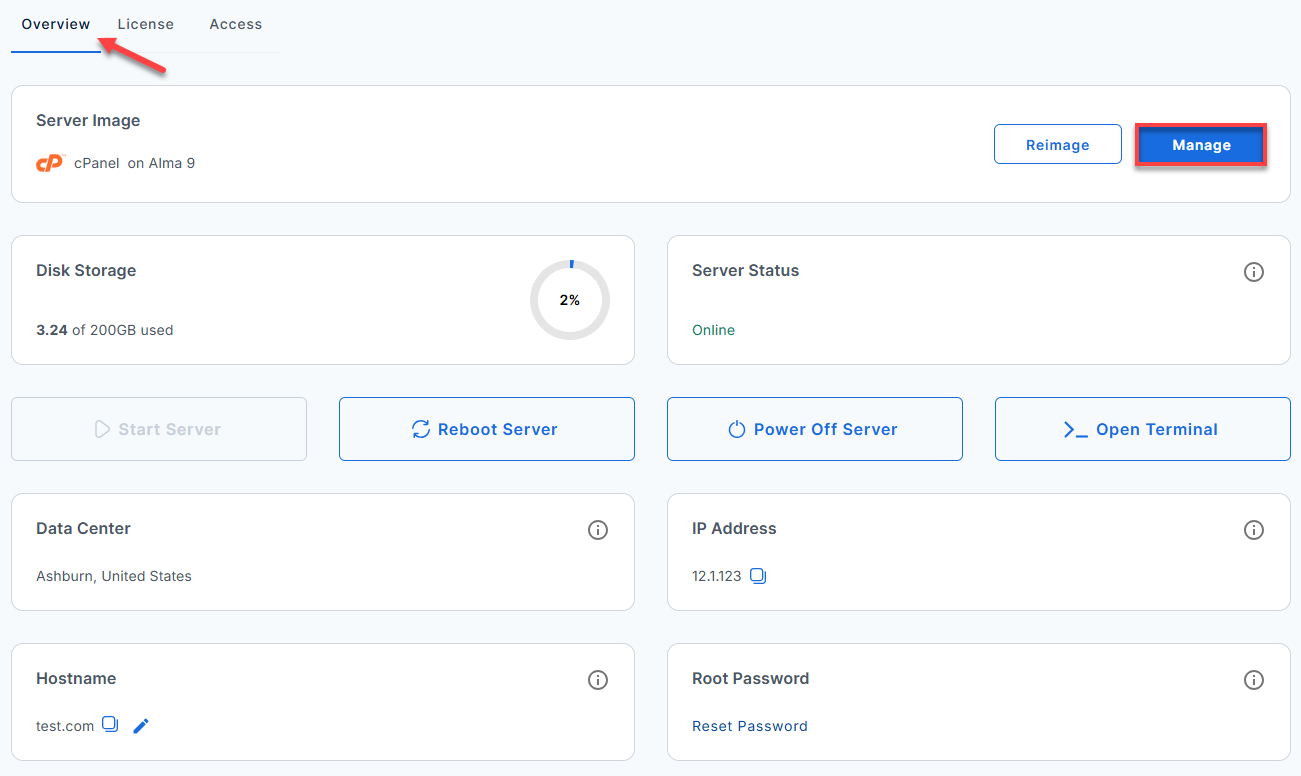
- In the Overview tab, click Manage under the Server Image tab.
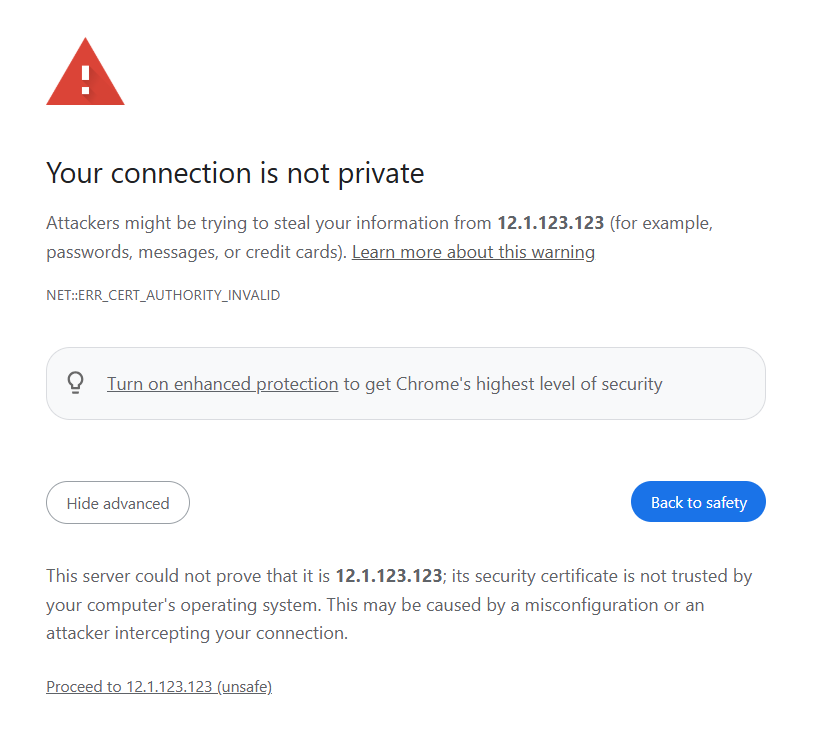
- Click Advanced, then select Proceed to 12.1.123.123 (unsafe) to open the page.
Note: This grants access for your current session, but your browser will still show a "Not Secure" warning in the address bar.
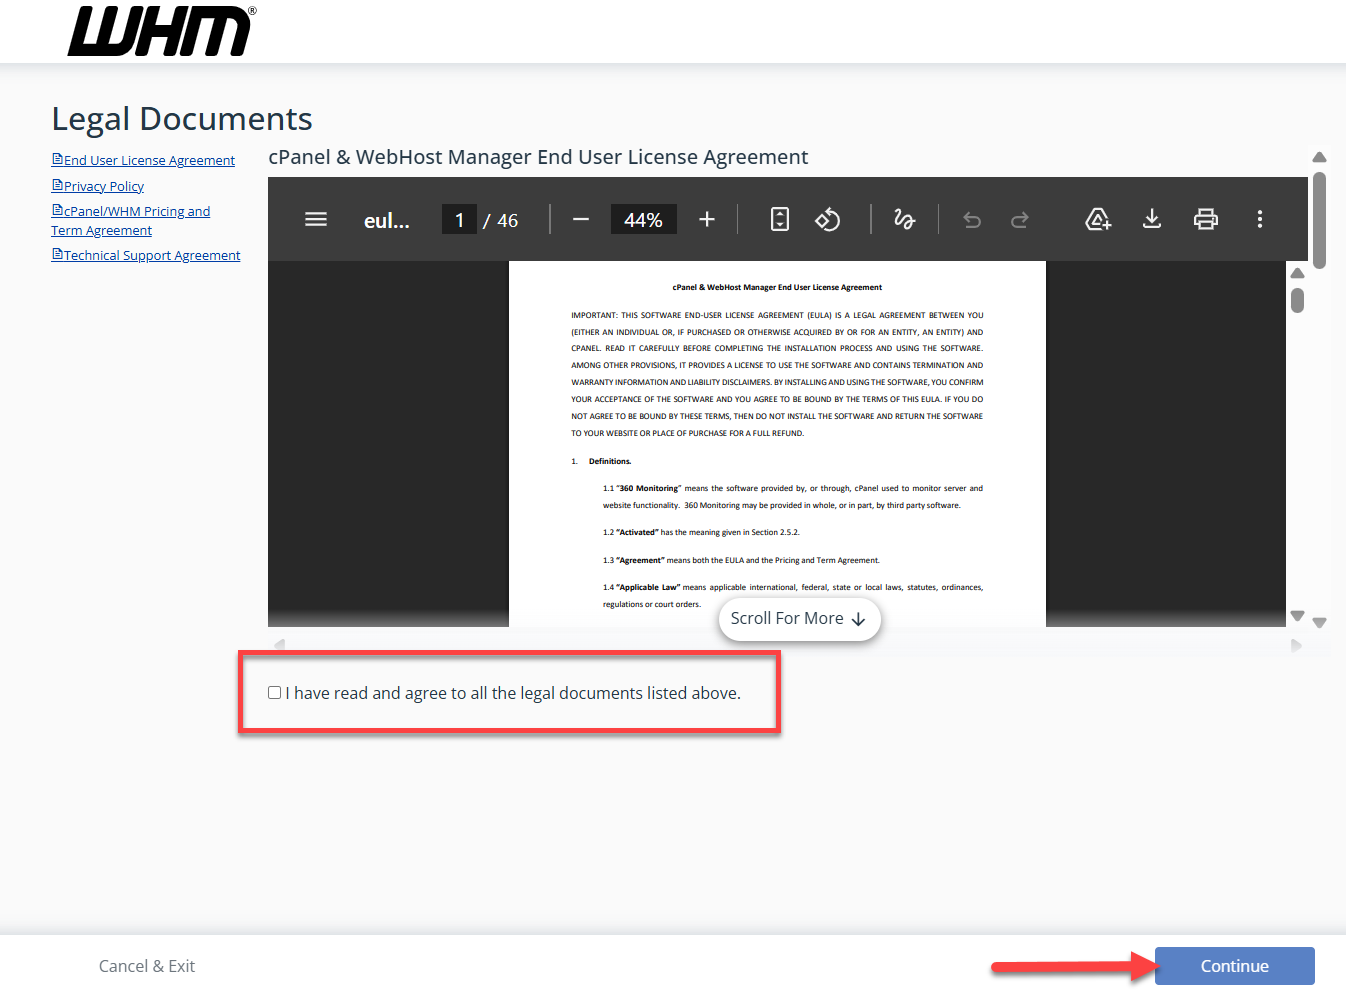
- Check the box for I have read and agree to all the legal documents listed above, then click Continue.
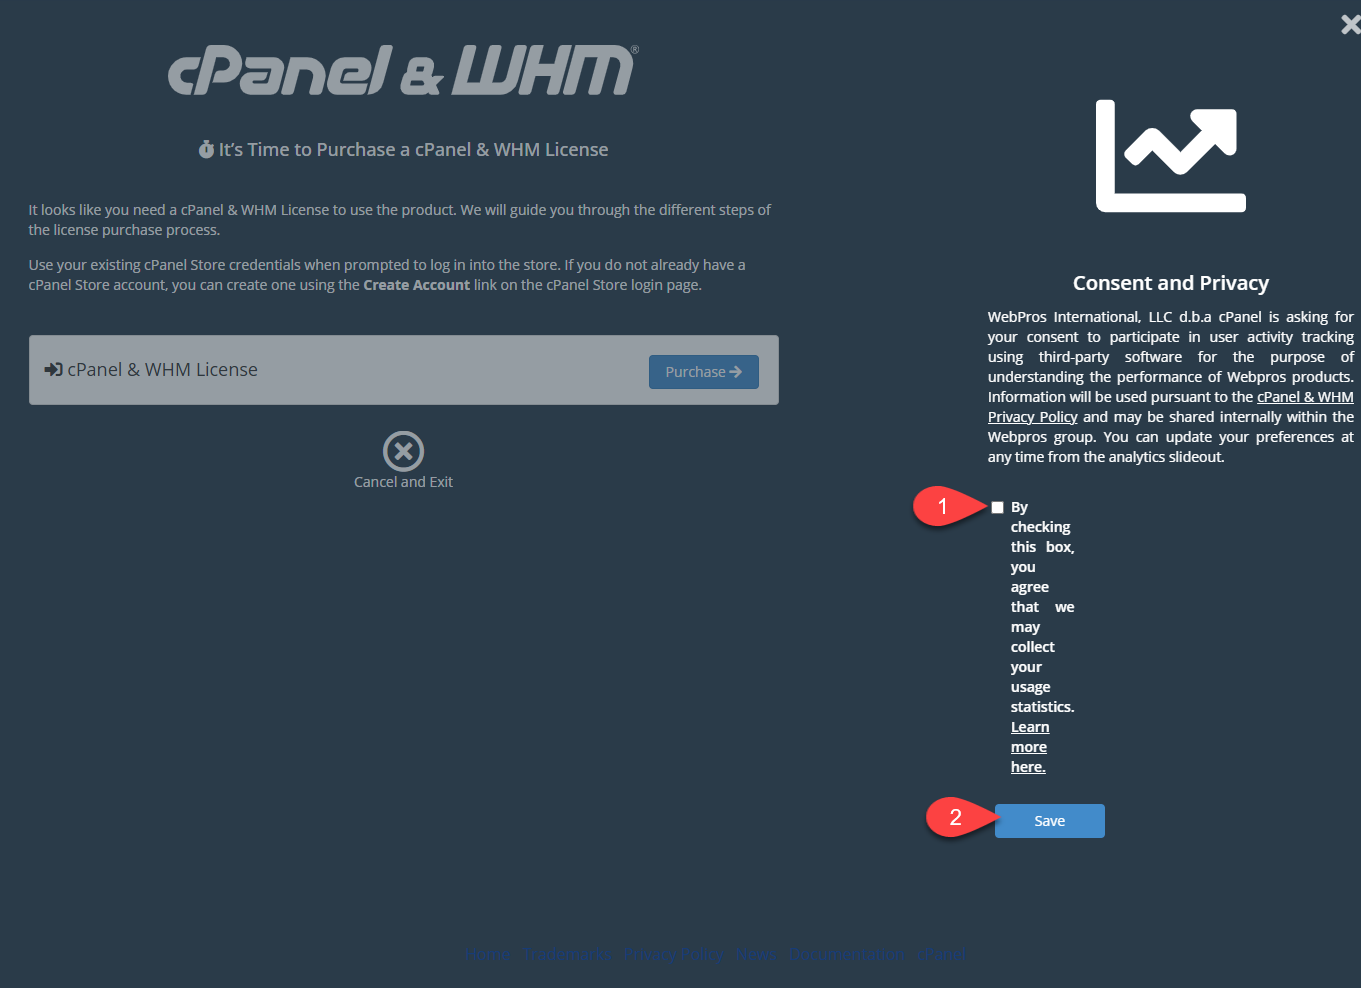
- Check the Consent and Privacy box if you agree to share usage statistics, then click Save.
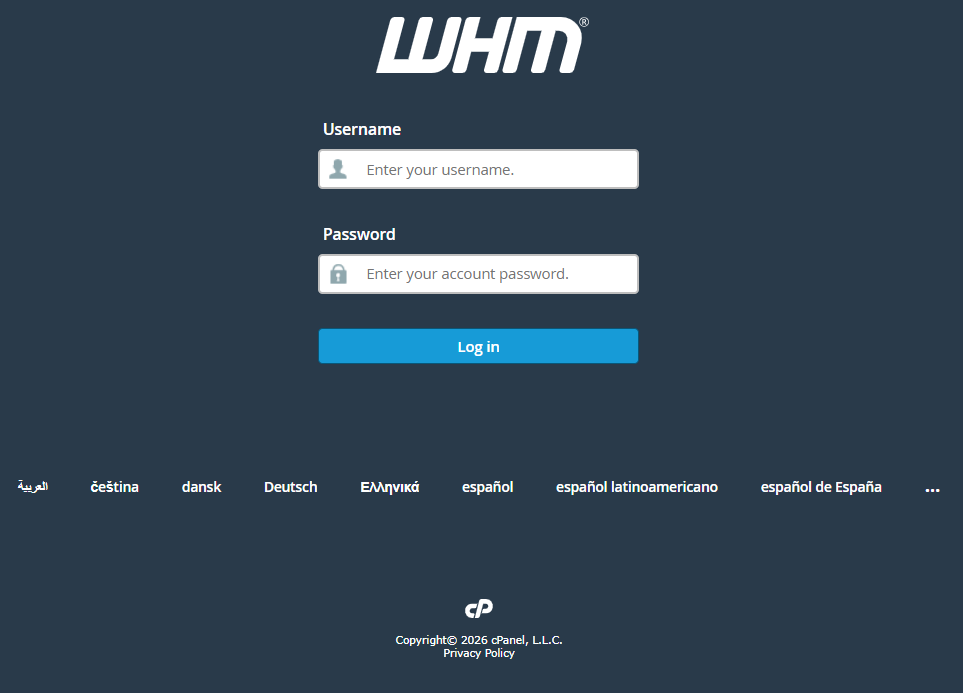
- Log in to your Root account.
- Username: root
- Password: Password you created.
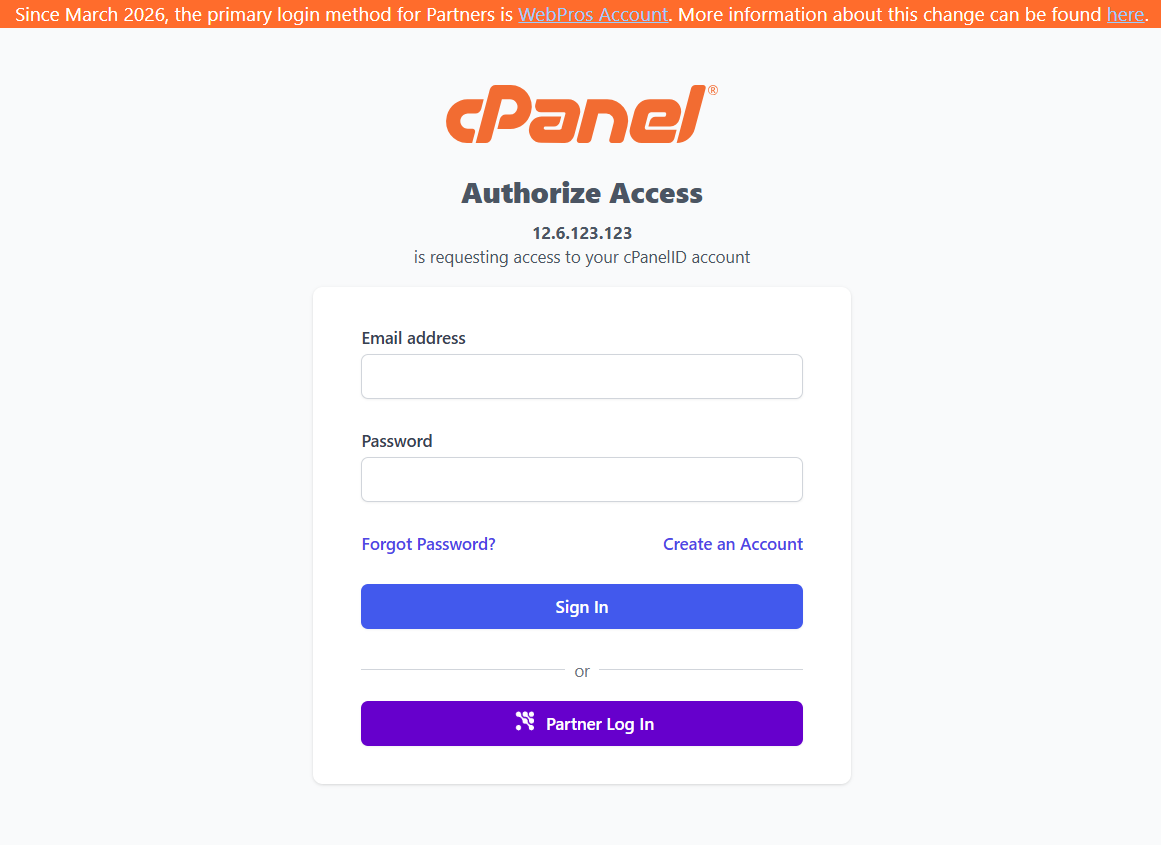
- Enter your cPanel Store credentials and click Sign In if you already have an account, or click Create an Account to set one up.
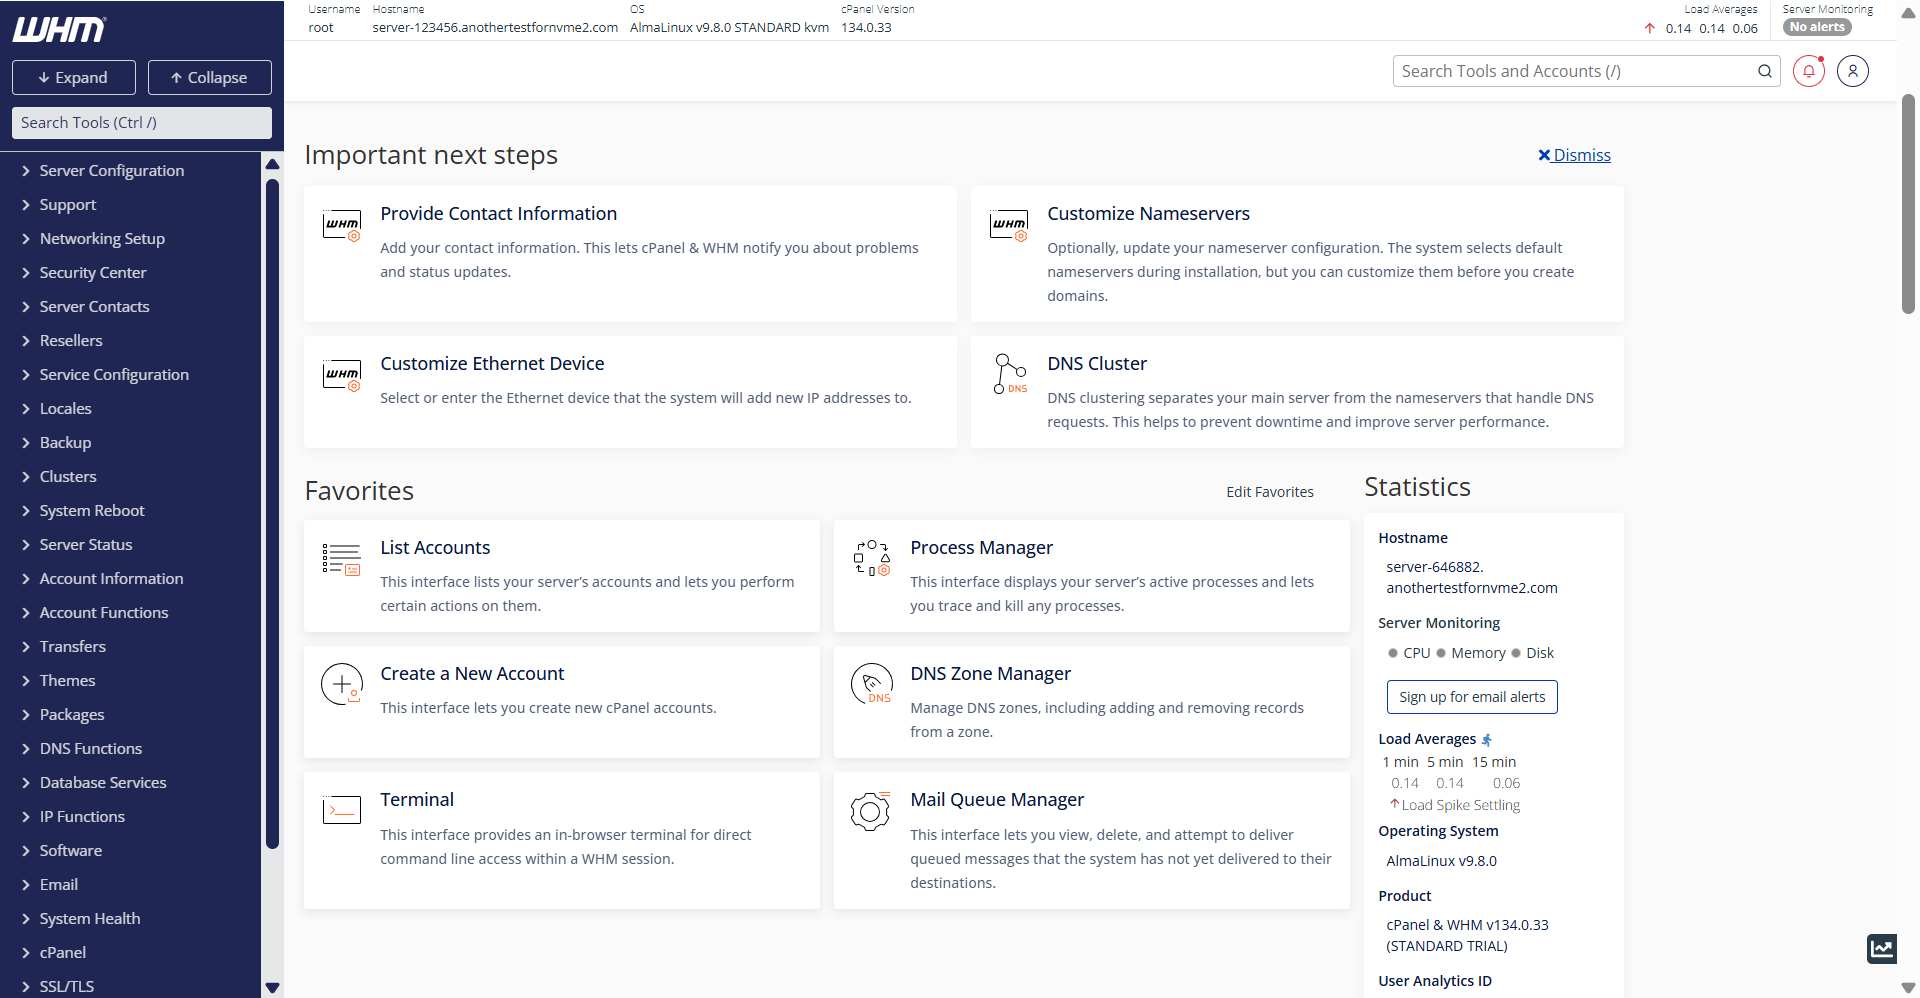
- You have successfully logged in to your WHM dashboard!
Summary
With cPanel on your Bluehost Virtual Dedicated Server, you get maximum performance and independence without the hassle of command-line configurations. Selecting cPanel at checkout automatically installs this widely used dashboard, giving you effortless control over your websites, email, databases, security, and backups through WebHost Manager (WHM)—all in just a few clicks. Simply choose your plan, complete checkout, and follow the guided setup in your Bluehost Portal to start managing your VDS with confidence.