Bluehost Hosting Tab: Manage Plans, Websites, and Resources
The Hosting tab provides a centralized view of your hosting plans, usage statistics, expiration alerts, and options to manage or upgrade services. This guide will help you understand your hosting environment and make informed decisions about your resources.
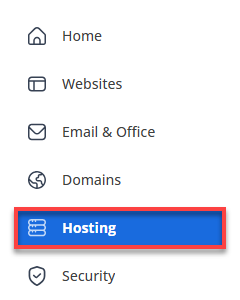
How to Access the Hosting Tab
- Log in to your Bluehost Portal.
- Click Hosting in the left-hand menu.
What You’ll See
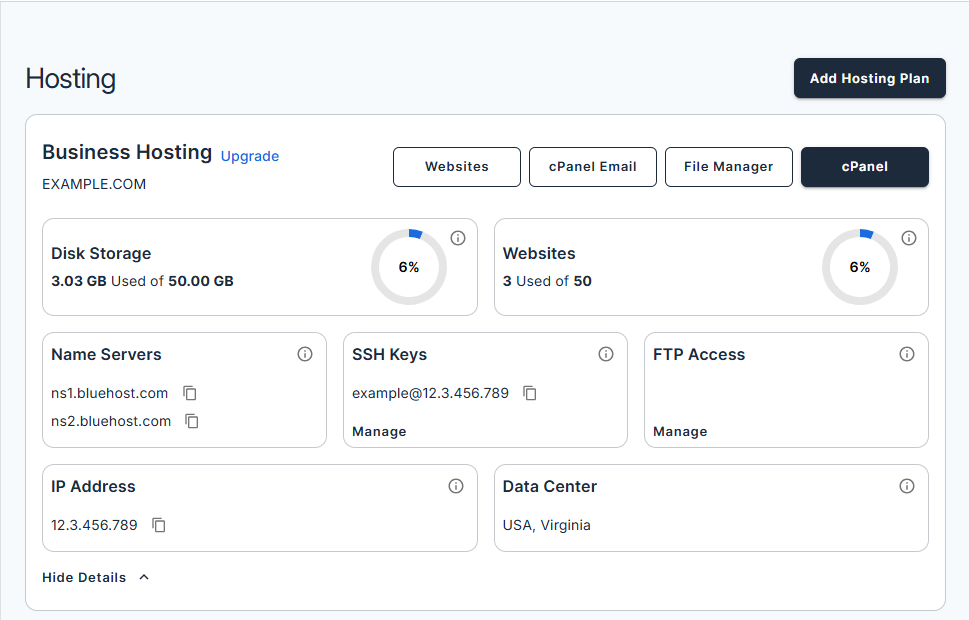
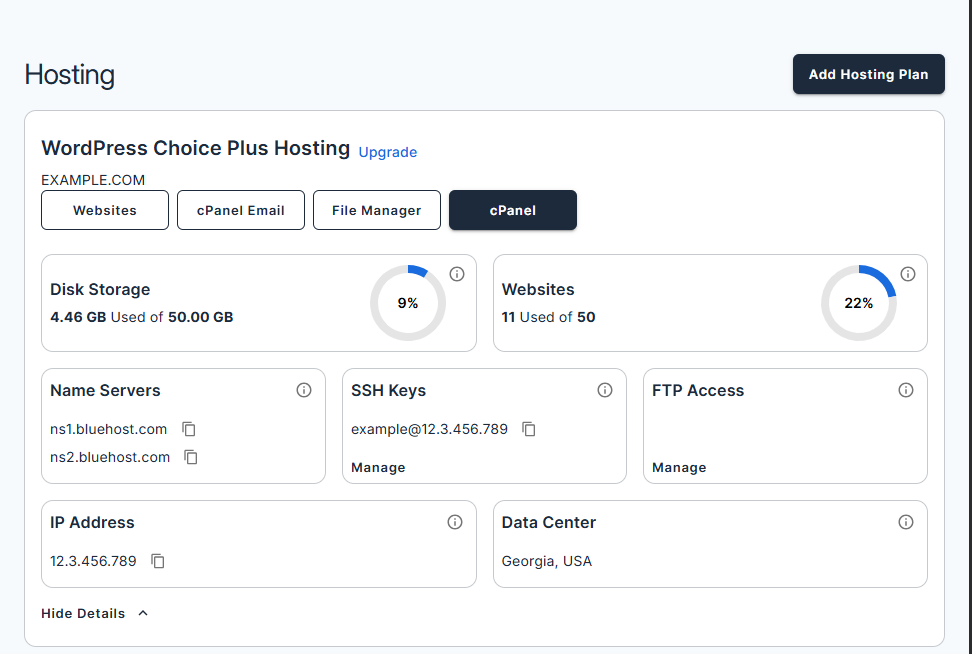
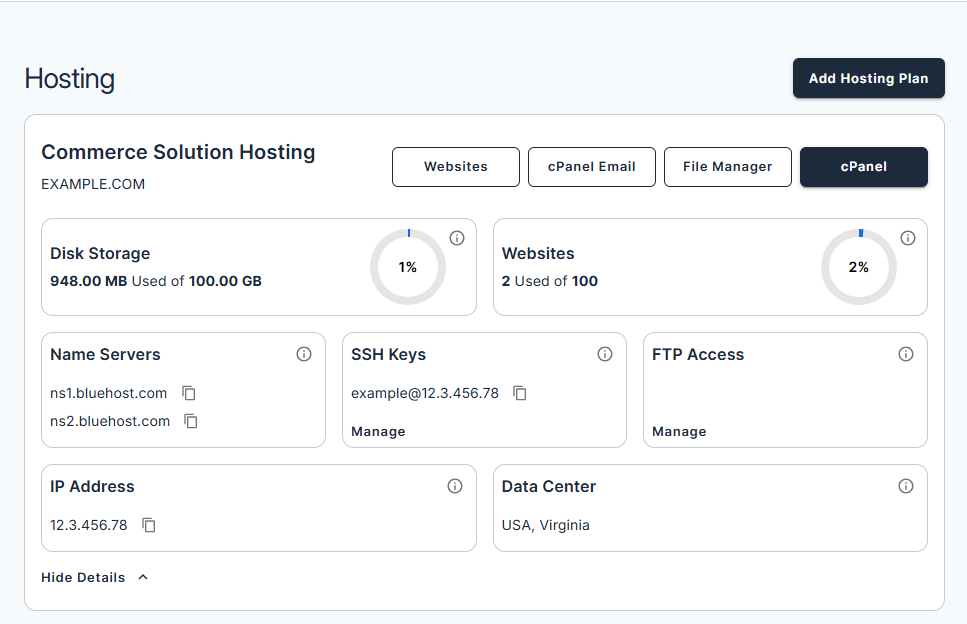
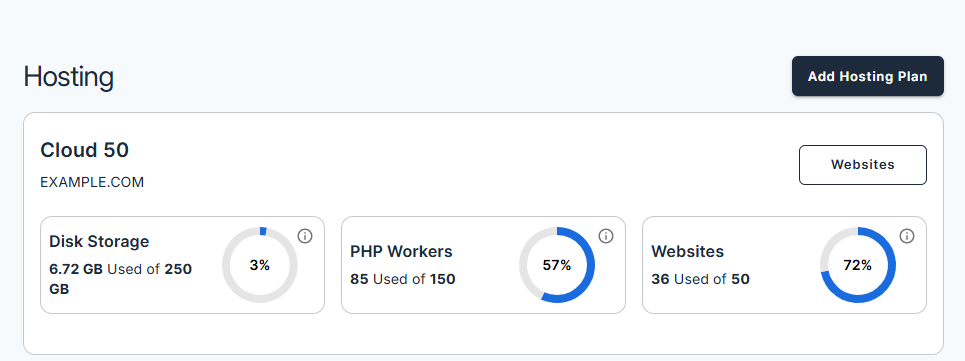
Hosting Plans Overview
Each plan displays:
- Disk Storage: Used vs. total available
- Websites: Number of hosted sites
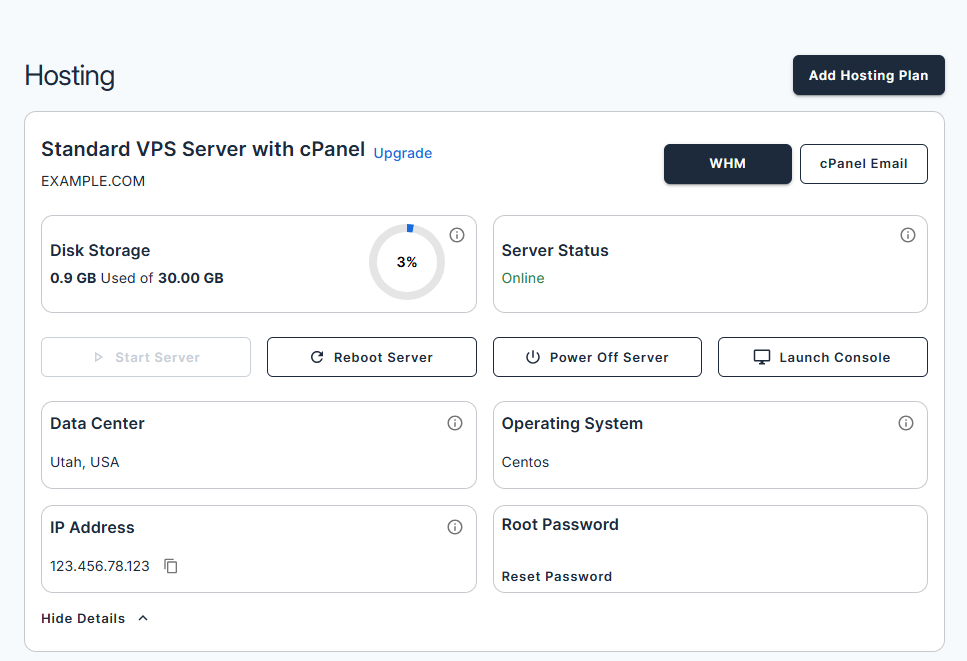
- Hosting Details: Displays complete plan specifications that vary based on your plan type:
- Shared Hosting
- WordPress Hosting
- WooCommerce Online Store
- Cloud Hosting
- VPS/Dedicated Server
- Shared Hosting
Action Buttons
- View Details: Shows full plan specifications:
- Name Servers: Copy your name servers, which translate your domain name into an IP address so your website connects to services seamlessly.
- SSH Keys: Manage SSH (Secure Shell) for secure command-line access to your server, allowing you to run commands safely.
- FTP Access: Manage FTP (File Transfer Protocol) to upload or download website files, including pages, images, and other content.
- IP Address: Copy your unique IP address, which identifies your server and enables internet communication.
- Data Center: View the data center location chosen during signup, where your site’s data is stored.
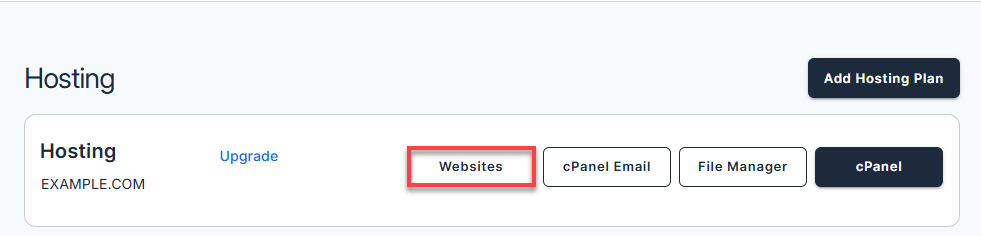
- WEBSITES: Navigate to your website list and access powerful tools designed to make managing your website settings easier than ever.
- CPANEL EMAIL: Manage cPanel email accounts, filters, spam settings, and more.
- FILE MANAGER: Upload, edit, and organize files.
- CPANEL: Access full hosting settings and configurations.
Add Hosting Plan
Whether you already have an active hosting plan or you’re starting fresh, just follow the steps below to set up the plan that fits your needs.
Note: Don’t have a Bluehost account yet? Refer to this article to learn how to sign up and purchase a hosting plan in just a few easy steps.
- In the Hosting tab:
- If you already have a hosting plan, click Add Hosting Plan.
- If you don’t have a hosting plan, review the plans that fit your needs and click SEE PLANS:
- Web Hosting: Launch your website with AI-powered tools.
- WooCommerce Online Store: Sell anything online with a custom eCommerce site.
- Select your plan on the next page.
- Choose and enjoy a FREE domain with your website package.
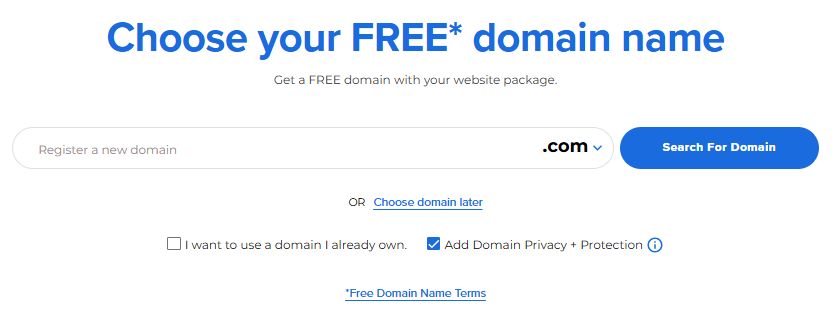
Tip: You can choose your domain later or use one you already own. - Review your cart and click CONTINUE TO CHECKOUT.

- Check your Account and Billing Information.
To use a different payment method, click + ADD PAYMENT METHOD and select from the available options.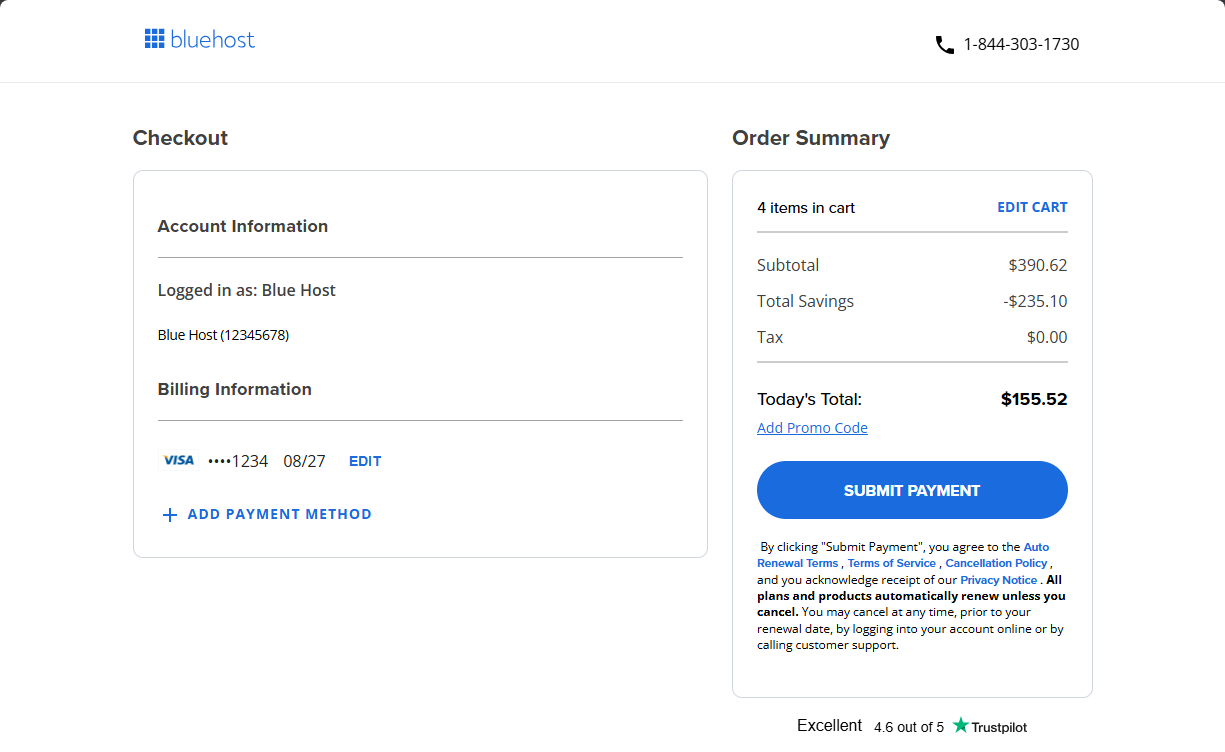
- Click SUBMIT PAYMENT to complete your purchase.
Alternative Way to Add Hosting Plan
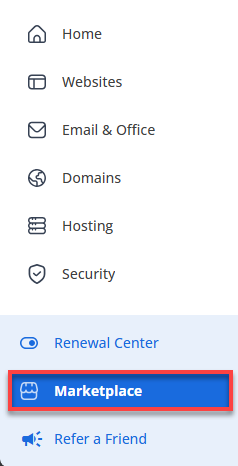
- Log in to your Bluehost Portal.
- Click Marketplace on the left-side menu.
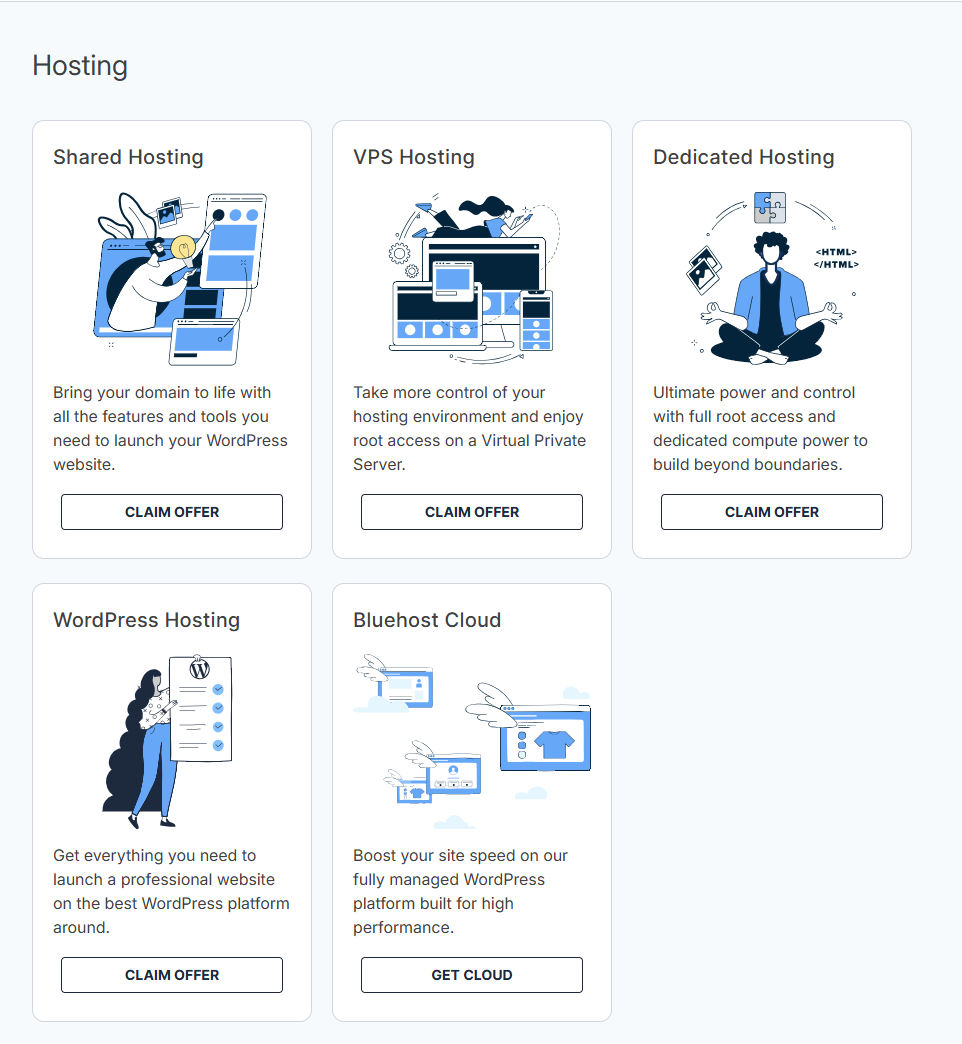
- Scroll down to the Hosting section and choose the plan that fits your needs:
- Shared Hosting: Bring your domain to life with all the features and tools you need to launch your WordPress website.
- VPS Hosting: Take more control of your hosting environment and enjoy root access on a Virtual Private Server.
- Dedicated Hosting: Ultimate power and control with full root access and dedicated compute power to build beyond boundaries.
- WordPress Hosting: Get everything you need to launch a professional website on the best WordPress platform around.
- Bluehost Cloud: Boost your site speed on our fully managed WordPress platform built for high performance.
- Click CLAIM OFFER/GET CLOUD.
- Select your plan on the next page.
- Choose and enjoy a FREE domain with your website package.
Tip: You can choose your domain later or use one you already own. - Review your cart and click CONTINUE TO CHECKOUT.
- Check your Account and Billing Information.
To use a different payment method, click + ADD PAYMENT METHOD and select from the available options. - Click SUBMIT PAYMENT to complete your purchase.
Add a Website
- In the Hosting tab overview, click Websites.
- Click Add Website and choose one of the following options:
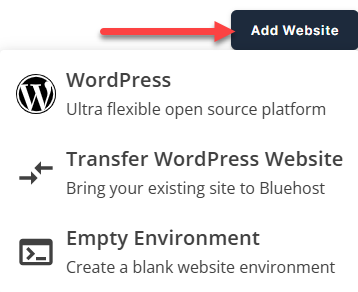
- WordPress: Install a new WordPress site.
- Transfer WordPress Website: Move your existing WordPress site.
Note: To transfer your WordPress website, you’ll need your WordPress login details and must approve the connection when prompted. This allows you to install and copy your files and database. - Empty Environment: Create a blank hosting environment for custom setup.
- Click your preferred option and follow the on-screen prompts to complete the installation.
- Review and confirm settings as prompted.
- Complete the process and verify your new site in the Website tab.
Summary
Managing your hosting plans through the Bluehost Hosting tab is simple and efficient. From monitoring disk usage and expiration alerts to adding new plans or websites, everything you need is centralized for easy access. By understanding the available options and tools, you can make informed decisions to optimize your hosting environment and ensure your websites run smoothly. Whether you’re upgrading resources, renewing plans, or launching new sites, Bluehost provides the flexibility and control to support your online goals.
If you need further assistance, Bluehost Chat Support is available 24 hours a day, 7days a week while Bluehost Phone Support is available 7 days a week from 7 am-12 midnight EST.
- Chat Support - While on our website, you should see a CHAT bubble in the bottom right-hand corner of the page. Click anywhere on the bubble to begin a chat session.
- Phone Support -
- US: 888-401-4678
- International: +1 801-765-9400
You may also refer to our Knowledge Base articles to help answer common questions and guide you through various setup, configuration, and troubleshooting steps.