 ChatGPT,
  Claude,
  Gemini,
  Grok — all four for
 Purchase a Virtual Dedicated Server with Hermes Agent Installation
Developed by Nous Research, Hermes Agent features an active learning core that evolves directly through everyday use. It continuously builds new abilities, remembers key preferences, and eliminates the hassle of repeating instructions. Purchase a Bluehost VDS with Hermes Agent pre-installed, and you're ready to start using this free, open-source, self-adapting AI that scales alongside your growing needs.
This article explains how to purchase a Bluehost Virtual Dedicated Server (VDS) hosting plan and set up and manage your Hermes Agent installation.
Why Choose Hermes Agent?
Combine the self-learning power of Hermes Agent with the high-performance isolation of a Bluehost VDS. Bluehost supplies dedicated server resources so your agent continuously creates skills, retains key knowledge, and adapts to your work without competing for speed. Choose Bluehost VDS to run your personalized AI assistant with strong reliability and lightning-fast responsiveness.
Uses of Hermes Agent
Hermes Agent’s capabilities span across several domains of autonomous productivity and digital management:
- Self-Iterative Learning: Automatically create, save, and refine "Skill Files" from successful tasks to improve performance on future requests.
- Persistent Research: Conduct deep-dive investigations and monitor data sources 24/7, providing real-time updates via Telegram, Slack, or Discord.
- Project Memory Management: Recall specific context, user preferences, and historical data across different sessions and devices.
- Autonomous Coding and DevOps: Execute terminal commands, patch files, and manage deployments within secure sandboxed environments or remote servers.
- Omnichannel Communication: Manage emails and messaging threads autonomously, acting as a high-level filter and responder for your digital life.
- Cross-Model Orchestration: Swap between hundreds of different LLMs to balance cost and reasoning power depending on the complexity of the task.
The platform’s self-evolving nature and persistent presence make it the ideal solution for users looking to transition from basic AI prompting to a fully integrated, autonomous digital workforce.
How to Purchase a Virtual Dedicated Server with Hermes Agent Installation
Hermes Agent can be installed on a Bluehost Virtual Dedicated Server (VDS). You can choose to have Hermes Agent installed during the initial VDS purchase or install it manually at a later time.
- In your browser, go to https://www.bluehost.com.
- Click Hosting in the top menu, then select Virtual Dedicated Server.

You can also go to this link directly: https://www.bluehost.com/vds-hosting.
- On the Virtual Dedicated Server Hosting page, click Explore Plans. You can also scroll down to the hosting plans section.

- Choose a plan from either tab — Standard or High Performance — by clicking Choose Plan.

Pricing is subject to change. Please visit https://www.bluehost.com/vds-hosting for the current introductory/sign-up offer for the Bluehost Virtual Dedicated Server hosting. For the most up-to-date renewal pricing, visit your Bluehost Portal's Renewal Center. - On the next page, configure your VDS hosting to meet your requirements. The configuration options are divided into the following sections:
- Location: Select your data center in this section.

- Hardware: This section shows your pre-selected plan. You can also switch to another Virtual Dedicated Server plan in this section.

- Software:
If the selected plan does not meet the app's minimum requirements, the app will be grayed out.
- Under the Application tab, click on Hermes Agent.
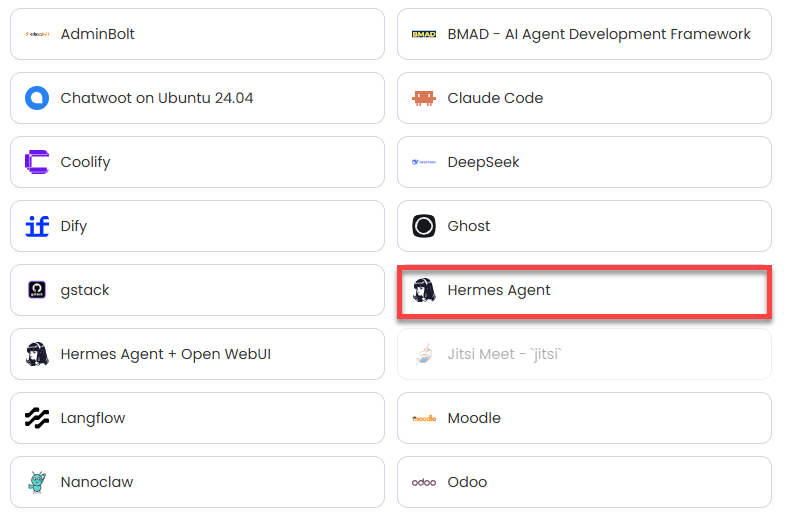
You can install only one application per purchase; the system will automatically select the best operating system for it. - In the pop-up, click Confirm.
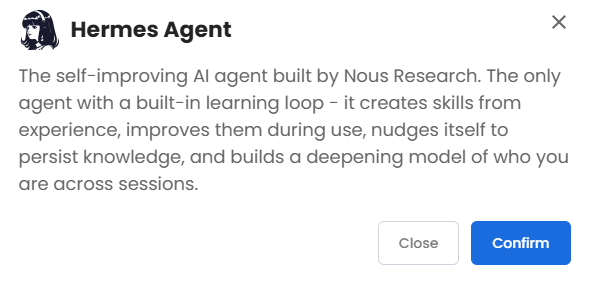
- Under the Application tab, click on Hermes Agent.
- Support & Security: You can add Premium Support - Recurring, which provides priority access to expert assistance and faster response times.

- Advanced Options:
- Extra IP's: You can add IP addresses for an additional fee. Pricing changes based on how many IPs you add.
- Hostname: Assign a custom hostname to identify your server. This is optional.
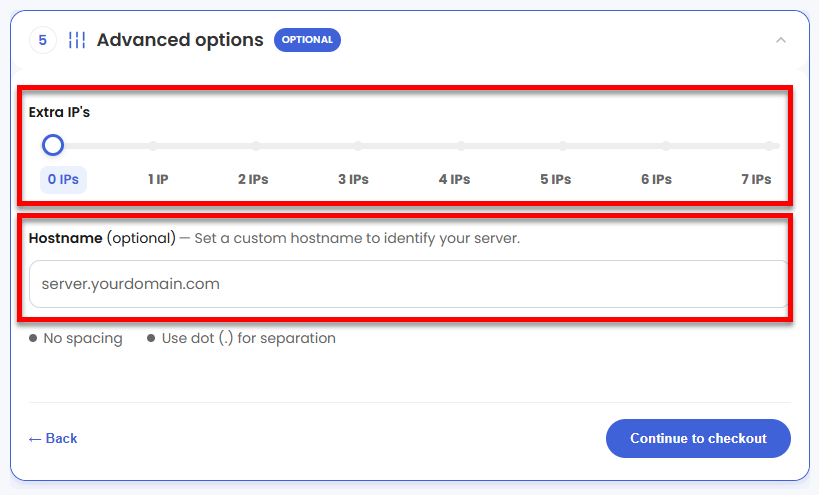
- Location: Select your data center in this section.
- Select your billing term and review your selected items on the right pane, along with the summarized total cost.
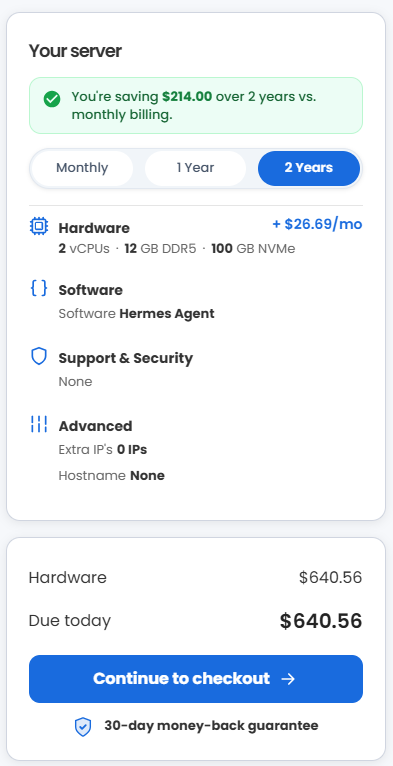
- Click Continue to checkout.
- Do the following on the Checkout page:
If you're new to Bluehost:- Create your Bluehost account by using your email address or by connecting with your Google, Apple, or GitHub account — whichever you prefer!

- Select your preferred payment method: credit card, Google Pay, or PayPal. Enter your billing information.

If you have an account with us, you will see your Bluehost login details when you are logged into your Bluehost Portal. If you are not logged in, please click the Log In link.

- Create your Bluehost account by using your email address or by connecting with your Google, Apple, or GitHub account — whichever you prefer!
- In the Shopping Cart, choose your billing term if you did not choose one on the previous page.
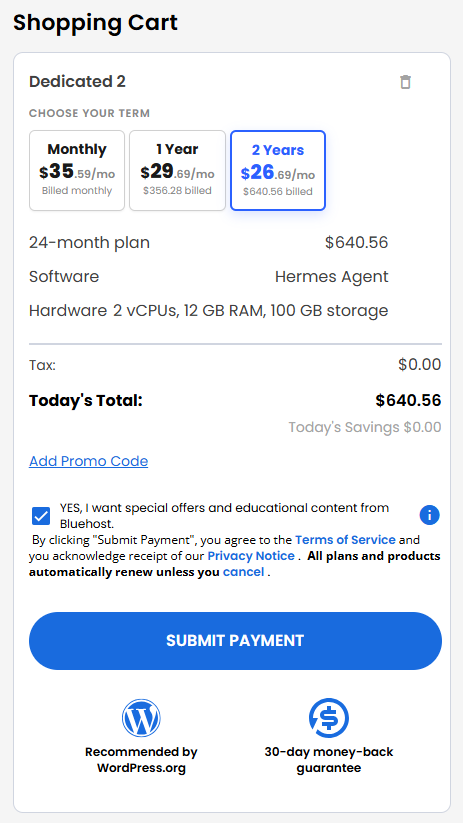
- Add a Promo code if you have one, and then click Submit Payment to complete your purchase.
After completing the purchase, your VDS hosting will begin provisioning. You can access and manage your new VDS hosting in the Hosting tab of your Bluehost Portal.
How to Get and Set Up Hermes Agent
After installation completes:
- Log in to your Bluehost Portal.
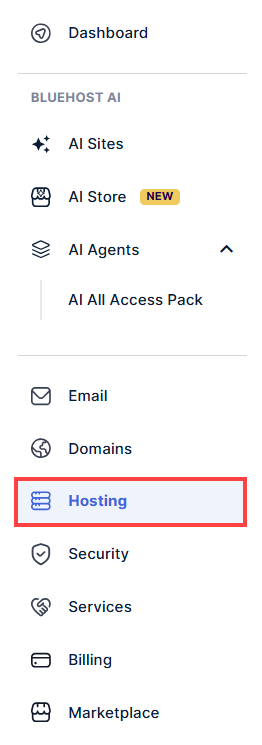
- In the left-hand menu, click Hosting, then select My Plans.
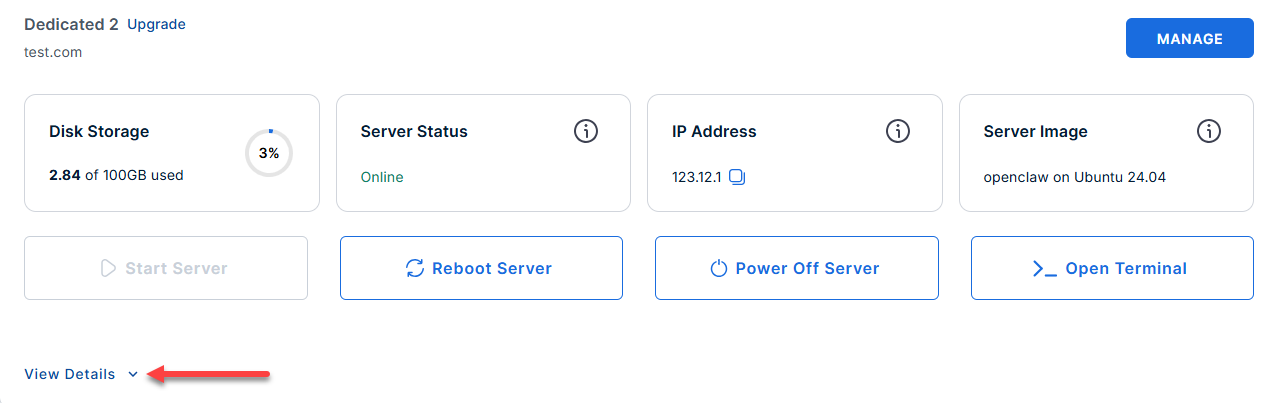
- Locate the server you want to manage, then click View Details in the bottom-left corner to expand the section and access additional server information.
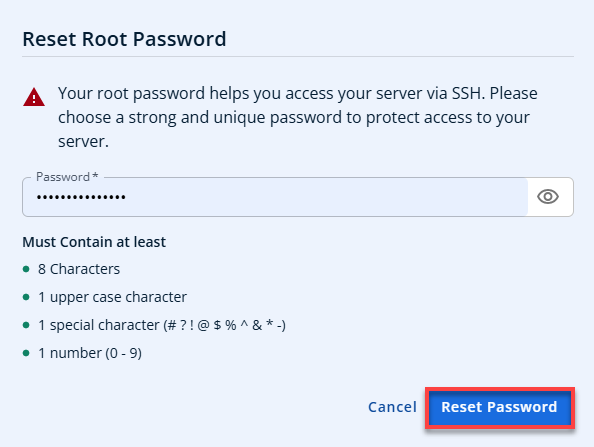
- Click the Reset Password.
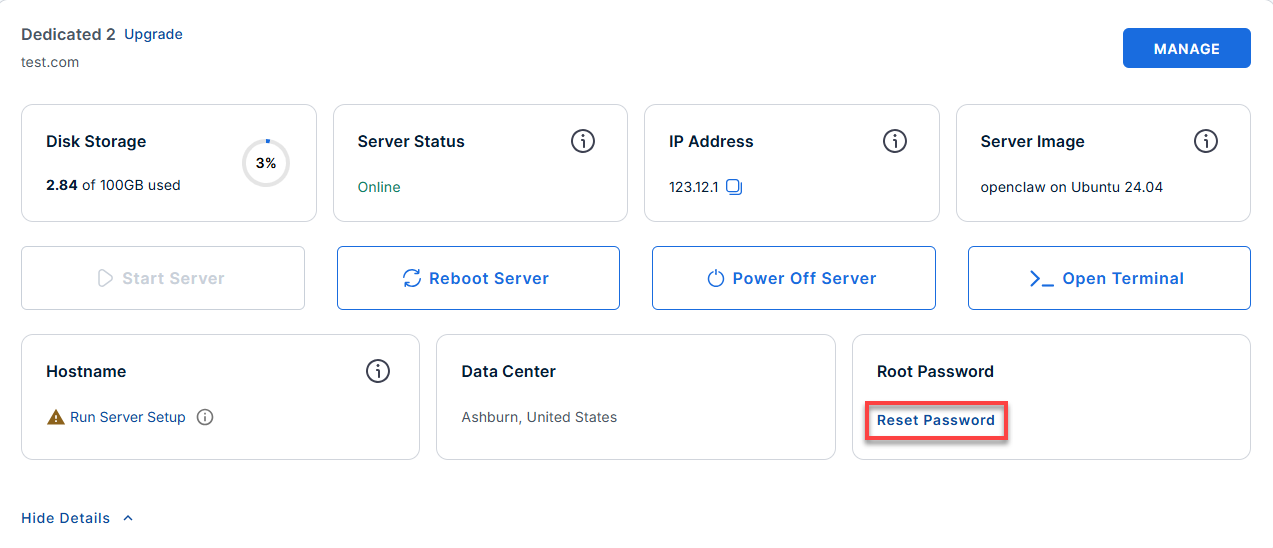
- In the pop-up window, type your new root password, then click Reset Password again to confirm and save the changes.
- Connect to your server via SSH.
Use your VDS IP and credentials with an SSH client, follow the prompts, and enter your root password when asked:Replaceyour_server_ipwith your actual server IP address.ssh root@your_server_ipExample Output:
Welcome to Ubuntu 24.04.4 LTS (GNU/Linux 6.8.0-111-generic x86_64) ******************************************************************************** Hermes is running on this server. The UFW firewall is enabled. All ports are BLOCKED except 22 (SSH) How To Use Log in to your server and type hermes to get started. To ensure the most up-to-date experience update Hermes before starting the setup process. hermes update hermes setup For more details please see /root/README.md To delete this message of the day: rm -rf /etc/update-motd.d/99-hermes ******************************************************************************** - Update Hermes Agent for the latest features:
hermes update
Example Output:
root@server-123456:~# hermes update ⚕ Updating Hermes Agent... → Fetching updates... ✓ Code updated! → Syncing bundled skills... ✓ Update complete! Tip: You can now select a provider and model: hermes model # Select provider and model - Start the Hermes Agent setup wizard:
hermes setup
You’ll see a setup menu (navigate with arrow keys):
How would you like to set up Hermes? ↑↓ navigate ENTER/SPACE select ESC cancel → (●) Quick Setup (Nous Portal) — free OAuth login, no API keys, model + tools (recommended) (○) Full setup — configure every provider, tool & option yourself (bring your own keys)- Quick Setup: Recommended for most users (uses OAuth, no API keys needed).
- Full Setup: For advanced users who want to bring their own API keys and configure every provider/tool.
- If you select Quick Setup:
- You’ll be prompted to log in via your browser. Open the provided link, and if prompted, enter the code shown.
┌─────────────────────────────────────────────────────────┐ │ ⚕ Hermes Agent Setup Wizard │ ├─────────────────────────────────────────────────────────┤ │ Let's configure your Hermes Agent installation. │ │ Press Ctrl+C at any time to exit. │ └─────────────────────────────────────────────────────────┘ ◆ Nous Portal One subscription, 300+ models, plus the Tool Gateway: web search, image generation, TTS, browser automation. Sign up: https://portal.nousresearch.com/manage-subscription Not logged into Nous Portal. Starting login... Starting Hermes login via Nous Portal... Portal: https://portal.nousresearch.com To continue: 1. Open: https://portal.nousresearch.com/manage-subscription?user_code=VYWR-6QX5 2. If prompted, enter code: VYWR-6QX5 Waiting for approval (polling every 1s)... - After you approve login in your browser, your terminal will show confirmation and link your Hermes Agent to Nous Portal:
✓ Login approved!
✓ Connected as [email protected]
✓ Hermes Agent is ready to use.
- You’ll be prompted to log in via your browser. Open the provided link, and if prompted, enter the code shown.
- Start Hermes Agent when setup is complete:
hermes
Example Output:
root@server-123456:~# hermes

Welcome to Hermes Agent TUI (Terminal User Interface)
─────────────────────────────────────────────────────

Type 'help' or use arrow keys for navigation.
Select an action:

→ Run a skill         (browse and execute available skills)
  Manage models       (select or switch AI providers)
  Project memory      (review/recall agent insights)
  Messages            (send/reply to Telegram, Discord, etc.)
  Shell/DevOps        (terminal automation and scripting)
  Settings            (view or edit configuration)
  Update Agent        (self-update and skill sync)
  Exit

Agent is ready. Press 'q' to quit.
or view help:
hermes helpExample Output:
root@server-123456:~# hermes help

Hermes Agent CLI - Command Reference
────────────────────────────────────

Usage:
  hermes [command]

Available commands:

  setup       Start the Hermes Agent setup wizard
  update      Update the Hermes Agent software/skills
  tui         Start the interactive Terminal UI (default for 'hermes')
  model       Select AI model/provider
  skill       List or run installed skills
  memory      Access agent memory and context
  shell       Run shell/DevOps commands with Hermes
  help        Show this help

For the full user guide, visit:
https://hermes-agent.nousresearch.com/docs/user-guide/
Supporting Information and Sample Output
For advanced configuration, usage instructions, and details about skills or integrations, review the Hermes Agent documentation by running:
Example Output:
root@server-123456:~# cat /root/README.md
# Hermes Agent

## Description

The self-improving AI agent built by Nous Research. The only agent with a
built-in learning loop - it creates skills from experience, improves them
during use, nudges itself to persist knowledge, and builds a deepening
model of who you are across sessions.

## Services

Service | Ports | Purpose
--------|-------|---------
OpenSSH | 22    | SSH

## How-to-use

Log in to your server and type `hermes` to get started. To ensure the most up-to-date experience update Hermes before starting the setup process.

hermes update
hermes setup

## Links

Using Hermes CLI Interface: https://hermes-agent.nousresearch.com/docs/user-guide/cli

Using Hermes TUI Interface: https://hermes-agent.nousresearch.com/docs/user-guide/tui
Summary
You can purchase and automatically install Hermes Agent on a Bluehost Virtual Dedicated Server (VDS) to get a self-learning AI assistant that adapts directly to your workflow. This powerful setup provides dedicated server resources so you can automate research, coding, and communication 24/7 without sacrificing speed or security. Once Bluehost finishes setting up your server, you simply log in via SSH and run two quick commands to launch your personalized AI assistant.