 ChatGPT,
 Claude,
 Gemini,
 Grok — all four for
Key highlights
- Learn how to deploy n8n with Coolify on a VPS in a few simple steps.
- Configure PostgreSQL, persistent storage and environment variables for a reliable deployment.
- Secure your n8n instance with a custom domain and automatic Let’s Encrypt SSL.
- Compare SQLite and PostgreSQL to choose the right database for your workloads.
- Discover how Bluehost VPS provides the dedicated resources needed for self-hosted automation.
If you want to self-host n8n without managing complex Docker Compose files, Coolify offers one of the simplest deployment options. It provides an intuitive interface for deploying and managing containerized applications, allowing you to run n8n on your own VPS with minimal manual configuration.
Hosting n8n with Coolify gives you full control over your workflows, credentials and infrastructure while eliminating the execution limits and recurring usage costs associated with many cloud automation platforms. By combining Coolify with a VPS, you can deploy n8n, connect a PostgreSQL database, configure persistent storage and secure your instance with HTTPS-all from a single dashboard.
Learn how to deploy n8n with Coolify, configure storage and environment variables, enable SSL, and choose the right database.You’ll also learn how to keep your deployment updated for long-term reliability.
Quick answer: How do you host n8n with Coolify on a VPS?
You can host n8n with Coolify on a VPS by following these steps:
- Set up a Linux VPS and install Coolify.
- Create a new n8n service from the Coolify dashboard.
- Attach a PostgreSQL database for production workloads.
- Configure persistent storage and required environment variables.
- Connect a custom domain and enable Let’s Encrypt SSL.
- Deploy the application and verify that the container is running successfully.
For production deployments, use a VPS with dedicated CPU, memory and NVMe storage to ensure reliable workflow execution as your automation grows. Once your VPS is ready, Coolify provides a straightforward way to deploy and manage n8n without having to configure the entire stack manually.
What is the fastest way to host n8n with Coolify on a VPS?
Hosting n8n with Coolify on a virtual private server (VPS) is the fastest way to run open-source workflow automation. You install the Coolify platform on your Linux server and select the pre-built n8n application template. Then you launch your instance with containerized database backing. This setup provides dedicated compute resources, complete data privacy and unmetered workflow execution without expensive cloud task limits.
Pairing n8n with Coolify turns a standard Linux server into an intuitive self-hosted platform using Coolify architecture. Coolify handles Docker container orchestration, Traefik reverse proxy routing and automated SSL management. You gain the flexibility of custom API integrations while avoiding manual Docker Compose file maintenance. It offers the ease of cloud platforms with total infrastructure ownership.
Compared to a traditional Docker deployment, Coolify provides a graphical interface for managing applications, databases, environment variables and updates. This makes it easier to deploy, monitor and maintain n8n while retaining full control over your server and data.
Before deploying n8n with Coolify, make sure your VPS meets the basic requirements for running both applications reliably. Preparing your server in advance helps prevent deployment issues and ensures a smoother setup.
What prerequisites do you need before deploying n8n on Coolify?
Preparing your server environment ensures a smooth n8n installation without networking or performance bottlenecks. Setting up these core components ahead of time allows Coolify to automate deployment and secure your instance immediately.
Recommended system requirements
| Component | Recommended |
| Operating System | Ubuntu 22.04 LTS or Ubuntu 24.04 LTS |
| CPU | 2 vCPUs |
| Memory | 4 GB RAM |
| Storage | 100 GB NVMe SSD |
| Database | PostgreSQL (recommended for production) |
| Container Platform | Docker (installed automatically by Coolify) |
| Domain | Custom domain or subdomain |
| SSL | Let’s Encrypt certificate |
Tip: While SQLite works well for testing and personal projects, PostgreSQL is the better choice for production environments that handle multiple workflows or concurrent executions.
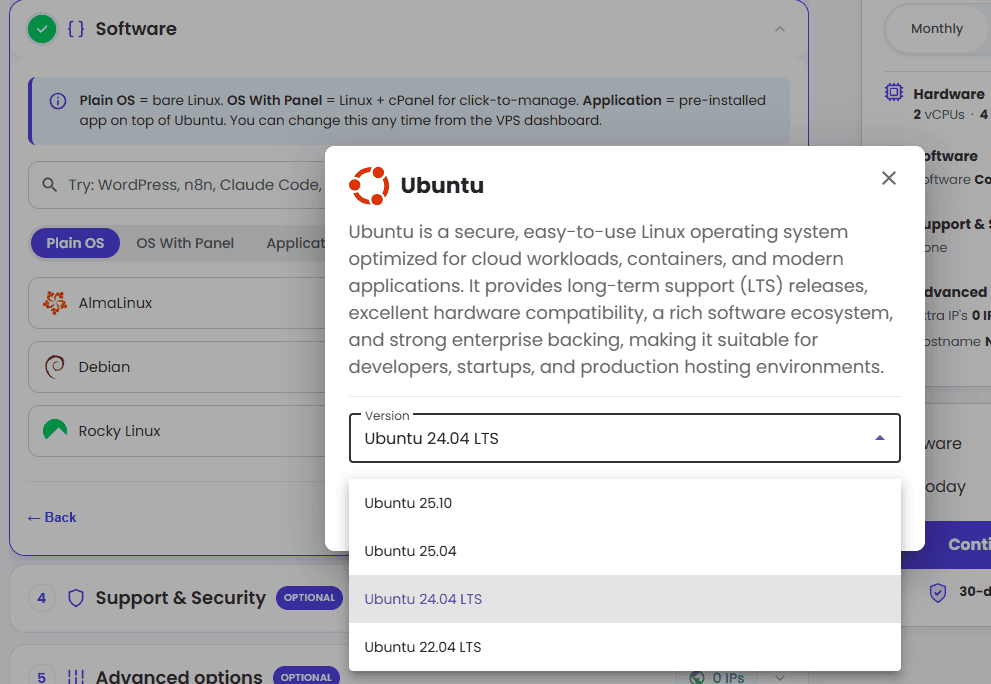
1. Prepare a clean Linux VPS
Start with a fresh Ubuntu 22.04 LTS or Ubuntu 24.04 LTS server. A clean installation reduces the risk of package conflicts and simplifies the Coolify installation process.
For production deployments, choose a VPS with dedicated CPU, memory and NVMe storage to run Coolify, n8n and PostgreSQL reliably as your workflows grow.
2. Install Coolify
Install Coolify on your VPS before deploying n8n. During installation, Coolify automatically configures Docker and its built-in reverse proxy, allowing you to manage applications from a web-based dashboard instead of maintaining Docker Compose files manually.
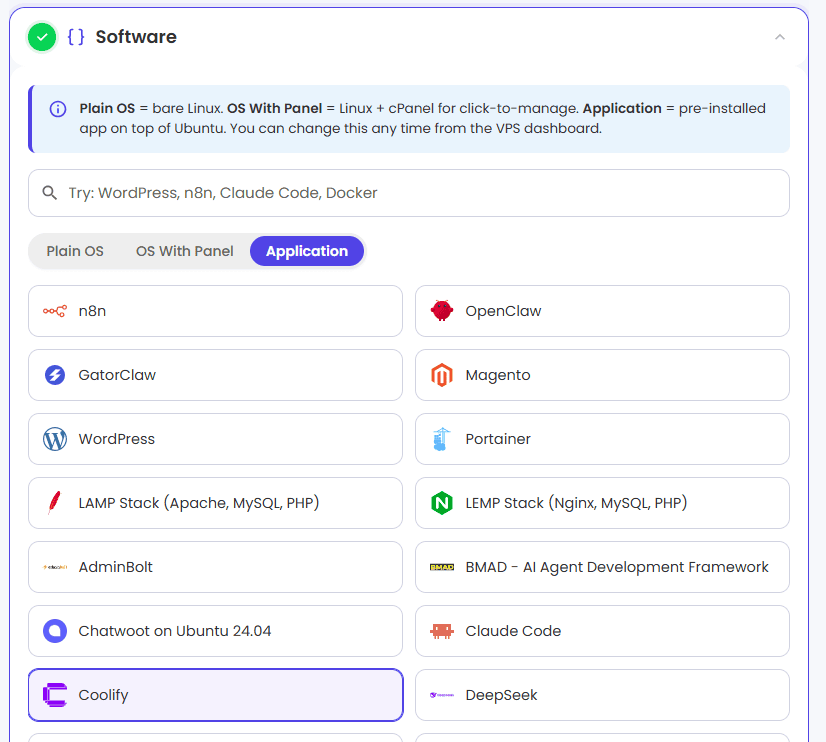
Once installed, verify that you can access the Coolify dashboard before proceeding.
3. Configure your domain
Point a domain or subdomain to your VPS using DNS records before deployment.
Using a custom domain allows you to:
- Enable HTTPS with Let’s Encrypt.
- Configure webhook endpoints correctly.
- Access your n8n instance using a secure, memorable URL.
For example:
n8n.[yourdomain].com4. Verify SSH access
Ensure you have root or sudo SSH access to your VPS. You’ll need it to:
- Install Coolify.
- Verify server health.
- Troubleshoot deployment issues if necessary.
ssh root@YOUR_SERVER_IPAlthough most day-to-day management happens inside the Coolify dashboard, SSH access remains essential for server administration.
With these prerequisites in place, your server infrastructure is fully prepared for container deployment. Let’s walk through the exact steps to deploy n8n inside your Coolify dashboard.
How do you deploy n8n using Coolify step-by-step?
Deploying n8n with Coolify is a straightforward process that replaces manual Docker configuration with an intuitive web interface. Instead of creating and maintaining Docker Compose files, you can deploy n8n, connect a database and manage updates directly from the Coolify dashboard.
Follow the steps below to launch a production-ready n8n instance on your VPS.
Step 1: Create a new n8n service in the Coolify dashboard
Log in to your Coolify dashboard and open the Project where you want to deploy n8n. Select the appropriate Environment, then click Add New Resource.
Projects
→ New Project
→ Production
Choose Service and search for n8n from the list of available applications. Select the official n8n template to automatically generate the required container configuration.
Add Resource
→ Service
→ Search "n8n"
→ Select n8n
Give your service a descriptive name, select your VPS as the deployment destination and review the default settings before continuing.
Recommended: Use a dedicated project for n8n if you plan to deploy multiple applications on the same VPS. This makes ongoing management and monitoring easier.
Step 2: Connect a PostgreSQL database for production execution state
By default, n8n can use SQLite to store workflow data and execution history. While SQLite is suitable for testing or personal projects, PostgreSQL is the preferred choice for production deployments because it offers better performance, reliability and support for concurrent workflow executions.
Within your n8n service settings, attach a new PostgreSQL database using Coolify’s built-in database wizard. Coolify automatically creates the database and populates the required connection details for your n8n container.
| Database | Best for |
| SQLite | Testing, learning and small personal workflows |
| PostgreSQL | Production deployments, teams and high-volume workflows |
Best practice: If you expect your workflows to grow over time, start with PostgreSQL rather than migrating later.
Step 3: Configure persistent storage
Containers are designed to be temporary. Without persistent storage, your workflows, credentials and application settings could be lost if the container is rebuilt or updated.
Open the Storage section in your n8n service and create a persistent volume that maps to:
/home/node/.n8n This directory stores important application data, including:
- Workflow definitions
- Credentials
- Encryption keys
- User settings
- Execution history
Using persistent storage ensures your data remains available after updates, container restarts or server reboots.
Best practice: Include this storage location in your regular backup schedule to protect your workflows.
Step 4: Configure environment variables
Environment variables control how n8n communicates with external services and secures sensitive information.
At a minimum, configure the following variables before deploying your application:
| Variable | Purpose |
| WEBHOOK_URL | Sets the public URL used for webhook triggers |
| N8N_ENCRYPTION_KEY | Encrypts stored credentials and API keys |
| GENERIC_TIMEZONE | Sets the default timezone for scheduled workflows |
| N8N_LOG_LEVEL | Controls logging for troubleshooting and debugging |
Example configuration:
WEBHOOK_URL=https://n8n.example.com
N8N_ENCRYPTION_KEY=your-random-secret-key
GENERIC_TIMEZONE=UTC
N8N_LOG_LEVEL=info
Important: Store your N8N_ENCRYPTION_KEY securely. If it’s lost or changed, n8n won’t be able to decrypt previously saved credentials.
Step 5: Deploy and verify your installation
Once you’ve configured your database, storage and environment variables, click Deploy to launch your application.
During deployment, Coolify automatically:
- Pulls the latest n8n Docker image
- Creates the application container
- Configures networking
- Starts PostgreSQL (if attached)
- Sets up HTTPS using Let’s Encrypt
You can monitor the deployment in real time through the build logs.
When the deployment finishes:
- Open the generated application URL.
- Complete the n8n setup wizard.
- Create your administrator account.
- Sign in to access the workflow editor.
If everything is configured correctly, your self-hosted n8n instance is ready to use. However, keeping it stable and reliable over the long term requires more than the initial setup. It also means choosing the right database, managing updates carefully and maintaining regular backups.
How do you handle database selection, updates and backups for long-term stability?
Once your n8n instance is up and running, ongoing maintenance is essential to keep your workflows secure, reliable and performant. Choosing the right database, keeping your deployment up to date and backing up your data regularly will help minimize downtime and reduce the risk of data loss.
1. Choose the right database for your workload
n8n supports both SQLite and PostgreSQL, but the right choice depends on how you plan to use your instance.
SQLite is lightweight and easy to set up, making it suitable for learning, testing and small personal projects. However, as workflow complexity and execution volume increase, PostgreSQL provides better reliability and performance.
| Feature | SQLite | PostgreSQL |
| Best for | Personal projects and testing | Production deployments |
| Performance | Good for light workloads | Optimized for high-volume workflows |
| Concurrent executions | Limited | Supports multiple concurrent executions |
| Scalability | Limited | High |
| Backup options | File-based backups | Automated database backups |
Recommendation: Use PostgreSQL for production environments where multiple workflows, scheduled jobs or webhook triggers run simultaneously.
2. Keep n8n up to date
Regular updates help you benefit from new features, bug fixes and security improvements.
With Coolify, updating n8n is straightforward:
- Open your n8n service in the Coolify dashboard.
- Click Rebuild or redeploy the application.
- Coolify pulls the latest Docker image and restarts the container.
- Verify that your workflows and integrations continue to work as expected.
Best practice: Review the n8n release notes before updating production environments, especially if you’re using community nodes or custom integrations.
3. Back up your deployment regularly
A backup strategy is just as important as your deployment itself. While persistent storage protects your data during container updates, it doesn’t replace regular backups.
At a minimum, back up:
- Your PostgreSQL database
- The /home/node/.n8n persistent volume
- Your N8N_ENCRYPTION_KEY
- Any custom nodes or configuration files
Automating backups and storing them in a separate location helps you recover quickly in the event of accidental deletion, hardware failures or server migrations.
4. Monitor your deployment
As your automation grows, regularly monitor your VPS to ensure it continues to perform reliably.
Check:
- CPU and memory utilization
- Available disk space
- Workflow execution failures
- Container health and logs
- Database performance
Monitoring these metrics helps identify performance bottlenecks before they affect your workflows.
5. Plan for future growth
If your workflows become more complex or execution volume increases, consider upgrading your VPS resources. Additional CPU, memory and storage can improve execution times and support more concurrent workflows without requiring changes to your n8n configuration.
With scalability in mind, the next step is choosing a VPS provider that offers the performance and resources your n8n deployment needs.
Why choose Bluehost VPS for hosting n8n with Coolify?
Running n8n with Coolify requires reliable infrastructure that can handle containerized applications, databases and growing workflow execution. Bluehost Self-Managed VPS provides the dedicated resources and server-level control needed to deploy, manage and scale your automation with confidence.
Key features of Bluehost VPS for self-hosted automation:
- High-speed NVMe storage architecture: NVMe drives provide ultra-fast disk write speeds, enabling rapid logging for concurrent PostgreSQL workflow executions.
- Dedicated compute allocation: Guaranteed vCPU and RAM resources prevent performance drops caused by shared resources.
- Full root access: Complete server control allows custom Docker daemon configurations, advanced security firewall rules and unrestricted port management.
- Unmetered bandwidth: Handle thousands of incoming webhooks and API payloads without worrying about bandwidth overage charges.
Combining Bluehost NVMe VPS performance with Coolify PaaS gives you an enterprise-grade automation platform at minimal cost.
Final thoughts
Hosting n8n with Coolify on a VPS gives you complete control over your automation workflows, data and infrastructure. With PostgreSQL, persistent storage and a secure server configuration, you can build a reliable environment that scales as your automation needs grow.
If you’re looking for a flexible platform to self-host n8n, Bluehost Self-Managed VPS provides the dedicated resources, NVMe storage and full root access needed to deploy and manage Coolify with confidence.
FAQs
Configure a persistent Docker volume mount in Coolify pointing to /home/node/.n8n. This volume path ensures workflow definitions, user credentials and execution histories survive container restarts, updates and server reboots.
Add WEBHOOK_URL containing your custom HTTPS domain (for example, https://[n8n.yourdomain].com/) in the Environment Variables tab. Define N8N_ENCRYPTION_KEY with a strong random string before your initial launch to protect saved API credentials.
SQLite is suitable for testing or personal projects with low transaction volumes. However, PostgreSQL is strongly recommended for production n8n deployments on Coolify to handle concurrent workflow executions without database locking issues.
Click the Rebuild button in your Coolify n8n service dashboard. Coolify pulls the newest Docker image, executes database migrations and restarts the container. Your workflows and settings remain completely intact within your persistent storage volumes.
We recommend the Bluehost NVMe 4 VPS plan featuring 4 GB RAM, 2 vCPUs and 100 GB NVMe storage. This configuration comfortably handles Coolify, n8n and PostgreSQL simultaneously without resource starvation.

Write A Comment