
Key highlights
- Integrating Salesforce with WordPress streamlines lead management, data syncing and customer insights for businesses.
- Popular plugins like WPForms, Gravity Forms and Object Sync can be used for easy and no-code solutions.
- Salesforce API helps developers create custom integrations for tailored workflows, like syncing complex Salesforce objects.
- Best practices, including data security, performance optimization and error handling, ensure a smooth and compliant integration process.
- Bluehost’s fast, secure WordPress hosting is recommended to support high-volume data syncs.
Introduction
Ever wondered how great it would be if your website could directly talk to your CRM, seamlessly turning casual visitors into customers without your input? Well, you’re not alone. For small business owners, marketers and sales teams, integrating Salesforce with WordPress can be a game-changer. So much so that it can have a huge positive impact on conversion, since you won’t have to spend all your time juggling leads between platforms.
In this blog, we’ll discuss in detail the steps for Salesforce WordPress integration and the tools that can help you achieve it. Whether you’re a Salesforce CRM administrator or a developer exploring API integrations, this guide will give you everything you need.
Methods of integrating Salesforce with WordPress
There’s no one-size-fits-all approach to WordPress CRM integration. Depending on your technical expertise and business needs, you can choose from one of these methods.
Here’s a high-level overview of all the tools that can help you integrate Salesforce with WordPress.
| Tool | Type | Best for | Pros | Cons |
| WPForms | Plugin | Beginners, small businesses | Easy-to-use interface, No coding required | Needs WPForms Pro license, Limited to one-way syncing |
| Zapier | Third-Party Tool | Businesses needing flexible automation | Highly versatile app connections, No coding needed, Quick setup for automation | Free plan limits features, Costs increase with usage |
| Gravity Forms | Plugin | Users needing dynamic forms | Flexible for complex forms, Supports advanced use cases | Requires Gravity Forms license, Addon adds extra cost |
| Object Sync | Plugin | Teams needing real-time sync | Free and open-source, Highly customizable, Real-time two-way syncing | Technical setup required, Not beginner-friendly |
| Jetpack | Plugin (via Zapier) | Jetpack users, multi-feature sites | Simplifies for Jetpack users, Combines CRM with site tools, No coding with Zapier | Needs Zapier for Salesforce link, Limited form customization |
Now let’s learn about the methods that you can use to sync Salesforce with WordPress. We’ll also take an in-depth look at the tools mentioned above.
Method 1: Using plugins for easy integration
When it comes to WordPress Salesforce integration, plugins are the go-to solution for non-developers. They’re user-friendly, quick to set up and ideal for small businesses. Here are some of the best WordPress plugins to consider:
1. WPForms Salesforce addon
What it does: This addon extends the popular WPForms plugin, allowing you to capture form submissions on your WordPress site. You can use this addon to send sign-ups directly to Salesforce as leads, contacts or other objects.
Key features:
- Drag-and-drop form builder for easy setup
- Seamless field mapping to Salesforce objects (for example, name, email, company)
- Support for conditional logic to filter submissions before syncing
Best for: Beginners or small businesses looking for a simple Salesforce lead capture WordPress solution.
Pros:
- Easy to use with a beginner-friendly interface
- No code platform, making it accessible to non-developers
- Integrates seamlessly with the widely used WPForms plugin
Cons: Requires a WPForms Pro license; limited to one-way syncing (WordPress to Salesforce).
2. Gravity forms salesforce addon
What it does: Connects Gravity Forms is one of the most powerful form plugins for WordPres to Salesforce integration. It enables you to push form data into Salesforce objects like leads, contacts or custom records.
Key features:
- Advanced form customization with conditional logic and multi-page forms
- Maps form fields to Salesforce fields with precision
- Supports multiple Salesforce feeds for different workflows
Best for: Businesses needing dynamic, customizable forms for WordPress CRM integration.
Pros:
- Offers extensive flexibility for creating complex, tailored forms
- Ideal for advanced use cases with dynamic field options
- Benefits from a large community and strong developer support
Cons: Requires a Gravity Forms license and the Salesforce addon (additional cost).
3. Object sync for Salesforce
What it does: Provides bidirectional synchronization between WordPress and Salesforce, syncing data like users, posts or custom objects in real-time or on a schedule.
Key features:
- Maps WordPress objects (for example, users, posts) to Salesforce objects (for example, contacts, opportunities)
- Supports custom Salesforce fields and objects
- Configurable sync triggers (for example, user registration or post updates)
Best for: Teams needing two-way data sync for deeper integration.
Pros:
- Free and open-source, making it budget-friendly
- Highly customizable for developers with technical skills
- Enables two-way syncing for real-time data consistency
Cons: Requires technical setup and configuration; not beginner-friendly.
Steps to integrate Salesforce with WordPress using plugins
Integrating Salesforce with WordPress using a plugin is a straightforward way to automate lead capture and data syncing without coding. Let’s look at the steps for integrating Salesforce with WordPress using the WPForms Salesforce addon.
Step 1: Install and activate
The first step is to install and activate WPForms on WordPress site. Here’s how to do it:
- Log in to your WordPress admin dashboard (for example, yourwebsite.com/wp-admin).
- Navigate to Plugins > Add New.
- Search for “WPForms” in the search bar.
- Click Install Now on “WPForms – Drag & Drop Form Builder,” then Activate once installed.

- Purchase and upgrade to WPForms Pro to unlock the Salesforce Addon. After purchasing, download the Pro version, upload it via Plugins > Add New > Upload Plugin and enter your license key under WPForms > Settings > General.
Step 2: Install the Salesforce addon
Now we have to install and activate the Salesforce addon. Here’s the steps:
- In your WordPress dashboard, go to WPForms > Addons.
- Scroll to the “Salesforce Addon” (or search for it in the search bar).
- Click Install Addon, then Activate. This requires an active WPForms Pro license.
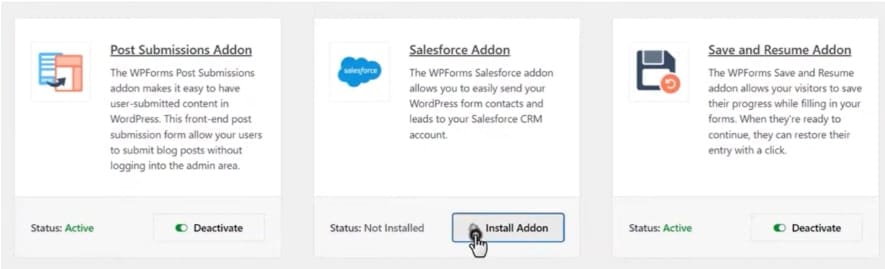
- Verify the addon is active under WPForms > Addons—it should show as “Active.”
Step 3: Establish connection
Now we’ll establish the connection between Salesforce and WordPress. Follow these steps for the same.
- Go to WPForms > Settings > Integrations in your WordPress dashboard.
- Locate the “Salesforce” section and click it to expand.
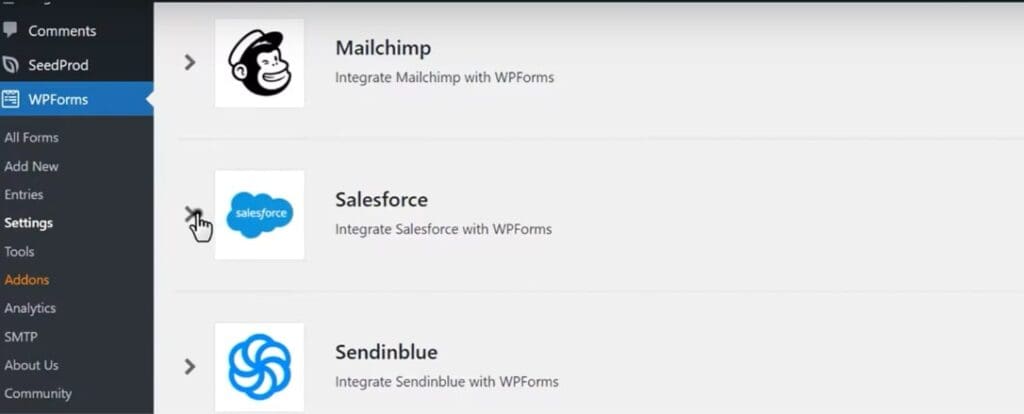
- Click Add New Connection and name it (for example, “Salesforce CRM”).
- You’ll be prompted to log in to Salesforce:
- Click the Connect to Salesforce button.
- A popup will redirect you to Salesforce’s login page. Enter your Salesforce credentials (username and password).
- Approve the connection by clicking Allow when Salesforce asks for permission.

- Once connected, WPForms will display Save the connection. You’ll see a “Successfully connected” message in WPForms.
Step 4: Create a form to capture data
In this step you’ll have to create the form that’ll be displayed in your WordPress site. Here’s how to do it.
- Go to WPForms > Add New in your WordPress dashboard.
- Choose a template (for example, “Simple Contact Form”) or start from scratch.
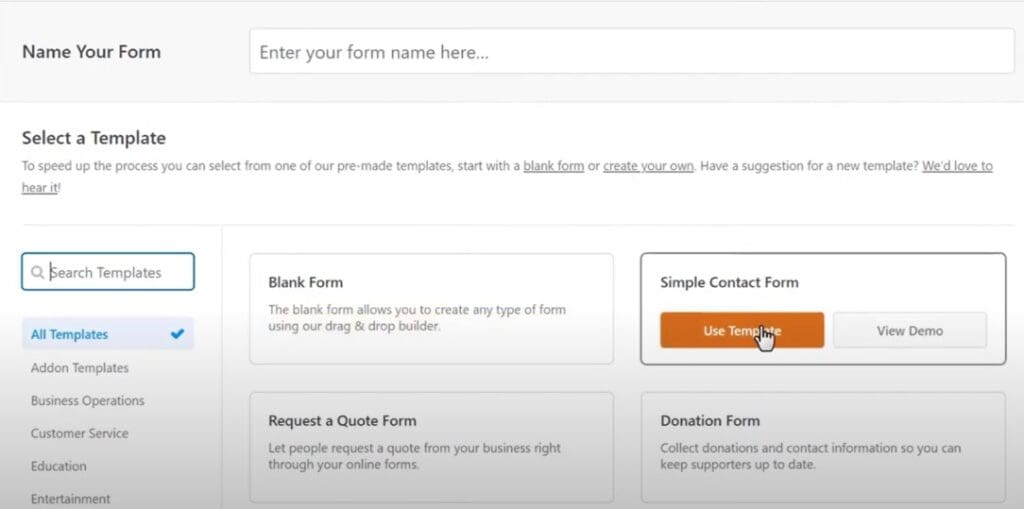
- Use the drag-and-drop builder to add fields:
- Add fields like “Name,” “Email,” “Phone,” or any custom fields you need.
- Customize labels and settings as desired.
- Click Save and name your form (for example, “Lead Capture Form”).
Step 5: Set up the Salesforce integration
Once the form is created, you’ll have to integrate it with Salesforce. Here’s the steps.
- With your form open in WPForms, go to Settings > Salesforce.
- Click Add New Connection
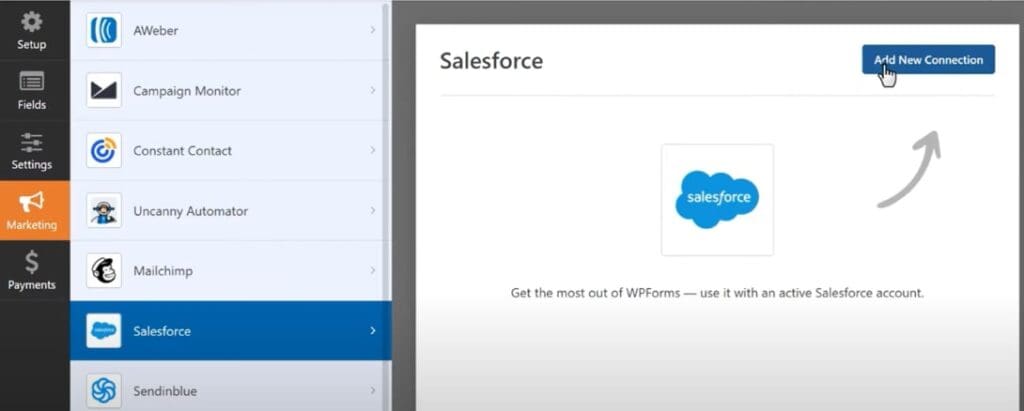
- Configure the feed for each respective field, for example, Name, Salesforce Object and Field Mapping.
- Click Save Feed.
Step 6: Embed the form on your WordPress site
Finally, you’ll have to integrate the form with your WordPress website to complete the process. Follow these steps.
- Copy the form’s shortcode from WPForms (for example, [wpforms id=”123″]).
- Go to Pages or Posts > Add New (or edit an existing page).
- Paste the shortcode where you want the form to appear.
- Publish or update the page.
Outcome:
Users achieve quick, automated lead capture and data syncing between WordPress forms and Salesforce without coding. This saves hours of manual work and enables non-technical teams to manage leads efficiently within a day.
Method 2: Using Salesforce API for personalized integration
Instead of using a plugin, you can also integrate Salesforce with WordPress manually using the Salesforce API. This approach is suitable for businesses needing tailored custom integration solutions with Salesforce. Here’s a step-by-step guide:
Step 1: Creating a Salesforce app for API access
The first step in connecting WordPress to Salesforce manually is setting up a Salesforce Connected App. This app acts as the bridge between the two platforms, allowing secure API access.
How to do it:
- Log into Salesforce: Use an account with administrative privileges and navigate to the Salesforce account dashboard.
- Access app manager: Go to Setup (top-right gear icon) > Apps > App Manager.
- Create a new connected app: Click New Connected App > Fill in basic details > Under OAuth Settings, check Enable OAuth Settings.
- Configure OAuth settings: Enter the URL where Salesforce will redirect after authentication > Add scopes like API, refresh_token and offline_access to allow full API access and persistent connections > Save and retrieve credentials like Client ID and Client Secret (Consumer Secret).
Key tips:
- Keep the Client Secret secure; treat it like a password.
- If you’re testing, use a Salesforce Sandbox environment to avoid affecting live data.
Step 2: Setting up authentication (OAuth 2.0)
Salesforce uses OAuth 2.0 to authenticate external applications like WordPress, ensuring secure data exchange. This step establishes a trusted connection and provides access tokens for API calls.
How to do it:
- Initiate OAuth flow: From WordPress page, direct users (or an admin) to Salesforce’s OAuth authorization UR > Replace YOUR_CLIENT_ID with the Connected App’s Client ID and YOUR_CALLBACK_URL with the redirect URL from Step 1.
- Handle the authorization code: After approval, Salesforce redirects to your callback URL with a temporary code parameter. Capture this code in WordPress using a custom endpoint.
- Exchange code for tokens: Make a POST request to Salesforce’s token endpoint to get an access token and refresh token:
- Store tokens securely: Save tokens in WordPress using the Options API. Encrypt sensitive data or use a secure vault solution to comply with security standards like GDPR.
Key tips:
- Test the OAuth flow in a browser first to ensure the callback works.
- Use the refresh_token to maintain access without re-authentication.
Step 3: Mapping WordPress form fields to Salesforce leads
With authentication in place, you’ll need to define how data flows from WordPress to Salesforce. This involves mapping fields from your WordPress forms (for example, Contact Form 7 or WPForms) to Salesforce objects like Leads.
How to do it:
- Identify WordPress form fields: Choose a form plugin or custom form. For example, a contact form might have fields: name, email, phone and message. Capture form submissions using WordPress hooks.
- Understand Salesforce objects: The Lead object typically includes fields like first name, last name, email, phone and description. Review Salesforce’s API documentation to confirm field names and requirements.
- Prepare data for API: Format data as JSON for the REST API
{

 "FirstName": "John",

 "LastName": "Doe",

 "Email": "john.doe@[example].com",",

 "Phone": "123-456-7890",

 "Description": "Interested in product demo"

}- For contact form 7:
add_action('wpcf7_mail_sent', function($contact_form)
{
$submission = WPCF7_Submission::get_instance();
$data = [

        'FirstName' => $submission->get_posted_data('name'),

        'Email' => $submission->get_posted_data('email'),

        'Phone' => $submission->get_posted_data('phone'),

        'Description' => $submission->get_posted_data('message')

    ];
    // Pass to Step 4 for API call
};
Key tips:
- Validate data (for example, email format) before mapping to avoid sync errors.
- Handle edge cases like missing fields with defaults.
Step 4: Automating data transfer using REST API
The final step is sending the mapped data from WordPress to Salesforce using the REST API. This requires custom code or a helper plugin to trigger API requests.
How to do it:
- Make the API call: Use the access_token from Step 2 to authenticate requests. Send a POST request to create a Lead and replace yourinstance with your Salesforce domain (for example, na123).
- Implement in WordPress: Use wp_remote_post to send the request.
php

$response = wp_remote_post('https://yourinstance.salesforce.com/services/data/v52.0/sobjects/Lead/', [

    'headers' => [

        'Authorization' => 'Bearer ' . get_option('salesforce_access_token'),

        'Content-Type' => 'application/json'

    ],

    'body' => json_encode($data)

]); - Alternative with plugins: Use a plugin like WP Webhooks to trigger API calls without writing extensive code. Configure it to fire on form submission and pass data to Salesforce.
- Test the sync: Submit a test form and check Salesforce for the new Lead.
Key tips:
- Respect Salesforce API rate limits (check your edition’s allocation).
- Add error handling (for example, retry on 401 Unauthorized with a refreshed token).
Outcome:
Developers can create a fully customized, scalable integration that syncs complex data—like custom objects or bidirectional updates. This gives businesses precise control over workflows and enhances CRM accuracy.
Method 3: Using third-party tools for complex automation
Middleware solutions act as a bridge, simplifying syncing without requiring deep coding knowledge for complex synching tasks. Some of the best ones for synching Salesforce and WordPress are:
1. Zapier
What it does: Zapier automates workflows by connecting WordPress and Salesforce through “Zaps”—pre-built or custom automation triggers. For example, when a visitor submits a WordPress form, Zapier will automatically create a lead or contact in Salesforce.
Key features:
- Supports hundreds of apps, making it highly versatile
- No coding required; uses a simple trigger-action interface
- Can sync data like form submissions, user registrations or e-commerce orders
Best for: Small businesses or marketers needing quick, no-code automation.
Example use case: A WordPress contact form submission automatically generates a Salesforce lead and assigns it to a sales rep.
2. Make
What it does: Make is a powerful automation platform that connects WordPress and Salesforce with more advanced workflows than Zapier. It allows multi-step processes and data transformations.
Key features:
- Visual workflow builder for complex automations
- Supports HTTP requests and webhooks for deeper integration
- Handles large data volumes with filtering and routing options
Best for: Users needing sophisticated syncing, such as bidirectional updates or conditional logic.
Example use case: Syncing WordPress user sign-ups to Salesforce as contacts, then triggering a personalized email campaign.
3. Workato
- What it does: Workato is an enterprise-grade integration platform that connects Salesforce and WordPress for robust, scalable data flows. It’s designed for businesses with complex needs.
Key features:
- Pre-built connectors for Salesforce and WordPress
- Advanced error handling and real-time monitoring
- Supports custom recipes for tailored integrations
Best for: Larger organizations or CRM administrators requiring secure, high-volume syncing.
Example use case: An e-commerce site on WordPress syncs customer orders and support tickets to Salesforce for unified tracking.
Outcome:
Teams can automate multi-step workflows across WordPress, Salesforce and other apps in a few hours. This reduces errors, streamlining the entire email marketing campaign. and connecting lead data to tools like email marketing platforms for seamless campaign.
Best practices for a seamless Salesforce WordPress integration
Let us look at the best practices that new need to ensure while linking SalesForce with WordPress.
Ensuring data security and compliance
Ensuring data security and compliance is critical since both WordPress and Salesforce manage sensitive info that laws like GDPR protect. Make sure to encrypt data transfers using HTTPS to comply with GDPR and CCPA, keeping customer details safe during every sync. You should also regularly audit your setup to maintain compliance and prevent breaches that could harm your business reputation.
Optimizing performance
Optimizing performance prevents slowdowns when syncing high volumes of Salesforce data with your WordPress site. Choose a fast WordPress hosting service like Bluehost, which optimizes load times even with heavy data transfers. Also, minimize API calls to avoid slowdowns by scheduling non-critical syncs for off-peak hours to keep speeds high. This ensures your site stays responsive for visitors while maintaining efficient CRM updates without delays.
Setting up automated backups
Setting up automated backups protect your data from loss if sync failures or server glitches disrupt operations. Make sure to export Salesforce data regularly, so you have a full record of leads and contacts ready for recovery. Test these backups often to confirm they work, to keep your integration secure and your business prepared.
Implementing error handling
Implementing error handling will catch issues before they hamper your lead tracking or data flow processes. Monitoring sync logs and setting up alerts for failed transfers using plugins can help you avoid such disruptions. Fixing errors as soon as they occur will keep your Salesforce-WordPress integration running smoothly.
Bluehost’s reliable hosting for WordPress integration
Regardless of the method you choose to integrate Salesforce with WordPress the success of your automation hinges on the quality of your hosting service. Even if you are attracting the right leads, without a fast, reliable and secure hosting environment, the entire integration can crumble. This will lead to failed data syncs and in worse case scenarios there can be critical breaches of sensitive customer data.
Bluehost’s WordPress hosting stands out as the right hosting solution for seamless WordPress integration with Salesforce. Our optimized servers ensure that high volumes of Salesforce data, including leads, contacts and custom objects, sync seamlessly with your WordPress site.
Our WordPress hosting comes with Jetpack, a popular plugin that enhances site functionality. You can use Jetpack’s built-in contact form block to capture leads and synced to Salesforce through Zapier automation.
Additionally, all Bluehost servers are fortified with free SSL certificates and advanced malware protection to ensure optimum security of customer data.
Final thoughts
Integrating Salesforce with WordPress doesn’t have to be daunting. Whether you opt for the best Salesforce plugins for WordPress or use the custom Salesforce API, the key is choosing the right method for your needs. With benefits like better lead management, automated workflows and enhanced customer insights, this integration can transform how you do business.
Ready to get started? Bluehost’s reliable WordPress hosting offers the performance, security and scalability you need to support seamless CRM integrations. Sign up for Bluehost WordPress hosting today and take the first step toward a smarter, more connected business!
FAQs
No, coding skills aren’t always required. For non-developers, plugins like WPForms Salesforce Addon or Zapier offer user-friendly solutions to connect Salesforce to WordPress without writing code. However, if you opt for a custom Salesforce API integration, basic knowledge of PHP, REST APIs and authentication (like OAuth 2.0) will be necessary.
Some of the best Salesforce plugins for WordPress include WPForms Salesforce Addon for easy lead capture and Object Sync for Salesforce for bidirectional syncing. There are key benefits for each plugin that caters to different needs, from simplicity to advanced data management.
The setup time varies by method. Using a plugin like WPForms or Zapier can take as little as 30 minutes to an hour with proper configuration. A custom API integration might take several hours to a few days, depending on your technical expertise and the complexity of your data mapping requirements.
Yes, it can work on most hosting providers, but performance and security matter. Bluehost’s WordPress hosting is ideal because it offers fast load times, automatic backups and robust security features like SSL—crucial for handling high-volume data. Managing sales leads will become way easier with the right hosting for WordPress integration.
If the integration fails, data may not sync properly, leading to missing leads or errors. To prevent this, test your setup thoroughly before going live, monitor sync logs and use error-handling measures. Choosing a reliable hosting solution also minimizes downtime or performance issues that could disrupt the integration. Bluehost is one of the best integration-friendly hosting options.

Write A Comment