Key highlights
- Learn how cPHulk provides automated brute force protection across SSH, FTP, email and cPanel without requiring manual intervention.
- Discover step-by-step instructions for enabling and configuring cPHulk protection in WHM for VPS and dedicated servers.
- Master advanced optimization techniques including whitelist management, graduated response mechanisms and service-specific security thresholds.
- Understand how to prevent accidental lockouts by whitelisting your IP address through WHM or the cPanel system console.
- Explore monitoring strategies and troubleshooting methods to ensure cPHulk blocks attacks without disrupting legitimate user access.
Cybersecurity threats continue to escalate, with brute force attacks representing one of the most persistent and damaging forms of unauthorized access attempts. For businesses relying on VPS and dedicated hosting environments, implementing robust automated threat detection becomes critical to maintaining server integrity and protecting sensitive data.
In this comprehensive guide, you’ll discover how cPHulk brute force protection serves as your first line of defense against malicious login attempts, learn advanced configuration strategies for optimal security and understand how to implement automated threat detection across your hosting infrastructure. Whether you’re managing a single VPS or multiple dedicated servers, this technical deep-dive will equip you with the knowledge to secure your hosting environment effectively.
TL;DR
- cPHulk is cPanel’s built-in brute force protection for VPS and dedicated servers.
- It automatically blocks IPs after repeated failed login attempts.
- You must whitelist your IP before enabling cPHulk to avoid lockouts.
- Enable and configure cPHulk through WHM Security Center.
- Use monitoring and tuning to reduce false positives and improve protection.
What is cPHulk and how does it work?
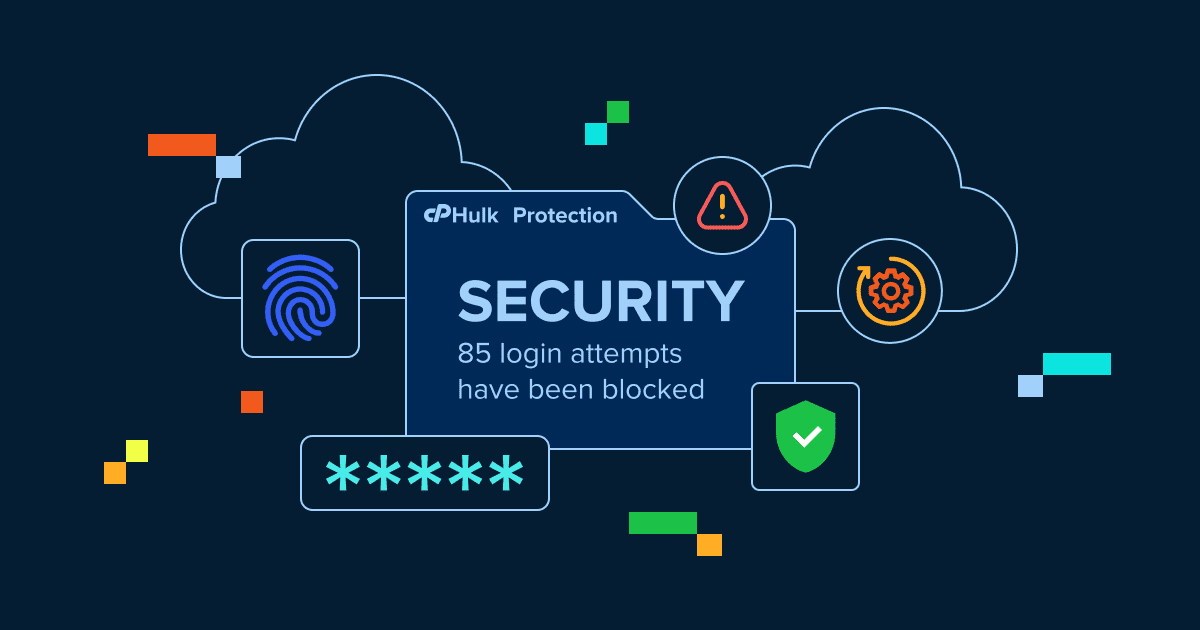
cPHulk is cPanel’s built-in brute force protection system designed to defend servers against automated login attacks. This powerful security tool monitors login attempts across various services including SSH, FTP, email accounts and cPanel itself, automatically blocking IP addresses that exhibit suspicious behavior patterns.
The system works by tracking failed login attempts from specific IP addresses within defined time periods. When an IP address exceeds the predetermined threshold of failed attempts, cPHulk automatically blocks that address for a specified duration, effectively preventing further attack attempts from reaching your server resources.
Key benefits of cPHulk protection
- Automated threat detection: Continuously monitors login attempts without manual intervention
- Comprehensive coverage: Protects multiple services simultaneously including SSH, FTP, email and web applications
- Customizable thresholds: Allows administrators to set specific limits based on their security requirements
- Resource optimization: Reduces server load by blocking malicious traffic before it reaches critical services
- Real-time monitoring: Provides instant visibility into attack patterns and blocked addresses
For hosting providers and system administrators, cPHulk represents an essential layer of defense that operates transparently in the background while maintaining legitimate user access to server resources.
Setting up cPHulk in WHM for VPS and dedicated servers
Setting up cPHulk brute force protection requires root-level access to WHM (Web Host Manager), which is available only on VPS and dedicated hosting environments. This is why cPHulk cannot be enabled on shared hosting plans.
Bluehost VPS and Dedicated hosting environments support WHM access, allowing administrators to enable and fine-tune cPHulk without the need for additional tools or third-party plugins.
Before enabling cPHulk, server administrators should ensure uninterrupted WHM access and identify their current IP address. Planning this step in advance helps avoid accidental lockouts and ensures the protection is aligned with how the server is accessed and managed.
This section focuses on preparation only. Actual enabling and configuration steps are covered below. If you’re moving beyond shared hosting, this is typically the point where VPS-level access becomes essential. For administrators who need WHM access without committing to full bare-metal resources, VPS hosting offers a practical middle ground. On Bluehost VPS Hosting, we support environments designed for server-level configuration, making it easier to implement tools like cPHulk as your security needs grow.

Enable cPhulk
To enable cPHulk, you will need to be logged into WHM. If you have not done this before, please see Log in to WHM. Once logged in:
- Look for the ‘Security Center’ section in the category list and click on ‘cPHulk Brute Force Protection’.
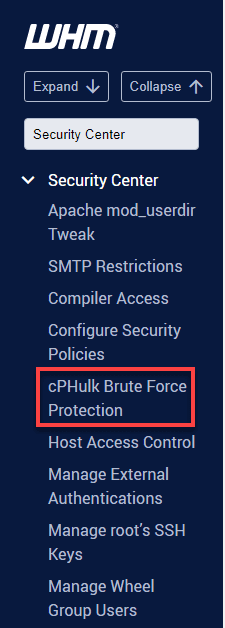
Alternatively, you can manually locate and expand the Security Center in the Tools section below the WHM home page and click on cPHulk Brute Force Protection.
2. Toggle ‘OFF’ to ‘ON’ beside cPHulk is Disabled.
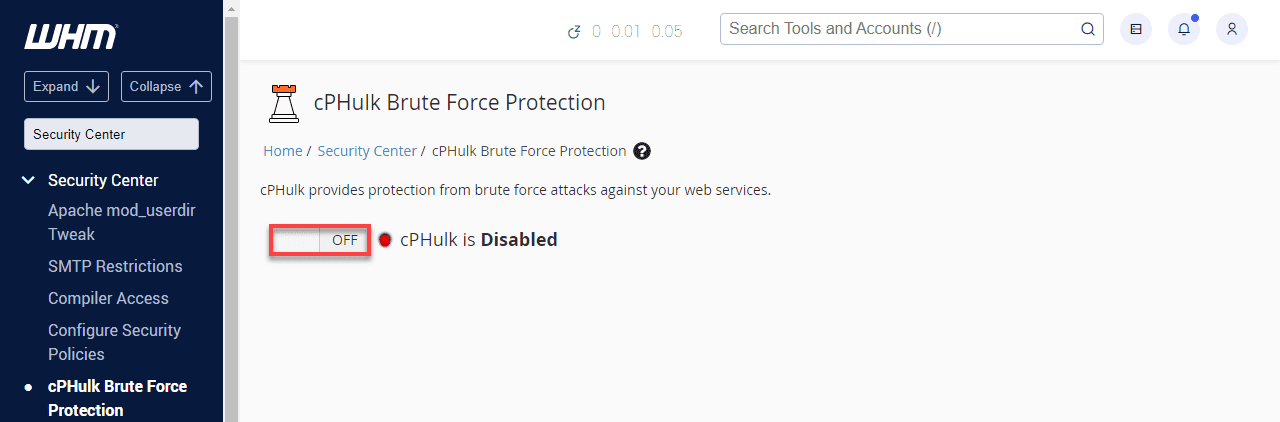
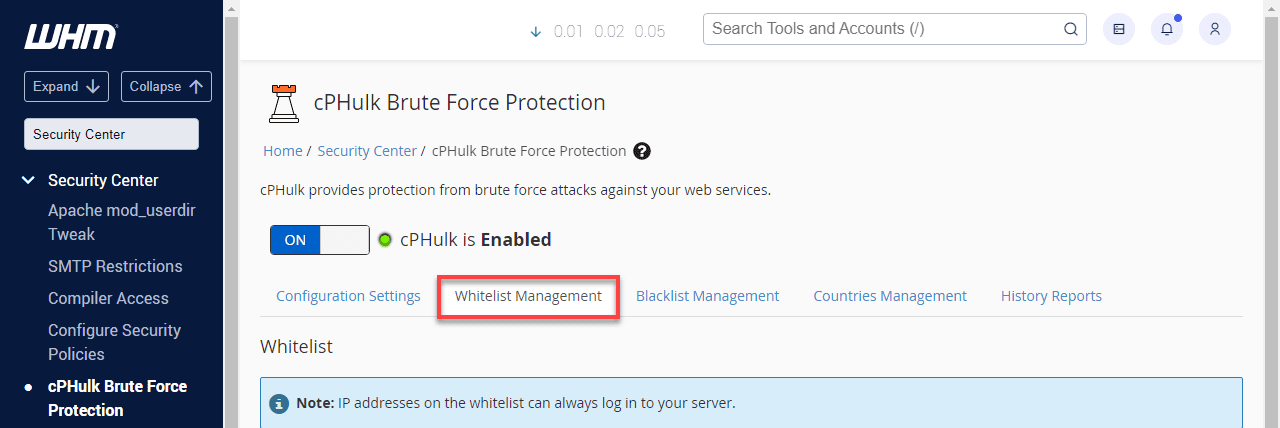
3. The status should say cPHulk is Enabled.

4. Once enabled, cPHulk immediately begins monitoring login activity across supported services.
Also read: How to Log In to WHM on VPS and Dedicated Servers
Initial cPHulk configuration steps
After enabling cPHulk, configure its core behavior to ensure effective protection without disrupting legitimate users.
Step 1: Access cPHulk settings
Log into WHM and navigate to “Security Center” then select “cPHulk Brute Force Protection.” This interface provides comprehensive controls for all protection parameters.
Step 2: Enable protection services
Select the services you want cPHulk to monitor. Recommended services include SSH, FTP, cPanel, Webmail and any custom applications that authenticate users.
Step 3: Configure threshold settings
Set appropriate failure thresholds based on your environment. Conservative settings might use 5 failures in 15 minutes, while more permissive configurations allow 10 failures in 30 minutes.
Step 4: Define block duration
Specify how long IP addresses remain blocked after triggering protection. Most environments benefit from 60-300 minute block periods, balancing security with legitimate user recovery.
These settings establish your server’s baseline brute force protection.
Also read: DNS Configuration with Web Host Manager
Advanced cPHulk optimization for VPS and dedicated servers
This level of optimization is recommended for high-risk environments, production servers and systems with privileged administrative access.
- Advanced optimization improves protection for high-risk and enterprise environments.
- Graduated response mechanisms work best for repeated attack patterns.
- Start with temporary blocks for initial failures.
- Increase block duration for repeated violations.
- Use permanent blocks only for persistent attackers.
- Administrative accounts require stricter thresholds than standard users.
- Higher privileges increase risk if these accounts are compromised.
Advanced configuration options
Beyond basic setup, cPHulk offers advanced features that enhance protection effectiveness:
- Whitelist management: Protect trusted IP addresses from accidental blocking.
- Blacklist enforcement: Permanently block known malicious addresses.
- Service-specific thresholds: Apply different rules to different services based on risk profiles.
At this level of security tuning, the underlying server resources and isolation matter just as much as configuration. For environments handling sensitive data or sustained attack traffic, dedicated servers provide the consistency and isolation needed for advanced security tuning. With Bluehost Dedicated hosting, we support administrators who need full control over resources to apply strict cPHulk thresholds without competing workloads.

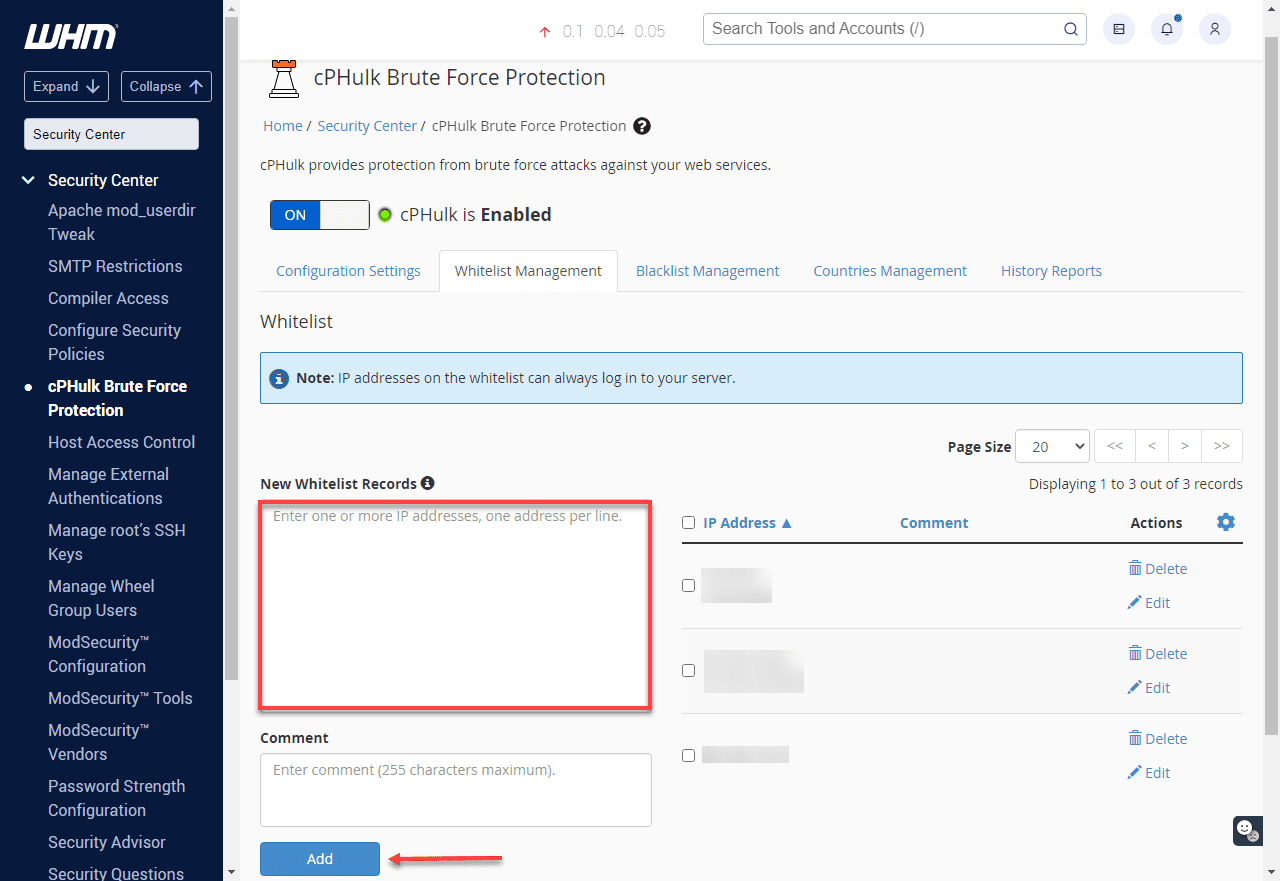
Whitelisting your IP address
Always whitelist your IP address before enabling or tuning cPHulk to prevent accidental lockouts. These steps will explain how-to whitelist an IP address. Whitelisted IP addresses will never be blocked by cPHulk.
- Click the ‘Whitelist Management’ tab.
2. Enter your IP address in the ‘New Whitelist Records’ entry field and click ‘Add’.
Also read:Whitelist IP Address: Complete Setup & Security Guide
Whitelisting in cPanel
If you have been blocked from WHM or any other login on your server, you may still login to your Bluehost cPanel and whitelist your IP address.
Important: If you need your IP address, it can be found at www.Bluehost.com/ip
- Log in to your Bluehost cPanel
- If you are not already on the hosting page, click the hosting link at the top.
- Click the performance link underneath the hosting tab.
- Click the system console link.
- Log in with root as your username and your root password.Note: If you aren’t sure of the root password, please see: Setting your Root password.
When typing in the password, the console will not act as if anything is being entered. This is done purposefully for security. Type your password carefully and hit enter as normal. - Once you are logged into the console, run enter this command:
/scripts/cphulkdwhitelist YOUR-IPNote: Please replace YOUR-IP with your actual IP address. - Next, run this command:
mysql cphulkd -e "delete from brutes where ip='YOUR-IP'"Note: Please replace YOUR-IP with your actual IP address. - Your IP address should now be whitelisted. Finally, enter this command to close the console.
exit
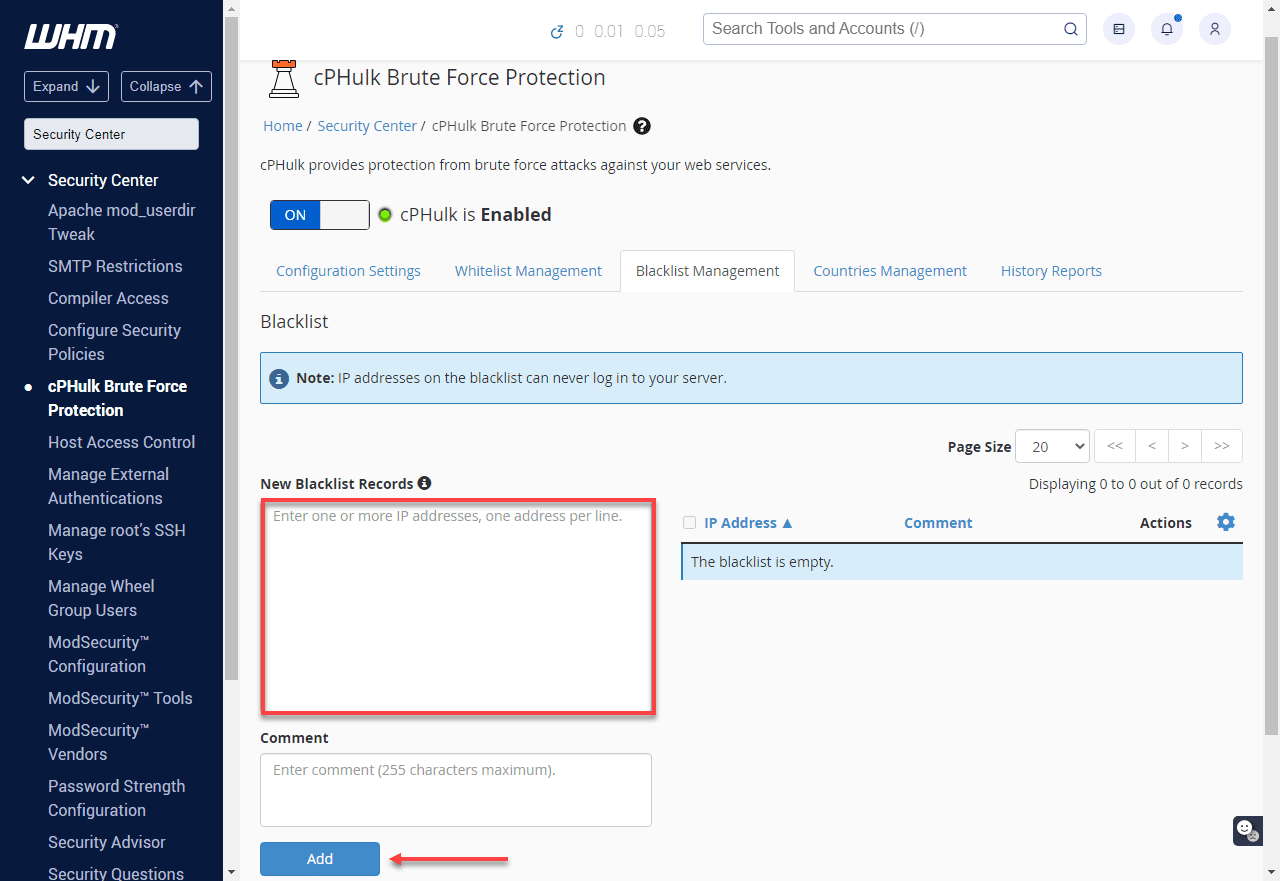
Blacklisting IP Addresses
- Click the Blacklist Management tab.

2. Enter the IP address into the Blacklist (Rejected IP list) entry field and click ‘Quick Add’.
Also read:Why is my IP blacklisted? Common causes, fixes and prevention tips
Monitoring and troubleshooting cphulk performance
Maintaining high server security standards requires a proactive approach to managing your brute force protection tools. By regularly evaluating the performance of cPHulk, administrators can ensure that their defensive measures are effectively mitigating unauthorized access attempts. Consistent monitoring and troubleshooting are essential for identifying potential configuration issues before they impact server accessibility. Review the following steps to manage your security settings and optimize system performance.
- Access cphulk logs: You can monitor blocked IP addresses and track brute force attempts by reviewing the cphulkd.log file located in the cPanel logs directory.
- Enable cphulk in whm: Log in to WHM through your account manager and navigate to the Security Center to verify that cPHulk brute force protection is fully enabled.
- Whitelist your ip address: Adding your specific IP address to the whitelist management tab is a critical step to prevent accidental lockouts during administrative sessions.
- Review blacklisted ips: The blacklist management tab allows you to view all currently blocked IP addresses and manually remove any that no longer pose a security threat.
- Check server logs for related issues: Reviewing the secure and login logs helps identify broader authentication failures that may be affecting the overall performance of cPHulk.
- Adjust cphulk settings: Modify the thresholds for failed login attempts and adjust lockout durations to customize the security response to your server’s specific needs.
- Restart cphulk service if needed: If you experience any performance delays, you can restart the service via WHM or by executing the restart script through the command line.
Regularly monitoring these logs and settings will help you troubleshoot and optimize cPHulk’s performance effectively. Understanding these essential maintenance tasks prepares you for more advanced configuration adjustments in the next section.
Common cPHulk issues and fixes
cPHulk Brute Force Protection is a vital component of cPanel security that helps prevent unauthorized access to your server. While it is highly effective at stopping malicious actors, administrators may occasionally encounter configuration issues or unintended lockouts. Properly managing these situations ensures that your security measures do not interfere with legitimate server operations.
The following sections detail common problems you might face along with the steps required to resolve them.
Ip address getting blocked unexpectedly
This issue typically occurs when the system detects multiple failed authentication attempts from your own connection, triggering an automated lockout to protect the server. To resolve this, you must whitelist your specific IP address within the WHM interface to prevent future blocks. Navigate to the Security Center, select cPHulk Brute Force Protection and add your IP to the Whitelist Management tab to ensure continuous access.
Legitimate users being locked out
It is common for genuine clients to lose access to their accounts after mistyping passwords several times across services like email, FTP or the control panel. When this occurs, administrators need to manually intervene to restore user connectivity by clearing the block. You can fix this by visiting the IP Address Management section in cPHulk and removing the affected user’s IP address from the blacklist.
cphulk conflicts with other firewalls
Running cPHulk alongside other firewall solutions like ConfigServer Security & Firewall (CSF) can lead to redundant filtering and unexpected blocking behavior. Because CSF often provides more comprehensive management features and often includes its own login failure daemon, it is generally recommended to disable cPHulk if CSF is active. You can toggle this setting in the Security Center to prevent software conflicts and performance degradation.
cphulk not blocking brute force attacks
If you notice that malicious login attempts are not being stopped, the cPHulk service may be disabled or experiencing a configuration error that prevents it from functioning. First, verify that the service is toggled to the enabled state within the WHM dashboard settings. If it is enabled but still failing to block attacks, review the system logs located at /usr/local/cpanel/logs/cphulkd.log to identify and troubleshoot the underlying cause.
High cpu usage due to cphulk
During intense brute force campaigns, the cPHulk daemon may consume significant CPU resources as it processes thousands of failed login events in real time. To mitigate this load, you can adjust the brute force protection settings in WHM to be less aggressive or shorten the block duration. Alternatively, offloading the filtering task to a firewall like CSF can help maintain server stability under heavy attack pressure.
Maintaining a balance between strict security and user accessibility is the key to managing cPHulk effectively. By applying these fixes, you can ensure your server remains protected against brute force attempts while minimizing disruptions for valid users.
Following these troubleshooting steps will help you optimize your brute force protection for better server performance.
Best practices for VPS and dedicated server security
Maintaining a secure server environment requires a proactive approach to prevent unauthorized access and data breaches. These strategies ensure that tools like cphulk brute force protection work efficiently alongside other defensive layers.
- Use a firewall to limit access. Setting up a firewall helps you manage incoming traffic and block unauthorized users from accessing sensitive ports. This layer of defense ensures that only verified connections can interact with your system services.
- Enable brute force protection. Cphulk brute force protection monitors login attempts and automatically blocks ip addresses that show malicious behavior. By restricting repeated failed attempts, you prevent attackers from gaining access through automated password guessing.
- Connect securely via ssh and sftp. Using ssh keys instead of passwords adds a critical layer of authentication that is much harder for hackers to bypass. Additionally, sftp ensures that all file transfers are encrypted to prevent data from being intercepted during transmission.
- Install only trustworthy software. You should only obtain software from official server repositories to ensure that the code is safe and free from vulnerabilities. Limiting your server to essential and verified applications reduces the number of potential entry points for attackers.
- Regularly check for malware. Performing frequent scans allows you to detect and remove malicious files before they can cause significant damage to your server. This proactive measure is vital for maintaining the integrity of your hosting environment and protecting user data.
- Manage ssl certificates properly. Installing ssl certificates for services like email and control panels ensures that all communication remains private and encrypted. Regular monitoring and renewal of these certificates prevent security warnings and maintain a professional reputation.
- Keep server software updated. Regularly patching your operating system and control panel software protects your server from newly discovered security threats. Staying current with updates ensures that you have the latest performance improvements and security fixes.
Following these structured security protocols creates a comprehensive defense strategy for any server administrator. This multi-layered approach keeps your data safe and ensures that your hosting environment remains stable.
Implementing these best practices ensures that cphulk brute force protection operates within a hardened system to maximize overall safety. These measures help balance strong security with the need for reliable access to your server resources.
Final thoughts
cPHulk brute force protection is a critical security layer for VPS and dedicated hosting environments, helping block repeated unauthorized login attempts without disrupting legitimate access. When properly configured, monitored and optimized, it strengthens your server’s defense against one of the most common attack vectors while preserving performance and usability.
The key is balance – setting realistic thresholds, reviewing block activity and pairing cPHulk with broader security best practices to stay effective as threats evolve.
If you’re running production workloads, custom applications or managing privileged access, your hosting foundation plays a major role in how securely you can operate. With Bluehost VPS hosting and Dedicated hosting, we give administrators the flexibility to manage server-level security through WHM and configure tools like cPHulk with confidence. Whether you’re upgrading from shared hosting or scaling an existing setup, our VPS hosting and Dedicated solutions are built to support secure, administrator-level control as your infrastructure grows.
FAQs
cPHulk is a security feature in cPanel that monitors login attempts and blocks IP addresses showing suspicious behavior. It protects your VPS or dedicated server from brute force attacks by limiting failed authentication attempts across multiple services.
cPHulk tracks failed login attempts and temporarily blocks IP addresses that exceed configured thresholds. This prevents automated bots from repeatedly guessing passwords, securing your hosting environment against unauthorized access attempts and potential security breaches.
Yes, you can configure cPHulk through WHM on VPS and dedicated hosting plans. Adjust failure thresholds, blocking periods, whitelist trusted IPs and customize protection levels to match your security requirements while maintaining legitimate user access.
When cPHulk blocks an IP, that address cannot authenticate to any service on your server for a specified period. Administrators can manually unblock IPs through WHM if legitimate users are accidentally blocked during authentication attempts.
cPHulk is primarily available on VPS and dedicated hosting plans where you have WHM access. Shared hosting customers benefit from server-level protection managed by the hosting provider, ensuring security without requiring manual configuration or management.


Write A Comment