Key highlights
- Understand what WebDisk is and why it remains a practical file management tool in cPanel-based hosting environments.
- Learn how WebDisk uses WebDAV to let you access, edit and manage website files directly from your computer.
- Explore when WebDisk makes more sense than FTP or File Manager, especially for quick edits and restricted access.
- Know how to set up WebDisk securely with the right ports, permissions and credentials to avoid common issues.
- Uncover real-world use cases where WebDisk simplifies file sharing and day-to-day website maintenance on shared hosting.
WebDisk is one of those hosting features that’s been around for years, yet many people either ignore it or don’t fully understand what it’s for. Even today, when we have FTP clients, cloud storage and Git-based workflows, WebDisk still solves a very specific problem.
For beginners, WebDisk feels simpler than FTP. For experienced users, it’s handy for quick edits, shared access or working behind restrictive firewalls. That’s why most cPanel-based hosting providers still include it by default.
In this blog, we’ll explain what WebDisk is, how it works with WebDAV in cPanel and when it makes sense to use it instead of FTP or File Manager. You’ll also learn how to set up WebDisk, access it on different operating systems and troubleshoot common issues.
What WebDisk is and why people still use it?
In simple words, WebDisk lets you connect to your hosting files using WebDAV, a web-based file access protocol. Once connected, your hosting directory appears like a normal folder or network drive on your computer. You can:
- Open files
- Edit them directly
- Upload or download folders
- Drag and drop content
All of this happens without opening cPanel every time and without using a separate FTP client.
Behind the scenes, WebDisk uses WebDAV (Web Distributed Authoring and Versioning), which works over HTTP or HTTPS. cPanel just wraps WebDAV into a more user-friendly feature and calls it WebDisk.
So if you’ve ever wondered why WebDisk and WebDAV are mentioned together so often, this is why.
WebDisk isn’t meant to replace every file transfer method, but there are cases where it simply feels easier.
It makes more sense than cPanel File Manager when:
- You don’t want to log in to cPanel repeatedly
- You need to work with files over a longer session
- You want to edit files using your local code editor
It can be more convenient than FTP when:
- You’re behind a firewall that blocks FTP ports
- You want everything to run over HTTPS
- You prefer browsing files like local folders instead of FTP panels
That’s why WebDisk is popular in shared hosting environments, educational setups and small teams that need simple, controlled access without advanced tooling.
Here’s how people actually use WebDisk in the real world:
- Uploading website files by dragging folders directly into a mapped drive
- Editing configuration files (like
.htaccessor CSS files) using local editors - Sharing access with a developer or content editor without giving full cPanel login
- Quick syncing small sets of files without setting up FTP clients
- Temporary access for troubleshooting or site fixes
Also read: How to Use CuteFTP (2026 Guide): Easy File Transfer Tips
WebDisk vs WebDAV
WebDisk and WebDAV are often mentioned together, which leads many users to assume they’re the same thing. While they’re closely related, there’s an important distinction, especially inside a cPanel environment.
WebDAV (Web Distributed Authoring and Versioning) is the underlying protocol that allows remote file access over HTTP or HTTPS. It’s a web standard designed to let users manage files on a remote server as if they were local.
WebDisk, on the other hand, is cPanel’s implementation of WebDAV. cPanel adds a user interface, access controls and account-level permissions on top of WebDAV and packages it as WebDisk. When you create a WebDisk account in cPanel, you’re essentially creating a WebDAV user with restricted directory access.
So while WebDAV is the technology, WebDisk is the hosting-friendly layer that makes WebDAV easier to use without manual configuration.
For simple team access, WebDisk works well. You can create separate users, restrict them to specific folders and revoke access easily without sharing your main cPanel login.
Also read: HTTP Status Codes List 2026 – All HTTP Error Codes Explained
What you need before you connect to WebDisk?
Before you try connecting to WebDisk from your computer, it’s important to have a few things in place. Most connection issues happen not because WebDisk is broken, but because one small detail, like the port, directory path or permissions, was missed during setup. Here’s what to check first.
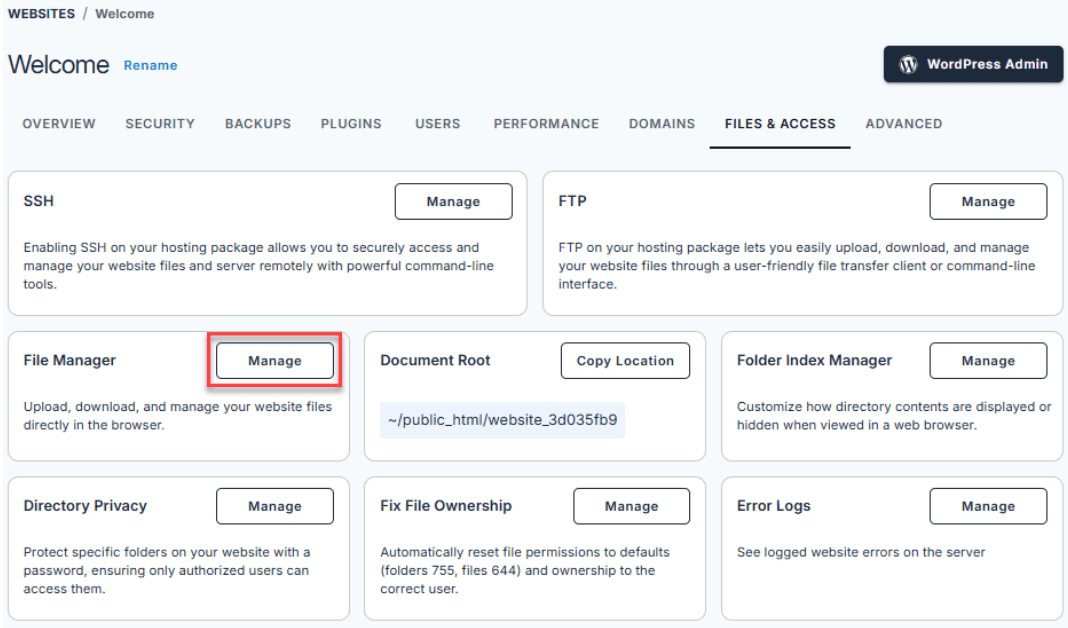
1. Locate WebDisk in cPanel
You can find WebDisk inside your cPanel dashboard under the Files section. Most hosting providers label it simply as Web Disk.
Once you open it, you’ll see options to:
- Create new WebDisk users
- Manage existing WebDisk accounts
- Configure client access for different operating systems
If you don’t see WebDisk in cPanel, it may be disabled by your hosting provider or restricted by your account type.
2. Gather WebDisk credentials
To connect successfully, make sure you have the following details ready:
- Username : usually in the format
[username]@[yourdomain].[com] - Password : the one set when creating the WebDisk account
- Directory path : the folder this user is allowed to access
- Server or hostname : often your domain name or server IP
Having these details upfront saves time and avoids repeated login prompts later.
3. Ports and SSL basics
WebDisk connections use specific ports depending on whether SSL is enabled:
- Port 2078 : Secure WebDisk (HTTPS, recommended)
- Port 2077: Non-secure WebDisk (HTTP)
Most modern guides recommend using 2078 because it encrypts your credentials and data. Port 2077 may still work, but it’s generally discouraged unless you’re testing in a controlled environment.
If your hosting account has SSL enabled, always choose the secure option.
Also read: How to Fix a Not Secure Website in Chrome?
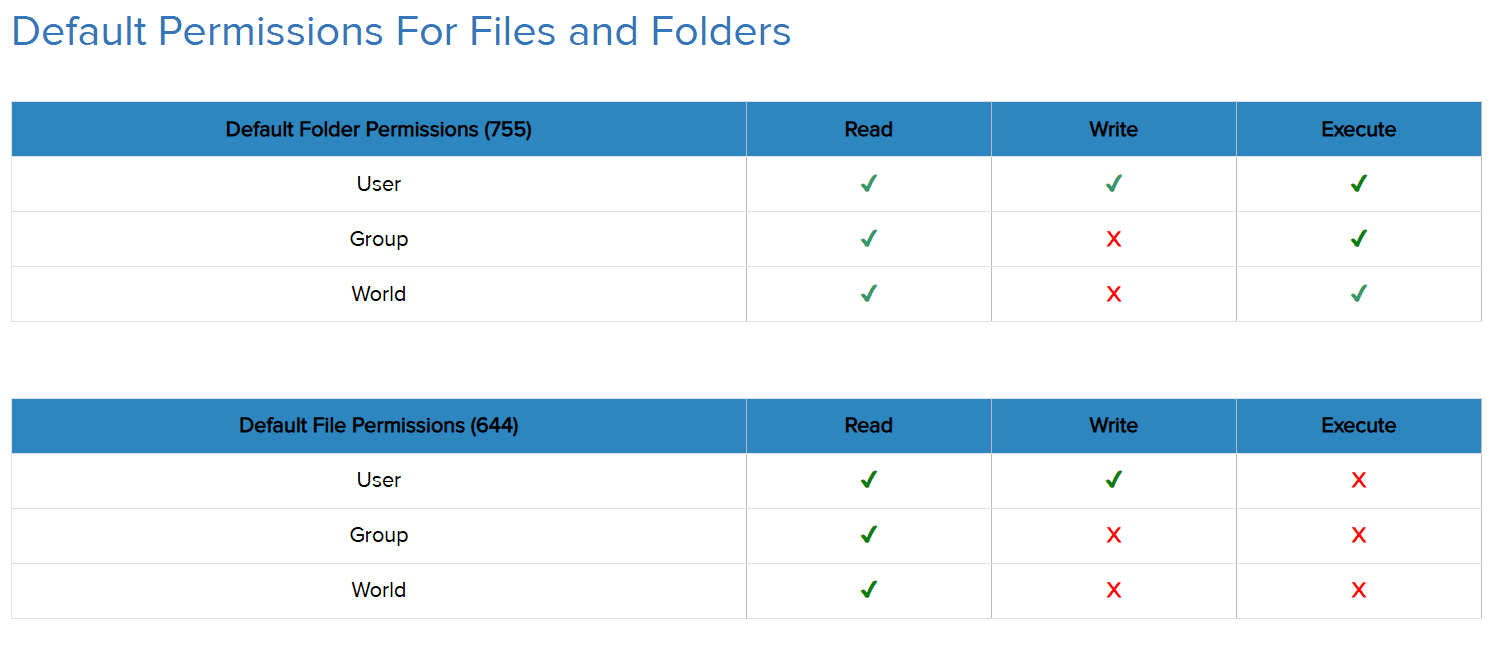
4. Allow folder permissions
One of the biggest advantages of WebDisk is controlled access—but only if it’s set up correctly.
Instead of giving access to your entire home directory, assign WebDisk users to:
- A specific project folder
- A subdirectory inside
public_html - A temporary working directory
This prevents accidental edits to sensitive files and reduces security risks. Planning folder access upfront makes WebDisk safer and easier to manage, especially when multiple users are involved.
How to set up a WebDisk account in cPanel?
Setting up a WebDisk account in cPanel only takes a few minutes, but doing it correctly makes a big difference for security and ease of use. Instead of using your main cPanel login, it’s best to create dedicated WebDisk users with limited access.
Here’s how to do it the right way.
Step 1: Create a WebDisk user for a specific folder
Inside cPanel, go to Web Disk and look for the option to Create an Additional Web Disk Account.
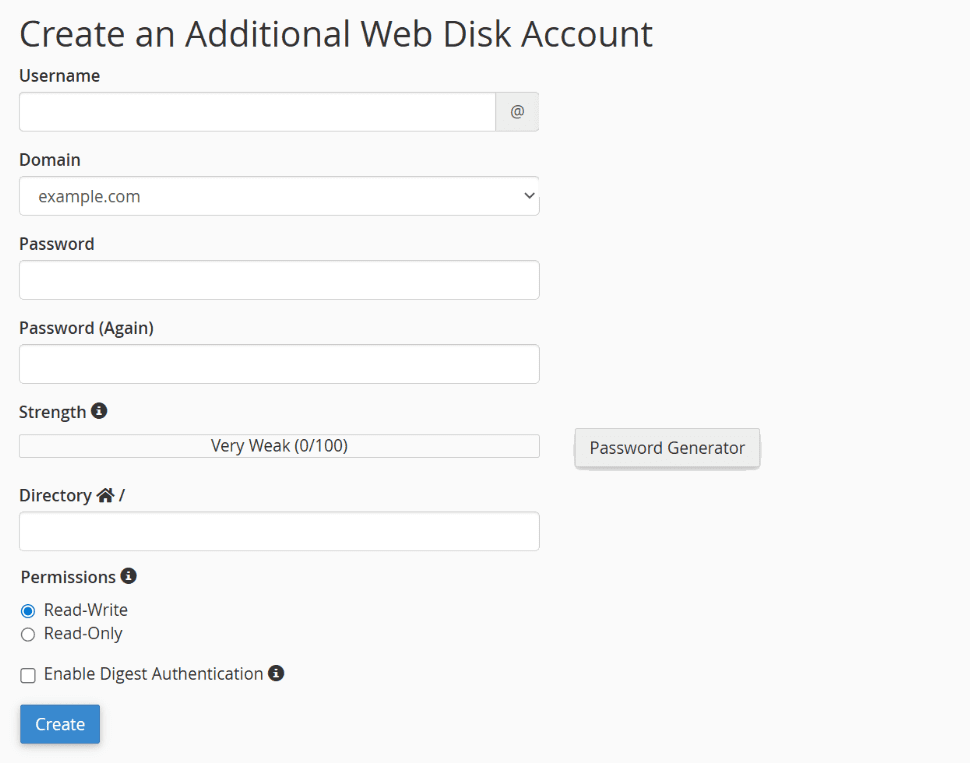
When creating a new user:
- Choose a unique username
- Set a strong password
- Select a directory the user can access
For safety, avoid assigning the root home directory. Limiting access to a specific folder (for example, a project folder or a subdirectory inside public_html) helps prevent accidental changes to sensitive files.
Step 2: Set the correct directory and permissions
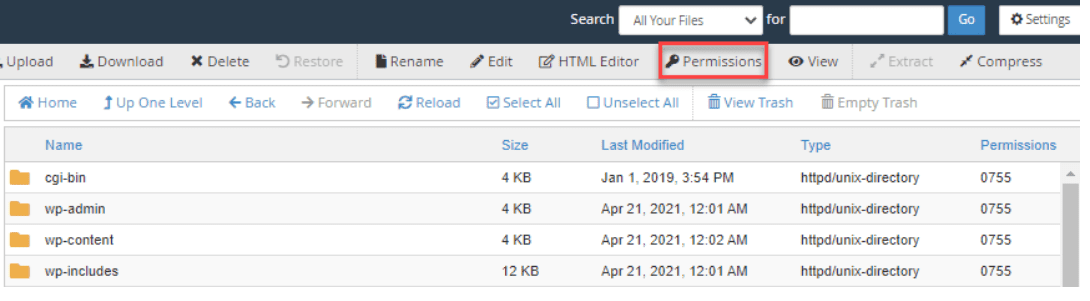
The directory you choose defines what the WebDisk user can see and edit.
A good practice is to:
- Create a dedicated folder first
- Assign that folder during WebDisk user creation
- Confirm the folder has the correct read/write permissions
If permissions are too restrictive, uploads may fail. If they’re too open, users may access more files than intended. Striking the right balance keeps things secure and functional.
Step 3: Use “Configure Client Access” correctly
Once the WebDisk user is created, cPanel provides a Configure Client Access option.
This section generates:
- Connection URLs for Windows, macOS and Linux
- The correct port and protocol (HTTP or HTTPS)
- Pre-filled connection strings
While these settings are helpful, it’s still a good idea to understand what they generate, especially if you’re connecting manually or troubleshooting later.
Step 4: Delete or disable WebDisk users when you’re done
WebDisk access should never be permanent unless necessary. When a project is complete or access is no longer needed:
- Delete the WebDisk user from cPanel
- Disable the account if you may need it again later
Removing unused accounts reduces security risks and keeps your hosting environment clean and manageable.
If you’re setting this up on a new site, choosing a cPanel-based hosting plan makes WebDisk easier to find, configure and manage. Bluehost shared hosting includes the tools you need to get started quickly. Along with simple file management, Bluehost provides a stable hosting environment, built-in security features and dependable support, making everyday tasks like uploading files, managing folders and sharing limited access smoother for site owners at any stage.
How to access WebDisk on different platform?
Once your WebDisk account is set up, you can connect to it from your operating system just like a network drive or remote folder. The steps vary slightly depending on the platform, but the core idea stays the same. Below are the most common and reliable ways to access WebDisk on Windows, macOS and Linux.
1. Accessing WebDisk on Windows
Windows supports WebDAV natively, which makes WebDisk easy to connect without installing extra software.
Connect using File Explorer
- Open File Explorer
- Right-click This PC and select Map network drive
- Choose a drive letter
- Enter the WebDisk URL (you’ll add the exact format next)
- Check Connect using different credentials
- Enter your WebDisk username and password
Once connected, your hosting directory will appear as a normal drive in File Explorer.
In most cases, this format works reliably:
https://yourdomain.com:2078/yourfolder
If your WebDisk user is assigned to the root of a directory, you may not need to add a folder name. Always use HTTPS and port 2078.
Digest authentication notes
Windows may prompt you for credentials more than once. This usually happens when digest authentication is required.
To avoid repeated prompts:
- Make sure you’re using the full username format
- Clear any saved credentials in Windows Credential Manager
- Reconnect using the secure WebDisk URL
Once authenticated correctly, Windows typically remembers the session.
Quick test: Before mapping the drive, paste the WebDisk URL directly into your browser.
If it asks for credentials and shows a folder listing after login, your WebDisk setup is working. If not, it’s easier to troubleshoot here before mapping the drive.
2. Accessing WebDisk on macOS
macOS includes built-in WebDAV support through Finder, making the connection process straightforward.
Connect to server in Finder
- Open Finder
- Click Go → Connect to Server
- Paste your WebDisk URL:
https://yourdomain.com:2078 - Enter your WebDisk username and password when prompted
Once connected, the folder will mount like an external drive on your Mac.
Save the connection and avoid repeated logins
You can click the + icon in the Connect to Server window to save the WebDisk URL as a favorite. This makes reconnecting faster and avoids typing the URL repeatedly.
For frequent use, consider adding it to Login Items so it mounts automatically.
Common macOS issues to watch for
Some common macOS-related issues include:
- SSL certificate warnings (often due to self-signed certificates)
- Password loops caused by incorrect username formats
- Permission errors if the assigned directory is restricted
Double-check credentials and folder permissions if Finder connects but shows empty or read-only folders.
3. Accessing WebDisk on Linux
Linux offers multiple ways to connect to WebDAV, depending on your desktop environment and preferences.
Connect via file manager
Most Linux file managers support WebDAV:
- Nautilus (GNOME) : Use “Other Locations” → “Connect to Server”
- Dolphin (KDE) : Use “Add Network Folder” → WebDAV
Use your secure WebDisk URL and enter your credentials when prompted.
Try a WebDAV mount if the GUI fails
If the graphical method doesn’t work, you can mount WebDisk using a WebDAV client like davfs2.
This approach is more technical but offers:
- Persistent mounts
- Better control over permissions
- Improved stability for long sessions
It’s especially useful for power users or server environments.
Check firewall and port settings
If Linux shows errors like “connection closed” or “timeout”, check:
- Whether port 2078 is allowed by your firewall
- If your ISP blocks certain outbound ports
- That your hosting server accepts secure WebDisk connections
These checks often resolve Linux-specific connection issues quickly.
Troubleshooting WebDisk and WebDAV connection issues
Even when WebDisk is set up correctly, connection problems can still happen. Most issues come down to authentication details, permissions, ports or SSL settings. The good news is that many of these problems have quick, predictable fixes.
Below are the most common WebDisk errors and how to resolve them.
401 unauthorized
This error usually means the server is rejecting your credentials, even if they look correct.
Things to check:
- Make sure you’re using the full WebDisk username, not just the account name
- Re-enter the password or reset it in cPanel
- Clear saved credentials (especially on Windows)
- Confirm you’re connecting over HTTPS (port 2078)
Repeated login prompts are often caused by cached or incorrect credentials rather than a server issue.
Also read: What is a 401 Error? How to Troubleshoot, Fix and Prevent it
403 forbidden
A 403 error means you’re authenticated, but your account doesn’t have permission to perform certain actions.
Common causes include:
- The assigned directory has read-only permissions
- The WebDisk user is restricted to a folder you’re trying to access outside of
- File ownership conflicts inside the directory
Review folder permissions in cPanel and confirm the WebDisk user has write access to the assigned path.
Also read: 403 Error in WordPress: How to Fix Forbidden Access (2025 Troubleshooting Guide)
Connection timed out
This usually points to a networking issue rather than a WebDisk misconfiguration.
Check the following:
- You’re using the correct port (2078 for secure WebDisk)
- Your firewall or antivirus software isn’t blocking the connection
- Your ISP allows outbound connections on that port
- The hosting server is online and responding
Trying the WebDisk URL in a browser first can quickly confirm whether the server is reachable.
SSL certificate errors
SSL warnings are common, especially on shared hosting or servers using self-signed certificates.
You may see messages like:
- “Certificate not trusted”
- “Cannot verify server identity”
In most cases, you can safely proceed if the connection is to your own hosting account. For long-term use, installing a valid SSL certificate on your domain helps eliminate these warnings entirely.
Also read: How to Fix ERR_SSL_PROTOCOL_ERROR – Easy SSL Troubleshooting
Slow transfers
WebDisk works well for small to medium file operations, but it’s not always the fastest option.
You may notice:
- Slow uploads with many small files
- Files locking when opened by multiple users
- Delays when syncing large folders
When performance becomes an issue, switching to FTP or SFTP is usually the better choice, especially for bulk transfers or development workflows.
If your site is hosted with Bluehost and WebDisk still isn’t working after these fixes, the issue may be related to account-level settings, SSL configuration or cPanel access. Our support team can take a closer look at your setup and help you resolve WebDisk and WebDAV connection issues quickly.
Final thoughts
WebDisk may not be the newest file management tool, but it continues to offer real value in modern hosting environments. By understanding how WebDisk works with WebDAV in cPanel and how to access it safely, you can manage your website files more efficiently and with greater control.
Whether you’re a beginner looking for an easy alternative to FTP or an experienced user who needs quick, restricted access, WebDisk fits specific use cases well. When paired with a reliable cPanel-based hosting platform, it becomes even more effective. Bluehost hosting provides an environment where features like WebDisk are readily available, well-supported and easy to configure.
Get started with Bluehost shared hosting and manage your website files with confidence from day one.
FAQs
WebDisk in cPanel is a file access feature that lets you manage your website files directly from your computer using WebDAV. On Bluehost hosting, WebDisk allows you to connect securely to your hosting files without using FTP or File Manager.
WebDAV is the underlying protocol, while WebDisk is cPanel’s user-friendly implementation of it. Bluehost uses WebDisk to make WebDAV connections easier to set up and manage for hosting users.
Port 2078 is the recommended option because it uses SSL for a secure WebDisk connection. Bluehost strongly advises using port 2078 to protect your login credentials and file transfers.
Yes, you can create a separate WebDisk user in cPanel and restrict access to a specific folder. This is the safest way to share file access on Bluehost without exposing your main cPanel account.
This usually happens when incorrect credentials are saved or the full WebDisk username isn’t used. Clearing stored credentials and reconnecting with the secure Bluehost WebDisk URL often resolves the issue.
When used with SSL (port 2078) and proper folder permissions, WebDisk is secure for managing production files. Bluehost recommends limiting directory access and removing unused WebDisk accounts to maintain security.

Write A Comment