 ChatGPT,
  Claude,
  Gemini,
  Grok — all four for
 Purchase a Virtual Dedicated Server with Ghost Installation
Build and scale your content business on your own terms with Ghost, the open-source publishing platform designed for independent creators. Write seamlessly in a distraction-free editor while leveraging built-in SEO, newsletter delivery, and membership management tools to grow your audience. Retain total ownership of your brand, subscriber data, and revenue without paying platform fees.
This article explains how to purchase a Bluehost Virtual Dedicated Server (VDS) hosting plan and set up and manage your Ghost installation.
Why Choose Ghost?
Ghost gives you complete ownership of your content, revenue, and audience when deployed on your VDS. Built with native SEO, clean editing, and automated newsletter tools, it lets you launch and scale a professional publishing business without third-party plugins
Uses of Ghost
There are many applications of Ghost in different fields:
- Premium Memberships: Create exclusive content tiers and lock specific articles behind a paywall to turn occasional readers into paying supporters.
- Integrated Newsletters: Deliver your latest stories directly to subscribers' inboxes automatically every time you publish, bypassing social media algorithms.
- Independent Journalism: Launch a fully independent news site or niche magazine with zero platform fees, so more of your subscription revenue stays with you instead of going to a hosted platform.
- Corporate Blogs: Build a fast-loading, security-conscious company publication that boosts search engine rankings and captures clean marketing leads.
- Content Hubs: Manage a sleek, distraction-free home for podcasts, video series, or text articles without wrestling with clunky website plugins.
This flexibility makes Ghost an excellent choice for creators and companies wanting to grow a professional audience with total peace of mind.
How to Purchase a Virtual Dedicated Server with Ghost Installation
Ghost can be installed on a Bluehost Virtual Dedicated Server (VDS). You can choose to have Ghost installed during the initial VDS purchase or install it manually at a later time.
- In your browser, go to https://www.bluehost.com.
- Click Hosting in the top menu, then select Virtual Dedicated Server.

You can also go to this link directly: https://www.bluehost.com/vds-hosting.
- On the Virtual Dedicated Server Hosting page, click Explore Plans. You can also scroll down to the hosting plans section.

- Choose a plan from either tab — Standard or High Performance — by clicking Choose Plan.

Pricing is subject to change. Please visit https://www.bluehost.com/vds-hosting for the current introductory/sign-up offer for the Bluehost Virtual Dedicated Server hosting. For the most up-to-date renewal pricing, visit your Bluehost Portal's Renewal Center. - On the next page, configure your VDS hosting to meet your requirements. The configuration options are divided into the following sections:
- Location: Select your data center in this section.

- Hardware: This section shows your pre-selected plan. You can also switch to another Virtual Dedicated Server plan in this section

- Software:
If the selected plan does not meet the app's minimum requirements, the app will be grayed out.
- Under the Application tab, click on Ghost.
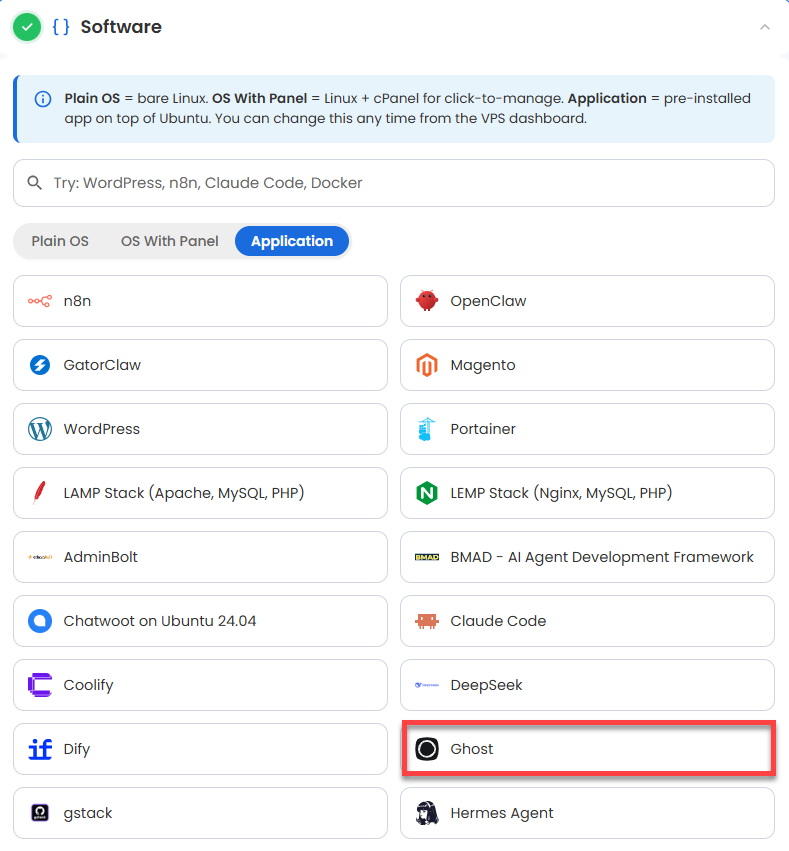
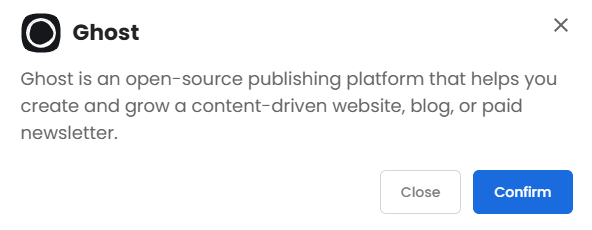
You can install only one application per purchase; the system will automatically select the best operating system for it. - In the pop-up, click Confirm.
- Under the Application tab, click on Ghost.
- Support & Security: You can add Premium Support - Recurring, which provides priority access to expert assistance and faster response times.

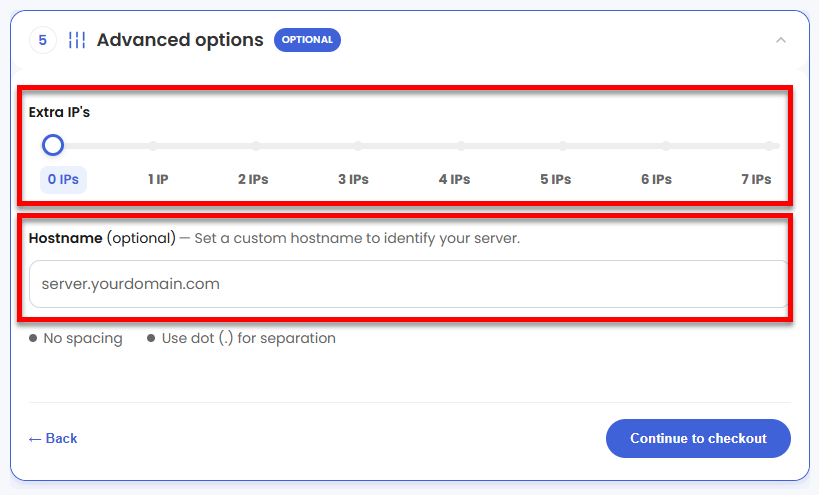
- Advanced Options:
- Extra IP's: You can add IP addresses for an additional fee. Pricing changes based on how many IPs you add.
- Hostname: Assign a custom hostname to identify your server. This is optional.
- Location: Select your data center in this section.
- Select your billing term and review your selected items on the right pane, along with the summarized total cost.
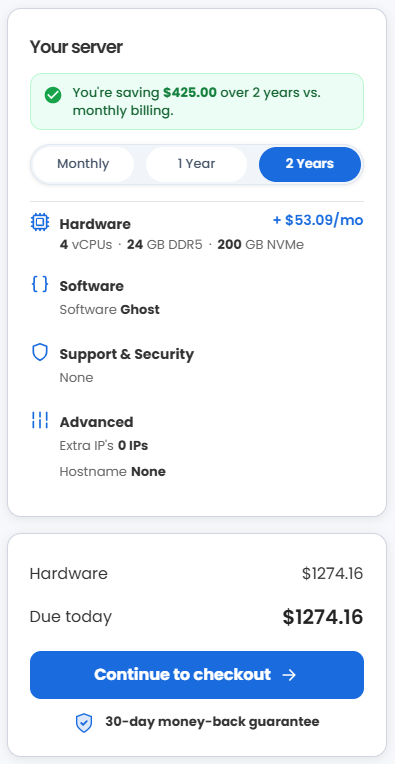
- Click Continue to checkout.
- Do the following on the Checkout page:
If you're new to Bluehost:- Create your Bluehost account by using your email address or by connecting with your Google, Apple, or GitHub account — whichever you prefer!

- Select your preferred payment method: credit card, Google Pay, or PayPal. Enter your billing information.

If you have an account with us, you will see your Bluehost login details when you are logged into your Bluehost Portal. If you are not logged in, please click the Log In link.

- Create your Bluehost account by using your email address or by connecting with your Google, Apple, or GitHub account — whichever you prefer!
- In the Shopping Cart, choose your billing term if you did not choose one on the previous page.
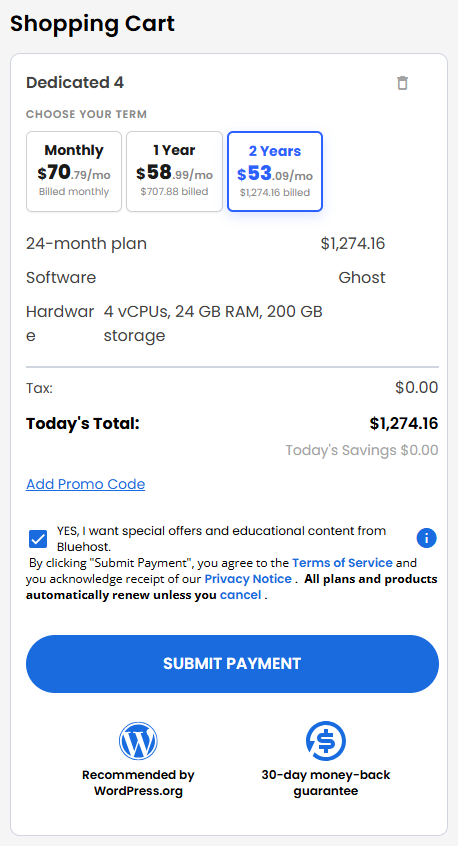
- Add a Promo code if you have one, and then click Submit Payment to complete your purchase.
After completing the purchase, your VDS hosting will begin provisioning. You can access and manage your new VDS hosting in the Hosting tab of your Bluehost Portal.
How to Set Up Ghost
After installation completes:
- Log in to your Bluehost Portal.
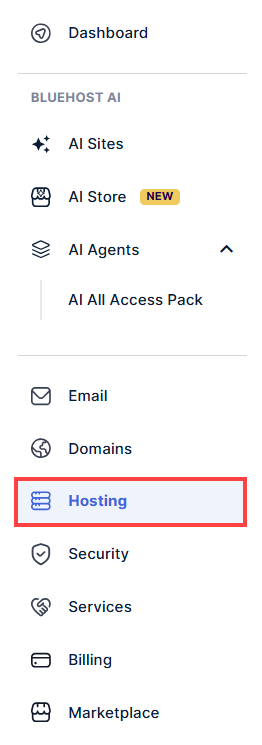
- In the left-hand menu, click Hosting, then select My Plans.
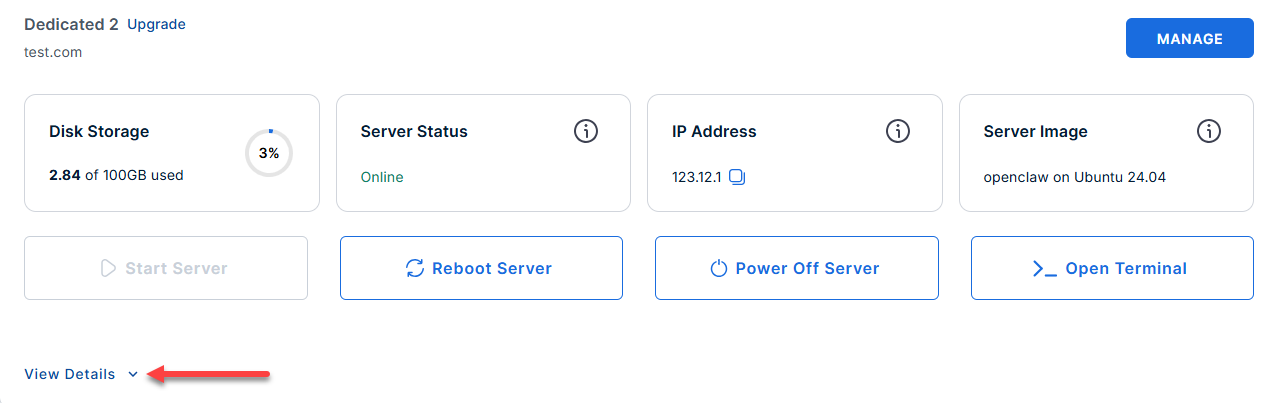
- Locate the server you want to manage, then click View Details in the bottom-left corner to expand the section and access additional server information.
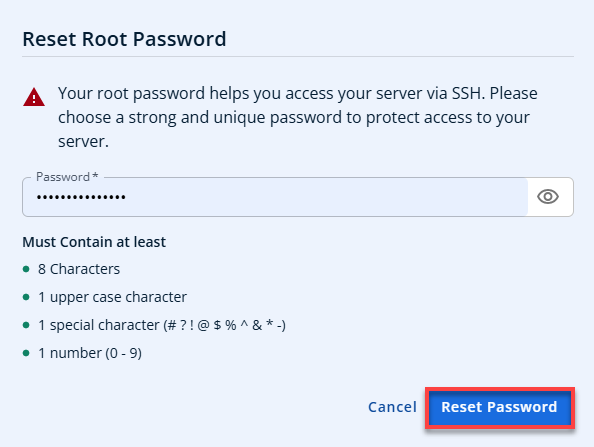
- Click the Reset Password.
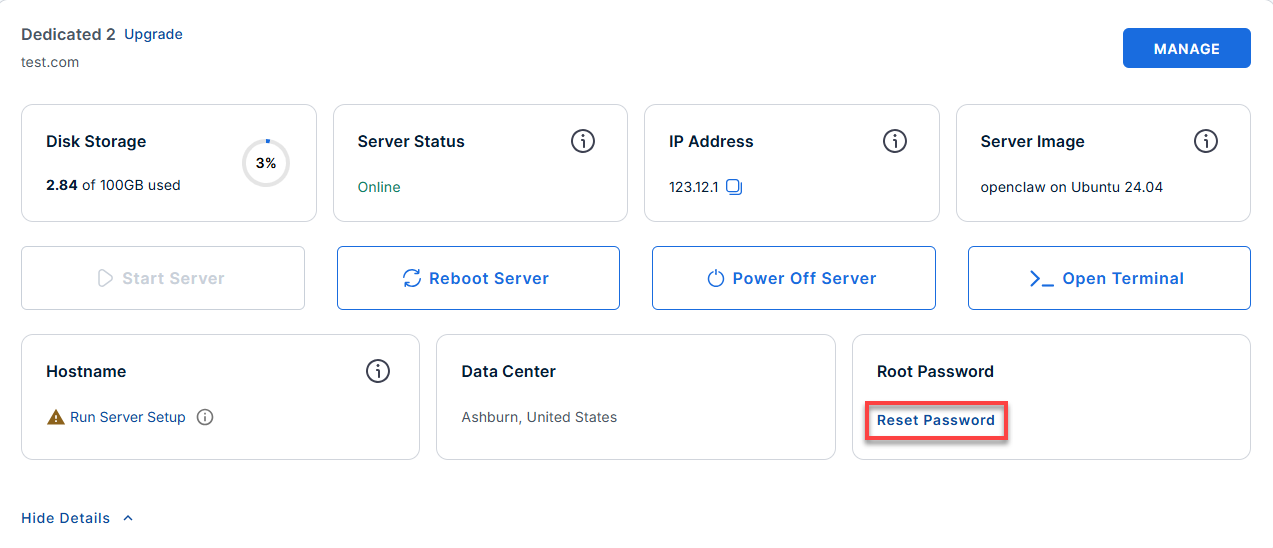
- In the pop-up window, type your new root password, then click Reset Password again to confirm and save the changes.
- Connect to your VDS via SSH.
Use your VDS IP and credentials with an SSH client, follow the prompts, and enter your root password when asked:Replaceyour_server_ipwith your actual server IP address.ssh root@your_server_ipWelcome to Ubuntu 24.04.4 LTS (GNU/Linux 6.8.0-117-generic x86_64) ******************************************************************************** Ghost Publishing Platform Ghost : 6.42.0 Nginx : active MySQL : active Node.js : v22.22.2 Blog : http://50.6.6.130/ Admin : http://50.6.6.130/ghost/ (create your account on first visit) SSH : port 22 | HTTP : port 80 | HTTPS : port 443 (UFW open; add SSL cert to activate) UFW enabled Credentials (generated on first boot): cat /root/.app_passwords Quick start: su - ghostapp # switch to the Ghost service user ghost status # check Ghost process status ghost restart # restart Ghost ghost update # update to latest version Service management: systemctl status nginx # Nginx reverse proxy systemctl status mysql # MySQL database tail -f /var/www/ghost/content/logs/http___*_production.log Enable HTTPS (post-deploy): 1. Point your domain DNS to this server's IP 2. Run the SSL setup script (uses acme.sh bundled with Ghost): bash /opt/ghost/setup-ssl.sh yourdomain.com 3. Update Ghost's URL to match: runuser -l ghostapp -c "ghost config set --dir /var/www/ghost url 'https://yourdomain.com'" 4. ghost restart --dir /var/www/ghost For full details refer: /root/README.md ******************************************************************************** To delete this message of the day: rm -rf /etc/update-motd.d/99-ghost ******************************************************************************** - View your first-boot credentials and URLs:
On first boot,
cloud-initgenerates all credentials (database, URLs) in/root/.app_passwords. Run:cat /root/.app_passwordsExample Output:
ghost_db_user="ghostapp" ghost_db_pass="23682b410ee4c0cf3e0193170930c52d45c5466d560bea45" ghost_db_name="ghost_prod" ghost_blog_url="https://50.6.6.130/" ghost_admin_url="https://50.6.6.130/ghost/" # ghost_magic_link: NOT available yet. # Magic links can only be generated AFTER the Setup Wizard is completed # and an admin account exists. To mint one post-setup, run: # # curl -s -X POST http://localhost:2368/ghost/api/admin/authentication/magic-link/ \ # -H "Content-Type: application/json" \ # -d '{"email":"","emailType":"signin"}' # # The link will be emailed to the admin address (if SMTP is configured) # or can be retrieved from the Ghost logs. - Access the Ghost Admin panel in your browser and set up your admin user:
Replace
<server-ip>with your actual server IP address.http://<server-ip>/ghost/- Open this URL in your browser (replace
<server-ip>with your actual server IP from the credentials file). - Follow the on-screen wizard to create your admin account. This is only needed once.
- Open this URL in your browser (replace
- If you want API access, use the Content API endpoint:
curl http://<server-ip>/ghost/api/content/posts/?key=<content-api-key>- Get your Content API key from the Ghost Admin panel.
- Use the Ghost CLI for management (run as the ghostapp user):
- Switch to the Ghost user:
su - ghostapp
- Show Ghost process status:
ghost status
- Restart Ghost:
ghost restart
- Update Ghost to latest version:
ghost update
- Tail the Ghost log:
ghost log
- List all Ghost installations:
ghost ls
- Switch to the Ghost user:
- Service management commands (run as root):
- Ghost systemd unit:
systemctl status 'ghost_*'
- Nginx reverse proxy:
systemctl status nginx
- MySQL database:
systemctl status mysql
- Follow Ghost journal logs:
journalctl -u 'ghost_*' -f
- Follow general Ghost log file:
tail -f /var/www/ghost/content/logs/ghost.log
- Follow production HTTP log file:
tail -f /var/www/ghost/content/logs/http___localhost_production.log
- Ghost systemd unit:
- Run the test suite (advanced):
prove /root/app_test/main.t
Additional Links
Supporting Information and Sample Output
You can run cat /root/README.md to see more information and useful commands:
Example Output:
root@server-123456:~# cat /root/README.md
# Ghost

## Description

Ghost is an open-source publishing platform that helps you create and grow a content-driven website, blog, or paid newsletter.

It includes a clean writing editor, built-in SEO tools, membership management, and subscription features, making it a strong choice for independent writers, journalists, and creators who want full ownership of their audience.


## Services

| Service        | Port | Protocol | Notes                                 |
| -------------- | ---- | -------- | ------------------------------------- |
| SSH            | 22   | TCP      | UFW rate-limited                      |
| Ghost / Nginx  | 80   | TCP      | HTTP - Ghost proxied via Nginx        |
| Ghost internal | 2368 | TCP      | Internal only, not exposed externally |


## How-to-use

### First-boot credentials

On first boot `cloud-init` generates all passwords and writes them to
`/root/.app_passwords`. Read them with:

```bash
cat /root/.app_passwords
```

### Accessing Ghost

```bash
# Admin panel (set up your account on first visit)
http:///ghost/

# Ghost Content API
curl http:///ghost/api/content/posts/?key=
```

### Ghost CLI (SSH into server)

```bash
# Run as the ghostapp user
su - ghostapp

ghost status                    # show Ghost process status
ghost restart                   # restart Ghost
ghost update                    # update Ghost to latest version
ghost log                       # tail the Ghost log
ghost ls                        # list all Ghost installations
```

### Service management

```bash
systemctl status 'ghost_*'    # Ghost systemd unit
systemctl status  nginx                       # Nginx reverse proxy
systemctl status  mysql                       # MySQL database
journalctl -u 'ghost_*' -f   # follow Ghost journal
#tail -f /var/www/ghost/content/logs/ghost.log
tail -f /var/www/ghost/content/logs/http___localhost_production.log
 # follow file logs
```

### Running the test suite

```bash
prove /root/app_test/main.t
```


## Links

- Documentation: [https://ghost.org/docs/](https://ghost.org/docs/)
- Ghost CLI reference: [https://docs.ghost.org/ghost-cli](https://docs.ghost.org/ghost-cli)
- Ghost API reference: [https://docs.ghost.org/content-api](https://docs.ghost.org/content-api)
- Ghost GitHub: [https://github.com/TryGhost/Ghost](https://github.com/TryGhost/Ghost)
Summary
Learn how to purchase, configure, and manage a Bluehost Virtual Dedicated Server (VDS) with Ghost pre-installed. This guide walks you through selecting your hardware and server options, connecting via SSH to complete the initial Ghost Admin wizard and set up your Content API. Finally, you will learn how to use systemd and Ghost CLI commands to update your installation, restart services, and monitor Nginx and MySQL logs.