Key highlights
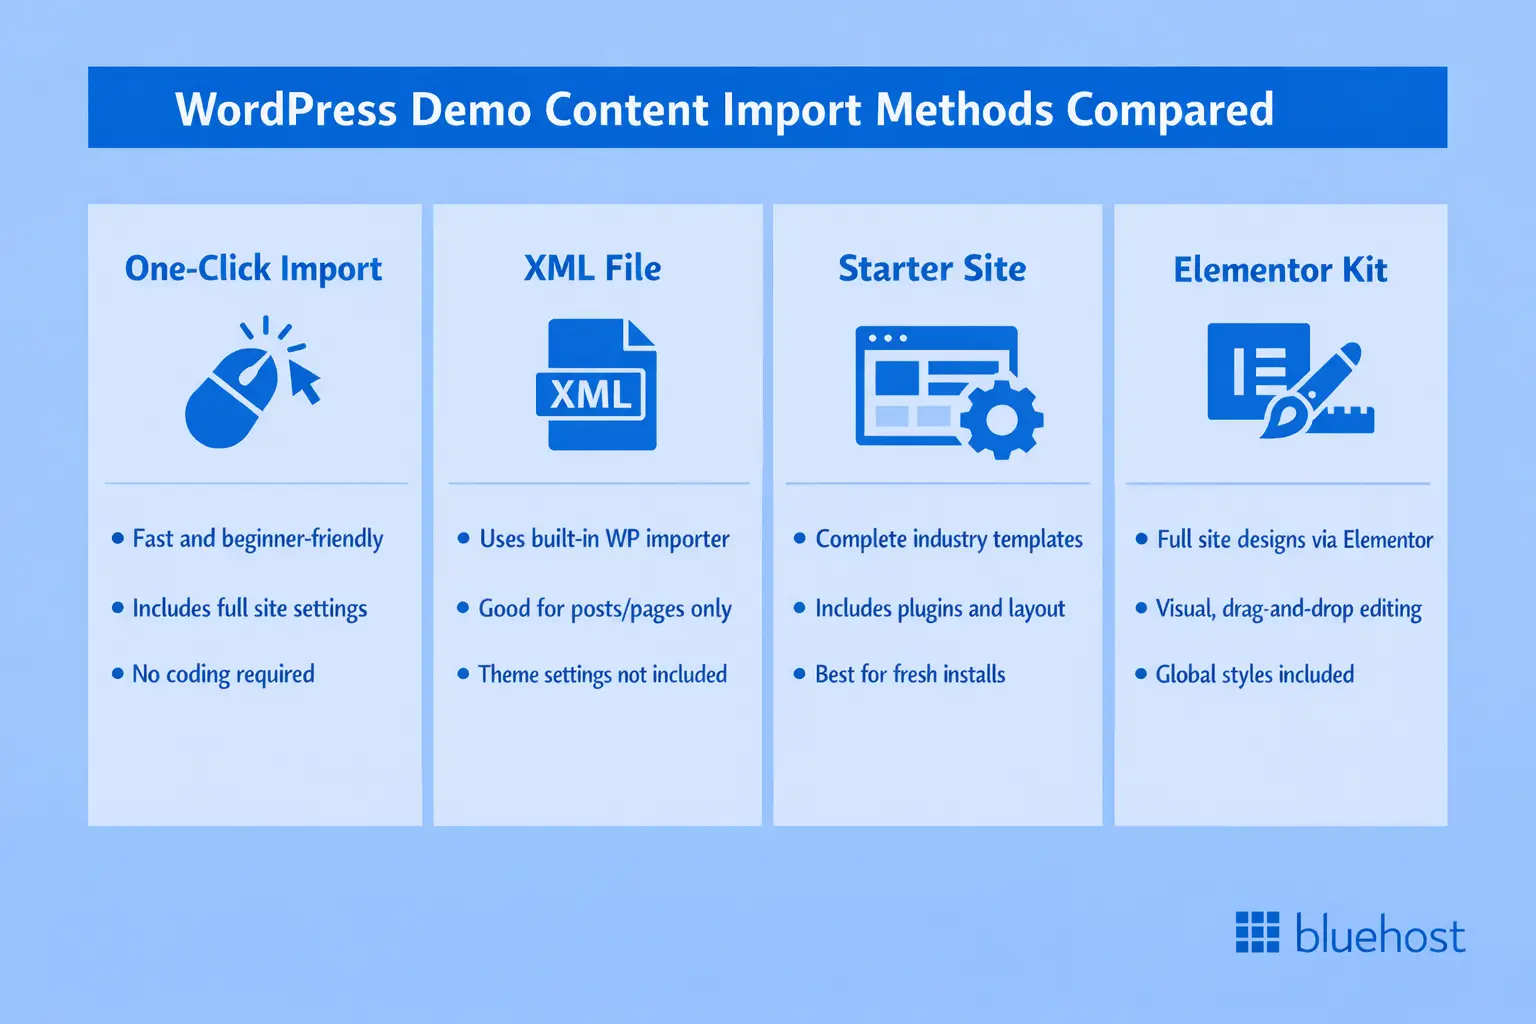
- Understand four distinct import methods: one-click theme demos, XML files, starter templates and Elementor kits.
- Test WordPress demo content import in a staging environment before applying to your live site to prevent data loss.
- Identify what WordPress theme demo content imports automatically and what needs manual configuration after installation.
- Discover why WordPress theme demo content might not match the demo preview immediately.
- Troubleshoot common WordPress demo content import issues including failed imports, missing media files and layout problems.
You’ve just purchased a beautiful WordPress theme, likely captivated by a demo site that features stunning layouts, professional imagery and polished design elements. Naturally, you want your actual site to mirror that perfection. Importing WordPress demo content is the fastest way to achieve these professional results.
This process transfers the theme’s sample pages, posts, widgets, menus and settings directly to your installation. It also creates a complete, working website in minutes, which saves you the effort of building everything from scratch.
While the concept sounds straightforward, there are important nuances to keep in mind. The process varies significantly depending on your theme, page builder and hosting environment. It isn’t uncommon for first-time users to encounter confusing errors, missing content or layouts that don’t match their expectations. Furthermore, premium themes often require specific license codes before they will unlock their demo import features.
This comprehensive guide is designed to walk you through every available import method. You will learn how to import demo content in WordPress safely using staging environments, understand exactly what each method includes and how to efficiently troubleshoot common problems should they arise.
Quick answer: choose your demo type first
Before beginning, identifying which method your theme or builder uses is essential. Each approach serves a different purpose and requires a specific set of tools.
1. Theme offers one-click demo import (Appearance/theme panel)
Most premium WordPress themes come equipped with built-in demo importers. You can usually find these in your WordPress dashboard under Appearance or within a dedicated theme panel; popular themes like Astra, OceanWP, GeneratePress and The7 all provide this functionality.
The “one-click” demo import method handles the heavy lifting automatically. It installs sample pages, posts, images, widgets, theme settings and menus with minimal input from you, making it the most approachable method for beginners.
2. Importing XML export files (Tools → Import)
Another common method involves importing XML export files. These files contain WordPress content exported from another source, which developers often use to migrate content or provide sample data for testing. While each file includes posts, pages, comments, custom fields and categories, you will use WordPress’s native importer (found under Tools → Import) to process them. It is important to note that this method imports content only; it does not transfer theme settings, widgets or Customizer configurations.
You’re using a starter template library plugin
When using popular page builders like Elementor, Beaver Builder or Divi, you gain access to extensive starter template libraries designed to import demo content into WordPress quickly. These plugins offer complete, pre-designed website templates often tailored to specific industries, making it easier to build professional sites. However, since these premium templates usually require active subscriptions, you’ll need to import demo content WordPress files through the page builder’s own interface rather than using WordPress’s standard import tools.
Before you import: 5-minute pre-flight checklist
Before you import demo content in WordPress, taking a few minutes to prepare your site environment is essential. Creating a complete backup of your WordPress database and files now can prevent data loss and save you valuable troubleshooting time if issues arise during the import process.
1. Use staging + take a backup (Recommended)
We strongly recommend against importing demo content directly onto a live production site. Imports can overwrite existing content, break layouts or cause conflicts with plugins you have already installed.
Bluehost offers integrated staging environments across all WordPress hosting plans to address this challenge. When you import demo content WordPress theme files, a staging site provides an isolated testing environment where you can safely experiment with WordPress theme imports without affecting your live site visitors.
If you have not used staging before, follow our guide on creating a WordPress staging site in Bluehost before proceeding with a demo import.
Always take a backup before importing demo content:
Even when working in staging, a full backup gives you a reliable rollback point if something goes wrong or the demo does not match your expectations.
Bluehost premium WordPress hosting plans include enhanced backup options and staging tools designed for safer testing and faster recovery. These features make it easier to experiment with theme demos while keeping your live site protected

Why staging plus backups matter:
- Test theme demos without risking live content
- Compare multiple demo designs side by side
- Revert changes instantly if imports fail
- Deploy only what works to your production site
With staging and backups in place, you can import, test and discard demo content freely. Once you find the right design and setup, you can confidently push changes live or start fresh with a different demo.
2. Prep your WordPress install
Clean installations invariably produce the best import results. To ensure a smooth process, follow this preparation checklist:
- Update WordPress to the latest version before importing demo content for optimal compatibility
- Update all installed plugins to prevent conflicts during the import.
- Ensure your theme is updated to its current release version.
- Verify your PHP version meets the theme’s requirements (usually PHP 7.4 or higher).
- Increase your PHP memory limit settings to at least 256MB to accommodate large imports.
- Temporarily disable security plugins that might inadvertently block import requests.
- Clear all caching plugins to prevent stale data issues.
Be sure to check your theme documentation for specific requirements. Premium themes often list mandatory plugins that must be active before you begin the demo import; missing these dependencies can lead to incomplete imports or broken layouts.
Also read: How to Clear WordPress Cache and Optimize Performance
Method 1: Import theme demo content with “One-Click Demo Import”
The one-click demo import method is the fastest way to replicate your theme’s demo site on your WordPress installation. This approach automatically imports sample content, images, widgets, theme settings and customizer configurations with minimal manual effort.
Most premium themes and many popular free themes now include built-in demo import functionality, making it easier than ever to launch a professional-looking website in minutes. The process typically handles all the technical setup behind the scenes, so you don’t need coding knowledge or extensive WordPress experience.
When to use this method
Choose the one-click import method when your theme includes a built-in demo importer. This approach works best for complete site setups where you want to replicate exactly what the demo shows.
Several popular themes offer this feature, including:
- Astra theme (via the Starter Templates plugin)
- OceanWP (via a dedicated importer panel)
- GeneratePress (via the GP Premium add-on)
- The7 theme (requires registration and a purchase code)
- Avada (via Fusion Builder demo content)
- Salient (includes an importer for portfolio and creative sites)
These one-click utilities automate media downloads, widget placement and menu assignments, saving you significant manual configuration time.
Steps (Generic flow)
Although the exact interface varies by theme, the general process typically follows this pattern:
- Install and activate your theme completely.
- Enable all recommended plugins when prompted by the theme.
- Navigate to the demo import section (usually found under Appearance → Import Demo).
- Browse the available demo variations if multiple options exist.
- Preview each demo to find the design that best suits your needs.
- Select your chosen demo from the options.
- Choose your import options, deciding between a complete import or specific elements only.
- Click the import button and wait for the process to complete.
- Monitor any progress indicators or status messages.
- Review the success confirmation message before closing the screen.
Import times can vary based on the size of the demo. Small demos may finish in under five minutes, while larger ones containing hundreds of images could take 15 to 30 minutes. Crucially, never close your browser window while the import is in progress.
Note that some premium themes require purchase codes before allowing imports. Without proper licensing, you may encounter messages such as “purchase developer or higher plan in order to activate the theme” or warnings that premium functionalities like demo imports and skins are unavailable.
What gets imported vs. what you must set manually
To avoid confusion, it is helpful to understand what happens automatically versus what requires manual setup. The table below offers a quick comparison:
| Imported automatically | Requires manual configuration |
|---|---|
| Sample pages and posts | Site title and tagline |
| Images and media files | Logo and site icon |
| Navigation menus | Contact form email addresses |
| Widget configurations | Social media profile links |
| Theme customizer settings | Analytics and tracking codes |
| Page layouts and designs | Payment gateway connections |
| Color schemes and fonts | Email marketing integrations |
Once the import is complete, you must replace all placeholder content with your actual information. This includes updating company names, contact details, service descriptions and product listings. Additionally, be sure to replace demo images with your own photography or licensed stock photos to avoid copyright issues.
Method 2: Import demo content using an XML file
The XML import method is one of the most widely used techniques for bringing demo content into your WordPress site. This approach uses WordPress’s built-in importer tool to transfer content packaged in XML format, which includes posts, pages, custom post types, categories, tags and basic media references.
Many theme developers provide XML demo files alongside their themes, making it straightforward to replicate the demo site appearance on your own installation.
When to use this method
XML imports are perfect for transferring content between WordPress sites or populating a site with sample data for testing. Developers typically receive these XML files when purchasing themes from marketplaces or when downloading free themes that include sample data.
Keep in mind that this method imports content structure only—not visual designs or theme settings. You will receive pages, posts, categories and tags, but widget positions and Customizer configurations will not transfer.
Steps to import WordPress XML demo content
The XML import process leverages WordPress’s built-in importer tool:
- Download the XML file from your theme package to your computer.
- Log into your WordPress dashboard as an administrator.
- Navigate to Tools → Import from the admin menu.
- Select the WordPress option from the list of available importers.
- Install the WordPress Importer plugin if prompted.
- Click Run Importer once the plugin activates successfully.
- Use the file upload button to choose your XML file.
- Upload the file and proceed to the import settings.
- Assign the imported content to existing authors or create new ones as needed.
- Check the box for “Download and import file attachments” to include demo images.
- Click Submit to begin the process.
- Wait for completion and review the import summary.
The importer will display success messages for each item it processes. Review the summary carefully to identify any failed imports or missing media files.
If you’re importing “dummy content” for testing
Developers often require blog demo content to test themes, plugins or layouts effectively. For this purpose, WordPress provides official sample content files. The WordPress Theme Unit Test data includes a diverse range of content types, such as:
- Posts with various formatting options and embedded media
- Pages demonstrating hierarchy and parent-child relationships
- Comments showing threaded discussions and moderation states
- Categories and tags with complex organizational structures
- Custom post types and taxonomies for deeper testing
Ideally, you should import dummy content on staging sites only. This prevents your production database from becoming cluttered with test data that will require cleanup later.
Method 3: Import a complete “starter site”
A starter site represents a complete, pre-designed website package that includes all pages, layouts, images and content exactly as shown in the theme demo. This method allows you to import an entire website structure with a single installation, providing a fully functional site that you can then customize to match your needs.
When to use this method
Starter sites offer industry-specific, complete websites curated by page builder companies. These templates cover various niches, including restaurants, agencies, portfolios, online stores and professional services.
This method works best when you are starting completely fresh. Because starter templates assume an empty WordPress installation, they can conflict with existing content or customizations.
Typical steps (Starter Templates-style flow) to import a starter site
Most starter template systems follow a similar workflow. Using Astra Starter Templates as a representative example, the process looks like this:
- Install the Astra theme from the WordPress theme directory.
- Install the Starter Templates plugin from your dashboard.
- Navigate to Appearance → Starter Templates after activation.
- Choose your preferred page builder (Elementor, Beaver Builder or Gutenberg).
- Browse the template library by category or industry.
- Preview templates by clicking to see full demonstrations.
- Select your preferred template from the available options.
- Review the items slated for import before proceeding.
- Click Import and monitor the progress indicator.
- Wait while the system displays the status message, typically asking you to “Hang on tight.”
- Review your imported site once the completion notification appears.
The import process typically installs required plugins automatically; you’ll see notifications as the system adds tools like Elementor, contact forms or WooCommerce if the template requires them.
Method 4: Import an Elementor demo / Website Kit
Importing an Elementor demo or Website Kit provides a comprehensive approach to setting up your WordPress site with professionally designed templates. This method delivers complete website designs built with the Elementor page builder, including all necessary pages, styling and pre-configured layouts in a single import process.
When to use this method
Elementor users can access thousands of pre-designed templates and complete website kits. This method is ideal when you specifically want Elementor-powered designs that offer full customization capabilities. Elementor kits maintain design consistency across all pages through global styling, meaning that changing colors or fonts in one location updates your entire website automatically.
Steps to import Elementor Kit workflow
Elementor provides integrated import functionality directly within its editor:
- Install Elementor (free) or Elementor Pro from the plugins directory.
- Create a new page or edit an existing one.
- Click Edit with Elementor to launch the visual editor.
- Click the folder icon to open the template library.
- Browse through Pages, Blocks or My Templates as needed.
- Use filters to find templates by category or style.
- Preview templates by hovering and clicking the magnifying glass icon.
- Click Insert to add the template to your page.
- Customize content, images and text directly in the editor.
- Save your changes and preview the final result.
For complete website kits, the process differs slightly:
- Visit the Elementor website and browse the kit library.
- Download your chosen kit file to your computer.
- Go to Elementor → Tools in your WordPress dashboard.
- Click the Import tab under the tools section.
- Upload your downloaded kit file using the upload button.
- Wait for processing to complete and review the imported elements.
- Apply the kit to establish global styling across your pages.
Remember that many advanced kits require an Elementor Pro subscription, as free versions often offer limited template access and functionality.
Post-import checklist (Why demos “don’t look like the preview”)
It’s a common frustration: your import completes successfully, yet your site doesn’t match the demo. This issue usually stems from predictable causes that have straightforward solutions.
Set the theme demo basics
Start by configuring these fundamental settings, which imports often cannot set automatically:
- Homepage and blog page settings: Go to Settings → Reading to set your homepage display. Choose a static page and select your newly imported homepage.
- Permalink structure: Navigate to Settings → Permalinks and match the demo’s URL structure. Most demos use “Post name” for cleaner URLs.
- Menu assignments: Visit Appearance → Menus to assign imported menus to their correct locations. Themes often offer multiple menu positions that require individual assignment.
- Widget areas: Check Appearance → Widgets to verify that all widgets appear in their intended sidebars and footer areas.
Fix WordPress demo theme visuals fast
Visual discrepancies typically trace back to a few common culprits:
- Missing images: Demo images may not import due to licensing restrictions. You will need to replace placeholder images with your own photography.
- Font loading: Some demos use premium fonts that require separate licensing. Be sure to install and activate any required font plugins.
- Plugin dependencies: Verify that all recommended plugins are installed and activated correctly, as deactivated plugins can break layouts.
- Caching conflicts: Clear all caches (browser, plugin and server-level) to ensure you are seeing the actual current styling.
- Customizer settings: Review Appearance → Customize to check imported settings; some options may require manual verification.
We recommend comparing your site to the demo side-by-side. Inspect specific elements that show differences and adjust settings accordingly. Often, most visual issues resolve simply by activating a plugin or tweaking a Customizer setting.
Using Bluehost Staging to import demos without breaking your site
One of the biggest risks when importing WordPress demo content is accidentally breaking your live website. Demo imports can override existing settings, replace content or cause conflicts with your current theme and plugins.
This is where Bluehost’s staging environment becomes invaluable. It gives you a safe space to test WordPress theme demos before applying any changes to your production site.
A staging site creates an exact copy of your WordPress website in a separate, isolated environment. Here, you can import demo content, test new themes and experiment with different configurations without posing any risk to your live site. Once you are satisfied with the results, you can push those changes to production with confidence.
Import on a staging site first
The staging workflow offers complete protection:
- Create your staging environment through the Bluehost dashboard.
- Access staging via the unique URL provided.
- Import demo content on the staging site using any of the methods described above.
- Test thoroughly and customize the site as needed.
- Verify that all functionality works correctly before going live.
- Push your changes to production only when you are completely satisfied.
Staging sites function identically to production sites, allowing you to install plugins, import content and test configurations without impacting your visitors.
Recover quickly if an import goes wrong
Imports can occasionally fail or produce unexpected results. If this happens on a staging site, recovery is instant. You can simply delete the staging environment completely, create a fresh staging copy of your production site and try a different demo or import method. This freedom allows you to experiment until you achieve the desired results.
Troubleshooting: common demo import problems + fixes
While importing WordPress theme demo content is generally straightforward, you may occasionally encounter issues during the process. Understanding these common problems and their solutions will help you successfully complete your demo import and get your site up and running quickly.
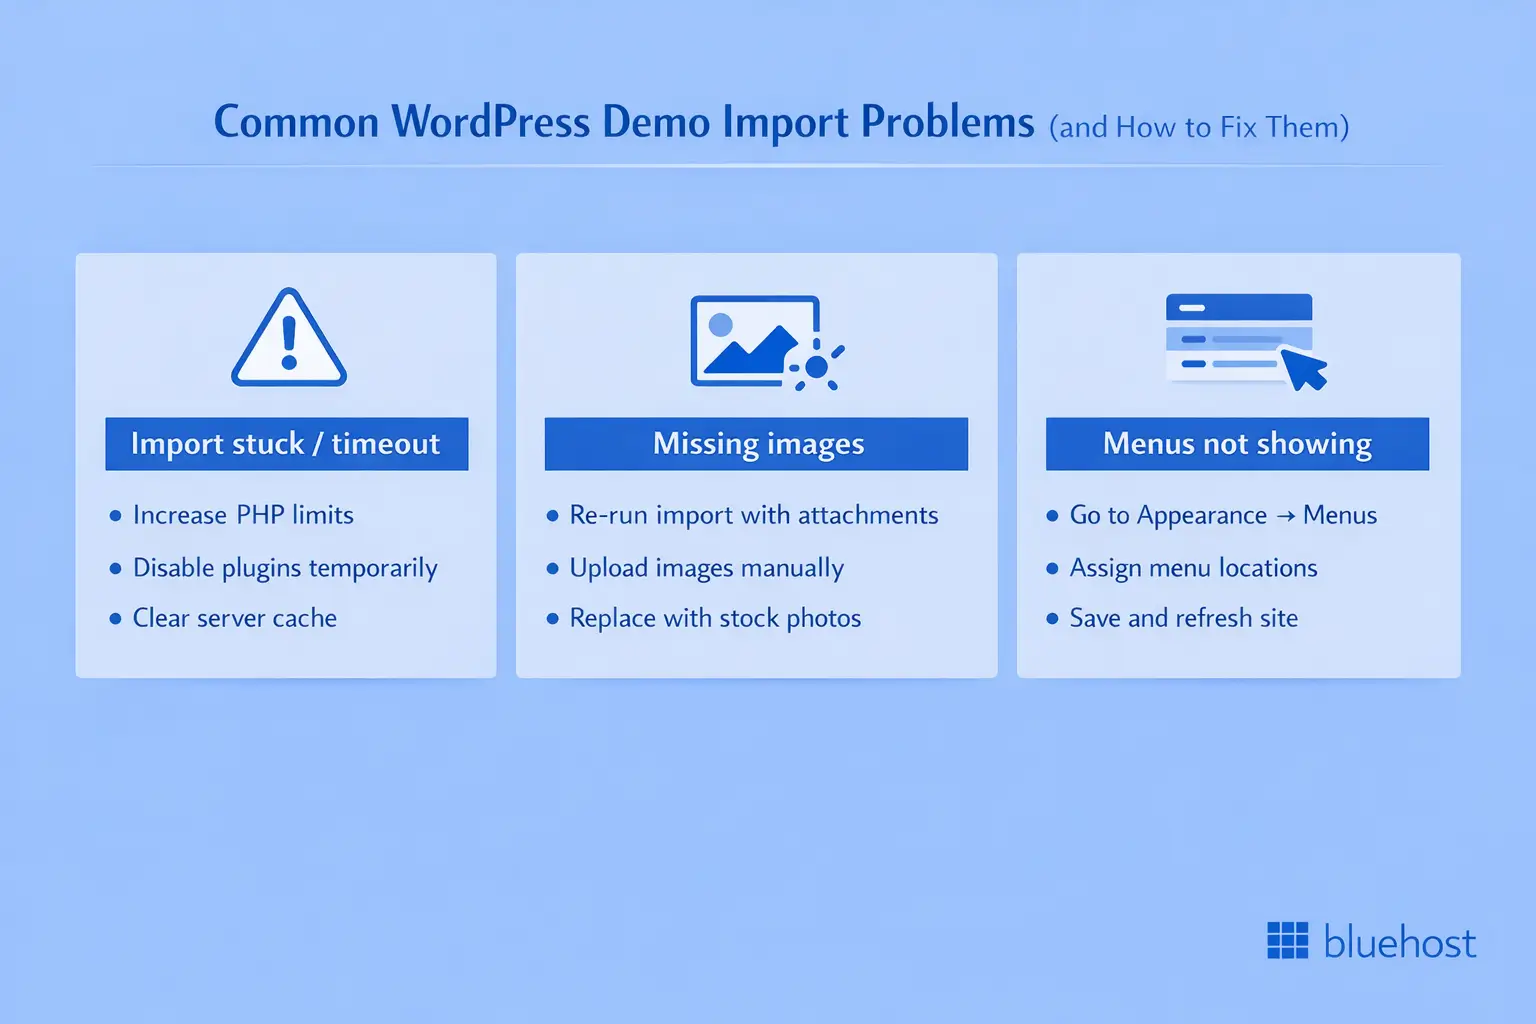
1. Import stuck / timeout / white screen
Imports may freeze or fail due to various technical reasons. If you encounter a stuck import or a white screen, try these solutions in order:
- Increase PHP limits: Large demos require substantial resources. Contact Bluehost support to increase your PHP memory limit to 512MB and your max execution time to 300 seconds.
- Disable plugins temporarily: Security and caching plugins sometimes block import requests. Try deactivating all plugins except those strictly required by your theme, then retry the import.
- Switch to manual import: If automatic import continues to fail, request manual import files from your theme developer. You can then import content, widgets and settings separately through WordPress’s built-in tools.
- Clear server cache: If the white screen persists after trying other fixes, contact Bluehost to clear server-level caching.
- Check error logs: Review PHP error logs in your Bluehost cPanel under Errors. These logs can reveal specific failures that are preventing a successful import.
In most cases, following these steps in order will resolve demo import timeouts and white screen errors.
2. Missing images after import
Images often fail to import due to licensing restrictions or connection timeouts. Potential solutions include:
- Re-run import with attachments checked: Ensure “Download and import file attachments” stays selected during XML import.
- Import images separately: Download image packages from theme developers and upload them through the Media Library manually.
- Use placeholder services: Replace missing images with licensed stock photography or custom graphics that match your brand.
- Check image file sizes: Extremely large images can timeout during download. If possible, compress images before importing.
Remember that demo images often carry licensing restrictions that prevent redistribution. In these cases, theme developers will provide placeholder images or recommend stock photo sources for replacement.
3. Menus not showing
Sometimes imported menus exist but don’t display in navigation areas. This usually happens because menu locations require manual assignment. To fix this:
- Navigate to Appearance → Menus in the WordPress dashboard.
- Select each imported menu from the dropdown list.
- Check the appropriate display location boxes at the bottom of the screen.
- Save your menu assignments and refresh your site.
- Verify that the menus now appear in the expected navigation areas.
Themes offer multiple menu locations (such as header, footer and mobile), and each requires individual assignment to function correctly.
Final thoughts
Importing WordPress theme demo content can transform empty installations into professional websites within minutes. However, successful execution requires careful preparation, appropriate method selection and post-import configuration.
Always use staging environments to protect your live site. Bluehost’s staging integration makes testing both safe and reversible, allowing you to experiment freely without affecting visitors or breaking existing functionality.
Remember that demo content serves as a starting point, not a finished product. You will need to replace placeholder content with your unique information, brand imagery and compelling copy. Don’t hesitate to customize colors, fonts and layouts to match your visual identity.
The import method you choose will depend on your theme, page builder and technical comfort level. One-click imports offer simplicity for beginners, XML files provide flexibility for developers, starter templates deliver industry-specific designs and Elementor kits enable advanced customization with visual editing.
Ready to build your professional WordPress website with confidence? Bluehost provides integrated staging environments, automatic backups and free SSL on all hosting plans.
Get started with reliable WordPress hosting designed for perfect demo imports and seamless site launches.
FAQs
Demo content refers to sample data provided by theme developers to demonstrate their design’s capabilities. Starter sites are complete, pre-designed websites offered by page builders like Elementor or Astra. XML imports are WordPress export files containing posts, pages and media intended for transfer between sites. Generally, demo content and starter sites include designs and settings, while XML imports contain only content structure without visual styling.
Demo imports typically add new content rather than overwriting existing pages. However, some themes may replace homepage settings or menu assignments. To prevent accidental content loss, always create complete backups before importing and use staging environments for testing. This allows you to experiment safely with different demos.
Several factors can cause visual differences between your site and demo previews. Missing required plugins often prevent certain features from displaying correctly and unassigned menus can leave navigation areas empty. Additionally, demo images may not import due to licensing restrictions and font licenses might require separate activation. We advise checking your homepage settings under Settings → Reading, verifying that all recommended plugins are installed and reviewing your theme customizer configurations.
Most theme importers install required plugins automatically during the demo import process. However, some demos specifically require Elementor Pro or WooCommerce for full functionality. Be sure to review your theme documentation before importing to identify any dependencies. You can often choose lightweight demo versions that work without premium page builders, or look for alternative demos using Gutenberg or other builders.
You can remove demo content through WordPress’s built-in bulk actions. Navigate to Pages or Posts, select all imported items using checkboxes and choose “Move to Trash” from the bulk actions dropdown. Delete imported media files through the Media Library using bulk selection and reset widgets by removing them from widget areas under Appearance → Widgets. Some themes also provide reset options in their settings panels that remove all imported data instantly. As always, backup your site before removing content in case you need to restore specific elements later.

Write A Comment