 ChatGPT,
 Claude,
 Gemini,
 Grok — all four for
Key highlights
- Learn how to diagnose the real cause of slow performance before changing plugins, themes or hosting plans.
- Understand how caching, image optimization and cleaner code reduce server work and improve loading speed.
- Explore practical ways to optimize database activity, server requests and background processes on shared hosting.
- Discover how to monitor CPU, memory and traffic patterns to identify when shared hosting becomes a limitation.
- Know when to optimize, upgrade or migrate to a hosting solution that better supports your website’s growth.
A slow website does not always mean you have outgrown shared hosting.
Large images, inefficient plugins, unnecessary scripts, repeated database queries and poorly scheduled background processes can consume more resources than the website actually needs. Moving to a larger hosting plan without addressing these issues may only hide the problem temporarily.
To optimize a website on shared hosting, you need to find where the delay begins and fix the factors you can control. That means testing important pages, reducing unnecessary processing, improving content delivery and monitoring shared server resources.
This guide walks you through that process step by step. You will learn how to optimize a website on shared hosting and recognize when the hosting environment has become the actual limitation.
Quick tips: How to optimize a website on shared hosting
Before taking any immediate action to resolve issue or upgrading your plan, first understand the visible problem and learn how you can handle it.
| Website issue | How to optimize it |
|---|---|
| Pages take too long to appear | Enable page caching and check server response time |
| Images load slowly or appear late | Resize, compress and convert images to modern formats like WebP or AVIF |
| The website becomes slow after installing plugins | Remove unnecessary plugins and replace resource-heavy alternatives |
| Buttons and menus respond slowly | Reduce JavaScript execution and third-party scripts |
| Pages make too many network requests | Remove unused assets, fonts, redirects and external resources |
| Dynamic pages load slowly | Enable object caching and optimize database activity |
| Visitors in distant locations experience delays | Use a CDN to serve static content from nearby locations |
| Performance drops during backups or scans | Reschedule background tasks for lower-traffic periods |
| Speed declines during traffic spikes | Review caching, CDN usage and shared server resource consumption |
| The site remains slow after optimization | Ask your hosting provider to check resource limits and server-side issues |
Start with the issue your visitors experience most often. Apply one major change at a time and retest the same pages so you can identify which improvement actually worked.
Run a quick test to find website performance bottlenecks
Before changing your website, create a performance baseline. Test your homepage and at least two important pages, such as a service page, blog post, product page or checkout page.
You can use the following tools:
- Google PageSpeed Insights: Run mobile and desktop speed tests for specific pages. Review Core Web Vitals, performance opportunities and diagnostic recommendations.
- GTmetrix: Run a GTmetrix speed test and review performance, page size, total requests, Time to First Byte and the waterfall chart. The waterfall shows which images, scripts and external services take the longest to load.
- Google Search Console: Open the Core Web Vitals report to find groups of pages with similar loading, responsiveness or layout stability issues.
Record your starting results. Use the same testing conditions later so you can measure actual improvement rather than comparing inconsistent tests.
How to optimize a website on shared hosting?
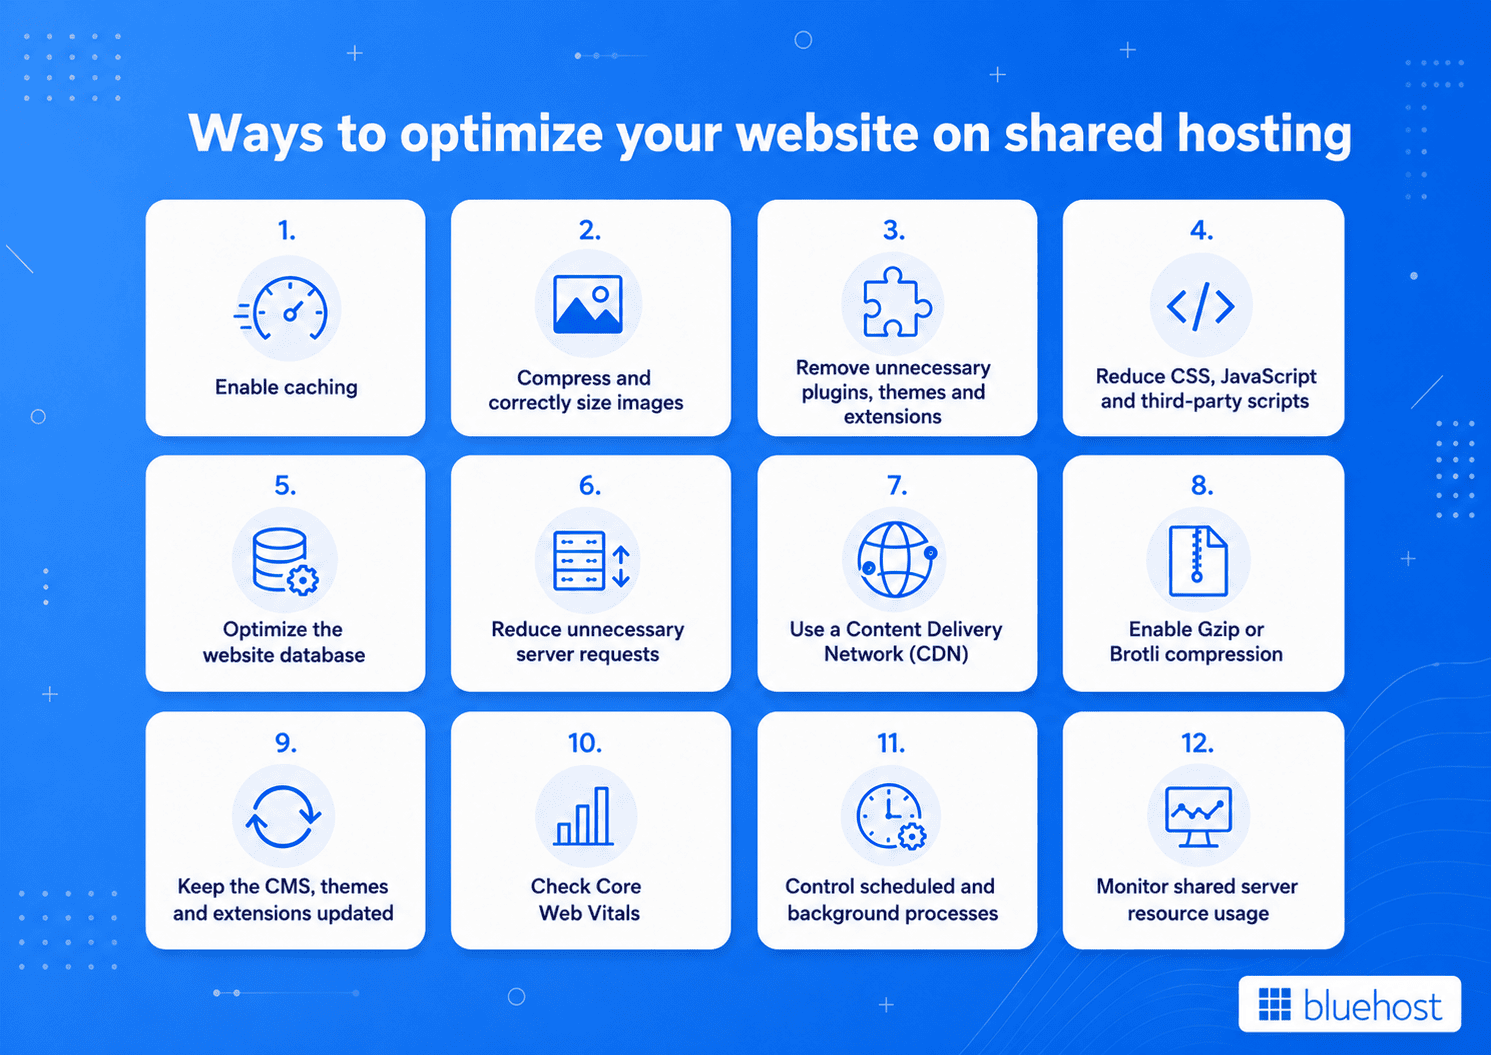
To optimize website performance effectively, begin with changes that reduce repeated server work. Then improve page assets, database activity and background processes.
Create a current backup before changing code, database tables, caching rules or plugin configurations. Use a staging site for changes that could affect website functionality.
1. Enable caching
Caching reduces how often your server rebuilds the same page or reloads unchanged files. Start by checking which caching options your host already provides. You need to go to the settings of the website and caching controls. Then enable:
- Page caching: Use it for blog posts, landing pages, service pages and other mostly static content.
- Browser caching: Allow visitors’ browsers to retain unchanged images, stylesheets and JavaScript files. This helps repeat visits load faster.
- Object caching: Use it for dynamic websites that repeatedly request the same database information, such as stores or membership websites.
Avoid full-page caching on shopping carts, checkout pages, account dashboards and other personalized areas.
For websites hosted on Bluehost, our plans include built-in static content caching and object caching. Avoid adding multiple caching plugins because overlapping settings can create conflicts.
After enabling caching controls, open the website in a private browser window and test forms, account pages and eCommerce functions to confirm everything works correctly.
Also read: Web Caching: What It Is, How It Works & Why It’s Key for SEO in 2026
2. Compress and correctly size images
Large images increase page weight and make visitors download more data than needed. Resize each image to match its display area before uploading it.
Follow these to optimize images:
- Check the image width required by your page or content block
- Resize the image using an editing tool before uploading
- Save photographs as WebP, AVIF or JPEG
- Use PNG only when transparency is required
- Compress the file while keeping the text and visual details clear
- Add width and height values to prevent the page from shifting while the image loads
If your website runs on WordPress and uses shared hosting, you can use a trusted image optimization plugin, such as Smush, ShortPixel Image Optimizer or Imagify. Configure any of the plugins and enable them to optimize new uploads automatically.
Use lazy loading for images further down the page. Exclude the hero image or another important above-the-fold image because delaying it may make the main content appear slower.
Finally, open the page in a private browser window and check that images remain sharp, load correctly and do not shift the surrounding content.
3. Remove unnecessary plugins, themes and extensions
Plugins and extensions can add scripts, database queries, scheduled tasks and external connections. Review what each tool does instead of focusing only on the total number installed.
- Audit active tools: Check whether every plugin or extension supports a feature that visitors or administrators still use. Remove tools linked to abandoned pages, campaigns or integrations.
- Remove unused software: Delete inactive plugins and old extensions and remove themes that are no longer required. Keeping them installed still creates update, security and maintenance work.
- Eliminate overlapping tools: Avoid using several plugins for the same task, such as caching, security or database cleanup. Duplicate tools may run the same processes and create conflicting settings.
- Replace resource-heavy plugins: Choose a lighter alternative when a tool includes many features your website never uses. For example, a basic form may not need a complete marketing automation suite.
- Check background activity: Review whether plugins run frequent scans, backups, reports or API requests. These tasks may consume shared server resources even when no visitor is loading a page.
Deactivate one suspected plugin at a time on a staging site, then retest the affected pages. This helps you identify the actual source of the slowdown without breaking essential features.
Before deleting a tool, confirm that forms, analytics, security or payment features do not depend on it.
4. Reduce CSS, JavaScript and third-party scripts
Large stylesheets, JavaScript files and external scripts can delay visible content and make buttons, menus or forms respond slowly.
Start by running PageSpeed Insights or Lighthouse and review the unused CSS, JavaScript and third-party code warnings. Then:
- Minify CSS and JavaScript: Enable minification through your host, build process or trusted optimization tool. It removes comments and unnecessary formatting, reducing the amount of code transferred.
- Remove unused code: Delete old libraries, animation effects and styles that the website no longer uses. Unused code still has to be downloaded and processed by the browser.
- Load assets only where needed: Configure plugins or page-builder components to load their files only on pages using that feature. A contact-form script, for example, does not need to load on every blog post.
- Defer non-critical JavaScript: Delay scripts that are not needed for the initial page view until important content appears. Do not defer navigation, checkout or consent scripts without testing them.
- Review third-party tools: Remove unused chat widgets, social embeds, heatmaps, advertising scripts and duplicate analytics tags. Each external tool creates another connection that your server cannot fully control.
After making changes, test navigation, forms, sliders and checkout functions. Do not defer scripts blindly because some interactive features need to load immediately.
5. Optimize the website database
Your database may collect old revisions, temporary records, spam, logs and data left by removed extensions. Excess data can increase the work required to generate dynamic pages.
- Create a database backup: Export a current copy before running any cleanup or optimization action. Database changes can affect content, settings and user information across the entire website.
- Remove unnecessary records: Clear old revisions, spam comments, trashed content, expired temporary data and outdated sessions. Review each category before deleting it.
- Review cleanup settings: Check exactly what a CMS cleanup tool plans to remove. Avoid automatic settings that delete data without giving you a chance to review it.
- Optimize database tables: Open your hosting database manager, such as phpMyAdmin, select the correct database and use Optimize table. This reorganizes table storage without intentionally deleting website content.
- Review leftover tables carefully: A removed plugin may leave database tables behind, but another feature may still use them. Do not delete a table based only on its name.
- Schedule cleanup sensibly: Run database maintenance during lower-traffic periods. Large optimization tasks can temporarily increase disk and database activity.
Do not delete unfamiliar tables or database entries. Ask a developer for help when reviewing autoloaded settings or slow database queries.
6. Reduce unnecessary server requests
Every image, font, stylesheet, script and external service creates a request. Focus on removing requests that do not support the page or the visitor’s task.
- Review the request waterfall: Open the Network tab in browser developer tools or run Lighthouse. Look for repeated files, slow external connections and assets that block visible content.
- Remove unused assets: Delete scripts for inactive widgets, duplicate stylesheets and icons that never appear. Each unnecessary file adds transfer and processing work.
- Simplify web fonts: Limit the number of font families, weights and styles. Loading several font files can delay text display and increase page weight.
- Load plugin assets selectively: Prevent plugins from loading CSS or JavaScript across the entire website when their feature appears on only one or two pages.
- Update internal links: Link directly to the current page URL instead of sending visitors through one or more redirects. Each extra redirect adds another request-response step.
Also review external maps, feeds and API-based widgets. Reduce their update frequency or remove them when they do not support an important user task.
Keep valid redirects when a URL has permanently changed. The goal is to remove unnecessary chains, not essential redirects.
7. Use a Content Delivery Network (CDN)
A Content Delivery Network stores copies of static files across multiple locations. Visitors can receive those files from a server closer to them instead of requesting every asset from the origin.
- Check your hosting dashboard: Look for a built-in CDN option or Cloudflare integration. Using the host’s integration is often simpler than configuring the service manually.
- Enable delivery for static assets: Use the CDN for images, CSS, JavaScript and other reusable files. These assets usually do not need to be generated separately for every visitor.
- Confirm HTTPS remains active: Check that both the website and CDN-delivered files load securely. Mixed HTTP and HTTPS content can cause browser warnings or missing assets.
- Test important functions: Review forms, login pages, account areas and checkout after activation. Dynamic pages may require different caching rules from static content.
- Clear the CDN cache after updates: Purge cached files after changing your design, stylesheets or scripts. Otherwise, visitors may continue seeing an older version.
Use the CDN mainly for static assets, such as images, stylesheets and scripts. Review caching rules carefully for personalized or dynamic pages.
If your website is with Bluehost, your hosting plan includes CDN integration, which reduces the number of static content requests reaching your hosting account.
8. Enable Gzip or Brotli compression
Gzip and Brotli reduce the size of text-based resources before they travel from the server to the browser. Smaller transfers can improve page delivery on slower connections.
First, run an online compression test or check the page response headers. Look for:
Content-Encoding: gzipContent-Encoding: br
If compression is not active:
- Enable compression through your host: Look under server settings in your hosting dashboard. Use the built-in control instead of editing server files.
- Contact support when needed: Ask your provider to confirm or enable compression if no setting is available. The required method depends on the server software.
Also, avoid editing server configuration files unless you understand the required rules.
Retest the website after activation. Compression is most useful for text files and is usually unnecessary for JPEG images, videos or compressed archives.
9. Keep the CMS, themes and extensions updated
Updates can resolve compatibility problems, inefficient queries and security weaknesses. However, major updates should be tested before they reach the live website.
- Create a full backup: Back up both website files and the database. This gives you a recovery point if an update causes an error.
- Review the release notes: Check what the update changes and whether it includes performance, security or compatibility fixes. Look for any known issues before installing it.
- Confirm compatibility: Make sure the update supports your CMS version, theme, plugins and PHP version. An incompatible component can create errors or additional processing.
- Use a staging website: Test major CMS, theme or plugin updates away from the live website. This allows you to fix problems without affecting visitors.
- Install updates in a controlled order: Update one major component at a time and test the site before moving to the next. This makes it easier to identify the source of any problem.
- Clear relevant caches: Remove cached files after the update so visitors receive the latest code and styles.
- Test important pages: Check navigation, forms, login areas, search, checkout and other dynamic functions.
Remove extensions that are no longer maintained. Do not assume every update will improve speed, so make sure to compare performance before and after major changes.
10. Check Core Web Vitals
Core Web Vitals measure how quickly important content appears, how responsive the page feels and whether visible elements move unexpectedly.
Use PageSpeed Insights and Search Console to review:
- Largest Contentful Paint (LCP): Optimize the main visible image, reduce server delays and remove render-blocking resources.
- Interaction to Next Paint (INP): Reduce long JavaScript tasks and unnecessary third-party scripts.
- Cumulative Layout Shift (CLS): Add image dimensions and reserve space for ads, videos and embeds.
Test important page types, not only the homepage. Focus on repeated problems across multiple pages rather than a single performance score.
11. Control scheduled and background processes
Backups, scans, imports and automated jobs can use shared server resources even when visitors are not actively loading the website.
- List recurring tasks: Review automated backups, security scans, email queues, product feeds, database cleanup, imports and cron jobs. Identify what runs and how often.
- Reduce unnecessary frequency: Match each schedule to the actual business need. A product feed that changes once per day may not need to update every few minutes.
- Avoid overlapping tasks: Do not run a full backup, malware scan and large import at the same time. Their combined CPU, memory and disk usage can slow visitor requests.
- Use lower-traffic periods: Review analytics to find quieter hours and schedule resource-heavy work during those windows.
- Check failed processes: Investigate tasks that repeatedly stop, restart or remain in a queue. A broken process can consume resources without completing useful work.
- Review task logs: Look for recurring errors, unusually long runtimes and jobs that never finish. Logs help identify which process needs adjustment.
Staggering background work helps prevent sudden resource spikes that affect visitors.
12. Monitor shared server resource usage
Shared hosting providers apply account-level limits so one website cannot consume all available server resources. Your website may still reach those limits during traffic spikes or heavy processing.
- Open your resource dashboard: Check whether your hosting account provides CPU, memory, disk and process reports. Review both current usage and historical patterns.
- Monitor CPU and memory: Look for repeated periods when usage reaches the limit. A sustained pattern often points to heavy plugins, non-cached requests or background tasks.
- Check disk activity: High disk input and output may occur during backups, imports or database-heavy operations. Match the spike with the task running at that time.
- Review concurrent processes: Check whether too many PHP, database or automated processes run together. High concurrency can lead to delays or rejected requests.
- Check error logs: Look for timeout errors, memory-limit messages, failed processes and server errors. Record the exact time and affected page.
- Compare usage with traffic: Match resource spikes with campaigns, traffic increases, updates or scheduled jobs. This helps distinguish visitor demand from internal processing.
- Record useful evidence: Note the URL, date, time, recent website changes, traffic level and error message. Support teams can investigate faster when you provide specific details.
Do not judge performance from one temporary spike. Look for repeated patterns at similar times or during specific tasks.
After applying these improvements, retest the same pages under similar conditions. If website loading speed improves and resource warnings stop, shared hosting may still meet your needs.
Persistent performance problems after thorough optimization may indicate a deeper technical issue or the need for additional hosting resources.
Situations when you need to upgrade from shared hosting
An upgrade may be necessary when performance problems continue after optimization, resource limits are reached regularly or the website needs more control than shared hosting provides.
| Situation | Upgrade to | Why it fits |
|---|---|---|
| Online store is adding more products, orders or customer activity | WooCommerce hosting | Provides a preconfigured WooCommerce environment with store, payment and performance tools built for online selling. |
| Website regularly experiences traffic spikes | Cloud hosting | Offers consistent performance during traffic growth and sudden demand. |
| Repeated CPU or memory limits affect normal traffic and dynamic processing | VPS hosting | Provides allocated CPU, RAM and NVMe storage for more consistent performance. |
| High-traffic or critical website needs maximum resource isolation | Dedicated hosting | Reserves an entire physical server and its resources for one business or workload. |
Look for repeated resource warnings, slowdowns during normal activity or performance problems that continue after thorough optimization.
If none of these situations match your website but it still performs poorly, shared hosting itself may not be the problem. Your current hosting environment may simply lack the performance tools and support your website needs.
In that case, migrating to Bluehost can give your optimized website a more reliable foundation without moving to a more complex hosting solution.
Why migrate to Bluehost Shared Web Hosting for reliable performance?
When website-level fixes are no longer enough, your hosting environment needs to support those optimizations. Our Bluehost Shared Web hosting combines performance, security and management tools in one platform.
- Faster performance: Our shared hosting plan includes NVMe SSD storage, static content caching, object caching, a free CDN and global data centers. Together, these tools help reduce latency, lower repeated server work and deliver content more efficiently.
- Reliable uptime and security: We provide 99.99% uptime SLA, free SSL and malware scanning. Select plans also include malware removal, a web application firewall, DDoS protection and weekly backups.
- Simpler website management: Our hosting plans include a free domain for the first year, managed WordPress updates and a staging site. You can manage key website services in one place and test changes before publishing them live.
- Easy migration: Our free migration tool helps you migrate your WordPress website to Bluehost without rebuilding it from scratch.
With performance, security and management tools built into one platform, we help you spend less time maintaining your hosting and more time growing your website. Explore Bluehost Shared Web hosting to find the right foundation for your next stage.
Final thoughts
A faster website starts with fixing the right problem. Test your most important pages, address the biggest bottleneck and measure the results before making another change.
If performance issues continue after optimization, your hosting environment may be holding your website back. Choose a reliable Bluehost hosting plan that supports your current traffic, resource needs and future growth.
Ready to give your website a stronger foundation? Explore Bluehost Web hosting and migrate your eligible WordPress website using our free migration tool today.
FAQs
Test several pages and compare server response time, page size and resource usage. If optimized pages remain slow while CPU or memory limits repeatedly spike, contact your hosting provider with timestamps and affected URLs.
Start by enabling caching, resizing images and removing unused plugins or scripts. Then optimize database activity, reduce unnecessary requests and retest the same pages with PageSpeed Insights to measure the improvement.
Prioritize the issue with the greatest impact. Reduce the main image size, remove render-blocking code, cache static files and delay non-critical scripts so visitors can see and use important content sooner.
Run a mobile and desktop performance test first. Check for oversized images, slow server response, unused code and third-party scripts. Apply one major fix at a time, then retest before continuing.
Common techniques include caching, image compression, code minification, database cleanup, lazy loading, CDN delivery and fewer external requests. The right combination depends on the bottlenecks identified during performance testing.
Yes. A well-optimized website can load quickly on shared hosting when its traffic and processing needs fit the plan. Bluehost Shared hosting includes NVMe storage, a free CDN, static content caching, object caching and scalable performance options that help your website perform better.
Enable page and object caching, reduce database queries and reschedule heavy background tasks. If response time remains high, check CPU and memory usage and ask your host to review account-level resource limits.
Yes. A CDN serves cached files from locations closer to visitors, reducing network delay and requests to the origin server. It is especially useful for image-heavy websites and geographically distributed audiences.

Write A Comment