Key highlights
- Bluehost’s free self-service migration tool lets you move your WordPress site from Hostinger to Bluehost automatically – most migrations complete in under two hours.
- Before you begin, back up your Hostinger site, check your email hosting setup under hPanel and note your contract end date to avoid overlap charges.
- Two migration paths are available: the Bluehost Site Migration Tool is the easiest option for most users, while manual migration via FTP and phpMyAdmin gives developers complete control.
- After migration, update your nameservers to point your domain to Bluehost – whether it’s registered at Hostinger or elsewhere. DNS propagation can take up to 48 hours.
- Your Hostinger site stays live throughout the entire process and only switches over to Bluehost once your nameservers are updated.
You picked Hostinger for its low price and quick setup. That made sense at the time. But now your site is growing and you’re starting to feel the limits – whether it’s support that doesn’t go far enough, or a hosting environment that wasn’t built with WordPress at its core.
So you’ve started looking elsewhere. And you’ve landed on Bluehost.
This guide covers the full process of how to migrate Hostinger hosting to Bluehost – what to do before you touch anything, how to run the migration and what to check once your site is live on the other side. You can use Bluehost’s free Site Migration Tool to automate the transfer or follow the manual path if you’d rather handle it step by step.
Either way, by the time you’re done, your site will be running on Bluehost – fully intact.
Why migrate from Hostinger to Bluehost?
Hostinger works for basic sites on a tight budget. But if WordPress performance, support depth and long-term scalability matter to you, Bluehost is the stronger platform. Here’s how the two compare:
| Feature | Hostinger | Bluehost |
| Uptime guarantee | 99.9% | 99.99% |
| 24/7 support | Live chat only | Live chat + phone |
| WordPress.org recommended | No | Yes |
| Free migration tool | Outbound migration tool | Yes |
| Free domain | Yes (select plans) | Yes (first year) |
Here’s why WordPress site owners choose to migrate Hostinger hosting to Bluehost:
- WordPress-first hosting: Bluehost is the only provider officially recommended by WordPress.org. The platform is built around WordPress – from the onboarding flow to the control panel.
- Free automated migration: Hostinger does not provide a dedicated outbound migration tool for moving your site away, so you’ll need to export your files/database or use Bluehost’s migration tool.
- Deeper support: Hostinger’s support is limited to live chat. Bluehost offers 24/7 human support – useful when you’re troubleshooting something time-sensitive.
- Room to grow: Bluehost’s hosting plans scale from shared hosting to dedicated servers, so you won’t need to switch providers again as your traffic grows.
Ready to make the move? Here’s exactly how to do it.
How to prepare before migrating from Hostinger to Bluehost?
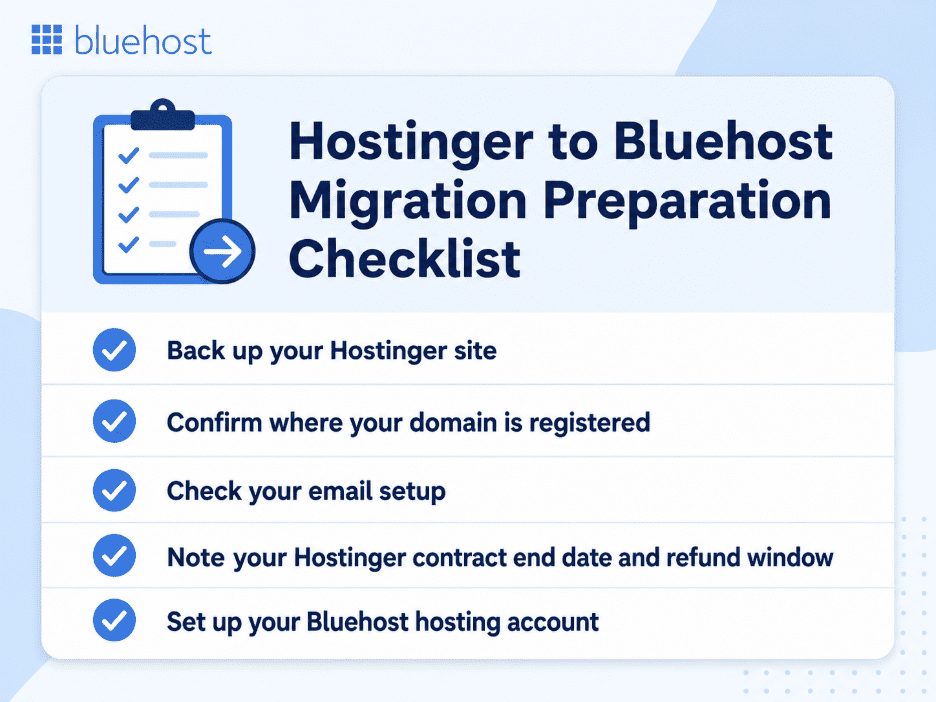
A little preparation before you migrate Hostinger hosting to Bluehost saves you from headaches mid-migration. Work through this checklist before you touch anything.
Back up your Hostinger site
Before anything else, create a full backup of your site – files and database. In hPanel, go to Backups and download a complete backup to your local machine. This is your safety net if anything goes wrong during the Hostinger website backup for Bluehost migration process. Do not skip this step.
Confirm where your domain is registered
Hostinger bundles a free domain with most of its plans, which means your domain may be registered directly at Hostinger. Log in to hPanel, go to Domains and confirm who holds the registration. This affects what you’ll need to do after migration – either transfer the domain to Bluehost or update the nameservers only.
Check your email setup
If you’re using Hostinger’s email hosting, those mailboxes won’t transfer automatically. Note down all active email accounts and export any emails you need to keep before you begin. You’ll set up new mailboxes on Bluehost after the migration is complete.
Note your Hostinger contract end date and refund window
Hostinger offers a 30-day money-back guarantee on most plans. Check your renewal date in hPanel under Billing so you can time your cancellation correctly and avoid being charged for another cycle.
Set up your Bluehost hosting account
If you haven’t already, sign up for a Bluehost plan before starting the migration. You’ll need an active Bluehost account to use the Site Migration Tool or set up your server environment for a manual transfer.
How to migrate from Hostinger to Bluehost: Step by step
There are two ways to migrate your site. The Bluehost Site Migration Tool is the recommended option for most users it’s automated, free and requires no technical knowledge. If you prefer hands-on control, the manual migration path is covered in Method 2.
Method 1: Migration using Bluehost Site Migration Tool (Recommended)
The Site Migration Tool handles your file and database transfer automatically. Here’s how to run it:
- Log in to your Bluehost portal.
- Click Add Website.
- Click Transfer WordPress Website.
- Wait while Bluehost prepares your account, then click Start Transfer.
- Enter the URL of your current Hostinger site and click Connect.
- Click Yes, Continue to Login – you’ll be redirected to your Hostinger WordPress site.
- Log in with your WordPress username and password.
- Click Yes, I approve this connection.
- Wait while Bluehost connects to your site – the status changes from Connecting to Connected.
- Your files and database transfer automatically.
- You’ll receive an email when migration is complete. Click Go to site to verify.
Method 2: Manually migrating from Hostinger to Bluehost
Manual migration is best suited for sites with custom configurations that need direct handling of files and databases, or when Bluehost support advises this path. While it requires working with FTP, phpMyAdmin and your WordPress database directly, it gives you complete control over every step of the process.
For a full technical walkthrough, refer to our WordPress manual migration guide.
Step 1: Export your WordPress files from Hostinger
Log in to hPanel and open the File Manager. Navigate to your public_html folder, select all files and compress them into a .zip file. Download the zip to your local machine. Alternatively, connect via FTP using your Hostinger FTP credentials and download the files directly.
Step 2: Export your WordPress database from Hostinger
In hPanel, go to Databases and open phpMyAdmin. Select your WordPress database, click Export, choose the Quick method and download the .sql file to your local machine.
Step 3: Create a new database on Bluehost
Log in to your Bluehost control panel. Go to Databases and create a new MySQL database. Note down the database name, username and password – you’ll need these in Step 5.
Step 4: Import your database
Open phpMyAdmin in your Bluehost control panel. Select the new database you just created, click Import and upload the .sql file you exported from Hostinger.
Step 5: Upload your files to Bluehost
Open the File Manager in your Bluehost control panel and navigate to the public_html folder. Upload the .zip file you downloaded from Hostinger and extract it. Make sure all files sit directly inside public_html – not inside a subfolder.
Step 6: Update your wp-config.php file
Open wp-config.php in the File Manager. Update the following lines with your new Bluehost database credentials:
define('DB_NAME', 'your_new_database_name');
define('DB_USER', 'your_new_database_username');
define('DB_PASSWORD', 'your_new_database_password');
define('DB_HOST', 'localhost');
Save the file.
Step 7: Fix your permalinks
Log in to your WordPress dashboard on Bluehost. Go to Settings, click Permalinks and click Save Changes without making any edits. This refreshes your .htaccess file and fixes any broken URL structures.
Step 8: View your site using a temporary URL
Before updating your nameservers, preview your migrated site using Bluehost’s temporary URL to confirm everything transferred correctly. Check your pages, images, menus and any forms or plugins.
Bluehost Site Migration Tool vs manual migration
| Factor | Site Migration Tool | Manual migration |
| Technical skill required | None | Intermediate |
| Time to complete | Under 2 hours | 2-4 hours |
| Risk level | Low | Medium |
| Best for | Most WordPress users | Developers, complex setups |
| Cost | Free | Free |
Final steps after the migration
Your site is now on Bluehost. Before you cancel your Hostinger plan, work through these final steps to make sure everything is running correctly.
Point your domain to Bluehost
Updating your domain’s nameservers is what switches your live site from Hostinger to Bluehost. How you do this depends on where your domain is registered.
If your domain is registered at Hostinger:
Log in to hPanel, go to Domains, select your domain and replace the existing nameservers with Bluehost’s:
- ns1.bluehost.com
- ns2.bluehost.com
If your domain is registered elsewhere:
Log in to your domain registrar’s control panel and update the nameservers to the same values above.
Once updated, DNS propagation can take anywhere from a few hours to 48 hours to complete. During this window, some visitors may still see your Hostinger site. This is normal. Keep both sites live until propagation is fully complete to avoid downtime when migrating from Hostinger to Bluehost.
Test the migrated site
Once your domain is pointing to Bluehost, run through this website migration SEO checklist before considering the migration done:
- Pages and posts: Click through your key pages and confirm content loaded correctly.
- Images and media: Check that no images are broken or missing.
- Navigation and internal links: Verify menus and internal links go to the right places.
- Forms: Test any contact or lead capture forms to confirm submissions are working.
- SSL certificate: Confirm the padlock is showing in the browser. If not, activate your free SSL certificate in the Bluehost control panel.
- Site speed: Run a quick speed test on Google PageSpeed Insights and compare against your Hostinger baseline.
- Google Search Console: Confirm there are no crawl errors or indexing issues after the switch.
Cancel your Hostinger plan
Once you’ve confirmed your site is fully live and working on Bluehost, you can cancel your Hostinger plan.
To cancel, log in to hPanel, go to Billing and follow the cancellation steps. If you’re within Hostinger’s 30-day money-back window, you may be eligible for a refund – check the terms based on your plan type before cancelling.
Do not cancel your Hostinger plan until your DNS has fully propagated and your site is confirmed live on Bluehost.
Final thoughts
The hardest part of switching hosting providers is getting started. Once you’ve backed up your site and run the migration, the rest follows a clear path.
Bluehost’s Site Migration Tool takes care of the heavy lifting. Your files transfer, your database moves across and your site goes live on infrastructure built specifically for WordPress. All that’s left is a nameserver update and a quick round of testing.
If you’ve been putting off the decision to migrate Hostinger hosting to Bluehost, now is a good time. Your Hostinger site stays live throughout the process – there’s nothing to lose by starting today.
Get started with Bluehost WordPress Hosting and migrate your site now.
FAQs
Hostinger does not provide an outbound migration tool, so moving your site manually requires downloading your files and database from hPanel. The easier route is using Bluehost’s free Site Migration Tool, which connects directly to your Hostinger WordPress site and handles the transfer automatically.
Yes. Bluehost’s Site Migration Tool is free for all new accounts. It automates the entire transfer files, database and settings without requiring any technical knowledge on your end.
Hostinger email accounts do not transfer automatically. Before you start, export any emails you need to keep and note down your active mailboxes. Once your site is live on Bluehost, you can set up new email accounts through the Bluehost control panel.
Bluehost’s Site Migration Tool is designed for WordPress sites. If your Hostinger site runs on a different platform, you’ll need to follow the manual migration path transferring your files via FTP and setting up your database on Bluehost manually.
You don’t need to transfer your domain. Updating the nameservers in hPanel to point to Bluehost is enough to route your traffic to your new hosting account. A full domain transfer is optional and can be done separately at any time.
That’s completely fine and actually recommended. Keep your Hostinger plan active until your site is fully live on Bluehost and DNS propagation is complete. Cancelling too early risks downtime if something needs to be fixed mid-migration.
Using the Bluehost Site Migration Tool, most WordPress sites migrate in under two hours. Manual migration typically takes two to four hours depending on the size of your site and database. DNS propagation after the nameserver update can take an additional 24 to 48 hours.

Write A Comment