Key highlights
- The wp-content folder, including wp-content uploads, houses WordPress’s essential media files, themes and plugins for your site.
- Two upload methods exist: your host’s control panel file manager or FTP access, each suited for specific needs.
- Protecting your wp-content uploads folder requires regular backups, proper file permissions and active change detection.
- Your wp-content folder needs specific permission codes: 755 for folders and 644 for files to balance security with function.
- CDN services distribute your wp-content uploads across multiple servers worldwide, accelerating load times and managing high-traffic situations effectively.
Imagine this scenario: You’ve invested significant time creating an engaging blog post. You meticulously selected high-quality images to complement your content. However, upon publishing, the images don’t display as intended. After investigating, you identify the root cause – a poorly organized WordPress wp content uploads folder.
Many WordPress users encounter this situation. They haven’t yet mastered media file management best practices. The wp-content folder, especially the uploads directory, is crucial. It ensures your website runs smoothly and looks professional.
This guide will dive deep into the WordPress upload directory within the wp-content folder. You’ll learn its importance and how to upload and manage media files efficiently.
We’ll also explore best practices for what is wp content security and optimization, including how to manage your WordPress wp content uploads folder effectively and protect your files through proper folder access controls.
To start, let’s explore what the wp-content folder is and why it’s a critical component of your WordPress site’s structure.
What is wp-content and why is it important?
The WordPress wp-content folder forms the backbone of your WordPress website’s customizable elements. This essential directory houses the components that make your site unique – themes, plugins and media files. Unlike WordPress core files, the wp-content folder contains everything you’ve personally added to customize your site.
You’ll find wp-content folder directly in your WordPress installation’s root directory. This strategic separation from core WordPress files serves a crucial purpose. When WordPress updates occur, the system refreshes core files while leaving your customizations untouched. This separation protects your personalized elements and ensures they remain intact through updates.
The wp-content folder gives you greater control over your WordPress website. This knowledge becomes particularly valuable when you need to:
- Customize your site’s appearance
- Add new functionality through plugins
- Manage your media library efficiently
- Troubleshoot specific issues
- Perform site maintenance
When you grasp the role of the wp-content folder, you transform from a casual WordPress user into a more confident website administrator.
Also read: WordPress user roles – A Complete Guide
Role of wp-content in WordPress file management
The wp-content folder serves as your website’s content management hub. This folder handles four critical aspects of your WordPress site:
- Theme management: When you select or upload a theme, WordPress stores it in wp-content/themes. Each theme occupies its own subfolder with template files, stylesheets and other assets that determine your site’s appearance. This organization makes switching between themes seamless while preserving your settings.
- Plugin functionality: The wp-content/plugins directory houses all installed plugins. Each plugin creates its own sub plugin folder containing the code that extends your site’s capabilities. This modular approach lets you easily activate, deactivate or remove plugins without affecting your core WordPress installation.
- Media storage: When you upload images, videos or documents, WordPress automatically stores them in wp-content/uploads. This folder uses a year/month structure for efficient organization, making content retrieval straightforward. For example, an image uploaded in February 2026 would reside in wp-content/uploads/2026/02/.
- Custom modifications: The wp-content folder provides a safe space for site customizations through child themes or custom code. These modifications remain separate from WordPress core files, preventing them from being overwritten during updates.
For website owners, this organization offers remarkable advantages. You gain better file control, simplified troubleshooting and enhanced security. Additionally, you can quickly identify which elements consume the most storage space, helping you optimize your site’s performance.
Also read: 10 WordPress Setting Changes to Optimize Your Site’s Performance
The WordPress wp-content folder essentially serves as your site’s foundation for customization, enabling you to build a personalized WordPress experience while maintaining stability.
How the wp-content/uploads folder stores media files?
The WordPress upload directory functions as your WordPress site’s media library. This intelligent storage system organizes all your images, videos, documents and other media files that enhance your content.
WordPress implements a chronological organization structure within the uploads folder. When you upload media, the system automatically creates directories based on the upload date:
- First, WordPress creates a year folder (for example, 2026)
- Within that, it adds a month folder (for example, 02 for February)
- Your files then get stored within this year/month hierarchy
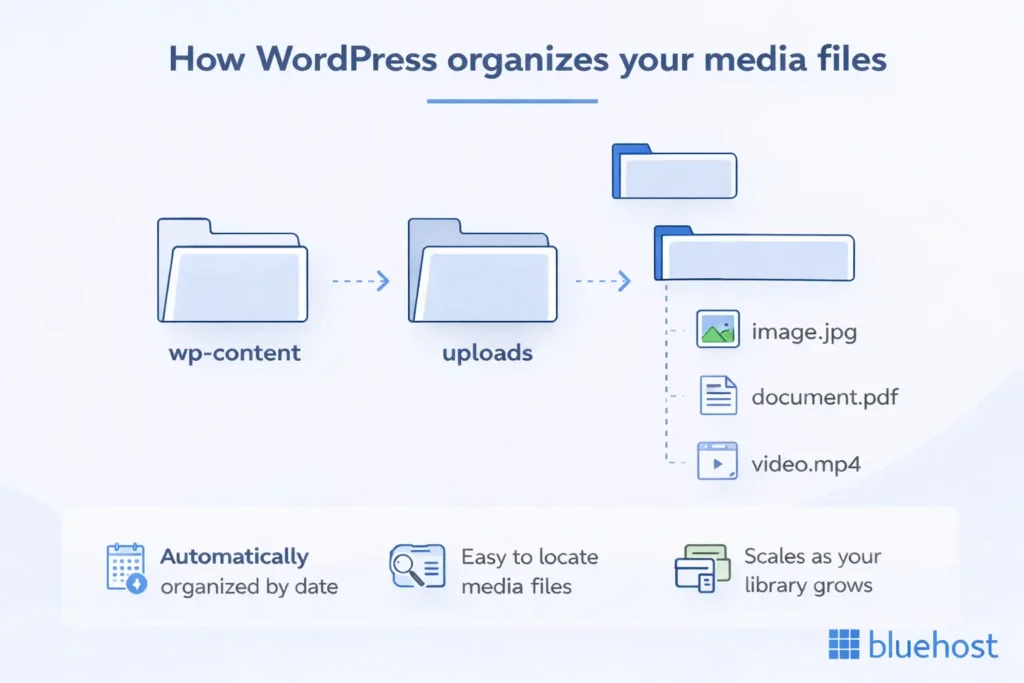
This WordPress file structure delivers significant benefits. You can easily locate files based on when you uploaded them. Your media remains organized even as your library grows to hundreds or thousands of files. And should you need to transfer or back up specific time periods, you can work with discrete folders rather than your entire library.
Also read: How to Organize Your Media Library
The uploads folder handles various file types essential for your website:
- Images (.jpg, .png, .gif, .webp)
- Documents (.pdf, .doc, .xls)
- Audio files (.mp3, .wav)
- Video files (.mp4, .mov)
- Other downloadable content
For each uploaded image, WordPress automatically generates multiple versions in different dimensions. This enables your site to serve appropriately sized images for various screen sizes, which improves performance and user experience.
The system also maintains a database record of each uploaded file, including metadata like dimensions, file size and alt text. These details help power the media library interface in the WordPress admin area. You can search and filter uploads efficiently without manually sorting through files.
Beyond standard uploads, some plugins or themes may create their own subfolder within wp-content folder to store specific media types or temporary files. For instance, a cache plugin like WP Super Cache might generate its own directory to store cached versions of images.
Also read: 11 Best WordPress Caching Plugins to Speed Up Website (2026)
How to access the wp-content/uploads folder?
Accessing your WordPress wp content uploads folder doesn’t require advanced technical skills. You have multiple straightforward methods available, each suited to different needs and experience levels.
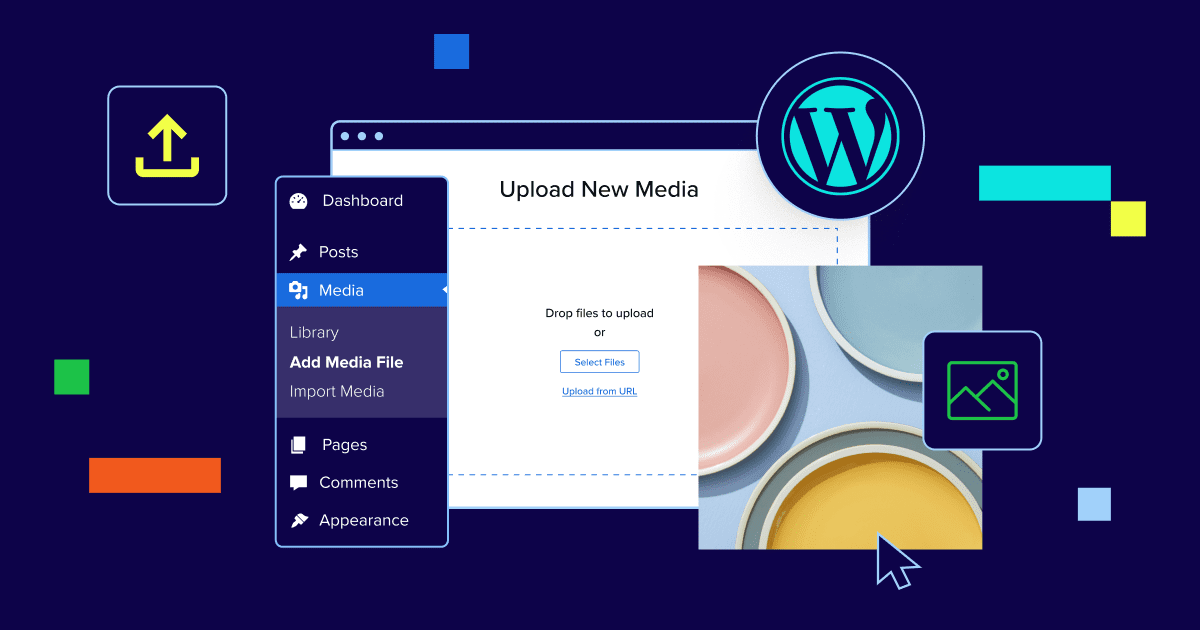
1. Using the WordPress dashboard media library
The simplest way to manage your media files is through WordPress itself. This native approach requires no technical knowledge while providing comprehensive file management capabilities:
- Log in to your WordPress admin dashboard
- Navigate to “Media” > “Library” in the left sidebar
- Browse, search or filter files using the intuitive interface
- Click any file to view its details and download options
This method offers convenient file management without leaving your WordPress environment. You can easily edit image metadata, replace files and even perform basic image editing. For most content creators, this approach handles 90% of media management needs. However, it can be cumbersome for bulk operations.
Find your perfect plan
📋 View Plans2. Direct file access through hosting dashboard and FTP
When managing large media files or needing more direct control over your wp-content uploads, the standard WordPress media library interface can feel restrictive. Using a file manager through your hosting control panel gives you efficient access to organize, upload, and modify files stored in your wp-content uploads directory with greater flexibility.
On Bluehost, the File Manager lets you reach your WordPress upload directory without needing FTP software:
- Log in to your Bluehost hosting account.
- Select Hosting from the left menu.
- Click File Manager to open the browser-based tool.
- Navigate to public_html > wp-content folder > uploads.
This method streamlines file management by allowing you to:
- Upload multiple files via drag-and-drop
- Rename, download or edit files using a right-click menu
- Modify file permissions for security
- Open and edit text-based files directly within the built-in code editor
For most WordPress site owners, this approach provides a balance of ease and control without requiring external software.
3. Advanced access via FTP (File Transfer Protocol)
For bulk operations or when direct server access is required, FTP provides an efficient way to interact with your uploads folder. However, modern FTP clients also offer secure SFTP connections, which encrypt your transfer data for enhanced security.
Bluehost supports both standard FTP and secure SFTP protocols, though we recommend using SFTP whenever possible to protect your credentials and data.
To access your uploads folder using FTP:
- Install an FTP client like FileZilla (Windows & Mac) or Transmit (Mac).
- Retrieve your FTP credentials from your Bluehost hosting dashboard.
- Connect to your server using the provided credentials.
- Navigate to /public_html/wp-content folder/uploads/.
Also read: Setting Up Using Secure FTP
When is FTP useful?
- Uploading or downloading multiple files simultaneously
- Performing bulk file operations such as renaming or moving files
- Accessing site files when the WordPress admin panel is down
For developers who prefer command-line operations, SSH access provides even greater control over file management. Unlike FTP, which relies on a graphical interface, SSH (Secure Shell) allows you to execute commands directly on the server. This makes it an efficient option for bulk file transfers, automated scripts and advanced site maintenance.
Bluehost includes SSH access with its Cloud, VPS, and Dedicated Server hosting plans. You can use powerful command-line tools like scp (secure copy protocol) for efficient file transfers. These tools work faster than traditional FTP methods and provide better control over bulk file operations. Developers handling large websites benefit the most from these options.
Also read: What is SSH Access and How to Enable It in Your Hosting Account
Each access method serves different needs in your WordPress journey. Beginners might prefer the WordPress dashboard, while those requiring more control will appreciate Bluehost’s file manager or FTP access. The right choice depends on your comfort level and specific requirements.
How to upload files to your WordPress wp-content folder?
Your wp-content folder plays a crucial role in WordPress, storing everything from media files to themes and plugins. While uploading files here requires careful attention, you can safely manage this process with the right approach.
Let’s explore the most reliable methods to upload content while protecting your site.
Important preparation steps
Before you start uploading files to wp-content folder, you need to protect your site from potential issues. A single wrong move could disrupt your website’s functionality. Take these essential precautions to ensure a smooth process.
- Make a complete backup of your current site
- Note down your current WordPress version
- Check if you have enough storage space
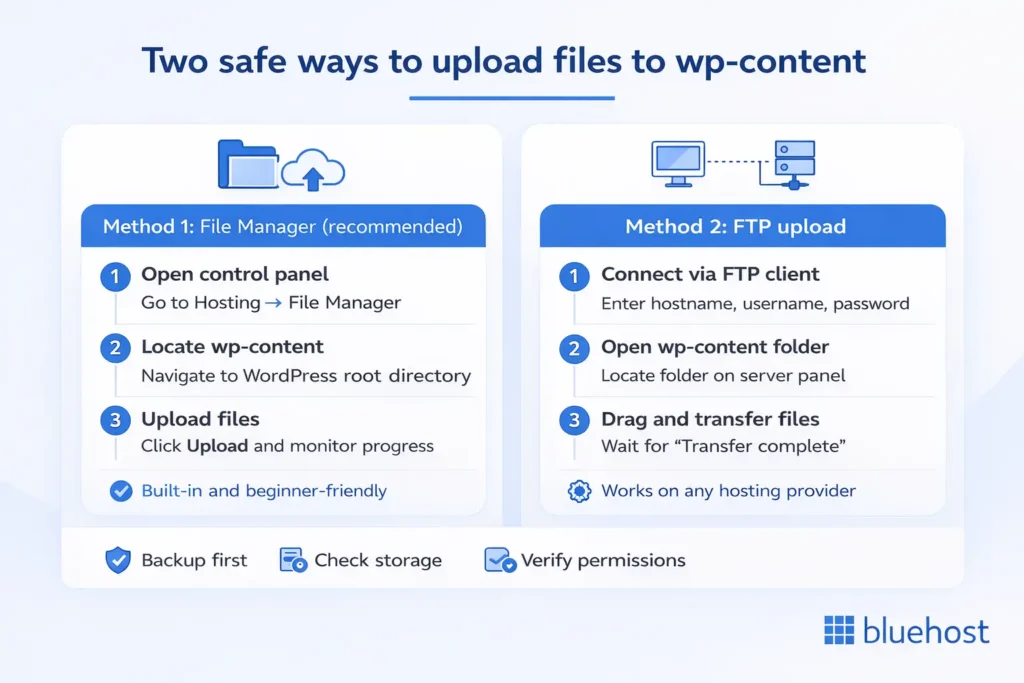
Method 1: Bluehost File Manager (recommended)
Bluehost File Manager provides the safest and most straightforward way to upload wp-content folder files. This built-in tool prevents many common upload errors and helps maintain proper file permissions.
Steps to access and upload:
- Open your Bluehost control panel
- Click “Hosting” in the left sidebar
- Select “File Manager”
- Navigate to your WordPress root directory
- Find the wp-content folder
- Click “Upload” from the top menu
- Select files from your computer
- Monitor the upload progress bar
Method 2: Using FTP (for any hosting provider)
File Transfer Protocol (FTP) works like a secure tunnel between your computer and web server. You’ll need special software called an FTP client to create this connection. The most popular option is FileZilla, a free program that works on both Windows and Mac.
Also read: The 6 Best FTP Clients To Develop Your Website
First, you need to gather your connection details. Your hosting provider gives you these credentials when you sign up for hosting. You can usually find them in your hosting control panel under ‘FTP Access’ or ‘FTP Credentials’.
Skip the jargon and get live human help 24/7
💬 Chat with an ExpertSetting up your FTP software
FileZilla needs four key pieces of information to connect to your server:
- Server hostname (like ftp.yoursite.com)
- FTP username (often starts with your domain name)
- FTP password (different from your hosting login)
- Port number (usually 21 for standard FTP)
Making the connection
Once you have your FTP software installed and credentials ready:
- Open FileZilla on your computer
- Look for the quickconnect bar at the top
- Enter your credentials in the right fields
- Click ‘Quickconnect’ to start the connection
- Wait for the connection confirmation
Uploading your files
After connecting successfully:
- Find your wp-content folder in the right panel
- Locate your files to upload in the left panel
- Drag files from left to right to start the transfer
- Watch the progress in the bottom window
- Wait for “Transfer complete” message
Verifying your upload
Always check your transferred files:
- Compare file sizes between source and destination
- Check file permissions (usually 644 for files)
- Test your website to ensure everything works
- Clear your cache after big uploads
How to protect the wp-content or the uploads folder?
The wp-content folder and uploads folders store your WordPress media files, themes and plugins. Attackers often target these folders to inject malware or steal sensitive data. You must secure these critical directories to protect your site and your visitors’ information.
1. Create regular backups
Reliable backups ensure quick recovery from cyberattacks, accidental file deletions or technical failures. A well-maintained backup system prevents data loss and allows you to restore your site without disruption.
If you’re using Bluehost, you can enable automated weekly backups through the hosting control panel. This feature ensures continuous data protection and keeps your site secure in case of unexpected issues.
Also read: How to Create a Manual Backup
2. Rename your wp-content folder
The default “wp-content folder” name makes it easy for automated attacks to find your files. Hackers use this predictable naming convention to target WordPress sites with malicious scripts. A custom folder name adds an extra security layer by breaking automated attack patterns. You should change this name to a unique identifier that only you know.
Steps to rename safely:
- Log into your Bluehost File Manager
- Find the wp-content folder
- Right-click and select “Rename”
- Open wp-config.php and add these lines:
define('WP_CONTENT_FOLDERNAME', 'your-new-name');

define('WP_CONTENT_DIR', ABSPATH . 'your-new-name');

define('WP_CONTENT_URL', 'https://[your-domain].com/your-new-name');
3. Block directory access
Your wp-content folder directory should never display its contents to visitors. Public directory listings can expose sensitive information about your site structure and files. Malicious users often scan these listings to find vulnerabilities. You must add protection at both the file and server level to prevent unauthorized access.
Add this code to your .htaccess file:
Protect directory listing
Options -Indexes

Block script execution


Order Allow,Deny

Deny from all
Also read: WordPress .htaccess File – How to Use & Edit It Easily
How to hide the wp-content folder?
Your WordPress wp-content folder needs multiple security layers to prevent unauthorized access. Standard security practices often miss crucial protection steps for this important directory. A properly hidden folder combined with correct permissions will shield your files from most common attacks.
1. Set correct file permissions
File permissions determine who can read, write and execute your WordPress files. Incorrect file permissions can leave your site vulnerable to unauthorized changes and malware injection. The right permission structure creates a strong foundation for your site’s security while maintaining normal functionality.
Required permission settings:
- wp-content folder directory: 755
- Uploaded files: 644
- PHP files: 640
- .htaccess file: 644
Commands to set permissions:
chmod 755 wp-content

find wp-content -type f -exec chmod 644 {} ;

find wp-content -type d -exec chmod 755 {} ;
2. Add server-level protection
Server configuration files provide powerful security controls beyond basic WordPress settings. These settings block malicious access attempts while keeping your site functional. A properly configured server acts as your first line of defense against attacks.
Add to your root .htaccess:
Block direct file access


RewriteEngine On

RewriteRule ^wp-content/.*.(php|phtml)$ - [F,L]

RewriteRule ^wp-content/uploads/.*.(php|phtml)$ - [F,L]


Protect sensitive files


Order Deny,Allow

Deny from all
3. Monitor file changes
Unauthorized file modifications often signal malware infections or hacking attempts. Attackers target the WordPress wp-content folder to inject common WordPress vulnerabilities, create backdoors or compromise site functionality.
With Bluehost’s security tools, you can track file modifications in real time and receive alerts for suspicious activity. Quick detection allows you to respond immediately, prevent breaches and simplify recovery if an issue occurs.
Here’s how to enable file monitoring:
- Open Bluehost control panel.
- Navigate to the section where you can manage your security products or SiteLock services.
- If you don’t have SiteLock yet, consider upgrading to SiteLock Essentials, Prevent, or Prevent Plus plans, as these include file change monitoring.
- Once you have the appropriate SiteLock plan, activate the file monitoring feature within the SiteLock dashboard.
- SiteLock will then automatically scan your website files daily to detect any unauthorized changes.
- You will receive alerts if any suspicious file changes are detected, helping you maintain your website’s security.
Best practices for optimizing the wp-content/uploads directory in 2026
Your uploads directory directly impacts your site’s speed, performance and user experience. In 2026, strategic optimization of this directory has become essential for modern WordPress sites. The key lies in implementing smart automation while maintaining thoughtful oversight of your media assets.
1. Automated image optimization tools
Modern optimization tools have fundamentally changed how we manage WordPress media files. These intelligent systems analyze each upload in real-time, applying precise compression without sacrificing visual quality.
When you upload an image, the system automatically creates optimized versions for different screen sizes and devices. This automated approach ensures consistent performance while saving countless hours of manual optimization work.
2. CDN integration for faster media delivery
Content delivery networks have become vital for serving media files efficiently in 2026. These systems distribute your uploads across a global network of servers, ensuring visitors receive content from the closest possible location.
By reducing the physical distance data must travel, CDNs dramatically improve load times for users worldwide. This distributed approach also provides built-in redundancy and protection against traffic spikes.
Bluehost includes Cloudflare CDN integration with all Managed WordPress hosting plans. This partnership means your wp-content folder files automatically sync to a global server network.
Once enabled through your Bluehost dashboard, your visitors will experience faster load times and smoother media delivery.
- Smart caching predicts content needs
- Next-gen formats reduce file sizes
- Intelligent routing minimizes delays
Also read: How to Enable Cloudflare CDN
3. Performance maintenance routines
Regular maintenance keeps your uploads directory lean and efficient over time. A strategic approach to media management prevents the common problem of bloated directories that slow down backups and updates.
Monthly checks help identify unused files, optimization opportunities and potential performance bottlenecks before they impact your site.
- Schedule monthly optimization checks
- Remove redundant media files
- Update metadata systematically
- Track storage patterns carefully
Final thoughts
Your WordPress wp content uploads folder plays a crucial role in your site’s speed, security and media accessibility. Managing it properly ensures a faster, safer site and more organized WordPress experience.
If you’re ready to enhance your WordPress experience, Bluehost provides comprehensive WordPress hosting with built-in security, automatic backups and advanced file management tools. Keep your uploads secure, your site running smoothly and your content always accessible.
Don’t settle for just storage – power your site with hosting that works as hard as you do. Get started with Bluehost today.
FAQs
To download all files in the “wp-content folder” directory, use an FTP client or your hosting control panel. Connect to your server, navigate to the “wp-content folder” folder, select all files and folders, and download them to your local computer.
If your uploads are not showing, check if the media files are in the correct “wp-content/uploads” directory. Ensure file permissions are set correctly, and the media library in your WordPress dashboard is not filtered or experiencing any issues. Additionally, confirm that the file paths in your content are accurate.
Access the “wp-content/uploads” directory through your hosting control panel’s file manager or an FTP client. Alternatively, in the WordPress dashboard, navigate to “Media” -> “Library” to view and manage your uploads. Knowing how to access wp-content folder properly is essential for efficient media management.
WordPress content uploads can be vulnerable to unauthorized access if file permissions are not configured correctly. Additionally, poorly coded plugins or themes may introduce security risks. Regularly update WordPress and its components, use strong passwords, and monitor for any suspicious activities.
The “wp-content/uploads” directory follows a chronological structure based on the year and month of file uploads. For example, files uploaded in March 2026 would be located in “wp-content/uploads/2026/03/.” This organization helps manage and retrieve media files efficiently.
Improving WordPress secure file access involves setting correct folder permissions, disabling php execution within the uploads folder, and using a reliable security plugin to monitor and block unauthorized activities.
To prevent unauthorized access to media files in WordPress, restrict directory listings, disable php execution in the uploads folder, rename the wp-content folder, and implement server-level protections via the htaccess file or security plugins.
Set folder permissions to 755 for directories and 644 for files within the WordPress upload directory to balance functionality and security, minimizing risks of unauthorized file modifications or access.

Write A Comment