Key highlights
- Discover the exact location of your WordPress database within your hosting environment.
- Learn how to access your database through phpMyAdmin and other database management tools.
- Understand what critical site data is stored in your WordPress database tables.
- Explore proven methods to locate your database credentials in the wp-config.php file.
- Uncover best practices for managing, backing up and securing your WordPress database.
Have you ever wondered where is WordPress database stored on your server? Whether you’re troubleshooting errors, backing up your site or preparing for a migration, knowing your database location is essential. Every WordPress site stores critical data – posts, pages, users and settings – in a MySQL database that powers your entire website.
This guide will show you exactly where is WordPress database located, how to access the wp-config.php file to find your database credentials and how to connect through phpMyAdmin for better management of your WordPress installation.
What is a WordPress database?
Think of a WordPress database as your website’s sophisticated digital filing cabinet. It serves as the central storage system that holds all your essential site data, ensuring everything from your latest blog posts to intricate account details is saved securely. While your WordPress theme and plugins handle the visual design and functionality, the database acts as the brain that contains the actual information populating those layouts.
WordPress relies on a management system called MySQL (or MariaDB) to operate efficiently. Every time a visitor loads a page, the software performs a WordPress database search to instantly retrieve and display the correct text and settings. Understanding this storage structure is the first step in learning how to access WordPress database tables for troubleshooting, performing backups or checking your WordPress database location.
Your WordPress database typically stores the following types of critical data:
- Posts and pages: Stores every blog post, page content and their revisions.
- User information: Contains profile details, login credentials and administrator roles.
- Comments: Holds all visitor discussions, trackbacks and pingbacks.
- Site settings: Saves global configurations like your site URL and general preferences.
- Plugin and theme data: Preserves customization options and active tool settings.
Why does WordPress require a database?
Unlike static HTML websites that require manual updates for every page, WordPress uses a database to generate content dynamically. Think of your site as a complex application where the design is the interface and the database is the memory bank storing every post, comment and user setting. This separation allows you to switch themes or update content instantly across thousands of pages without touching a single line of code, providing the flexibility needed for modern, interactive websites.
Because the database powers interactivity and scalability, it is the most critical component of your installation. This central role is exactly why learning files is essential for troubleshooting errors or optimizing performance. Mastering a empowers you to directly manage the core data that keeps your site running smoothly.
How does your WordPress database work?
Think of your WordPress database as a sophisticated spreadsheet system with multiple interlinked sheets. In this analogy, the database tables represent individual sheets, columns define specific data categories (like dates or titles) and rows contain the actual entries. This organized structure allows the CMS to efficiently store and retrieve information. When a visitor lands on your site, WordPress performs a query to instantly locate the correct content rows and dynamically assemble the page they see.
- wp_posts: The core table storing all your content, including blog posts, pages and revision history.
- wp_users: Contains essential account information like usernames, passwords and email addresses.
- wp_options: Houses global site settings, including your site URL, time zone and active plugins.
- wp_comments: Manages all visitor feedback and discussion data associated with your content.
- wp_postmeta: Stores additional details describing your posts, such as custom fields or attached image metadata.
When learning how to access WordPress database tables via management tools, you will notice they typically begin with a wp_ prefix. This default identifier helps the server distinguish WordPress data from other applications sharing the same storage space. While wp_ is the standard, many security-conscious users customize this prefix during installation to make the WordPress database location and structure harder for malicious scripts to predict or target.
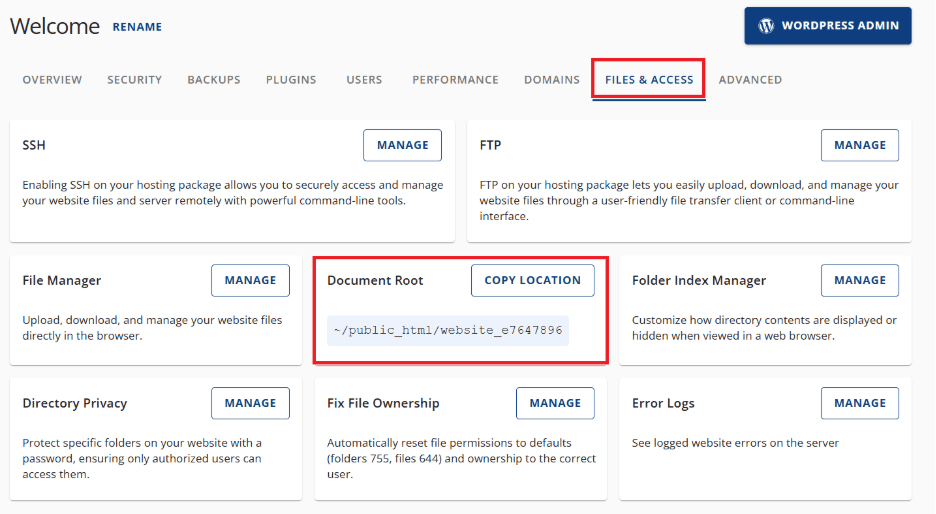
Step 1: Identify the document root
The document root is the main folder where the WordPress installation is created. Confirming the correct root ensures you view the right php file containing database information.
Using account manager
- Log in to your Bluehost Account Manager.
- From the navigation menu, select “Website” and click “Manage.”
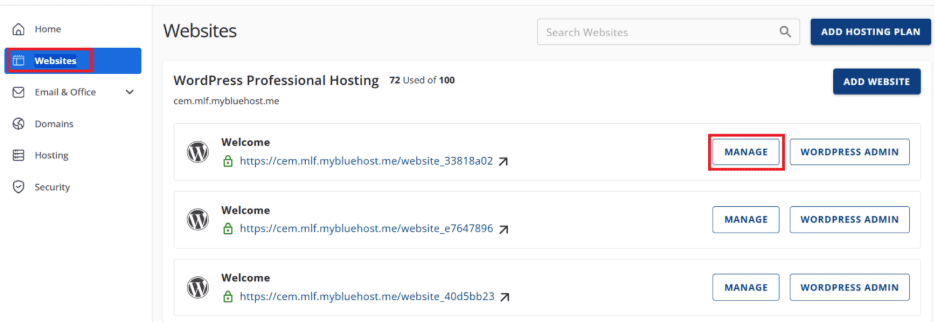
- From top, navigate to “Files & Access.”
- The Document Root column shows where WordPress stores its data.
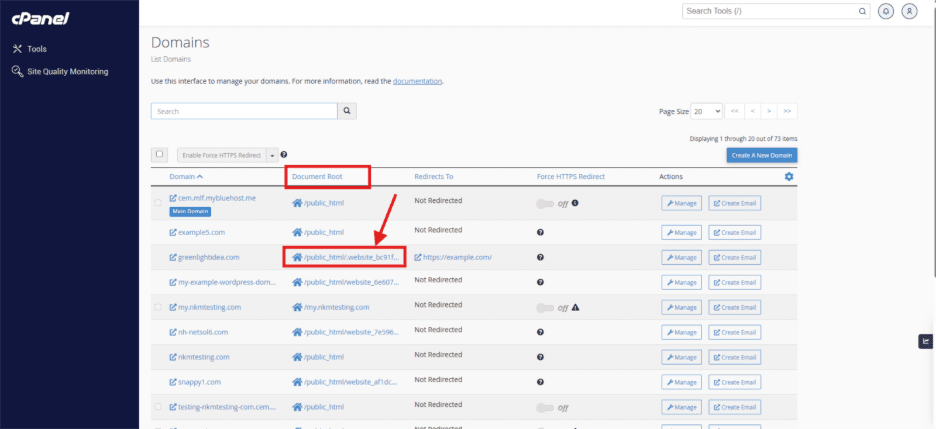
Using cPanel
- Log in to cPanel.
- Navigate to the Domains section.
- Locate the required domain.
- The Document Root column lists the folder where WordPress files are stored.
Step 2: Open file manager
Once you know the correct document root:
- Log in to the Account Manager.
- Select Hosting and choose File Manager.
- File Manager opens, showing your website files and folders. Navigate to the confirmed document root to access your WordPress dashboard files, including the wp admin directory, plugins and configuration files like .htaccess.
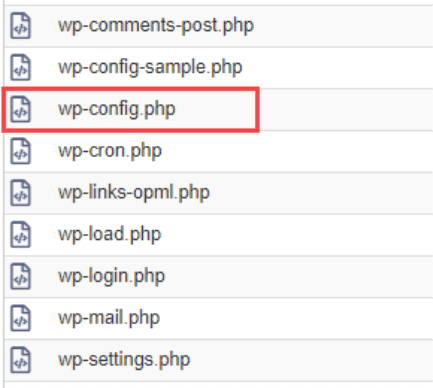
Step 3: Locate and edit the wp-config.php file
The wp-config.php file contains the database information used by your WordPress site. This file links your hosting setup to the correct database host.
- In File Manager, locate the wp-config.php file inside the document root.
- Select the file and click “Edit.”

- In the editor, search for the following lines of code:
define(‘DB_NAME’, ‘example_database’);
define(‘DB_USER’, ‘example_user’);
define(‘DB_PASSWORD’, ‘example_password’);
define(‘DB_HOST’, ‘localhost’);
- DB_NAME: The name of your WordPress database.
- DB_USER: The MySQL user with access.
- DB_PASSWORD: The login password for the database.
- DB_HOST: The server hosting the database.
This confirms which database directly powers your WordPress development site and how data is stored.
Understanding database host (DB_HOST)
The DB_HOST parameter in your wp-config.php file defines the specific server where your database resides. For most standard hosting setups, including the majority of Bluehost plans, this value is set to 'localhost'. This indicates that your WordPress database location is on the same server as your website files, allowing for direct internal communication. However, in some managed hosting environments or advanced configurations, databases may live on separate servers to optimize performance. In those scenarios, the host value will appear as a specific IP address or URL rather than localhost.
It is critical that you do not change the DB_HOST value unless specifically instructed by your hosting support team. An incorrect host address prevents the system from knowing how to access WordPress database content, which will immediately take your site offline. While Bluehost typically utilizes localhost for standard plans, always verify your specific credentials in your account dashboard before attempting any manual configuration changes.
Understanding database host (DB_HOST)
The DB_HOST parameter in your wp-config.php file defines the specific server where your database resides. For most standard hosting setups, including the majority of Bluehost plans, this value is set to ‘localhost’. This indicates that your WordPress database location is on the same server as your website files, allowing for direct internal communication. However, in some managed hosting environments or advanced configurations, databases may live on separate servers to optimize performance. In those scenarios, the host value will appear as a specific IP address or URL rather than localhost.
It is critical that you do not change the DB_HOST value unless specifically instructed by your hosting support team. An incorrect host address prevents the system from knowing how to access WordPress database content, which will immediately take your site offline. While Bluehost typically utilizes localhost for standard plans, always verify your specific credentials in your account dashboard before attempting any manual configuration changes.
Step 4: Access phpMyAdmin (Optional)
After identifying the correct database, you can manage it using the phpMyAdmin tool in cPanel.
- In the Website section, select Manage for your website.
- Under the overview section, navigate to phpMyAdmin under the horizontal buttons below.
- You can now view, edit, export or back up your database tables.
Also read: File Manager – How to Create, Remove and Edit Files
Important: Always save a backup before modifying tables. Deleting or editing rows incorrectly can affect your WordPress dashboard, login URL or even break your site’s admin area.
How to manage and secure your WordPress database?
Effective database management ensures your website runs smoothly and remains secure. Through the Bluehost Account Manager, you can easily launch phpMyAdmin to perform direct administrative tasks, such as running queries or modifying tables. However, modifying your database directly carries significant risks, so understanding safety protocols is essential before you begin any or edit operations. Regular maintenance, such as removing overhead and cleaning up old post revisions, keeps your site performance optimized.
Adhering to strict management protocols helps prevent data loss and security breaches. Consider these essential best practices for maintaining a healthy database:
- Schedule regular backups: Ensure you have automated daily backups to restore data quickly if errors occur.
- Optimize tables periodically: Routinely clear database overhead to improve website loading speeds.
- Limit user access: Restrict database privileges and use strong credentials to prevent unauthorized entry.
- Monitor database size: Keep an eye on storage usage to avoid performance bottlenecks.
- Use security plugins: Implement reliable plugins to scan for vulnerabilities and suspicious activity.
Never modify your database without a safety net. We strongly recommend using Bluehost’s CodeGuard solution for automatic backups, which provides a simple one-click restore feature if an edit compromises your site. By combining regular optimization with robust backup strategies, you can confidently manage your data while ensuring your website remains fast and resilient. Explore Bluehost’s backup and security tools to safeguard your hard work.
How to optimize your WordPress database?
Database bloat significantly impacts loading times and user experience, making regular optimization essential for maintaining high site speed. When tables are cluttered with post revisions, spam comments and expired transients, every WordPress database search becomes sluggish. You can manually clear this data by learning how to access WordPress database tables through phpMyAdmin and selecting the “Optimize” function, though plugins like WP-Optimize offer a safer, automated alternative for beginners. We recommend scheduling monthly optimizations and monitoring storage limits within your Bluehost dashboard to keep your site efficient.
Important: Always create a full backup before performing any optimization tasks to prevent accidental data loss.
Final thoughts
Knowing where your WordPress database is located gives you complete control over your website’s data and functionality. Whether you’re troubleshooting issues, migrating to a new host or optimizing performance, understanding where is WordPress database stored helps you work efficiently. By checking your wp-config.php file, you can quickly locate your database name, host and credentials.
Remember that managing your database requires careful attention to avoid data loss or security vulnerabilities. If you encounter any challenges or need expert assistance while working with your database, the Bluehost support team is available 24/7 to guide you through the process and ensure your site remains secure and functional.
FAQs
Your WordPress database is stored on your hosting server, not within your WordPress files. It’s managed through your hosting control panel (cPanel or Plesk) under phpMyAdmin. The database contains all your site’s content, settings and user information.
Access your WordPress database through cPanel by clicking phpMyAdmin. Alternatively, find database credentials in your wp-config.php file located in your WordPress root directory. Your hosting provider’s control panel provides the easiest access method for database management.
The wp-config.php file contains your database name (DB_NAME), database username (DB_USER), database password (DB_PASSWORD) and database host (DB_HOST). This configuration file connects your WordPress installation to your database and is located in your site’s root directory.
Yes, log into your hosting cPanel and navigate to the Databases section. Click MySQL Databases or phpMyAdmin to view all databases. Your WordPress database name typically includes your username prefix followed by “wp” or your site name.
Check your wp-config.php file for the DB_NAME value, which reveals your exact database name. In phpMyAdmin, look for databases containing WordPress tables like wp_posts, wp_users and wp_options. The table prefix confirms it’s your WordPress database.


Write A Comment