 ChatGPT,
 Claude,
 Gemini,
 Grok — all four for
Key highlights
- Learn what a WordPress staging site is and how it lets you test updates, plugins, themes and code before visitors see them.
- Compare three ways to create a staging site: through your host, with a plugin or manually.
- Follow step-by-step instructions to set one up through your hosting dashboard in a few clicks.
- Use a ready-made testing checklist to catch broken layouts, checkout errors and plugin conflicts before you deploy.
- Discover how to back up, pick the right deploy type and push changes live without overwriting new orders, comments or registrations.
One plugin update can break a checkout page, a contact form or an entire theme. If that update happens on your live site, your visitors see the error before you do.
A WordPress staging site gives you a safe place to make those changes first. You test the update on a private copy, fix what breaks and publish only when everything works.
This guide explains how staging works, when to use it, the different setup options and how to create a staging copy step by step. It also covers what to test and how to push your changes live without losing data.
What is a WordPress staging site?
A WordPress staging site is a separate, non-production copy of your live website that you use to test changes before you publish them. It includes your theme, plugins, content and database, so changes behave the way they would on the live site.
In general terms, a staging site is any duplicate of a live site used for testing. The WordPress version simply applies that idea to WordPress files and the WordPress database.
A staging site has three defining traits:
- It is private. You can restrict it to you and authorized users with password protection and block search engines from indexing it.
- It is separate. Nothing you change on staging affects your live site until you deploy it.
- It is temporary or refreshable. You can delete it or clone your live site again when you start a new round of testing.
Your live site is often called the production site. Staging sits one step before it, so it is the last place to catch a problem before real visitors find it.
When should you use a WordPress staging site?
Use a staging site any time a change could break how your site looks or works. Common WordPress examples include:
- Plugin updates: Test a major WooCommerce, page builder or security plugin update before it reaches your store.
- New plugins: Check that a new booking or form plugin does not conflict with the plugins you already run.
- Theme changes: Switch or customize a theme and review every page template before visitors see it.
- WordPress core and PHP updates: Confirm your theme and plugins still work after a major version change.
- Custom code: Try edits to functions.php, CSS or templates where a single typo can take down a page.
- Redesigns and restructures: Rework menus, page layouts or navigation without a half-finished site going live.
Small edits, like fixing a typo in a blog post, rarely need staging. Publishing posts, swapping an image or moderating comments only changes content, so you can do these on your live site.
A simple rule helps: If a change touches code, plugins, themes or site settings, test it on staging first. The same goes for anything that affects checkout, forms or logins, even if the change looks minor. Small plugin updates can still conflict with other plugins, and a quick settings tweak can break permalinks or caching.
Who needs a staging site?
Every site benefits, but staging matters most when downtime has a direct cost:
- Online stores: A broken cart or payment page stops sales immediately.
- Lead-generation and booking sites: A failed contact or booking form means missed customers you may never hear about.
- Membership and course sites: Login or access errors frustrate paying members.
- Agencies and freelancers: Staging lets clients review and approve changes before launch.
- Beginners: Staging gives you a place to learn WordPress without risking your real site.
Whatever kind of site you run, staging gives you room to test before your visitors notice anything.
Benefits and limitations of a WordPress staging site
Staging makes updates safer, but it isn’t a perfect mirror of your live site. The table below compares the main advantages of staging with the trade-offs to plan for.
| Benefits | Limitations |
|---|---|
| Catch errors before visitors see them | Staging may not match live exactly (caching, CDN and some server settings often differ) |
| Debug and fix issues without taking the live site down | Live data keeps changing, so staging goes out of date quickly |
| Test freely, since breaking staging costs nothing | Full testing takes time |
| Give clients or teammates a private preview to approve | Some staging plugins charge for push-to-live features |
| Deploy with a tested, known set of changes | Deploying the wrong scope can overwrite new live orders or users |
Most limitations are manageable. Clone your live site again before each new round of testing and follow the deploy steps later in this guide.
3 ways to create a WordPress staging site
The right method depends on what your hosting plan includes and how much control you need. If your host offers built-in staging, start there.
| Method | How it works | Best for | Effort | Watch out for |
|---|---|---|---|---|
| Hosting-based staging | Your host clones the site to a private staging environment on the same server and gives you a deploy button | Most site owners and small businesses | Low | Only available on plans that include staging |
| Staging plugin | A plugin such as WP Staging or other creates the copy from your WordPress dashboard | Sites whose host has no staging tool | Low to medium | Free versions often limit or exclude push-to-live |
| Manual setup | You copy files and the database to a subdomain or local environment and update the site URLs yourself | Developers who need full control | High | Easy to miss URL replacements, file permissions or search engine blocking |
Which option should you choose?
- Choose hosting-based staging if your plan includes it. It needs no extra software and keeps staging on the same server setup as your live site.
- Choose a plugin if your host does not offer staging and you want a dashboard workflow.
- Choose manual setup if you work with version control, custom server settings or a local development tool.
Hosting-based staging takes the least effort because the tools are already part of your plan.
You create a copy in one click, switch between staging and live from the same screen and choose whether to deploy files, the database or both.
If your current host has no built-in staging, the walkthrough below shows the workflow you would get, and the free site migration tool can move your site over.
How to create a WordPress staging site on Bluehost
Bluehost builds staging into the Bluehost plugin in your WordPress dashboard. Bluehost hosting plans include staging, so all you need is a site running WordPress.
Disclaimer: Staging is available on all Bluehost hosting plans. The steps below apply to Bluehost WordPress hosting and Web hosting plans.
- Log in to your Bluehost Portal.
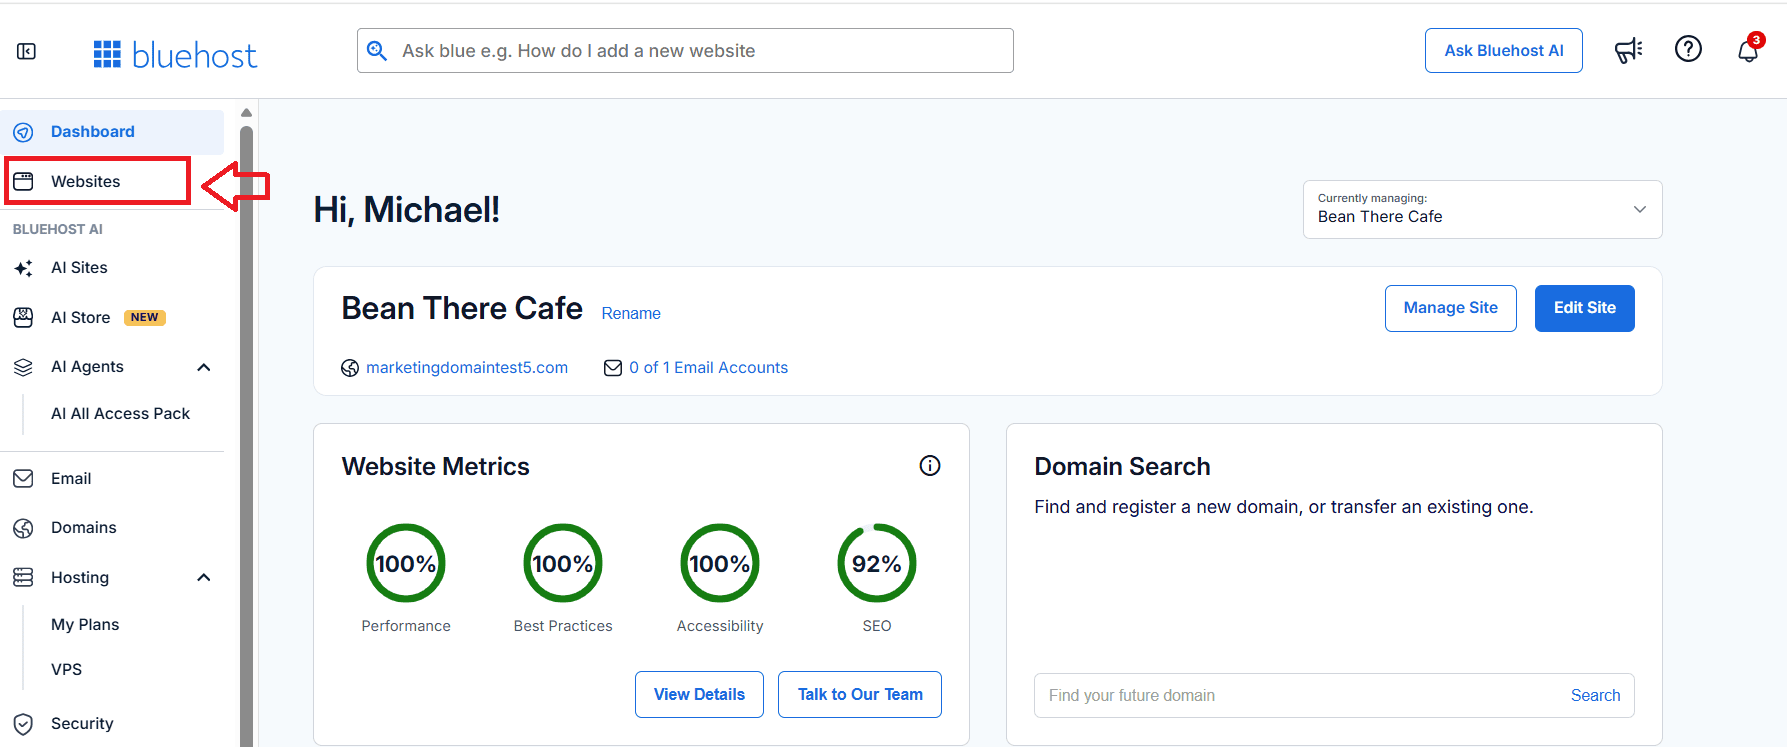
- Click Websites in the left-hand menu.
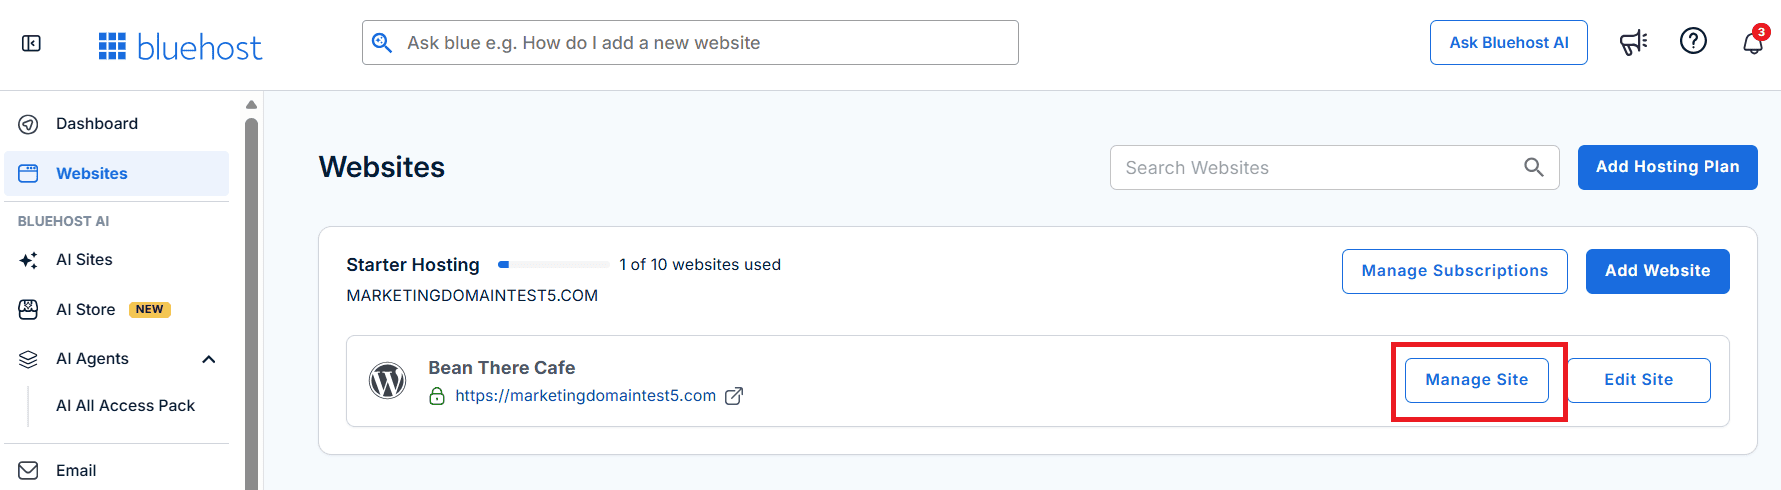
- Click Manage Site next to the website you want to stage.
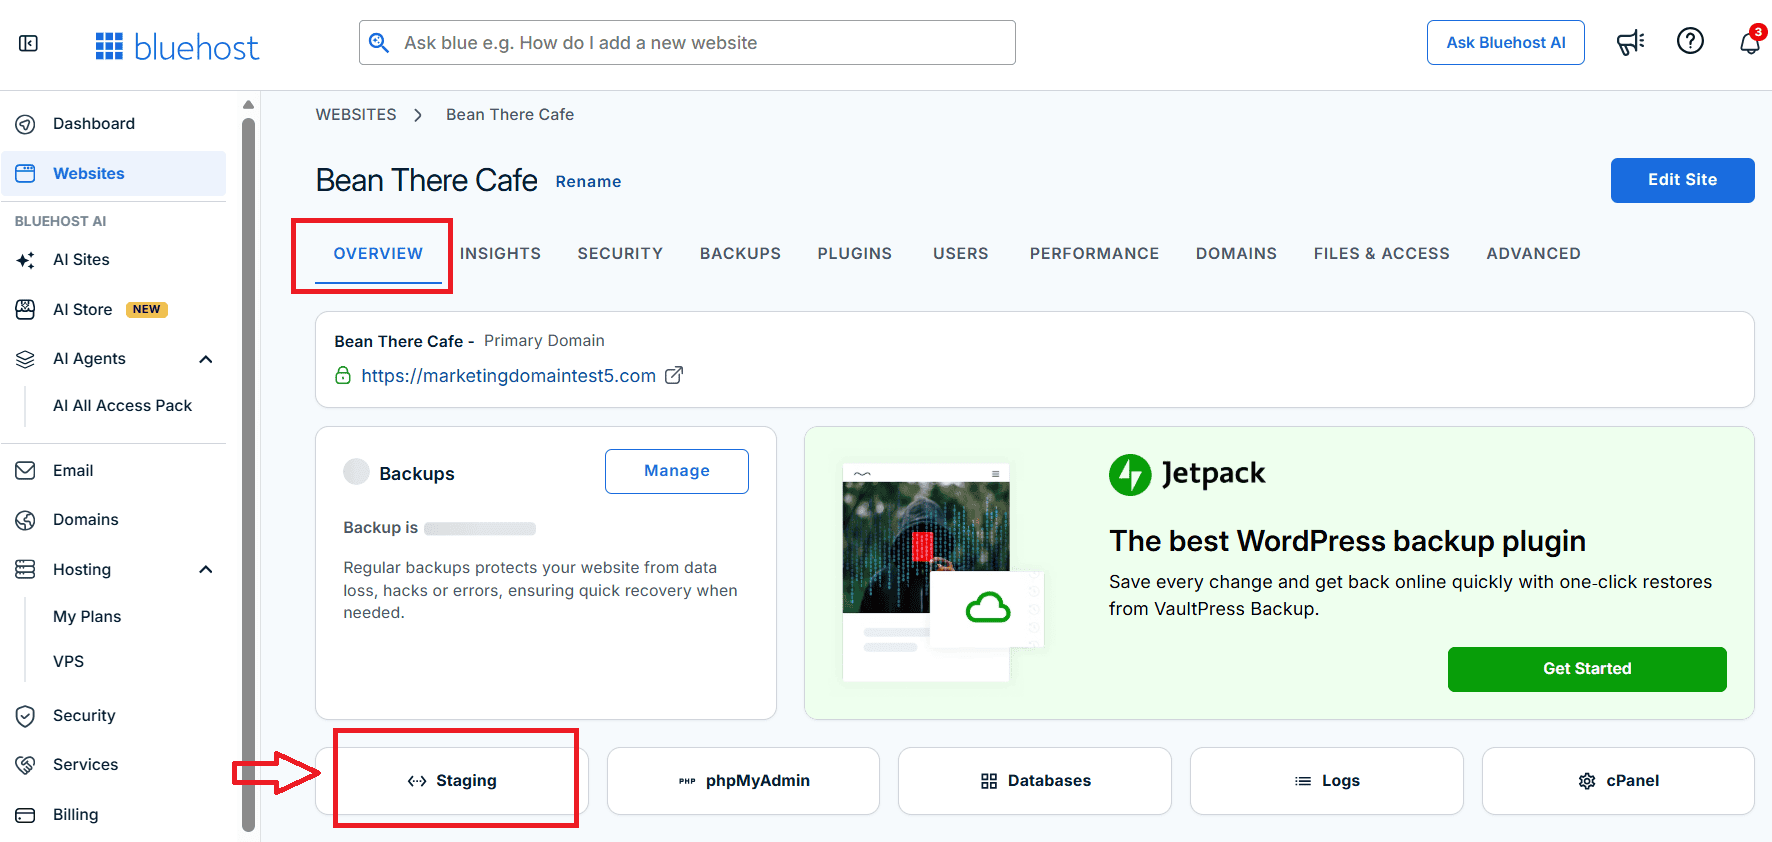
- On the Overview tab, click Staging. Bluehost opens the Manage WordPress tab of the Bluehost plugin.
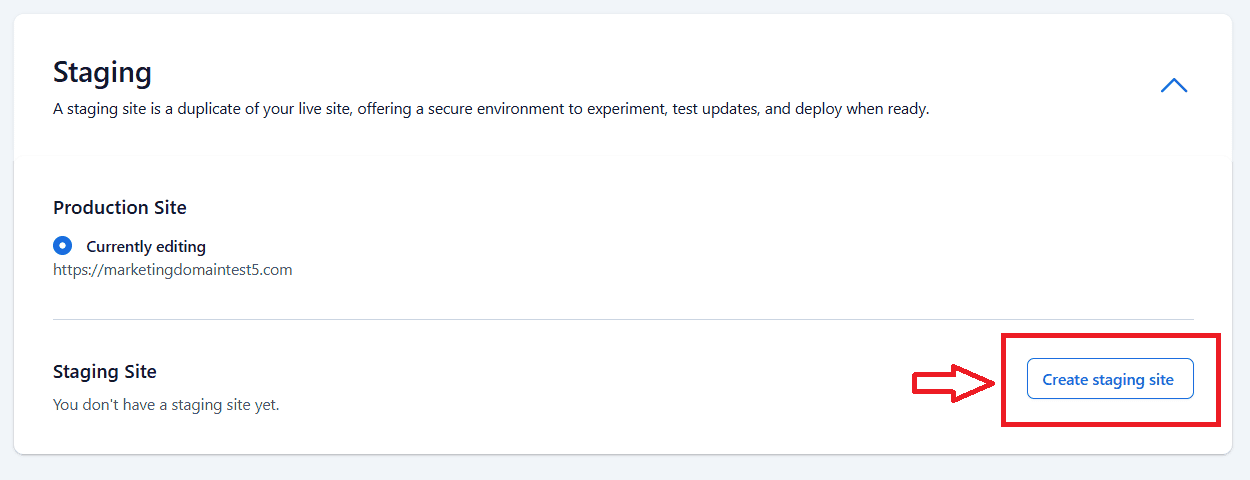
- Scroll to the Staging Site section and click Create staging site. Creation takes a few minutes, depending on your site’s size.
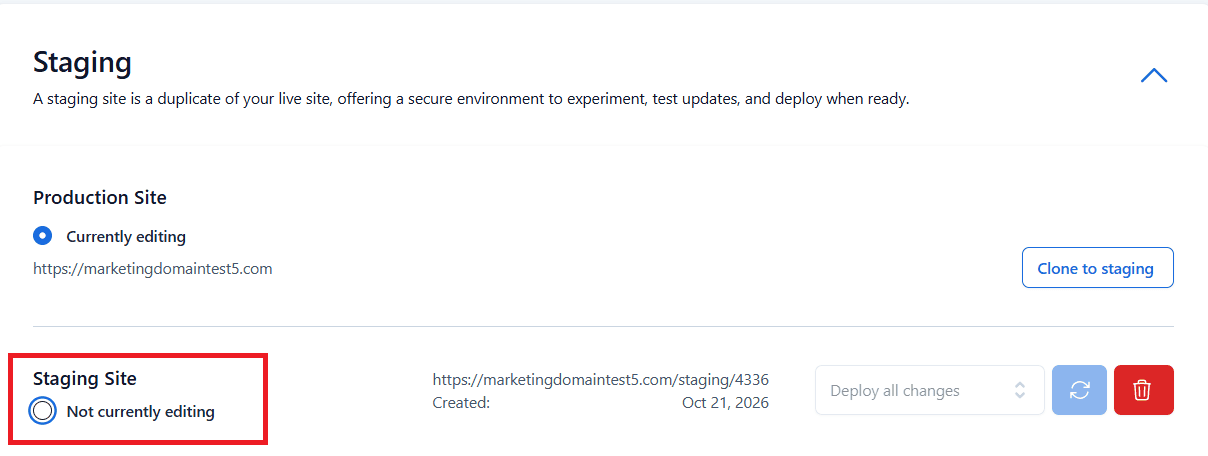
- Review the staging details. You will see the staging domain, the creation date, the Deploy menu and an option to delete the staging site.
- Select Not currently editing under Staging Site.
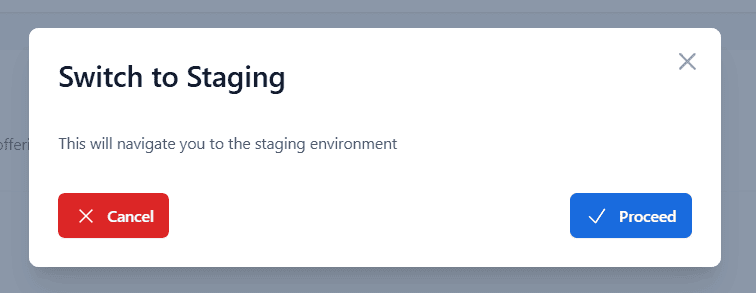
- Then click Proceed in the pop-up.
- Check the top-left corner of your dashboard. The label Staging Environment confirms you are working on the staging copy.
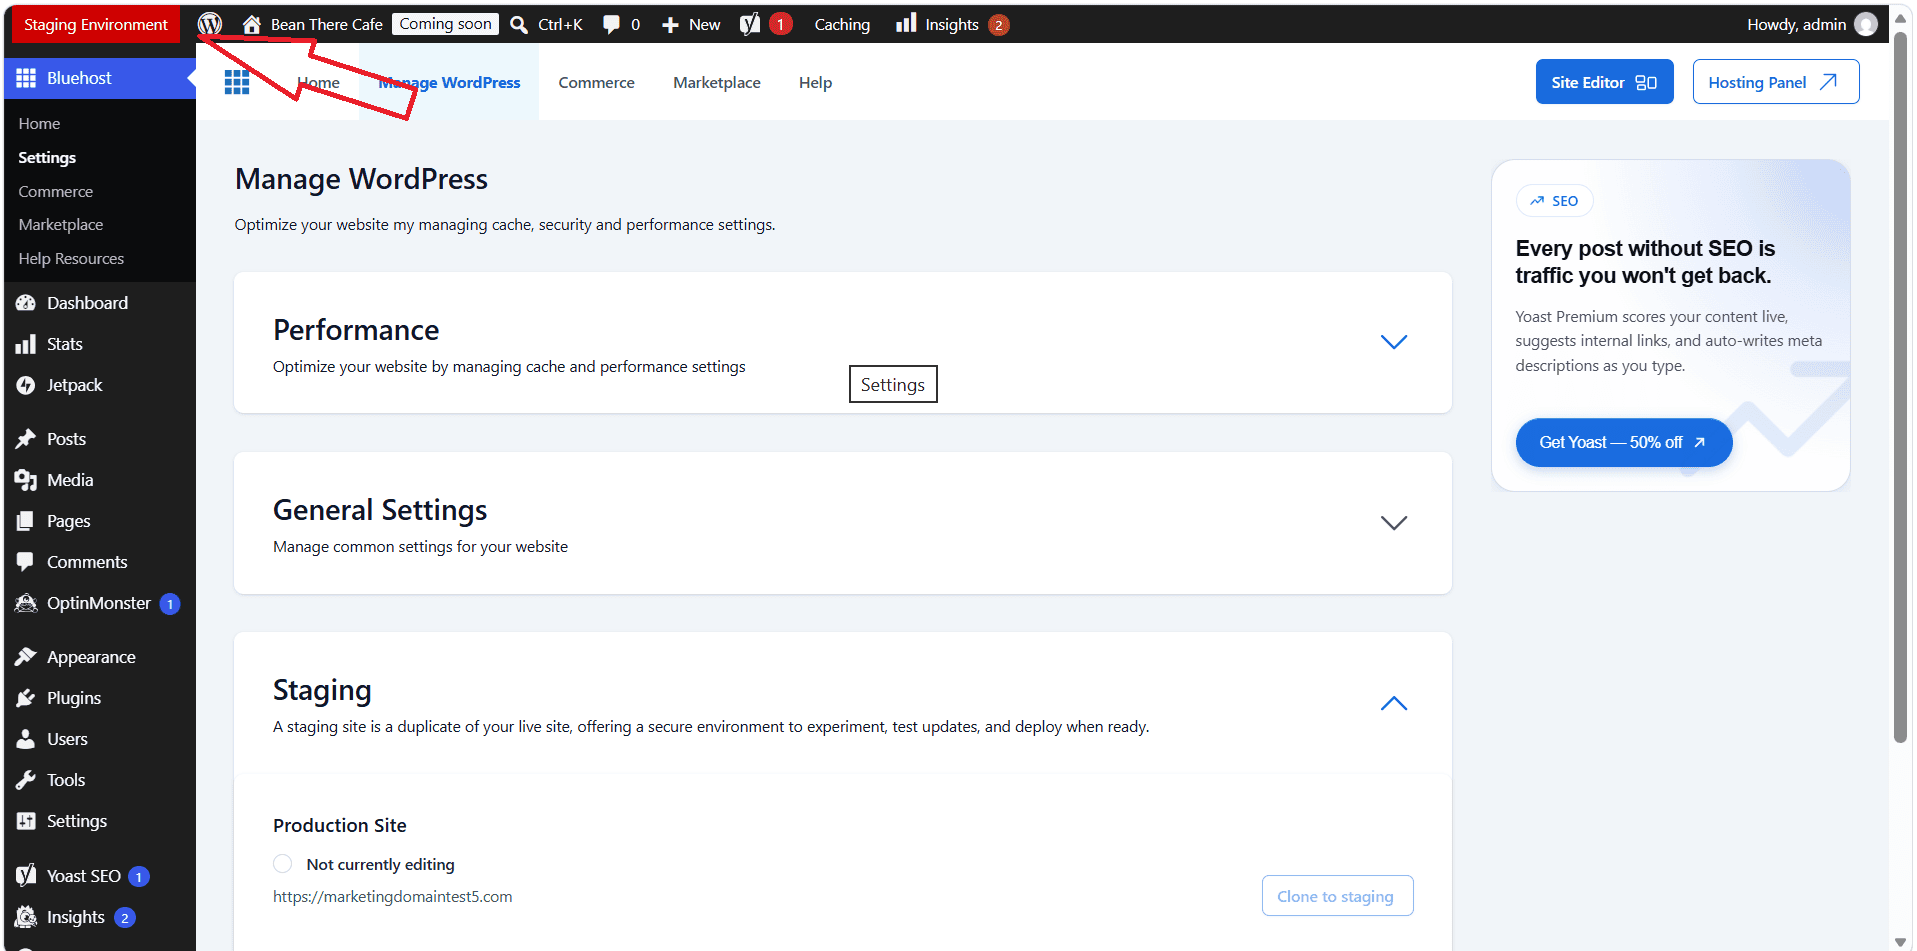
You can now update plugins, switch themes or edit code without affecting visitors.
For a video walkthrough, see Bluehost’s help article on how to create a staging site in WordPress.
WordPress staging site testing checklist
Work through this checklist after you make changes on staging and before you deploy. Keep notes on what you changed and what you tested, so you can trace any problem later.
Before you start
☐ Clone a fresh copy of your live site so staging matches current content and settings.
☐ Confirm staging is hidden from search engines (Settings > Reading > Discourage search engines, or password protection).
☐ Match WordPress, PHP, theme and plugin versions to your live site.
Functionality
☐ Load your homepage, key landing pages and a sample of posts.
☐ Submit every contact, booking and signup form.
☐ Test login, registration and password reset
☐ For stores: add to cart, apply a coupon and complete a test checkout in payment sandbox mode.
☐ Click through menus and internal links to check for 404 errors.
Design and compatibility
☐ Review pages on desktop, tablet and mobile.
☐ Check Chrome, Safari, Firefox and Edge.
☐ Confirm images, fonts and media load correctly.
Performance and errors
☐ Compare page load times with your live site.
☐ Check for PHP errors, debug warnings or browser console errors.
☐ Run a malware or security scan after adding new plugins.
Regression
☐ Retest features you did not change, since updates can break unrelated pages.
☐ Record any bugs, fix them on staging and retest before you deploy.
Once every box is checked, your changes are ready to push from staging to your live site.
How to push staging changes to your live site safely
The biggest deployment risk is overwriting live data. Your live site keeps collecting orders, comments, form entries and new users after you clone it, and staging does not have those records.
Step 1: Back up your live site
Create a full backup of files and database right before you deploy. If something goes wrong, you can restore the live site quickly.
Step 2: Choose the right deploy scope
Bluehost offers three deploy types in the Staging Site section of the Manage WordPress tab:
| Deploy type | What it moves to live | Use it when |
|---|---|---|
| Deploy files only | Files in wp-content: themes, plugins, custom code and media uploads. The live database stays untouched | You updated plugins or themes, edited code or added media |
| Deploy database only | Database tables and settings. Live files stay untouched | You changed settings, menus or page content and no files |
| Deploy all changes | Both the database and files, overwriting live with the staging version | Your live site has had no new orders, users or comments since you cloned it |
For stores, membership sites and busy blogs, prefer “Deploy files only” when it covers your changes. It keeps every live order, registration and comment intact. Some plugin updates also change database tables, so check the live dashboard for a “database update required” notice after deploying.
Step 3: Deploy at a quiet time
Pick a low-traffic window. For stores, consider pausing checkout or turning on maintenance mode for a few minutes so no orders land mid-deploy.
Step 4: Deploy from Bluehost
- Open the Bluehost plugin’s Manage WordPress tab.
- In the Staging Site section, select your deploy type from the dropdown and click Deploy Site.
- Click Deploy in the pop-up. Deployment time depends on your site’s size.
- Select Production Site, then click Proceed to switch back to your live site.
- Refresh your live site to see the changes.
Step 5: Verify live and keep staging current
Run a short version of the checklist on your live site: homepage, forms, login and checkout. Keep in mind that later changes to your live site don’t sync to staging. . Before your next round of testing, click Clone to Staging in the Production Site section to refresh the copy.
Staging vs development vs production
Staging is one of several environments a site can move through. Most small sites only need staging and production.
| Environment | Purpose | Who sees it |
|---|---|---|
| Development | Build and code new features, often on a local machine | Developers |
| Staging | Test changes on a copy of the live site before release | You, your team or your client |
| Production | The live site | Everyone |
For a deeper look at each environment, including QA, read our guide to staging vs production environments.
Final thoughts
The habit that matters most when you push staging changes live is to deploy only what you changed. Your live site keeps collecting orders, sign-ups and comments while you test, so a narrow deploy carries over your work without replacing that new data. This helps protect your visitors, orders and search rankings while you improve your site.
Your next step depends on where your site lives:
Already on Bluehost? Open the Bluehost plugin in your WordPress dashboard and create your first staging site today.
Hosting elsewhere? Compare Bluehost WordPress hosting plans. Every plan includes staging, and the free site migration tool can move your site over.
FAQs
A WordPress staging site is a private copy of your live website, including its files and database. You use it to test plugin updates, theme changes and code before you publish them to visitors.
Your live site, also called the production site, is the public version visitors use. A staging site is a private copy only you and authorized users can reach. Changes on staging stay isolated until you deploy them, while changes on the live site appear to visitors immediately.
If you only publish posts, you may not need one often. If you update plugins, change themes or take payments or bookings, a staging site helps you catch errors before customers do.
Yes, in many cases. Some hosting plans include staging at no extra cost, and free plugins can create a staging copy. Free plugin versions often limit pushing changes back to your live site.
It can. Deploying the full database replaces live data with the staging version, so orders, users or comments added after you cloned may be lost. On Bluehost, choose “Deploy files only” when your changes are limited to themes, plugins, code or media, and always back up first.

Write A Comment