Key highlights
- Secure staging areas, client projects, private downloads and admin-only resources from unauthorized access.
- Secure entire folders with .htaccess password protection in minutes, no coding knowledge required through our intuitive interface.
- Learn the basics of these two files that control Apache HTTP authentication and directory access rules.
- Go beyond folder-level security by protecting specific files using .htaccess file directives.
- Safely disable password prompts through cPanel or by editing .htaccess configuration files.
- Validate your setup works correctly and avoid common errors that could lock you out or break your site.
When you’re running a website, there are times when you need to restrict access to certain areas. Maybe you have a staging site you’re testing before going live, client files that need to stay private or downloadable resources meant only for paying customers. Without proper protection, these sensitive folders and files remain exposed to anyone who stumbles across the URL – putting your content, your clients’ assets or your business at risk.
The good news? You can password protect a directory using HTTP authentication through an .htaccess file or the cPanel Directory Privacy feature. This method prompts visitors with a username and password dialog box right in their browser before they can access the protected content. It’s a straightforward, server-level security layer that works independently from your website’s application (like WordPress login). Keep in mind, this isn’t a replacement for full user authentication systems,it’s designed for quick, folder-level access control.
To follow along, you’ll need access to your web hosting account, specifically cPanel or File Manager. You’ll be editing WordPress .htaccess files, so careful editing matters. In this guide, we’ll walk you through both the easy cPanel method and the manual approach to password protect a directory with .htaccess, showing you exactly where to make changes and how to secure your website’s private areas effectively.
Secure website folders or files
When you set up password protection for a folder or individual files on your website, user authentication is required to gain access. With password-protected folders or files, you can restrict unauthorized access, thus protecting your site from hackers from hackers.
Password protecting your site with an .htaccess file
Password protecting your website with an .htaccess file works through Apache HTTP authentication, a security feature built into most web servers. When someone tries to access a protected directory, Apache checks two key files: the .htaccess file (a configuration file that sets rules for your directory) and the .htpasswd file (which stores usernames and hashed passwords). Together, these files create a browser login prompt before visitors can view your protected content.
You have two main paths for password protection. cPanel Directory Privacy is the easiest option,it automatically creates both files and manages users through a simple interface, making it ideal for protecting entire folders quickly. Direct .htaccess file editing gives you more control when you need to password protect a single file, apply custom rules or use advanced patterns like protecting only certain file types. If you’re just starting out or protecting a standard folder, use cPanel Directory Privacy. If you need granular file-level control, edit .htaccess directly.
Before you start, complete this quick checklist: back up your existing .htaccess file (if one exists), confirm your hosting uses Apache (most shared hosting does), know the full server path to the directory you’re protecting and avoid making changes on a live production site without a rollback plan. Even a small .htaccess configuration errors can break your site, so test changes carefully.
The .htaccess file
The .htaccess file is a directory-level configuration file that controls how your Apache web server handles requests to a specific folder. When you set up password protection, this file tells Apache to require authentication before displaying any content in that directory. It typically lives inside the folder you’re protecting, for example, if you’re securing a folder called “private,” the .htaccess file sits directly inside that folder.
Before you make any changes to .htaccess, always create a backup copy. Even a small typo, like a missing closing tag or incorrect file path, can trigger a 500 Internal Server Error and break your entire site. Edit carefully, double-check your syntax and test your changes in a private browsing window to ensure password prompts appear correctly without cached credentials interfering. This cautious approach keeps your site running smoothly while securing your sensitive content.
Editing the .htpasswd file
The .htpasswd file stores your authentication credentials,each username paired with a cryptographically hashed version of its password. For security, this file should live outside your public web root (typically in a path like /home/[username]/.htpasswds/) so visitors can’t accidentally access it through their browser. When you need to update credentials, use Directory Privacy to add a new user or modify an existing password.
Before making any changes, verify that the AuthUserFile path in your .htaccess file matches the actual location of your .htpasswd file, a mismatch will lock you out entirely. After updating passwords, always test access in an incognito or private browser window since your regular browser may cache old login credentials and give a false positive that access works when it doesn’t.
How to access the Directory Privacy Tool?
Before you can password protect a folder, you need to access the Directory Privacy tool in your hosting dashboard. The steps differ slightly depending on whether your plan uses cPanel or Bluehost’s Account Manager.
Option A (recommended): from Account Manager (no cPanel)
- Log in to your Bluehost Account Manager.
- Click Websites in the left menu.
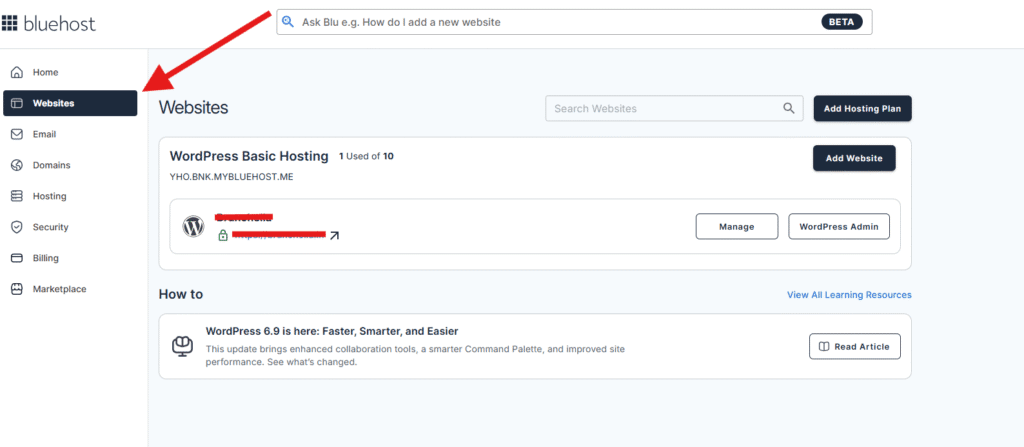
- Click Manage for the site you want
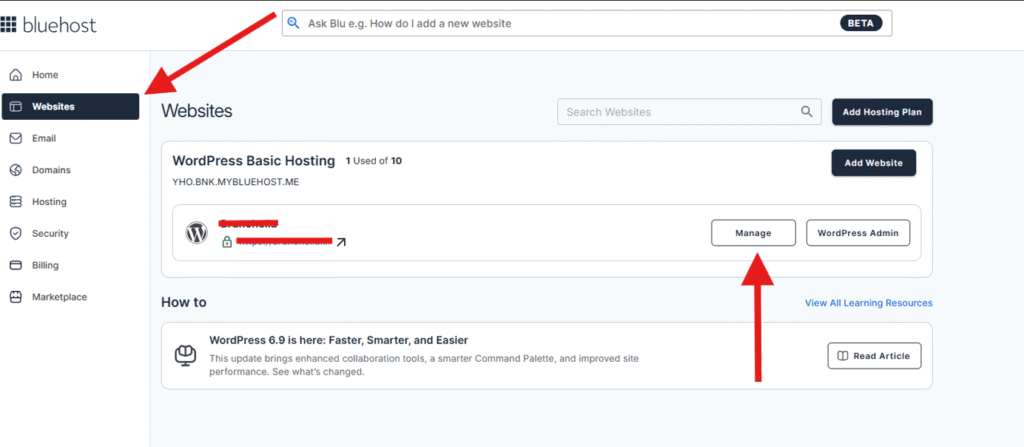
- Open the Files & Access tab.
- In Directory Privacy, click Manage.
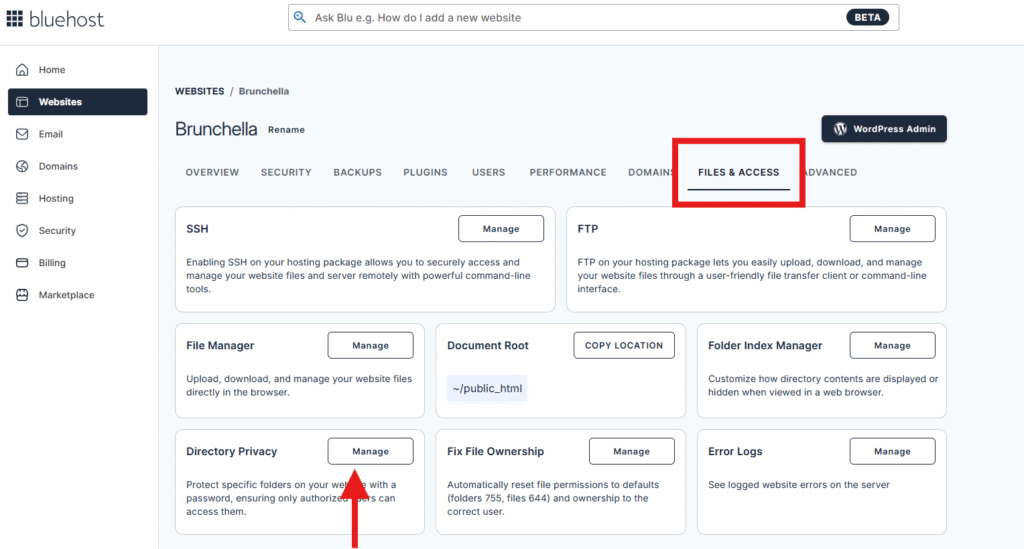
You’ve accessed the Directory Privacy section where you can password protect directory contents to secure sensitive folders on your website. This essential feature allows you to control access and add an extra layer of protection to specific directories.
Option B (still valid for some plans): via cPanel
- Log in to your Bluehost Account Manager.
- Click Hosting in the left menu.
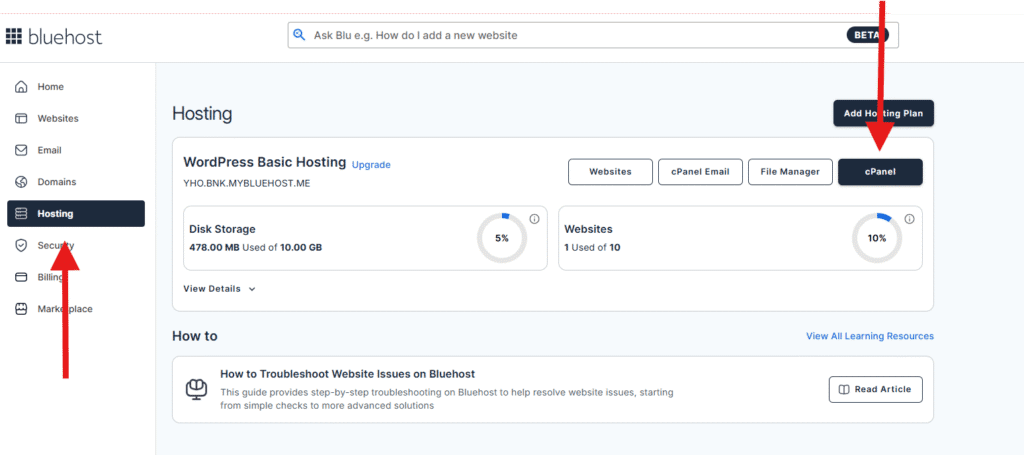
- On the hosting details page, click CPANEL (it opens in a new tab).
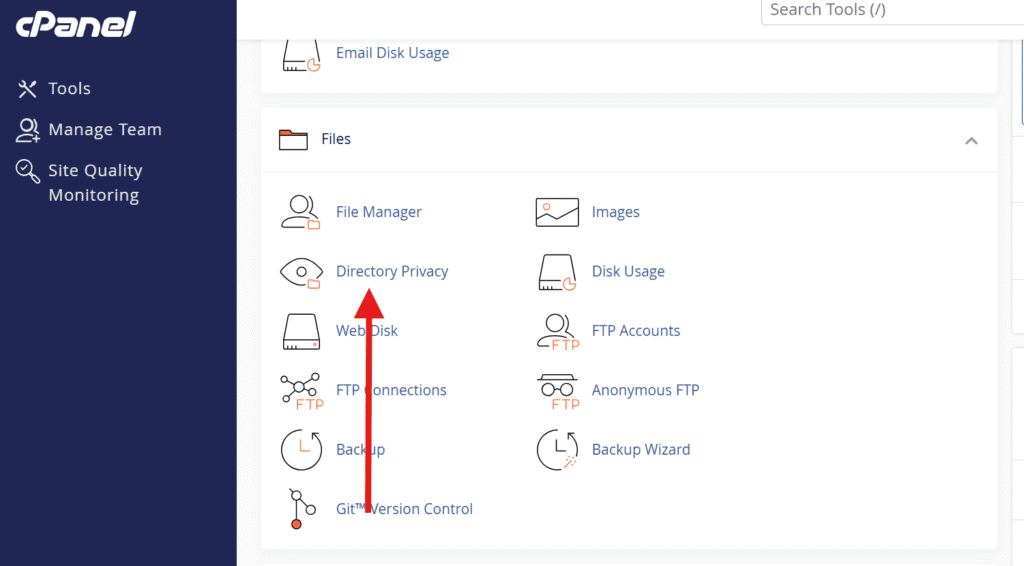
- In cPanel, go to the Files section and click Directory Privacy. (This part is the standard cPanel location.)
Note: Bluehost for agencies hosting doesn’t include cPanel, so Option A is the one that applies there.
How to password protect a website folder?
This approach helps you secure a full folder along with all its contents. You can set it up easily using the Directory Privacy tool without editing server files manually.
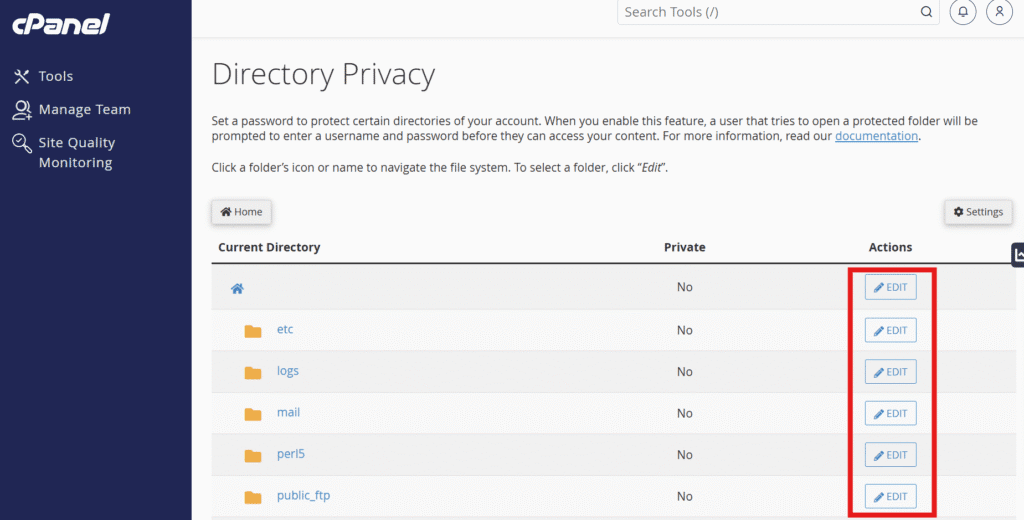
- In the Directory Privacy tool, navigate the folder structure. Click the folder icon to open a folder, or click the folder name to select it for protection.
- Select the directory you wish to protect. You will see a settings screen for that specific folder.
- Check the box labeled Password protect this directory
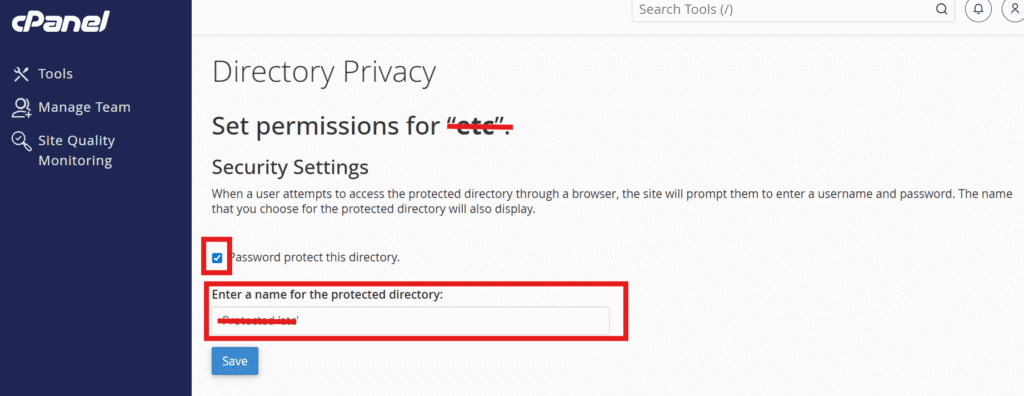
- Enter a name for the protected directory. This label will appear in the login prompt when someone accesses the directory. Click the Save button.
How to password protect a website file?
When you password protect a directory using the tool above, the system automatically writes configurations into a file called ‘.htaccess’ located in that protected folder.
Note: For step-by-step instructions on accessing and editing files manually, check out our guide on – How to Navigate the File Manager.
Inside the .htaccess file, you will see statements similar to the following:
AuthType Basic
AuthName "Restricted Area"
AuthUserFile "/home/[username]/.htpasswds/public_html/passwd"
Require valid-user
To protect a single specific file instead of the entire folder, you need to modify the .htaccess file manually. You will wrap the authentication code in tags.
In this example, we will protect the file ‘secure.html.’ Modify your .htaccess file as follows:
<Files "secure.html">
  AuthType Basic
  AuthName "Restricted Area"
  AuthUserFile "/home/[username]/.htpasswds/public_html/passwd"
  Require valid-user
</Files>
You can also protect multiple files that match a specific pattern using Apache’s FilesMatch directive. This allows you to list regex patterns for files:
<FilesMatch "\.(pdf|docx|html)$">
  AuthType Basic
  AuthName "Restricted Area"
  AuthUserFile "/home/[username]/.htpasswds/public_html/passwd"
  Require valid-user
</FilesMatch>
Important: When configuring password protect directory settings, verify that the AuthUserFile path in your .htaccess file accurately points to where your .htpasswd file is stored on your server to ensure proper authentication and directory protection.
Create the .htaccess file
If your directory doesn’t already have an .htaccess file, you’ll need to create one manually via File Manager:
- Open cPanel File Manager and ensure “Show Hidden Files” is checked in the Settings (top right corner).
- Locate and access the directory you want to password protect.
- Click + File (New File) in the top left. Name it exactly .htaccess (with the dot at the start).
- Right-click the new file and select Edit to add your code.
How to password protect your entire WordPress site?
Protecting your entire WordPress site with a password works well for WordPress staging sites, under-construction pages, client reviews or private membership previews. Keep in mind that site-wide password protection blocks search engines from indexing your content and requires sharing credentials with authorized users. Before you proceed, back up your site completely, test in a safe environment first and confirm you retain admin access.
How to password protect directory access across your entire website:
- Server-level HTTP authentication: Use Directory Privacy (explained above) on your root public_html folder to password-protect the directory. This creates a browser login prompt before WordPress loads, providing the strongest site-wide control.
- WordPress visibility settings: Navigate to Settings > Reading to discourage search engines, then password-protect pages or adjust site visibility settings as needed.
- WordPress maintenance mode: Enable a coming-soon or under-construction display through your WordPress dashboard for temporary access restrictions without modifying server files.
How to password protect individual pages?
Protecting individual pages is common when you need to share specific content privately—like a client proposal page, exclusive landing page or temporary campaign preview—without locking down your entire site. You have two main approaches: server-level protection using .htaccess or WordPress’s built-in page password feature.
For server-level protection, you can use the same .htaccess method described earlier with tags, targeting the specific page file (like proposal.html). This works well when you need strong HTTP authentication that’s independent of WordPress, ideal for non-WordPress pages or when you want browser-level security prompts.
However, WordPress offers a simpler option: its native page password feature in the editor’s visibility settings. This lets you password-protect individual posts or pages directly from your dashboard without touching server files, making it perfect for quick, user-friendly protection.
| Method | Best for |
| Server-level (.htaccess) | Static pages, non-WordPress content, stronger security layer |
| WordPress page password | Quick setup, blog posts, client previews, no technical skills needed |
After applying protection, always test in an incognito window to confirm only your target page prompts for credentials while the rest of your site remains accessible.
How to create a user?
After you enable password protection for the directory (and click Save, then Go Back), use the Create User section:
- Enter a Username.
- Enter and confirm the Password (or use Password Generator, if shown).
- Click Save.
Result: That folder will now prompt for this username/password. You can add more users, change passwords or delete users from the authorized users list.
Note: If you cannot create a user, update the directory permissions to 0700 in cPanel’s File Manager.
How to remove a page, folder or site password?
Removing password protection is straightforward. Whether you used cPanel’s Directory Privacy tool or manually edited .htaccess files, follow these steps to unlock your content.
Using Directory Privacy (cPanel): Navigate back to the Directory Privacy tool in cPanel and select the protected directory. Uncheck the “Password protect this directory” box and click Save. This automatically removes the authentication code from the .htaccess file.
Manual .htaccess Method: Open the .htaccess file in File Manager. Delete (or comment out with #) the lines starting with AuthType, AuthName, AuthUserFile and Require. If you wrapped them in tags, remove the entire block.
Validation: Always test your site in an incognito window after removing protection to ensure the login prompt is gone and no cached credentials remain.
Also read: How to Redirect URL Using an .htaccess File?
Final thoughts
Password protecting folders and files with .htaccess gives you precise control over who accesses sensitive areas of your website. Whether you’re securing client files, protecting staging environments or limiting access to admin resources, HTTP authentication adds a valuable security layer. You’ve learned two main approaches: using cPanel’s Directory Privacy tool for quick folder protection and editing .htaccess directives with tags when you need to protect individual files.
This method works well for its intended purpose, but it’s just one piece of your overall website security strategy. Beyond restricting directory access, take time to review your site’s broader security fundamentals, ensuring you have an SSL certificate protection, regular backups and a plan for keeping your software updated.
As your website grows, choosing a hosting provider with strong security features and ease of management becomes increasingly important. Look for plans that include built-in security features, automatic updates and 24/7 expert support to help you implement and maintain protections without hassle. With the right hosting foundation and security practices working together, you can protect your content and focus on what matters most, building your online presence.
If you’re looking for a hosting solution that makes security easier to manage, Bluehost offers built-in tools like Directory Privacy, free SSL certificates, automated backups and 24/7 expert support. With these features in place, you can confidently secure sensitive files and folders while spending less time on technical setup and more time growing your website. Explore Bluehost web hosting plans today!
FAQs
Protecting a folder applies password requirements to all contents within that directory. To protect just one file, you must manually edit .htaccess and wrap authentication rules in tags targeting that specific filename.
The .htpasswd file is stored outside your public directory for security, typically at /home/[username]/.htpasswds/public_html/passwd. You can verify the exact path in the AuthUserFile line of your .htaccess file.
500 errors indicate syntax problems in your .htaccess file. Common causes include missing closing tags ( or ), incorrect AuthUserFile paths or extra spaces. Restore your backup and carefully recheck your syntax.
Yes, .htaccess password protection works perfectly on WordPress since most WordPress hosts use Apache servers. It provides an extra security layer before WordPress loads, ideal for protecting admin areas or staging sites.
To change passwords, use Directory Privacy in cPanel to update credentials for existing users. To remove protection entirely, uncheck the protection option in cPanel or delete the authentication directives from your .htaccess file.

Write A Comment