 ChatGPT,
 Claude,
 Gemini,
 Grok — all four for
Key highlights
- Understand how Hermes Agent exposes an OpenAI-compatible API on port 8642.
- Learn how to connect Open WebUI to the Hermes Agent API endpoint.
- Configure key environment variables, including API_SERVER_ENABLED and OPENAI_API_BASE_URL.
- Secure your setup with API_SERVER_KEY while keeping port 8642 internal.
- Explore Bluehost’s one-click template for deploying Hermes Agent and Open WebUI together.
Connecting Hermes Agent to Open WebUI gives you a familiar chat interface for interacting with your agent and its tools. Hermes Agent exposes an OpenAI-compatible API, while Open WebUI connects to that API as the frontend.
You can set up the connection manually by enabling Hermes Agent’s API server, configuring the required environment variables and pointing Open WebUI to the Hermes endpoint. If you’re running Open WebUI in Docker, the connection URL needs to account for the container network.
For a faster setup, Bluehost also provides a one-click Hermes Agent + Open WebUI installation for Self-Managed VPS and VDS. The template installs both applications together, so you can configure your LLM backend and start using the interface without setting up each component from scratch.
In this guide, you’ll learn both approaches, including the required configuration, connection settings, security considerations and troubleshooting steps.
How does Hermes Agent connect to Open WebUI?
Hermes Agent exposes an OpenAI-compatible API server on port 8642 by default. Open WebUI connects to this endpoint using the same OpenAI-compatible API format.
When you send a message through Open WebUI, it forwards the request to Hermes Agent. Hermes then processes the request, uses its available tools when needed and streams the response back to Open WebUI.
For the connection, Open WebUI uses the Hermes API endpoint and matching API key. If Open WebUI runs in Docker, its connection URL should point to the Hermes API using the appropriate container network address. The default endpoint is http://localhost:8642/v1 outside Docker or http://host.docker.internal:8642/v1 in the documented Docker setup.
Running Open WebUI on a VPS gives you a browser-based interface for interacting with Hermes Agent while keeping the agent runtime and its tools on your server.
What do you need before connecting Hermes Agent to Open WebUI?
- Before connecting Hermes Agent to Open WebUI, make sure you have the following:
- A Linux VPS: Use a Linux server with the access needed to install and manage Hermes Agent. Root or equivalent administrative access is useful for server configuration.
- Hermes Agent: Install and configure Hermes Agent before enabling its API server.
- An LLM provider: Configure a supported model provider and API credentials so Hermes Agent can process requests.
- Open WebUI: Run Open WebUI on the same VPS or another accessible host. Docker is one supported deployment method.
- Hermes API server: Enable API_SERVER_ENABLED and set API_SERVER_KEY. The API server listens on port 8642 by default and binds to 127.0.0.1 by default.
- Open WebUI connection: Configure OPENAI_API_BASE_URL with the Hermes endpoint, including /v1. Your OPENAI_API_KEY must match the Hermes API_SERVER_KEY.
Which ports need to be accessible?
Hermes Agent uses port 8642 for its OpenAI-compatible API by default. Open WebUI uses port 3000 in the documented Docker setup, which maps to its internal port 8080.
You generally only need to expose the Open WebUI interface to users. Keep the Hermes API private when both services run on the same server. The exact networking configuration depends on how you deploy the two applications.
Also read: Reimage Your Server for Hermes Agent + Open WebUI Installation
How do you manually connect Hermes Agent to Open WebUI?
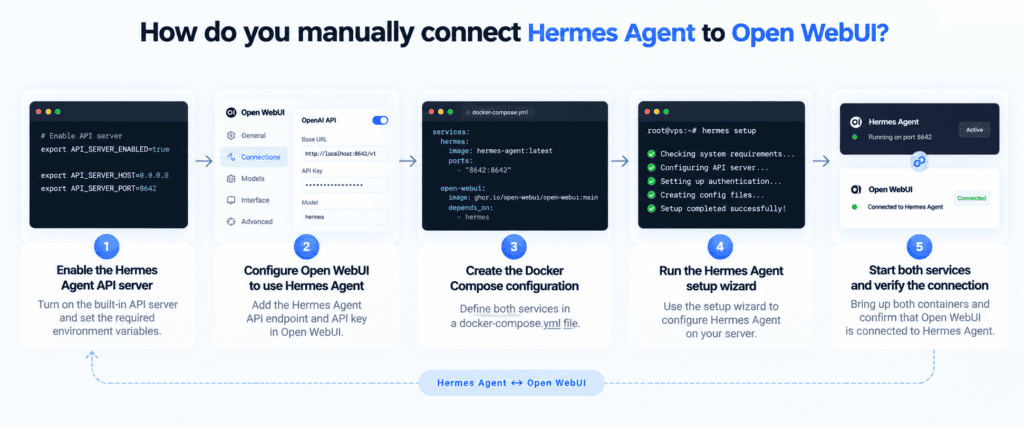
You can connect Hermes Agent and Open WebUI with Docker Compose by running both services on the same Docker network. Hermes Agent exposes its OpenAI-compatible API, while Open WebUI connects to that API as its backend.
Follow these steps to configure the connection.
Step 1: Enable the Hermes Agent API server
Enable the Hermes API server and configure an authentication key. When Hermes runs in its own container, bind the API server to 0.0.0.0 so Open WebUI can reach it over the Docker network.
API_SERVER_ENABLED=true

API_SERVER_HOST=0.0.0.0

API_SERVER_KEY=$(openssl rand -hex 32)
Hermes uses port 8642 for its API server by default. The API requires API_SERVER_KEY for authentication.
Because Open WebUI connects through the internal Docker network, you do not need to publish port 8642 to the host. This keeps the Hermes API from being directly exposed to the public internet.
Step 2: Configure Open WebUI to use Hermes Agent
Next, point Open WebUI to the Hermes API endpoint. When both services use the same Docker Compose network, Open WebUI can reach Hermes using its service name.
Set:
OPENAI_API_BASE_URL=http://hermes-agent:8642/v1

OPENAI_API_KEY=<same-value-as-API_SERVER_KEY>
The /v1 path is required for the OpenAI-compatible API connection. The API key in Open WebUI must match the API_SERVER_KEY configured for Hermes.
You can also configure the connection from Open WebUI → Admin Settings → Connections → OpenAI API instead of using environment variables.
Step 3: Create the Docker Compose configuration
Save the following configuration as docker-compose.yml:
services:
hermes-agent:

    image: nousresearch/hermes-agent:latest

    container_name: hermes-agent

    command: gateway run

    volumes:

      - ./hermes-data:/opt/data

    environment:

      - API_SERVER_ENABLED=true

      - API_SERVER_HOST=0.0.0.0

      - API_SERVER_KEY=${API_SERVER_KEY}

    restart: unless-stopped

  open-webui:

    image: ghcr.io/open-webui/open-webui:main

    container_name: open-webui

    ports:

      - "3000:8080"

    volumes:

      - open-webui:/app/backend/data

    environment:

      - OPENAI_API_BASE_URL=http://hermes-agent:8642/v1

      - OPENAI_API_KEY=${API_SERVER_KEY}

    depends_on:

      - hermes-agent

    restart: unless-stopped


volumes:

  open-webui:
Create a .env file in the same directory and add your API key:
API_SERVER_KEY=$(openssl rand -hex 32)Important: Do not commit the .env file to a public repository. It contains the credential Open WebUI uses to authenticate with Hermes.
Step 4: Run the Hermes Agent setup wizard
Before starting the gateway, configure Hermes Agent with your model provider credentials.
Create the persistent data directory:
mkdir -p hermes-data

Then run the official setup wizard:

docker run -it --rm \

  -v "$(pwd)/hermes-data:/opt/data" \

  nousresearch/hermes-agent setup
The wizard stores Hermes configuration and credentials in the mounted data directory. This allows the configuration to persist when the container is recreated.
If you use Nous Portal, the current Hermes documentation also provides hermes setup –portal as an option for configuring the Portal connection.
Step 5: Start both services and verify the connection
Start the stack:
docker compose up –d Docker creates a shared network for the services. Open WebUI can then reach Hermes using http://hermes-agent:8642/v1.
Open:
http://<your-server-ip>:3000 in your browser and create the initial administrator account.
Your Hermes Agent should appear in the model selector after Open WebUI connects successfully. The Hermes documentation notes that the default model name is hermes-agent, unless you configure a custom model name.
Also read: Purchase a Self-Managed VPS with Hermes Agent + Open WebUI Installation
How can you deploy Hermes Agent and Open WebUI with one click on Bluehost?
With Bluehost, you can deploy Hermes Agent + Open WebUI on a Self-Managed VPS or VDS using a one-click installation. The template connects Hermes Agent, Open WebUI and Nginx automatically, so you don’t need to configure the components manually.
Once the installation is complete, Bluehost configures Open WebUI as the browser-based interface and connects it to the Hermes Agent API. Nginx handles the web connection, while the backend services remain internal to the server. The setup exposes only the required SSH and web ports through UFW.
You still need to configure an LLM provider before Hermes Agent can process requests. On your Bluehost server, add your provider credentials to:
/var/lib/hermes-agent/.hermes/.envYou can also configure the model through the Hermes setup command:
HOME=/var/lib/hermes-agent hermes modelAfter configuring your provider, restart Hermes Agent:
systemctl restart hermes-agent Then open the Bluehost server URL in your browser and create your Open WebUI account. The first user to register becomes the global administrator. The hermes-agent connection is preconfigured, so you can select it from the model menu and start chatting.
With Bluehost Hermes Agent + Open WebUI template, you get a preconfigured AI agent workspace without manually wiring the services together. You can deploy it on a Self-Managed VPS or VDS and retain control over your server environment.
Also read: What is Hermes Agent? A Self-Hosted AI Agent Guide for Developers
Final thoughts
Connecting Hermes Agent to Open WebUI gives you a browser-based interface for working with your AI agent. You can build the connection manually or use Bluehost’s one-click template to simplify deployment.
With the manual approach, you control the Docker configuration, API credentials and networking between both services. Keeping the Hermes API private while exposing only Open WebUI helps maintain a cleaner deployment.
If you want to avoid configuring the services yourself, Bluehost one-click Hermes Agent + Open WebUI template pre-wires the core components for you. You can then configure your LLM provider and start using the interface without building the entire setup from scratch.
Ready to run Hermes Agent with Open WebUI? Explore Bluehost Hermes Agent hosting and deploy your AI agent stack on a VPS.
FAQs
Yes. Open WebUI supports multiple installation methods, including Docker, Python and its desktop app. You can connect it to Hermes Agent through the OpenAI-compatible API by adding the Hermes endpoint and API key in Open WebUI.
Yes. Running both services on the same VPS can simplify networking because Open WebUI can communicate with the Hermes API over the server’s internal network. Your VPS needs enough resources for the agent, Open WebUI and the model provider or services your workflow uses.
No. Hermes Agent’s API server uses port 8642 by default, but you do not need to expose it publicly when Open WebUI runs on the same server or Docker network. Keeping the API internal reduces the number of publicly accessible services.
Yes. Bluehost provides a one-click Hermes Agent + Open WebUI installation for Self-Managed VPS and VDS. The template configures the core services together, after which you configure your LLM backend and create your Open WebUI account.

Write A Comment