
Key highlights
- Expires headers improve WordPress site speed by enabling browser caching for static files.
- Tools like GTmetrix, PageSpeed Insights and Lighthouse help identify missing or misconfigured headers.
- You can add expires headers via plugins, .htaccess (Apache) or Nginx server configuration.
- Bluehost simplifies caching with built-in features, SSD storage, CDN integration and plugin compatibility.
- Avoid common caching errors with best practices like versioning, testing and using staging environments.
Introduction
Your website may look great—but if it loads like it’s stuck in 2005, visitors won’t stick around to admire it.
Speed is non-negotiable, and one of the easiest ways to boost performance is to add expires headers in WordPress. This powerful tweak enables browser caching, allowing static files like images, stylesheets and scripts to be stored locally for faster repeat visits.
The result? Faster load times, reduced server stress and a smoother user experience—all with a few simple steps.
In this guide, you’ll learn how to add expires headers using plugins, by editing your .htaccess file and by configuring your web server (Apache or Nginx). We’ll also cover how to avoid common mistakes that slow down your site.
How to add expires headers in WordPress: Step-by-step guide
There are different ways to add expires headers in WordPress, depending on your hosting setup, server type and technical comfort level. Let’s explore each method one by one:
Method 1: Add expires headers using a plugin
If you’re not comfortable with code, the easiest way to add expires headers in WordPress is by using a caching plugin. These plugins handle browser caching automatically and let you configure expiration times without editing server files.
W3 Total Cache and WP Super Cache are the two popular plugins you can use. For this method, we’re using W3 Total Cache for reference:
- Go to the WordPress dashboard.

- Click on ‘Plugins’> ‘Add New Plugin’ and search for W3 Total Cache. Then click on ‘Install’ and ‘Activate’ it.

- Navigate to the ‘Performance’ tab then click on ‘Browser Cache.’

- Locate ‘Set expires header’ and check its box.

- Scroll down to the ‘CSS & JS section,’ then check the option for ‘Set expires header.’
- Enter your preferred lifetime value in seconds.
- By default, it’s set to 31536000 seconds (equal to 365 days), but you can adjust it based on your caching strategy.

- Repeat the same steps for HTML and media.
- After adjusting the settings, click on the drop-down arrow of ‘Save Settings’ button and click ‘Save Settings & Purge Caches.’

Method 2: Manually add expires headers by editing the .htaccess file (Apache server)
If your site is running on an Apache web server, you can manually add expires headers by modifying the .htaccess file. Here is how to add expires headers manually:
- Access your site’s root directory via FTP or File Manager in your hosting control panel. Bluehost users will find their ‘File Manager’ under ‘Quick Links.’

- Locate the .htaccess file (make sure hidden files are visible). You will get a .htaccess file inside the ‘public_html’ folder.

- Add the following code snippet before the # END WordPress line:
<IfModule mod_expires.c>


ExpiresActive On

ExpiresByType image/jpg "access 1 year"

ExpiresByType image/jpeg "access 1 year"

ExpiresByType image/gif "access 1 year"

ExpiresByType image/png "access 1 year"

ExpiresByType image/svg "access 1 year"

ExpiresByType text/css "access 1 month"

ExpiresByType application/pdf "access 1 month"

ExpiresByType application/javascript "access 1 month"

ExpiresByType application/x-javascript "access 1 month"

ExpiresByType application/x-shockwave-flash "access 1 month"

ExpiresByType image/x-icon "access 1 year"

ExpiresDefault "access 3 days"

</IfModule> - Save and upload the file.
This instructs the browser to cache different types of files for defined periods, reducing future load times.
Method 3: Configure Nginx for expires headers
If your site is hosted on a Nginx web server, the .htaccess method won’t apply. Instead, you’ll need to edit the server’s configuration file.
location ~* \.(jpg|jpeg|gif|png|css|js|woff2)$ {
expires 30d;
add_header Cache-Control "public";
}
Add this to your Nginx site configuration block, which is usually located at
‘/etc/nginx/sites-available/yourdomain.conf’. How to check if your website needs expires headers?
Many caching plugins, CDNs or hosting environments may implement expires headers by default. But not always in the most optimized way. A proper check ensures you’re not duplicating efforts or missing opportunities to leverage browser caching for faster performance.
Here are three reliable tools to help you identify if your website is missing expires headers:
1. GTmetrix
GTmetrix is a popular site speed testing tool that provides detailed recommendations to optimize your website’s performance. GTmetrix analyzes how your pages load and flags missing or misconfigured expires headers.
Here are the steps to check if your website needs expires headers using GTmetrix:
- Go to GTmetrix.com, enter your website URL and click on ‘Test Now.’

- Click on the ‘Structure’ tab after completing the scan.

- Look for issues like:
- ‘Add Expires headers’ or
- ‘Leverage browser caching’ under the audit list
What it means:
If you see these warnings, it usually means your static files (for example, .jpg, .css, .js) are not cached efficiently. GTmetrix will also show which files are affected, helping you decide where to add headers.
Also read: Optimize Your Site: Website Speed Test GTmetrix Tips
2. Google PageSpeed Insights
It is a tool provided by Google that analyzes your website’s page speed and overall performance. It provides real-world performance data, including caching issues related to expires headers in WordPress.
Here’s how to check if your website needs expires headers using PageSpeed Insights:
- Visit pagespeed.web.dev.
- Enter your WordPress site’s URL and run the test.

3. Scroll down to the ‘Diagnostics’ section.
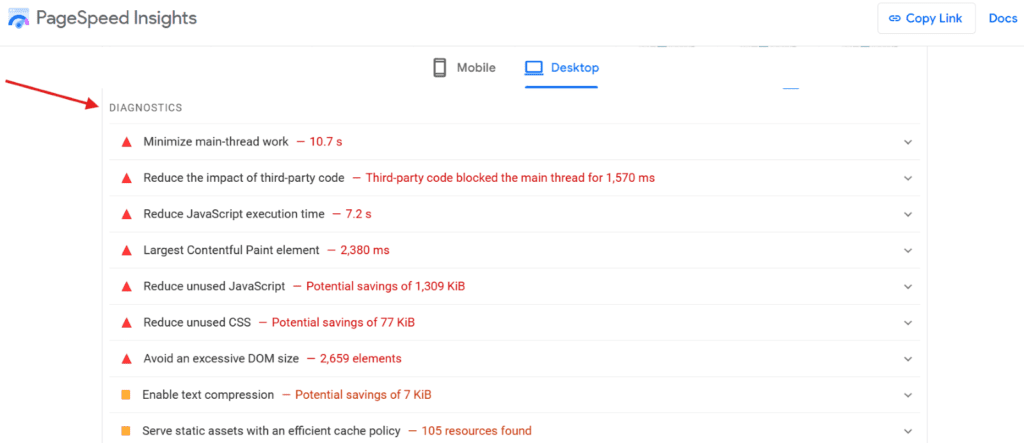
4. Look for warnings like:
- ‘Serve static assets with an efficient cache policy’;
- ‘Reduce unused JavaScript’ (often linked to poor caching)
What it means:
This warning signals that some resources aren’t using effective expires headers. You’ll get a list of affected URLs, file types and suggestions to fix them. You can apply appropriate caching rules using a plugin, CDN or directly in your .htaccess file or web server configuration.
3. Lighthouse Performance test (via Chrome DevTools)
Lighthouse is a robust audit tool built into Google Chrome. It offers advanced performance testing, including a deep look at your site’s use of browser caching and expires headers.
Here are the steps to check if your website needs expires headers using the Lighthouse Performance test:
- Open your website in Google Chrome.
- Right-click anywhere on the page and click ‘Inspect.’

- Navigate to the ‘Lighthouse’ tab.

- Select ‘Performance’ (you can also include ‘SEO’ and ‘Best practices’).

- Click ‘Analyze page load’ and wait for the test to be completed.

What it means:
In the results, look for red flags in the ‘Performance’ section, such as:
- ‘Serve static assets with an efficient cache policy’;
- ‘Reduce server response times (TTFB)’
This checks if your site is caching content correctly and shows if any expires header is missing or needs fixing.
By using all three tools, you’ll get a comprehensive picture of how your website handles browser caching and whether adding or optimizing expires headers is necessary. If these tools show caching warnings, don’t worry—you’re just a few steps away from fixing it.
How does Bluehost help improve website performance?
Bluehost understands that speed is a necessity. That’s why we offer WordPress hosting plans, which are built from the ground up with performance in mind. From server-level caching to easy integration with speed-enhancing plugins, Bluehost helps WordPress users implement essential optimizations without any advanced technical setup.
Whether you’re running a blog, portfolio or business site, our WordPress hosting plans offer the speed, security and scalability that creators need to grow confidently.
We take care of the back-end complexity so you can focus on growing your site and delivering a seamless experience to your visitors. Here’s how we enhance your website’s performance:
Built-in caching mechanisms
Our hosting environment includes integrated caching features designed to reduce load times by storing frequently accessed data closer to your users. This means that repeat visitors experience faster page loads, enhancing their overall browsing experience.
You can find this setting in the WordPress dashboard under the Bluehost tab.

NVMe storage for faster data access
We utilize high-performance NVMe (Non-Volatile Memory Express) storage across our servers, ensuring quicker data retrieval and improved website responsiveness. NVMe storage accelerates the reading and writing processes, which is vital for dynamic content and database-driven sites.
Also read: NVMe WordPress Hosting: Boost Speed & Site Performance
Content delivery network (CDN) integration
To further boost your site’s speed globally, we offer seamless integration with Cloudflare CDN. A CDN distributes your website’s static content across a network of servers worldwide, allowing users to download data from the nearest server location. This reduces latency and ensures faster load times for visitors, regardless of their geographic location.
PageSpeed Insights tool
Understanding your website’s performance is key to optimization. Within your Bluehost Account Manager, you have access to the PageSpeed Insights feature. This tool evaluates your site’s speed and provides actionable recommendations to enhance performance. By leveraging these insights, you can make informed decisions to further optimize your website’s loading times.
Support for caching plugins
For WordPress users, we offer compatibility with popular caching plugins such as W3 Total Cache and WP Super Cache. These plugins provide advanced caching capabilities, allowing you to fine-tune your site’s performance settings to meet your specific needs.
Expert support
Our dedicated support team is available 24/7 to assist you with any performance-related inquiries. Whether you need guidance on configuring caching settings, implementing expires headers or troubleshooting performance issues, our experts are here to help.
If your site demands more speed, uptime and scalability, consider upgrading to agency hosting. Unlike shared environments, Agency hosting distributes resources across multiple servers, helping your site stay fast and reliable even during traffic spikes.
With built-in caching, automatic scaling and isolated resources, Bluehost for Agencies is ideal for high-traffic sites, eCommerce businesses and fast-growing brands.
How to avoid caching-related errors?
While adding expires headers and enabling browser caching can significantly improve your site’s speed, improper configurations can lead to unexpected issues. Here are a few key things to keep in mind to avoid caching-related errors:
1. Be cautious with extended expiry times
Setting overly long expiration dates (e.g., 1 year) for assets like CSS or JavaScript can cause visitors to see outdated content. If you make frequent changes to your site, consider using cache-busting techniques.
2. Test after applying changes
After configuring expires headers—whether via plugin, .htaccess file or web server settings—always clear your site cache and browser cache before testing.
3. Watch for plugin conflicts
Using multiple caching plugins or combining manual caching rules with plugin settings can sometimes lead to conflicts. These may override each other, cause broken styles/scripts or even prevent updates from showing to users.
4. Server-specific behavior
Caching behavior can vary depending on whether you’re using Apache, Nginx or a managed host. Make sure you’re applying the correct syntax for your environment.
5. Use staging environments for testing
Before rolling out changes on your live site, primarily if you’re editing server files or caching rules, use a staging environment.
Final thoughts
By now, you’ve learned exactly how to add expires headers to your WordPress site—and why it matters. This simple yet powerful technique helps improve your website’s speed and performance by enabling browser caching for static files.
At Bluehost, we know that performance isn’t just a feature—it’s a foundation. That’s why we’ve built our hosting platform to support your WordPress site with lightning-fast SSD storage, built-in caching tools, seamless CDN integration and one-click plugin compatibility. You focus on your content and audience—we’ll handle the backend.
Don’t let a slow site hold you back. Choose Bluehost WordPress hosting and unlock lightning-fast performance today.
FAQs
Expires headers are HTTP response headers that tell a browser how long it should cache a file before requesting it again from the server. They help improve website performance by enabling browser caching of static files like images, CSS and JavaScript.
You can add expires headers in WordPress using a caching plugin like WP Super Cache or W3 Total Cache. These plugins allow you to set caching rules without editing code. Alternatively, you can add expires headers manually through the .htaccess file (Apache) or your Nginx server configuration.
Adding expires headers helps speed up your website by telling browsers to cache static content for a set time. This reduces page load time, lowers server requests and improves SEO and user experience.
The .htaccess file is located in the root directory of your WordPress installation, typically under /public_html/. It may be hidden by default—make sure your file manager or FTP client is set to show hidden files.
Most modern web servers like Apache and Nginx support expires headers, but the configuration method differs. Apache uses the .htaccess file and mod_expires module, while Nginx requires changes in the site’s configuration file.
You can check for expires headers using tools like GTmetrix, Google PageSpeed Insights or Lighthouse. These tools will highlight if your site is missing caching headers and offer suggestions for improvement.
Expires headers use a fixed date for caching, while Cache-Control uses relative time (e.g., max-age=86400). Both are used to control browser caching and it’s common to use them together for better cache management.


Write A Comment