Key highlights
- Convert your basic website from HTML to WordPress so that it grows with your business needs.
- Keep your existing website design and features intact while gaining WordPress’s advanced capabilities.
- Follow proven migration methods that match your technical comfort level and project requirements.
- Protect your new WordPress website with essential security features and automated backup systems.
- Maintain your search engine rankings by implementing proper URL structures and redirect methods.
- Speed up your WordPress website with performance optimization techniques that improve user experience.
Introduction
Imagine pouring your heart and soul into the perfect website, only to find yourself stuck with a static HTML site that’s holding you back. Updating content is a chore, your site looks awful on mobile and your search rankings are tanking, making it harder to attract visitors.
But what if there was a way to breathe new life into your old site without starting from scratch? Enter WordPress: the key to unlocking your website’s true potential.
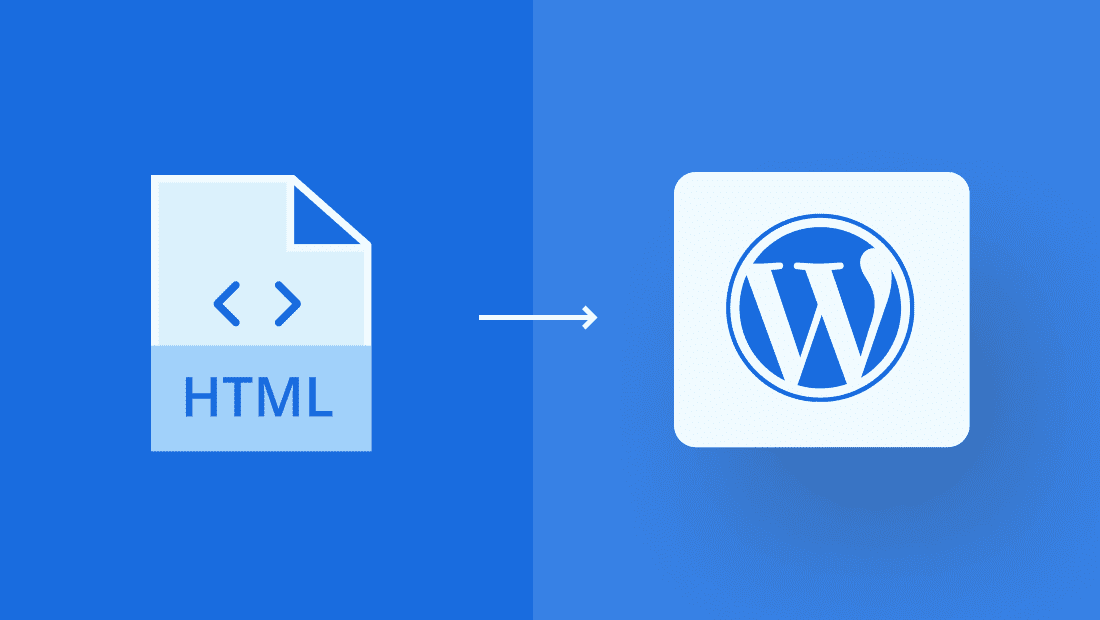
In this guide, you’ll learn how to migrate your site from HTML to WordPress step by step.
But first, let’s explore why migrating from HTML to WordPress is a smart move for your website.
Why convert a static HTML website to WordPress?
You might be wondering, “Is migrating to WordPress really worth the effort?” The short answer is yes! WordPress, one of the most popular CMS platforms, offers numerous benefits that can transform your static HTML site into a dynamic, user-friendly and search engine-optimized website.
If you’re still unsure about making the switch, consider these compelling advantages of WordPress:
User-friendly content management
WordPress offers an intuitive, easy-to-use interface for managing your site content. You can create, edit and publish pages and posts without needing to touch a single line of code. This makes updating your site a breeze, even if you don’t have technical expertise.
Responsive, mobile-friendly templates
With WordPress, your site will look great and function smoothly on any device. Most WordPress themes are built with responsive design in mind, automatically adapting your layout to fit various screen sizes. In today’s mobile-first world, this is a key aspect to deliver a seamless user experience and maintaining search engine rankings.
Also read: How to Make Mobile Friendly Website on WordPress
Extensive customization options
WordPress offers a vast library of themes and plugins, allowing you to easily customize your site’s appearance and functionality. Whether you want to change your color scheme, add a contact form or integrate social media feeds, there’s a plugin or theme for that. This flexibility lets you create a site that perfectly reflects your brand and meets your specific needs.
SEO advantages
WordPress is designed with search engine optimization (SEO) in mind. It offers built-in features like customizable URLs, header tags and alt text for images, which help search engines understand and rank your content.
Additionally, there are numerous SEO plugins available, such as Yoast SEO or Rank Math, that provide even more advanced optimization options.
Enhanced security
While no website platform is entirely immune to security threats, WordPress takes a proactive approach to keep your site safe. It releases regular updates that address vulnerabilities and improve security.
Furthermore, there are many security plugins available that offer additional layers of protection, including firewalls, malware scanning and two-factor authentication.
What you need before migrating HTML to WordPress
Before diving into the HTML to WordPress migration process, take care of these important preliminaries:
Set up WordPress hosting & installation
Moving HTML to WordPress requires solid hosting that supports its unique needs. You need reliable performance, strong security and easy management tools to run WordPress effectively. Before you migrate your HTML site, set up your new WordPress home.
Look for these essential WordPress hosting features:
- Fast SSD storage for quick loading
- Built-in security tools and SSL
- Automatic WordPress updates
- One-click WordPress installer
- 24/7 WordPress support
Bluehost stands out for WordPress websites. As an official WordPress.org recommended host since 2005, we offer optimized hosting that takes care of technical details. You won’t need to configure PHP versions, adjust memory limits or set up basic security. Focus on migrating your content while we handle the technical foundation.
Backup your HTML website
Your website’s safety depends on a complete backup before migration. A proper backup protects your content, design and functionality from unexpected issues during the conversion process. You must include every file that makes your website work – from visible content to behind-the-scenes PHP and HTML code.
Follow these key backup steps:
- Create a content inventory of all HTML, CSS and media files
- Export any databases you use for dynamic features
- Save your domain and server configuration files
Choose the backup method that matches your technical comfort level. The manual approach gives you full control through FTP, while CodeGuard automates the entire process. Bluehost’s File Manager offers a middle ground with its user-friendly interface.
Here’s how to use Bluehost’s built-in backup tools:
- Access your Bluehost control panel dashboard. The backup section lives under the “Quick Links” menu. Click “File Manager” to see all your website files in one place.

- Select everything in your website’s root directory. This ensures you capture all the components that make your site work. Download the files as a compressed archive to save space on your local computer.
- For automated protection, activate CodeGuard Basic through the Bluehost Marketplace. This service creates daily backups automatically and lets you restore your site with one click if needed.
Read more: How Do I Back Up My WordPress Website?
Identify the best conversion method
You have three ways to convert HTML to WordPress website. Each method matches different needs and skill levels. Pick the one that fits your goals and technical comfort.
- Using a plugin to import your content
- Creating a child theme based on an existing WordPress theme
- Manually converting your design into a custom WordPress theme
The best route depends on your site’s complexity, your technical skills and how much of the original design you want to keep.
If you’re open to a new design and just want to migrate content, a plugin may do the trick. If preserving the design is key, consider creating a custom theme. For a simpler approach, look at using a child theme.
Method 1 – Using a plugin for content migration
If preserving your current design is not a top priority, you can use a plugin to quickly import your content into a new WordPress installation. This method is ideal if you want a fresh look for your site and don’t mind selecting a new WordPress theme.
Here’s how to do it:
1. Install an import plugin
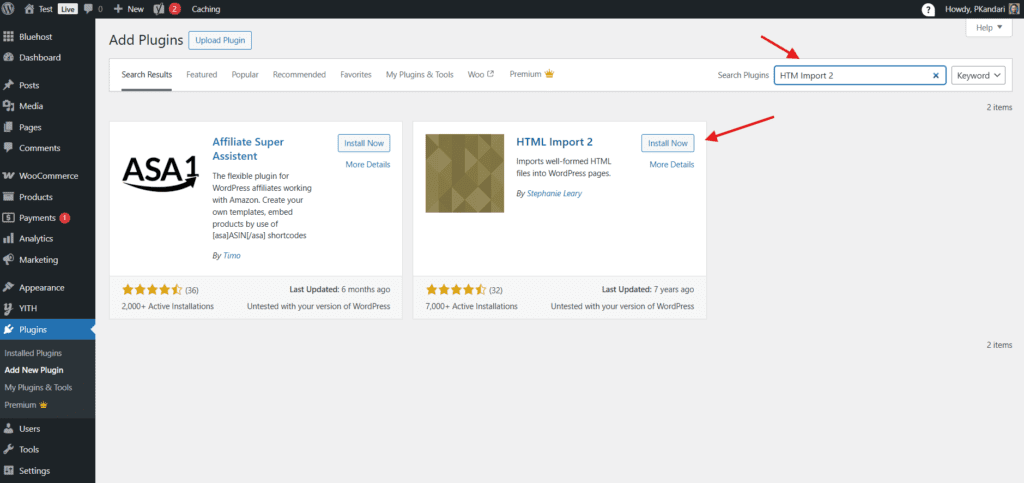
First, install and activate an import plugin. We recommend using “HTML Import 2” by Stephanie Leary. It’s a free, straightforward tool that can handle most content migration needs.
To install the plugin:
- Log in to your WordPress dashboard
- Go to “Plugins” → “Add New”
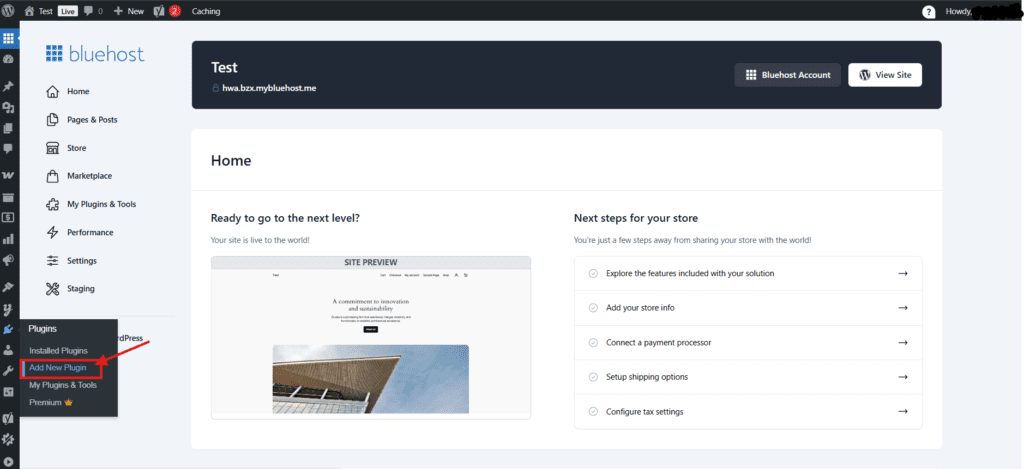
- Search for “HTML Import 2”
- Click “Install Now”
- Once installed, click “Activate”
2. Configure plugin settings
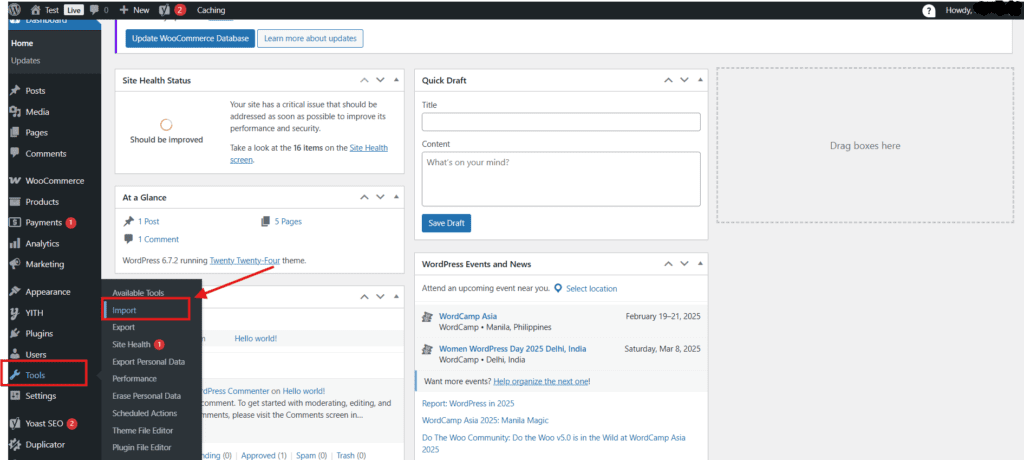
After activating HTML Import 2, go to “Tools” → “Import” → “HTML.” You’ll see a “Settings” page where you can configure how the plugin handles your content.
Here are a few key settings to consider:
- Root directory: Specify the root directory where your HTML files are located.
- Default file extension: Choose the extension of your main content area (for example, .html, .htm).
- Segment content: If your content is divided into sections (for example, header, main content, footer), you can specify the HTML tags that divide these sections.
- Import linked media: Decide whether to import images and other media linked to your content.
- Create redirects: Choose whether to create 301 redirects from your old URLs to the new WordPress URLs.
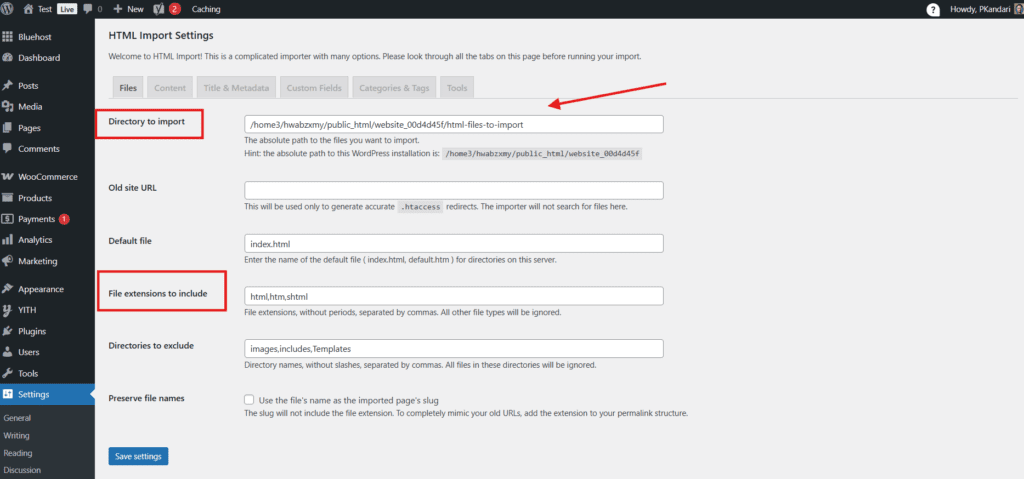
Take your time to review the settings and ensure they match your needs.
3. Import content
When you’re ready, click the “Import Now” button to start the migration process. HTML Import 2 will scan your specified directory and import your content from HTML to WordPress.
Depending on the size of your site, this may take a few minutes. Once complete, you’ll see a success message indicating how many files were imported.
After the import, review your content to make sure everything migrated correctly. You may need to make some manual adjustments, such as updating internal links or fixing formatting issues.
And that’s it! With the HTML Import 2 plugin, migrating your content from HTML to WordPress is a straightforward process. Just remember, this method focuses on content, not design.
Plugin migration works perfectly for basic HTML websites. But sites with custom features, complex structures or dynamic content need careful handling. Each technical component adds migration complexity that could affect your site’s performance and search rankings.
For example, an eCommerce site with customer accounts, shopping cart integrations and payment gateways requires specialized migration expertise. Each technical component adds migration complexity that could affect your site’s performance and search rankings.
That’s why Bluehost offers a Professional Migration service. Our WordPress experts manage your entire transition – from content transfer to URL preservation. You get a perfectly migrated WordPress site without wrestling with technical details or risking your website’s functionality.
Next, let’s explore another migration approach: moving your design with a WordPress child theme.
Method 2 – Convert HTML to WordPress website using a child theme
If you want to maintain the look and feel of your HTML site, creating a WordPress child theme is a great approach. You’ll start with an existing WordPress theme that closely matches your design, then customize it to mirror your original site. Here’s how:
1. Select a parent theme
First, find a WordPress theme that resembles your HTML site’s layout and design. The closer the match, the less customization you’ll need to do.
Browse the official WordPress Theme Directory or explore premium theme marketplaces like StudioPress or Themify. Look for a responsive, well-coded theme with positive reviews and active support.
Once you’ve found the perfect parent theme, install and activate it on your WordPress site or blog.
2. Create a child theme
Next, create a child theme to house your customizations. Using a child theme lets you modify the parent theme without editing its files directly. Parent theme updates will preserve your customizations when you use a child theme
To create a child theme, follow these steps:
Create a new folder in your WordPress themes directory (usually /wp-content/themes/) and name it after your parent theme, appending “-child” to the end (for example, parenttheme-child).
Inside the child theme folder, create a new file named style.css.
Open style.css and add the following code at the beginning:
/*

Theme Name: Parent Theme Child

Theme URI: http://[example.com]/parenttheme-child/

Description: A child theme of Parent Theme

Author: Your Name

Author URI: http://[example].com

Template: parenttheme

Version: 1.0.0

*/
Replace the placeholder information with your own details, making sure to update the “Template” line with the parent theme’s directory name.
Read more: How to Create a WordPress Child Theme, Step by Step
3. Customize the theme
With your child theme set up, you can now start customizing it to match your original HTML design. Here are a few common ways to customize your child theme:
- Copy CSS styles: If you want to keep the same styles (colors, fonts, etc.), copy the relevant CSS from your HTML site’s stylesheet and paste it into your child theme’s style.css file.
- Override template files: To modify the layout or structure of your WordPress site, you can override the parent theme’s template files. Copy the specific template file you want to customize (for example, header.php, footer.php, single.php) from the parent theme into your child theme’s directory. Then, make the desired changes to the copied file.
- Add custom functions: If you need to add custom functionality or modify the behavior of your WordPress site, you can create a functions.php file in your child theme directory. In this file, you can write PHP code to extend or override the parent theme’s functions.
Remember to test your customizations thoroughly to ensure your WordPress site looks and functions as intended.
4. Migrating content
With your child theme in place, you can migrate your content using the HTML Import 2 plugin covered in the previous section. The plugin will import your pages, posts and media into your new site.
After the import, review your content and make any necessary adjustments to ensure everything looks right with your new child theme.
Using a WordPress child theme is a great way to maintain your site’s original design while still enjoying the benefits of WordPress. However, since this method involves making changes to theme files, there’s a chance that something could go wrong during the customization process.
To minimize the risk of errors affecting your live site, consider using Bluehost’s staging environment. Staging allows you to create a duplicate of your website in a separate, isolated environment where you can safely test your child theme customizations.
With our staging feature, you can:
- Create an exact copy of your live site with just a few clicks.
- Make your child theme customizations and test them thoroughly in the staging environment.
- Preview your changes and ensure everything looks and functions as intended.
- Once you’re satisfied with your customizations, deploy the changes from staging to your live site seamlessly.
This added layer of safety allows you to fine-tune your design and functionality without the risk of downtime or errors.
Also read: How to Create a Staging WordPress Site
Method 3 – Manual conversion (creating a custom WordPress theme)
For full control over your site’s design and functionality, you can manually convert your site from HTML to WordPress theme. This method requires the most technical knowledge but provides the greatest flexibility. Here’s how to do it:
1. Create a theme folder and basic files
Start by creating a new folder for your theme in the /wp-content/themes/ directory. Choose a unique and descriptive name for your folder, such as myCustomTheme.
Inside your new theme folder, create the following basic files:
- style.css: This is your theme’s main stylesheet.
- index.php: This is the default template file.
- header.php: This file contains your site’s header section.
- footer.php: This file contains your site’s footer section.
- functions.php: This file is used to add custom functionality to your theme.
Also read: How to Create a WordPress Theme
2. Transfer HTML and CSS
Next, break your HTML site down into sections (header, main content, footer) and copy the corresponding HTML into your WordPress theme files.
For example, the <head> section of your HTML file should go into header.php, the main content into index.php and the footer into footer.php.
Then, copy your site’s CSS styles into the style.css file. Make sure to update any file paths to reflect the new WordPress directory structure.
3. Add WordPress PHP functions
To turn your static HTML into a dynamic WordPress theme, you’ll need to replace certain parts of your HTML with WordPress template tags and functions.
Some common replacements include:
- Navigation menus: Replace your static menu code with the wp_nav_menu() function to create dynamic, easily managed menus.
- Post titles: Use the_title() function to display the title of each post or page automatically.
- Post content: Replace static content with the_content() to show the main content of each post or page.
- Permalink structure: Ensure your links are dynamic by using the_permalink() function for post and page URLs.
In your index.php file, you’ll also need to add a few essential template tags to integrate your header, footer and content seamlessly:
<?php get_header(); ?>

<?php while (have_posts()) : the_post(); ?>

<!-- Your post content goes here -->

<?php endwhile; ?> <?php get_footer(); ?>
These tags tell WordPress to include your header and footer files and loop through your posts to display their content.
4. Upload and activate the custom theme
With your custom theme files complete, it’s time to package them up and upload them to your WordPress site. Compress your entire theme folder into a ZIP file.
Log in to your WordPress admin dashboard, navigate to “Appearance” → “Themes,” and click the “Add New” button at the top of the page. Then, click “Upload Theme” and choose the ZIP file you just created.
WordPress will upload and install your custom theme. Once it’s ready, click the “Activate” button to make it live on your site.
Creating a custom WordPress theme from your HTML site gives you total control over your site’s design and functionality. It’s the most advanced method but also the most rewarding if you have the necessary technical skills.
HTML to WordPress post-migration steps
Your WordPress migration needs final touches to ensure optimal performance. Complete these essential steps to secure and optimize your new WordPress website.
1. Testing the new WordPress site
Thoroughly test your migrated site to make sure everything looks and functions as expected. Click through your pages, test your forms and check for any broken links or images.
Pay special attention to your site’s responsiveness. Make sure your design adapts smoothly to different screen sizes and devices.
If you spot any issues, troubleshoot them one by one. You may need to make adjustments to your theme files, CSS, or plugin settings.
2. Redirecting old URLs
If your WordPress site has a different URL structure than your old HTML site, you’ll need to set up redirects. Visitors who click your previous HTML page links will automatically reach the correct WordPress pages on your new website.
The simplest way to set up redirects is with a plugin like Redirection or Safe Redirect Manager. These plugins let you easily create and manage 301 redirects, which tell search engines that your pages have permanently moved.
Also read: 301 Redirects in WordPress: 4 Ways to Retain all your Traffic and SEO Value
Setting up redirects is crucial for maintaining your search engine rankings and avoiding broken links.
3. Implementing security and backup measures
Now that your site is on WordPress, it’s important to prioritize security and regular backups.
Start by installing a security plugin like Wordfence or Sucuri. These plugins offer features like firewall protection, malware scanning and login attempt limiting.
For an added layer of security, consider enabling two-factor authentication on your WordPress login page. Users must verify their identity with both a password and a secondary confirmation method, such as a mobile phone code.
Your security strategy must include a solid backup system. Manual backups take time and often get forgotten. Automated backups ensure you always have a recent copy of your site. Most importantly, your backups need secure off-site storage to protect against server failures or security breaches.
This is where CodeGuard becomes essential. This backup service creates daily copies of your WordPress files and database, storing them securely off-site. You can restore your entire site with a single click if something goes wrong. CodeGuard also tracks changes, so you can review updates and quickly fix issues.
Also read: CodeGuard: Back Up and Restore Your Site Like a Pro
Beyond backups, your site needs active protection. Bluehost offers SiteLock Security Essential as an add-on to scan your site daily for threats. It automatically removes malware, blocks suspicious traffic and strengthens your site’s defenses. The included web application firewall stops attacks before they reach your WordPress installation.
4. Performance optimization
Website speed directly impacts your success. Slow loading times frustrate visitors and hurt your search rankings. Google considers page speed when determining your site’s position in search results.
Your WordPress site needs fast server response times, efficient content delivery and optimized code to perform well. Most website owners struggle with complex server configurations and technical optimizations. Without proper performance tuning, your site can lose visitors and sales.
Bluehost WordPress hosting removes these technical hurdles. You get optimized server settings that maximize WordPress performance. Our built-in caching system speeds up page delivery, while our global network serves content from locations near your visitors. You don’t need to worry about server configurations or performance tweaks.
For even better performance, optimize your images and remove unused plugins. Use our integrated Cloudflare CDN to deliver content faster worldwide. These simple steps, combined with our optimized hosting service, ensure your WordPress site loads quickly for every visitor.
Final thoughts
When you convert HTML to WordPress website, you open exciting possibilities for your online presence. With the right approach and tools, you can transform your static site into a dynamic WordPress platform without losing your existing design or content.
Remember to back up your site before starting the migration process. Take time to choose the right conversion method based on your technical skills and needs. Test thoroughly in a staging environment before going live.
Ready to move your site from HTML to WordPress? Start your journey with Bluehost WordPress hosting plans. Our platform includes everything you need – from one-click WordPress installation to professional migration services.
Visit Bluehost today and transform your static site into a powerful WordPress website.
FAQs
Use a child theme or create a custom theme to match your original HTML design. Transfer your HTML structure and CSS styles to the WordPress template files and stylesheet.
Plugins like HTML Import 2 can help automate content migration. However, design and functionality often require manual work. Automated tools may not perfectly replicate your original design.
Review your WordPress theme’s stylesheet and template files. Ensure your original CSS styles are properly integrated. Make necessary adjustments to account for WordPress’s structure and classes.
Some coding knowledge in HTML, CSS and basic PHP would be helpful. The level of coding knowledge required depends on the complexity of your site and the chosen conversion method.
SEO rankings may be temporarily affected during the conversion process. Set up proper redirects from old URLs to new WordPress URLs. Update your sitemap and follow SEO best practices to maintain and improve rankings.
The time required varies based on the size and complexity of your website. It also depends on the chosen conversion method and your level of expertise. A simple site could be converted in hours, while a complex site may take several days or weeks.

Write A Comment