Key highlights
- Learn how can you use AI to build an online store through simple, step-by-step instructions.
- Build a professional eCommerce storefront with no developer or technical setup required.
- Manage inventory, payments and shipping using dedicated Bluehost AI agents.
- Optimize your product listings automatically for traditional search engines and AI discovery platforms.
- Get enterprise-grade hosting, WooCommerce integration and end-to-end order support in one plan.
Starting an online store does not require managing fragmented tools or writing complex code.
For small business owners and first-time online sellers, the process of configuring a digital storefront can be a barrier to entry. Bluehost AI Store simplifies this setup by letting you build and manage your complete eCommerce experience through natural conversation.
We designed this platform on WordPress and WooCommerce to combine enterprise-grade hosting with the simplicity of agentic commerce. This structural integration means you do not need developer skills or previous eCommerce experience to publish your site or sell online.
This guide explains how you can use AI to build an online store from setup to launch. You will learn how Bluehost AI agents configure your payment processing, organize shipping zones and optimize listings for traditional and AI search engines.
Let’s dive in!
Why use AI to build an online store?
Traditional eCommerce setup often involves multiple tools, plugins and technical configurations.
An AI online store builder simplifies the process by helping you:
- Generate a complete storefront in minutes
- Create product descriptions and images
- Set up payments and shipping
- Organize products into categories
- Improve SEO automatically
- Manage store operations with AI assistance
This means you spend less time configuring your store and more time growing your business.
Who can create an online store using AI?
| Business type | How AI helps | Key benefit |
|---|---|---|
| First-time online sellers | Assists with product descriptions, homepage copy, category organization and brand messaging. | Launch an online store faster without starting from a blank page. |
| Offline-first businesses going online | Converts existing products, services and business information into an eCommerce-ready store. | Creates an online presence without building everything from scratch. |
| Solo entrepreneurs and lean teams | Generates store content, product messaging and page structures quickly. | Saves time and reduces the need for additional tools or external support. |
| Service businesses expanding into online sales | Simplifies setup for selling products, gift cards, memberships or digital offerings. | Adds new revenue streams without creating a complex eCommerce experience. |
| Growing small businesses | Refreshes website content, improves store presentation and supports new campaigns. | Enables faster launches for promotions, seasonal offers and store relaunches. |
| Businesses seeking a simpler launch process | Reduces decision fatigue by helping with content creation, store setup and structure. | Makes it easier to get online and focus on selling instead of technical tasks. |
Bottom line: AI-powered website setup is most valuable for small businesses that want to launch an online store quickly, simplify the setup process and build confidence as they grow. It works especially well for entrepreneurs, local businesses and growing brands looking for a faster path from idea to launch.
How to use Bluehost AI Store to create an online store for your small business?
Our Bluehost AI Store helps small business owners move from concept to an active eCommerce site in minutes. Instead of configuring a database or installing plugins, you describe your business in a simple prompt and answer conversational questions while the store configures itself in real time.
This platform deploys a fully functional WooCommerce store that remains entirely yours. You retain complete brand ownership and customer data without paying the transaction fees associated with closed eCommerce platforms.
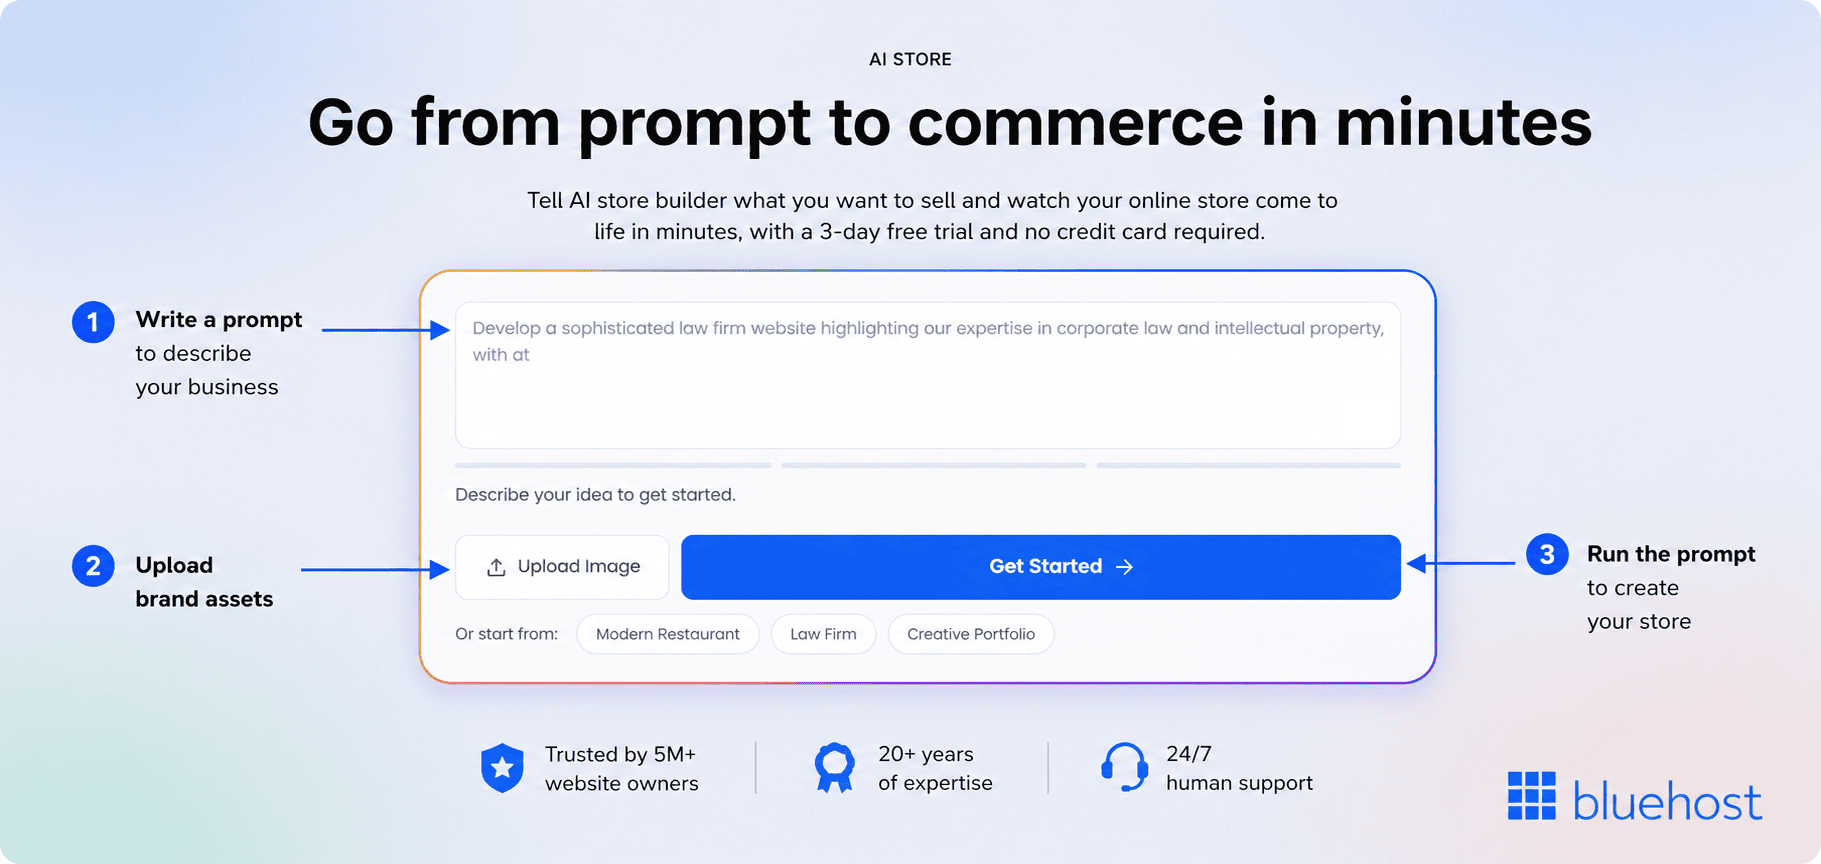
1. Describe your business in a simple prompt
To begin, provide details about what you sell, who your target audience is and where you plan to ship your products.
Example prompt:
“Build an online store for a handmade candle business located in Austin, Texas. The store sells soy candles, gift sets and seasonal products. Use a warm, modern style with a homepage, product category listings, an About page and a Contact page.”
An effective prompt includes:
- Your business name and location
- Products or key inventory categories
- Target audience
- Brand style and aesthetic preferences
- Required pages and primary customer actions
You can also select a pre-written prompt from our curated library to guide the store creation process.
Note: Creating a website or store is free with a 3-day trial. Your store website can be created during the trial. To make it live and unlock eCommerce store capabilities, you need to purchase the “Sell Online” plan. Hosting is included in the plan. You can use an existing domain or purchase one through Bluehost, with the domain free for the first year.
2. Let AI agents configure your store structure
Once you move forward with the Sell Online plan, Bluehost AI Store helps turn your business details into a fully functional WooCommerce store in less than 30 minutes.
Our AI agents can help with:
- Store structure
- Product setup
- Payment configuration
- Shipping setup
- Sales channel setup
- Store copy and layout
Bluehost AI Store is built on WordPress and WooCommerce, so sellers get the flexibility of WooCommerce without needing to manage the technical setup themselves. Our AI Store is designed to help users launch and run a complete store through natural conversation, including products, orders, payments and shipping.
3. Refine layouts and copy through natural conversation
After the initial store is created, you can make modifications through natural language chat. There is no need to write code or adjust complex settings menus manually.
You can instruct the AI to perform several actions:
- Rewrite product titles or description copy
- Change page structures or update headlines
- Add new promotional sections and pages
- Adjust brand colors, fonts and visual styles
- Generate SEO-optimized articles about your product catalog
This conversational customization lets small business owners keep absolute control over their store appearance while avoiding the learning curve of traditional CMS editors.
4. Set up payments, shipping and store essentials
When you are ready to accept transactions, our platform provides pre-configured Stripe authentication so you can process credit cards immediately. This avoids the technical challenges of API configuration and webhook setups.
Our AI agents are designed to help configure payments, shipping and product listings without requiring sellers to open WooCommerce settings manually.
The Sell Online plan includes eCommerce essentials such as:
- WooCommerce pre-configuration
- Direct bidirectional sync with WooCommerce
- 100 GB of high-speed disk storage
- Dedicated IP address
- Yoast WooCommerce SEO tools
- Free SSL certificate
- Weekly backups
- Malware scanning and removal
- Secure checkout and automated payment configuration
- Support for physical products, subscriptions and digital downloads
- Pre-configured security tools and automatic daily backups
This packages reliable WordPress database hosting with specialized eCommerce tools, giving you high-performance and security in one subscription. This structure unifies the storefront and the server. You receive the performance optimization of our infrastructure alongside the ease of a conversational dashboard.
5. Manage the store after launch
After launch, six specialized AI agents run on a recurring schedule to monitor store health, inventory, orders, customer retention, payments and sales channels. The Coordinator Agent synthesizes this data into a daily prioritized Action Plan.
Instead of manually auditing spreadsheets, you receive direct alerts for low stock levels, pending order delays, payment issues and catalog errors. You can ask our AI agents to make bulk price changes or list customers who have not ordered recently, keeping your business running efficiently.
Start building your online store with Bluehost AI Store today to launch a professional eCommerce site with conversational setup.
Who should choose Bluehost AI Store?
| Business type | How AI Store helps | Key benefit |
|---|---|---|
| First-time online sellers | Sets up shipping zones, configures payment processing and builds product listings | Launch an online store under 30 minutes without developer costs |
| Offline retailers going digital | Translates physical inventory and brand details into a digital storefront | Establishes a brand-owned store without manual data entry |
| Solopreneurs and creators | Analyzes store performance, generates product copy and automates inventory tracking | Reduces admin hours to focus on product creation and marketing |
| Existing Bluehost hosting customers | Syncs products directly with existing WordPress setups using conversational controls | Upgrades hosting plans with zero database migration friction |
Bottom line: Bluehost AI Store provides a conversational eCommerce layer that eliminates technical or manual setup. Our solution is built for business owners who want brand ownership, zero transaction fees, AI store creation and an AI assistant to handle daily administrative tasks.
What to look for in an AI store builder?
The right AI store builder should do more than help you launch an online store. It should simplify everyday operations, automate repetitive tasks and give you the flexibility to grow as your business expands. When comparing platforms, look for these essential features:
1. AI-powered website creation
Choose a platform that can generate a complete online store from a simple prompt. It should create your homepage, product pages, branding and layout in minutes, helping you get online faster.
2. Conversational store management
Look for an AI store builder that lets you manage products, orders and store settings through natural conversations instead of navigating complex dashboards.
3. Built-in eCommerce tools
Your platform should include everything you need to start selling, such as product management, secure checkout, payment processing and shipping configuration, without relying on multiple third-party tools.
4. SEO optimization
A good AI store builder should help improve your search visibility by generating SEO-friendly product descriptions, meta titles, meta descriptions and keyword suggestions.
5. WooCommerce compatibility
If you want the flexibility of WordPress, choose an AI store builder that integrates with WooCommerce. This gives you access to a powerful eCommerce ecosystem while simplifying store setup and management.
6. Secure hosting and fast performance
Reliable hosting, SSL certificates, automatic backups and fast page speeds are essential for protecting customer data and delivering a smooth shopping experience.
7. Scalability and customization
As your business grows, your AI store builder should support more products, advanced features, marketing integrations and customization options without requiring you to migrate to a new platform.
Choosing an AI store builder with these features helps you launch your online store quickly while giving you the tools to manage, optimize and scale your business with confidence.
Best practices for running an AI-powered store
Once your storefront is live, implementing standard optimization practices ensures long-term operational success. With Bluehost AI Store, you can:
- Optimize for traditional and AI search: Bluehost AI Store automatically formats structured schema data, making your listings discoverable on Google, Bing, ChatGPT and Perplexity.
- Review agent recommendations daily: Use the Action Plan to address low-stock alerts, resolve payment conflicts and update inaccurate catalog descriptions promptly.
- Keep product catalogs accurate: Track your Catalog Health score within the dashboard to quickly identify listings that lack prices, images or descriptive copy.
- Sync multi-channel listings: Connect your inventory directly with Google Shopping and Meta Commerce from the Channels tab to keep product details consistent across platforms.
Final thoughts
You now understand how you can use AI to build an online store that matches the power of WooCommerce with the simplicity of direct conversation.
Bluehost AI Store handles the entire setup lifecycle, including payment configuration, shipping calculations and catalog optimization. This allows you to manage a high-performance WordPress eCommerce business without technical complications.
Ready to start selling? Build and launch your store with Bluehost AI Store and run it through seamless AI conversations.
FAQs
Yes, AI simplifies the process of starting an online business by automating administrative work. Bluehost AI Store uses autonomous AI agents to build product listings, write SEO copy, sync multi-channel distribution and compile daily operational tasks. This reduces the time required to manage a storefront, allowing you to focus on sourcing products and marketing your business.
Yes, Bluehost AI Store turns a single prompt into a fully operational eCommerce site in under 30 minutes. It automatically configures secure payment processing via Stripe, establishes shipping zones and generates optimized product listings. Unlike closed platforms, it is built on WordPress and WooCommerce, giving you complete brand ownership with zero per-transaction fees.
Yes, the platform is designed specifically for small business owners with zero coding or WordPress experience. You can edit design elements, update product prices, check pending orders and manage shipping rules through natural language commands without accessing back-end configuration files.
The top 3 benefits of using Bluehost AI Store includes:
1. Rapid setup: Move from prompt to an active storefront in minutes with automated configurations.
2. Conversational management: Run inventory updates, pricing adjustments and order tracking through natural language conversation with AI agents.
3. Proactive insights: Receive customized daily tasks from specialized AI agents that audit catalog health and sales channels automatically.
This technology is designed for small business retailers, content creators, service providers and solopreneurs who want a professional online storefront but lack developer resources or technical experience. It allows anyone to run a professional WooCommerce business using simple, everyday language.
WooCommerce is highly extensible and supports dozens of global gateways. Bluehost AI Store includes pre-configured Stripe authentication, allowing you to accept all major credit cards securely right from launch.
Yes, Bluehost AI Store builds professional storefronts using highly responsive themes that adjust automatically to look consistent on mobile phones, tablets and desktop screens.
There are no product catalog limits imposed by WooCommerce. Your hosting plan performance depends on your server resources, and our plans provide 100 GB of high-speed disk storage to accommodate extensive product listings smoothly.
Yes, you can modify design elements, write new copy, add product categories or change shipping rules at any time using the Blue AI Chat interface, ensuring your storefront adapts alongside your business goals.
Yes, WooCommerce integrates extensions that allow you to display pricing and process transactions in multiple currencies, which makes international sales straightforward.

Write A Comment