 ChatGPT,
 Claude,
 Gemini,
 Grok — all four for
Bluehost Google Workspace: How to Import Emails From Business Gmail
If your business email is on another Google Workspace account and you’re moving to Google Workspace with Bluehost, you can copy your users’ existing email into their new mailboxes, so their old mail is there when they start using your new account. This guide walks you through importing email from a Google Workspace account using the data import tool in the Google Admin console.
If you’re importing from somewhere else, choose the guide that matches where your email is now:
- If you’re importing from a personal Gmail account, see Bluehost Google Workspace: How to Import Emails From Personal Gmail.
- If you’re importing from Microsoft 365 or Exchange Online (Outlook), see Bluehost Google Workspace: How to Import Data From Microsoft Exchange Online.
- If you’re importing from another email provider that uses IMAP, such as Yahoo, iCloud Mail, or GoDaddy, see Bluehost Google Workspace: How to Import Email From an IMAP Account.
Important: Bluehost offers a paid Email Migration service, but it covers mailbox content only and is priced per mailbox. Bulk migration isn’t included, so it isn’t a practical alternative for moving a whole organization. The import tool described in this article handles up to 1,000 users at once.
Before You Begin
Make sure you have the following in place before you start:
- You can sign in to the Google Admin console of your Google Workspace account (the account you’re importing to) as a super administrator. Only a super administrator can set up and run the import.
- A super administrator of the source account (the account you’re importing from) is available to approve the request.
- Each person you’re importing already has a user account in your Google Workspace account. The import tool doesn’t create accounts. It only copies email to accounts that already exist.
- You have a list of the source and target email addresses for the users you’re importing, up to 1,000 users.
Note: You don’t need to turn on IMAP in either account. The import tool uses the Gmail API.
Tip: The super administrator who approves the request can only migrate messages. They can’t view or open any of the messages.
Important: Resellers can’t import data for their customer accounts, so a super administrator of your own account must set up and run the import. You also can’t start a new import until you exit a completed one.
What Gets Imported
The import copies each source user’s email to the matching user in your Google Workspace account. It includes:
- Email messages, including drafts and sent messages
- Labels and sublabels
- Stars
Spam and deleted messages are only imported if you choose to include them in the import settings.
Import Email From a Google Workspace Account
The Admin console shows four numbered steps for setting up and running the import. The sections after Step 4 cover running a delta import and exiting the completed import.
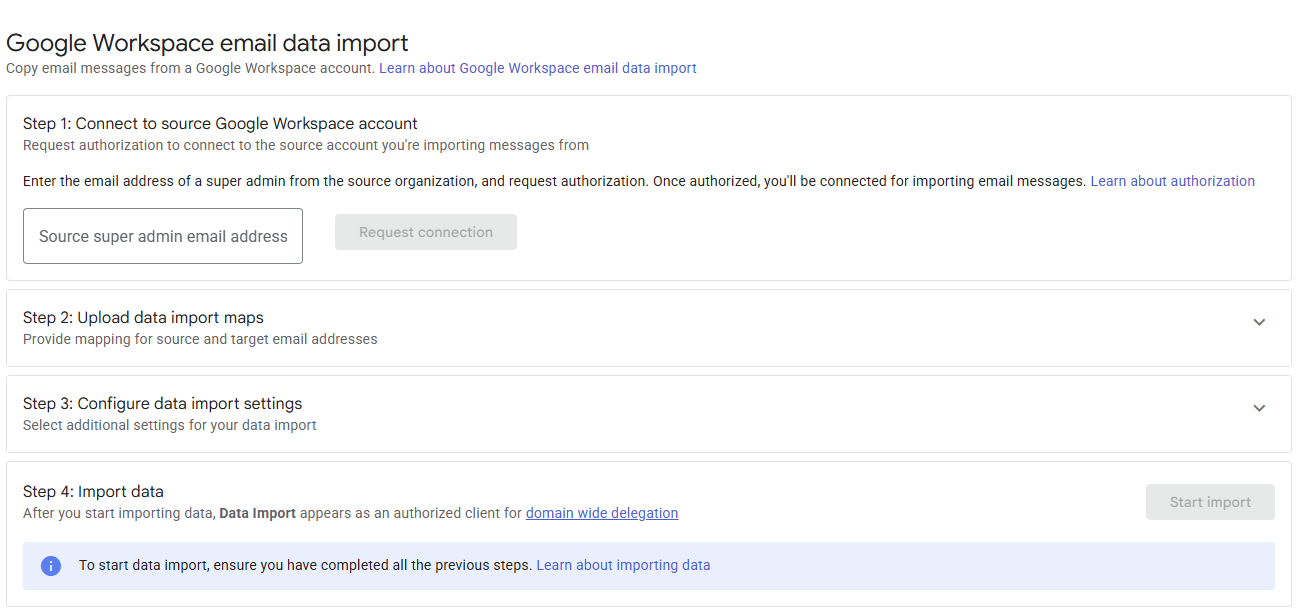
Step 1: Connect to Source Google Workspace Account
Part A: Request Authorization
- Sign in to the Google Admin console of your Google Workspace account as a super administrator.
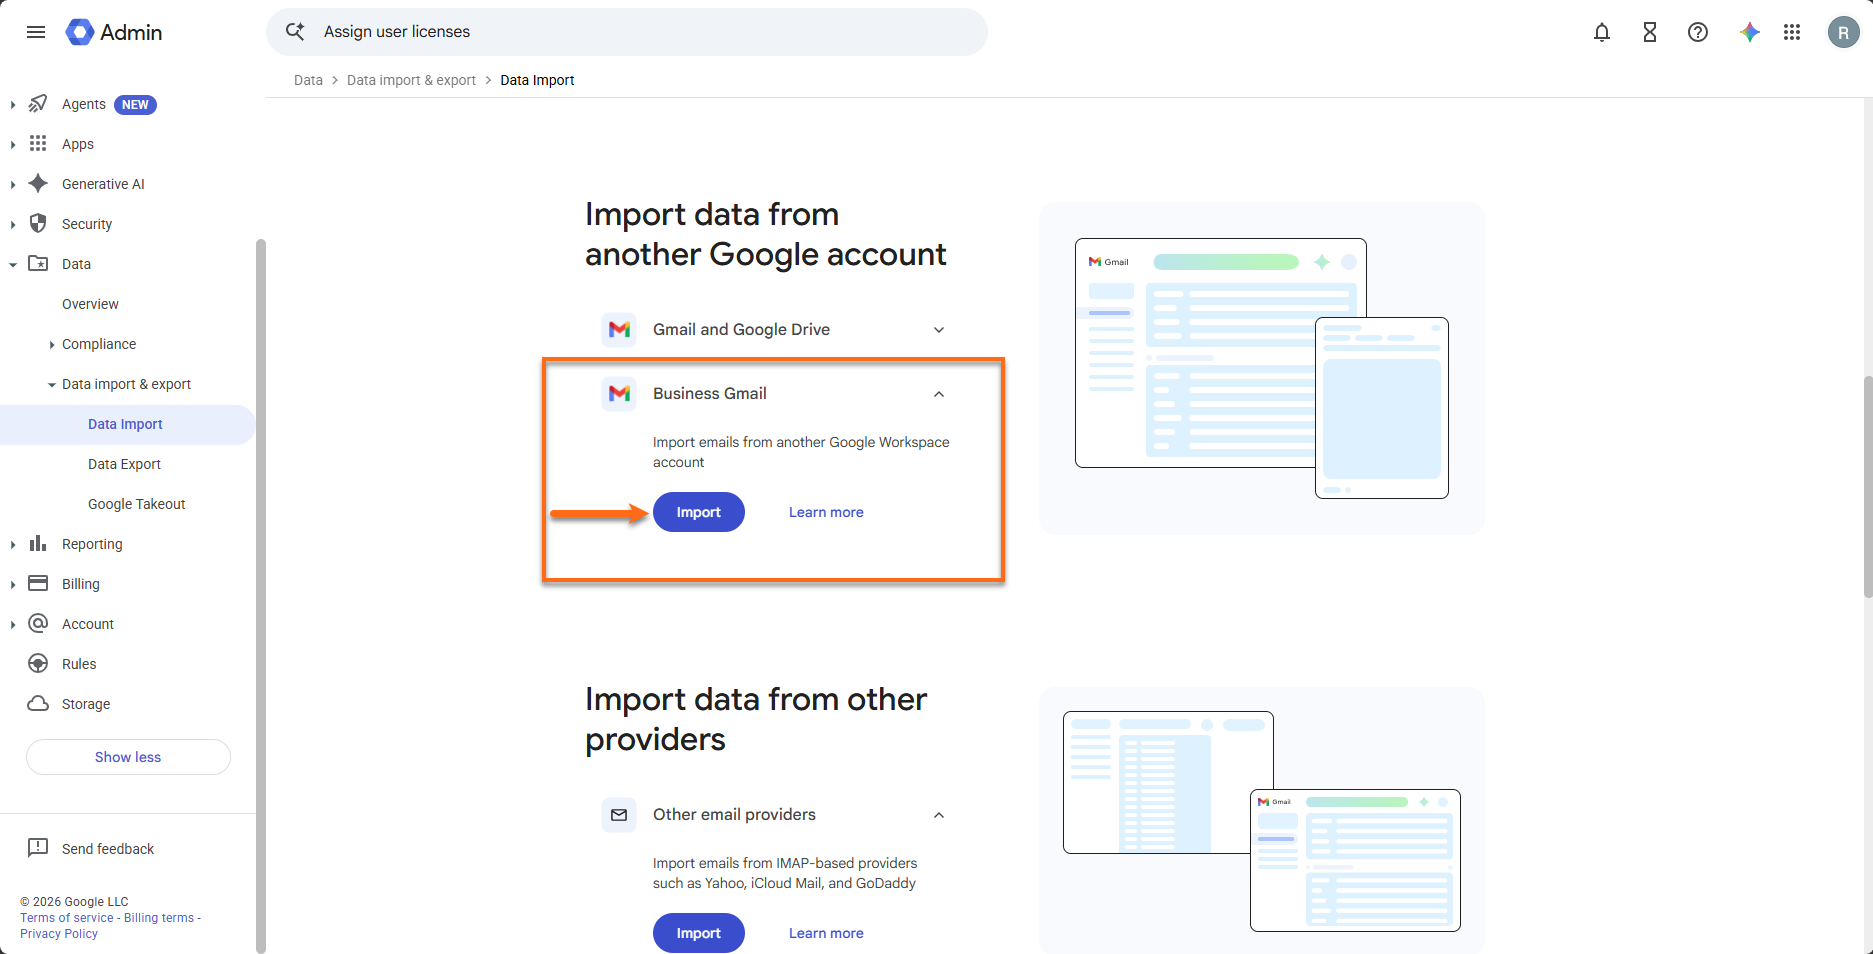
- Go to Menu, then Data, then Data import & export, then Data Import.
- Under Import data from another Google account, click Import in the Business Gmail section.
- For Source super admin email address, enter the email address of a super administrator on the source account, and click Request connection.
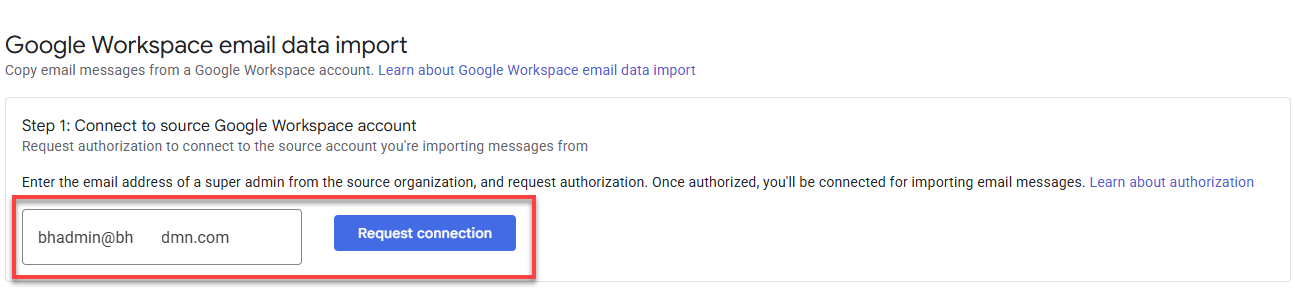
Important: Only the super administrator you enter in this field can authorize the request.
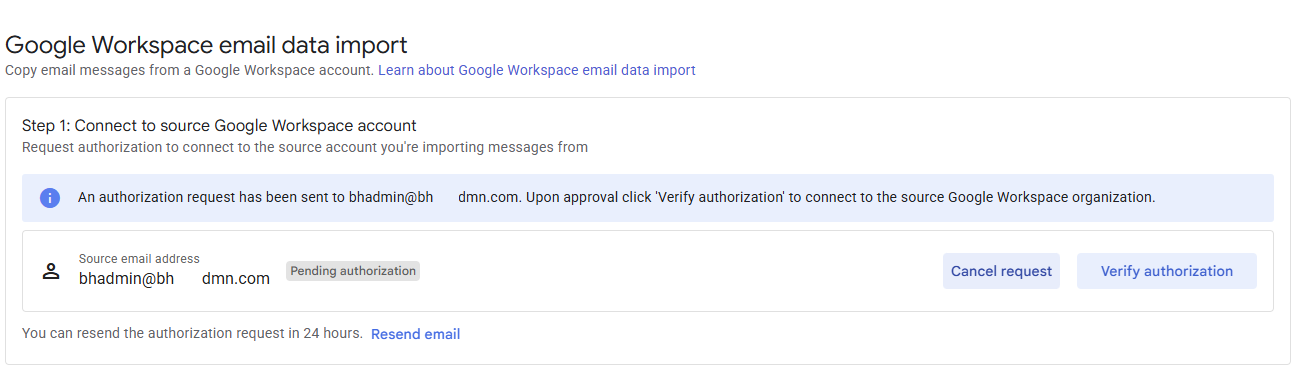
The status changes to Pending authorization, and an authorization request is sent to the super administrator you entered. The request expires in 24 hours. While you wait, you can click Cancel request to stop it, or Verify authorization after it’s approved. To send the request again, click Resend email. You must wait 24 hours after sending a request before you can resend it.
Part B: Authorize the Request (Source Account)
The super administrator of the source account completes these steps in their own account.
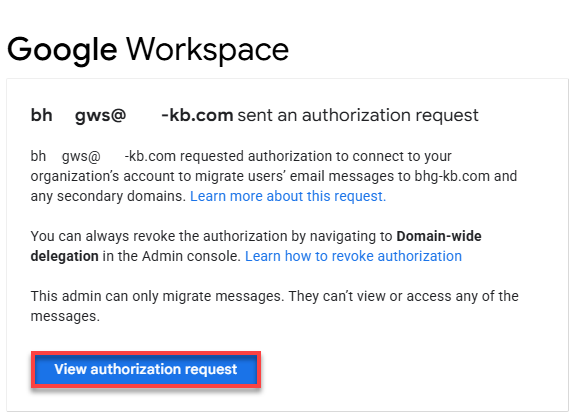
- Open the authorization request email and click View authorization request.
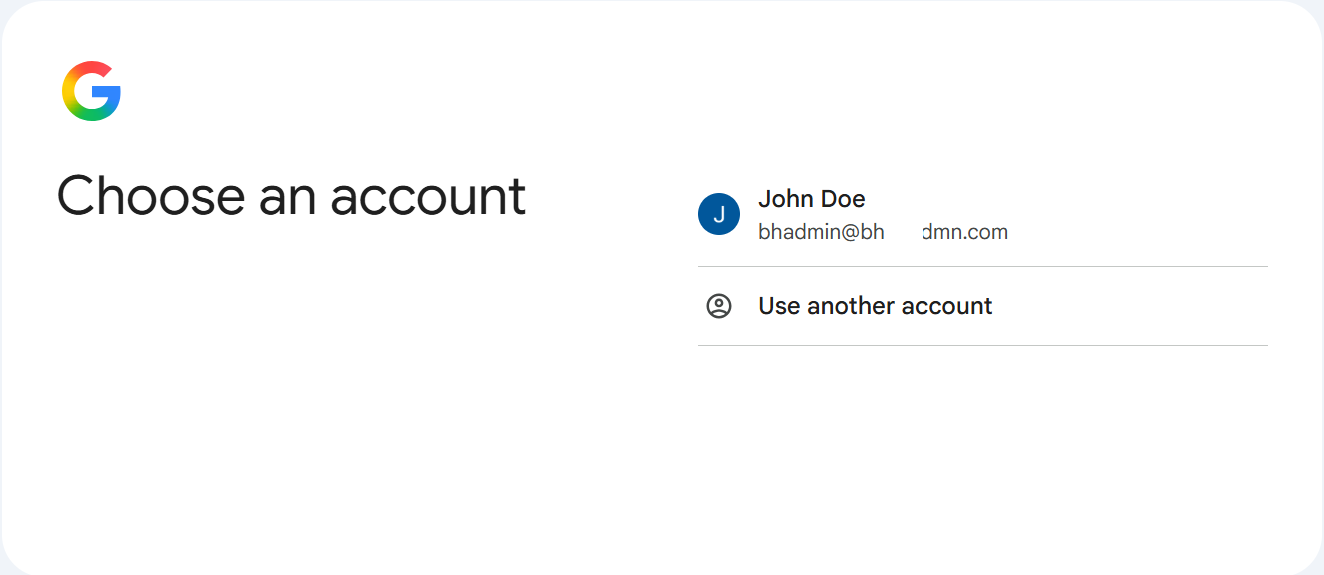
- If you’re asked to choose an account, select the super administrator account the request was sent to.
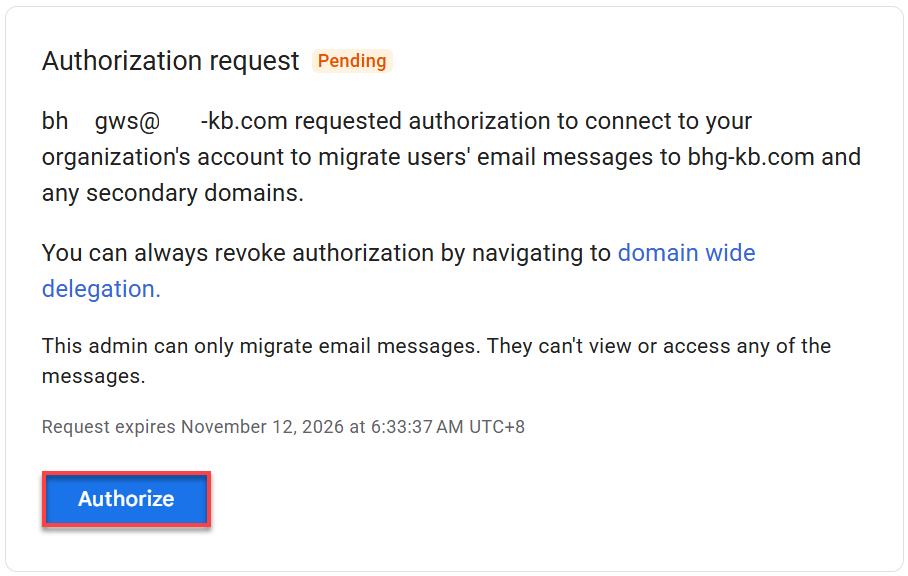
- Click Authorize.
- The request now shows Granted.
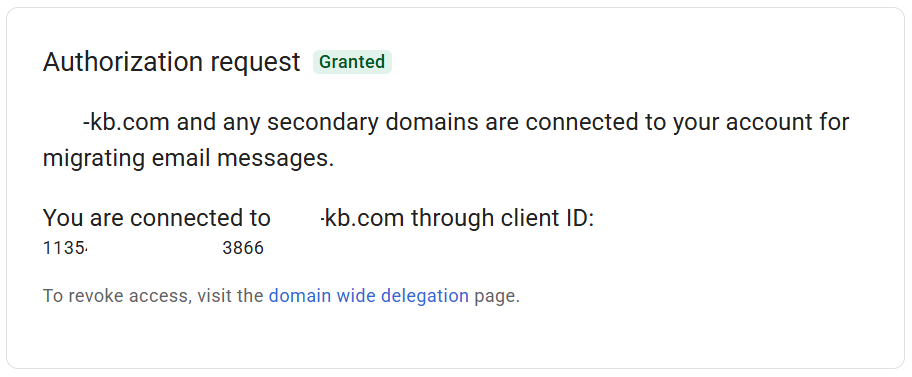
Authorizing the request also gives the data import tool domain-wide delegation in the source account. You can revoke this access at any time from the Domain-wide delegation page in the source account’s Admin console.
Part C: Verify the Connection
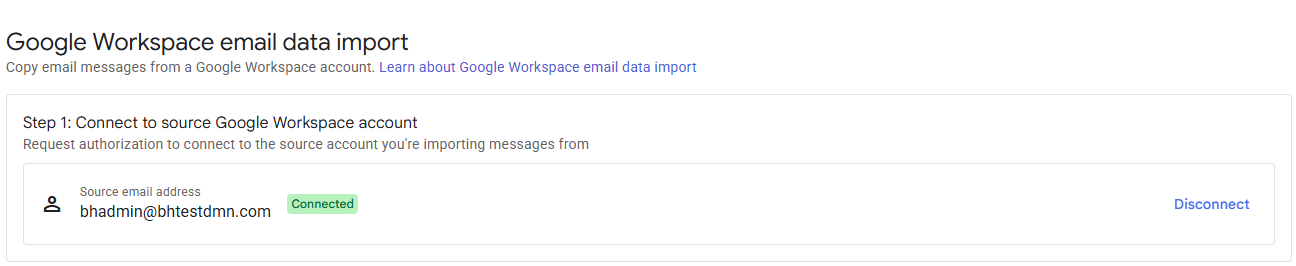
- In the Admin console of your Google Workspace account, click Verify authorization.
- The status changes to Connected. To remove the connection, click Disconnect.
Step 2: Upload Data Import Maps
An import map connects each user on the source account to a user on your account. The import tool uses it to copy email from the source user to the target user.
Create the Mapping File
- In a spreadsheet program, add the headers Source GUser (the email addresses on the source account) and Target GUser (the email addresses on your account). To get an example file, click Download a sample CSV.
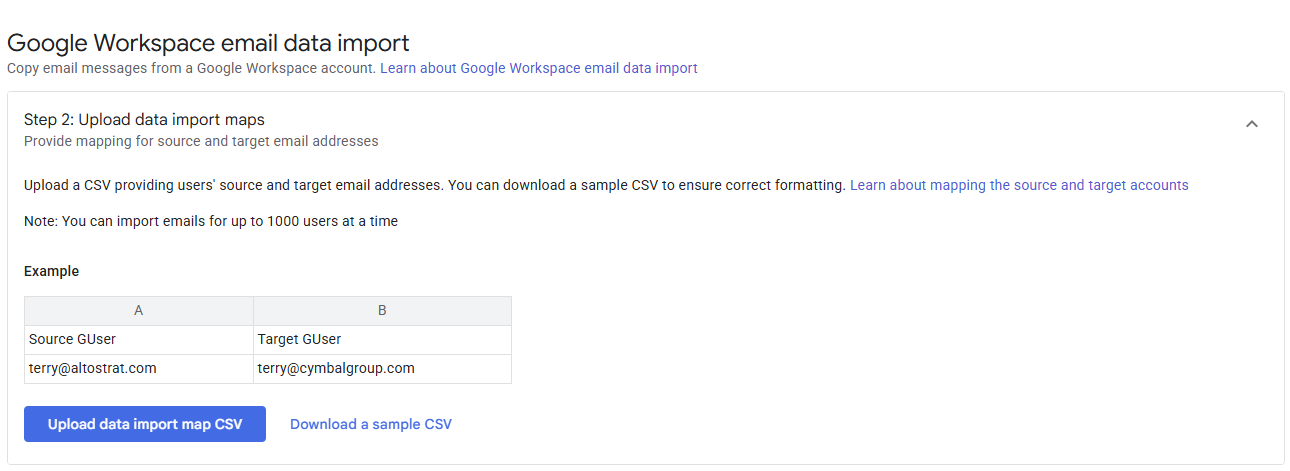
- Under the headers, enter a valid email address for each source user and for the matching target user. Both addresses are required. You can’t map one source user to more than one target user.
- Make sure the file has no more than 1,000 source users and is no larger than 128 MB.
- Save the file as a CSV.
Upload the File
- Click Upload data import map CSV.
- Select your CSV file, and then click Open.
- Click Tasks to confirm the file uploaded. The task list shows a completed message when all rows are uploaded.
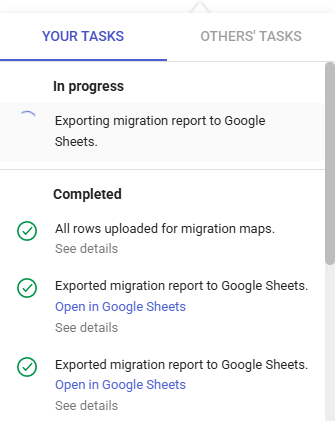
- The page now shows the name of your file with a green check mark.

If the file doesn’t upload or the upload gets stuck, delete it and try again. Select the file, click Delete, click Yes to confirm, and then upload a new file.
Step 3: Configure Data Import Settings
- For Start date, enter the date you want to copy email from, in MM/DD/YYYY format, or select it from the calendar. The import copies messages from that date up to the day you start the import.
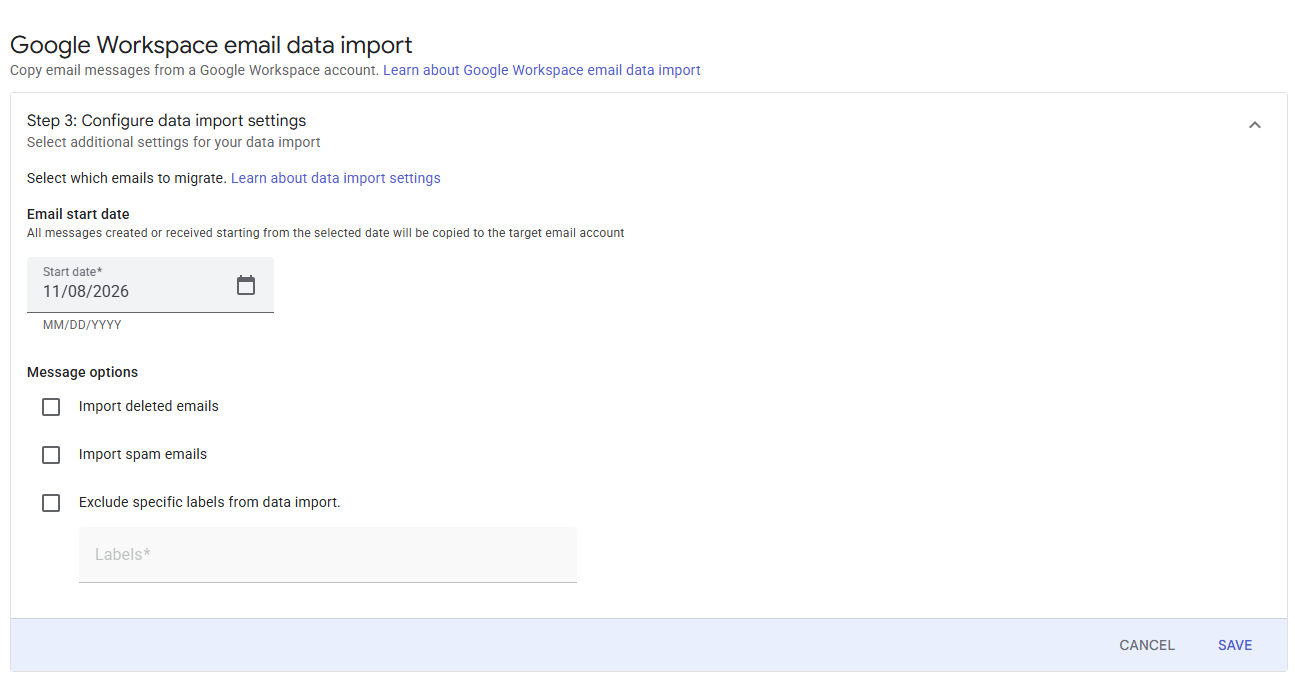
- Under Message options, check any of the following:
- Import deleted emails: Include messages that users deleted.
- Import spam emails: Include messages with the Spam label.
- Exclude specific labels from data import: Check this box, then enter the labels you don’t want imported in the Labels field, separated by commas.
- Click Save. To discard your changes, click Cancel.
Important: Check the start date before you save. Only messages from that date forward are copied, so choose a date early enough to include all the email you want to keep.
When you exclude labels, keep the following in mind:
- Enter each label and sublabel separately.
- For a sublabel, use the full path, with a forward slash between the parent label and the sublabel. For example, to exclude the label Travel and its sublabel Asia, enter
Travel,Travel/Asia. - Don’t add All Mail to the excluded labels. If you do, no email messages are imported.
Step 4: Import Data
- Click Start import.

- The status changes to In progress, and the numbers update automatically every 10 seconds.
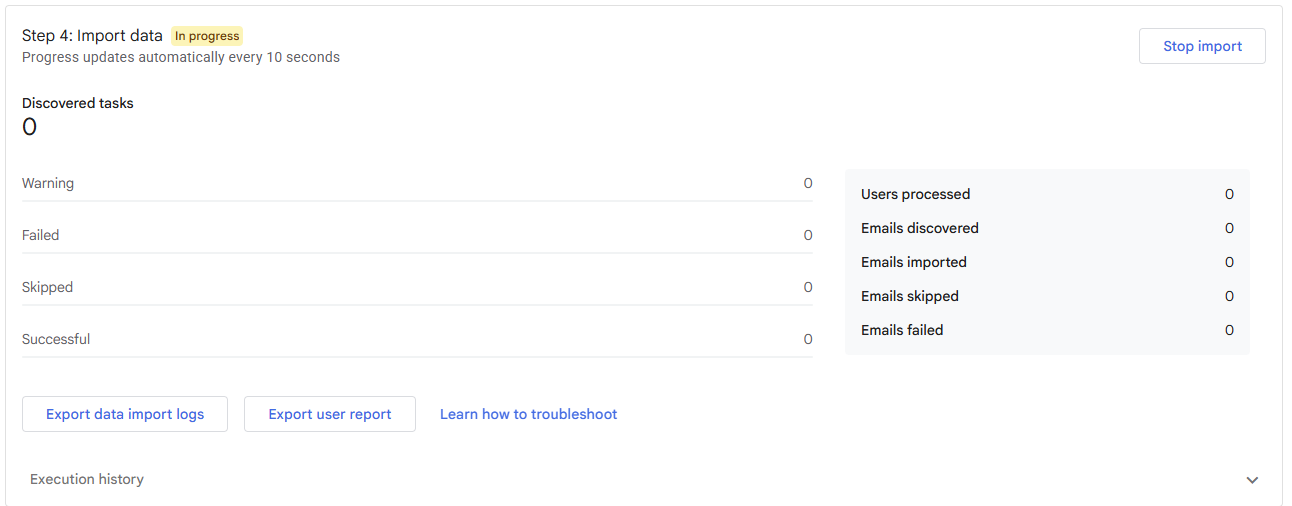
- When the import finishes, Google sends an email with the import statistics. Any reports are attached.
The page shows these numbers as the import runs:
- Discovered tasks: The total number of items, such as messages and labels, that were imported, skipped, or failed.
- Warning: Items that were imported but didn’t finish as expected.
- Failed: Items that didn’t import because of an error.
- Skipped: Items that were skipped.
- Successful: Items that imported successfully.
- Users processed: Users whose import is complete.
- Emails discovered, imported, skipped, and failed: The number of email messages in each group.
To stop an import that’s in progress, click Stop import.
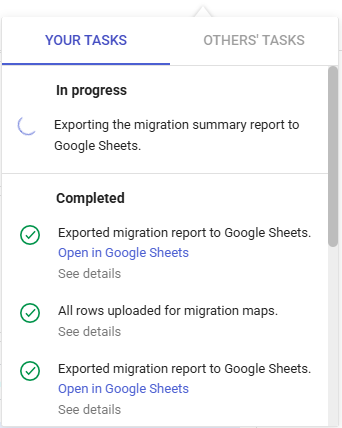
To save a report, click Export data import logs or Export user report. Click Tasks to follow the export and open the report in Google Sheets.
Note: When you start the import, Data Import appears as an authorized client for domain-wide delegation in your Google Workspace account.
Step 5: Run a Delta Import (Optional)
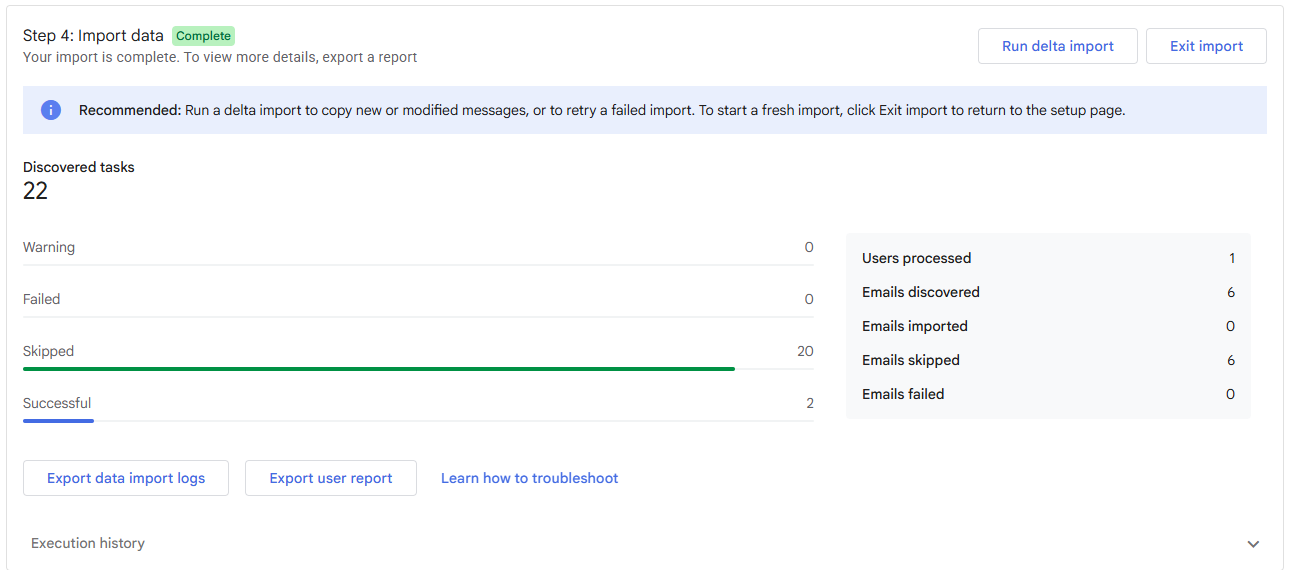
When the import is complete, the status shows Complete. To copy new or changed messages, or to retry an import that had failures, click Run delta import.
Step 6: Exit the Completed Import
- (Optional) Click Export data import logs or Export user report to save a report for your records.
- Click Exit import, then Exit and delete import.
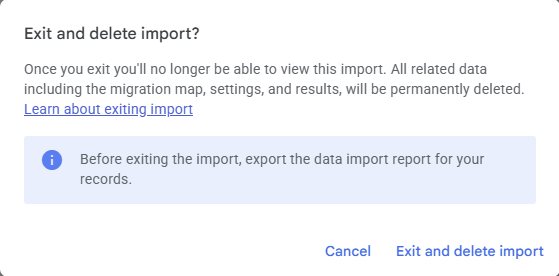
Important: Once you exit an import, you can no longer view it. The import map, settings, and results are permanently deleted, so export your reports first. You also can’t start a new import until you exit the completed one. When you exit, the import tool is removed from the domain-wide delegation settings.
Check Your Imported Mail
Sign in to one of the Google Workspace mailboxes you imported into and look for the messages. Labels, sublabels, and stars should come across with the mail.
Troubleshooting
| What you’re seeing | What to do |
|---|---|
| The authorization request expired | Requests expire after 24 hours. Click Resend email to send a new one. You must wait 24 hours after sending a request before you can resend it. |
| The source super administrator didn’t receive the request | Check that you entered the right email address. Only the super administrator you enter can authorize the request. Ask them to check their spam folder. |
| The status still shows Pending authorization | The source super administrator hasn’t approved yet. If they have, click Verify authorization to check again. |
| The import map won’t upload, or the upload gets stuck | Select the file, click Delete, click Yes to confirm, then upload a new file. Check that it has no more than 1,000 source users and is no larger than 128 MB. |
| A user’s mail didn’t import | Confirm the target user already exists in your account. The import tool doesn’t create accounts. Check the import logs to see why items failed. |
| No email imported at all | Check whether you added All Mail to the excluded labels in Step 3. If you did, no messages are imported. |
| Mail from before a certain date is missing | Only messages from your start date forward are copied. To import older mail, you’d need to exit the import and start a new one with an earlier start date. The new import might copy messages that were already imported, which can create duplicates in your users’ mailboxes. Before you exit, make sure you no longer need this import’s reports or delta imports. |
| A label or sublabel is missing | Check whether you excluded it in Step 3. Each label and sublabel is entered separately, and a sublabel uses its full path. |
| Some items show a warning | Warnings mean items imported but didn’t finish as expected. Export the data import logs to see the details. |
| You can’t start a new import | Exit the completed import first. You can only run one import at a time. |
Frequently Asked Questions
Does importing change anything in the source account?
No. The import copies messages to your account. Nothing in the source account is changed or deleted.
Can the source super administrator read our email?
No. The super administrator who approves the request can only migrate messages. They can’t view or open any of them.
How many users can I import at once?
Up to 1,000 source users in one import map, and the file must be no larger than 128 MB.
Do I need to create the target users first?
Yes. The import tool doesn’t create accounts. Each person you’re importing must already have a user account in your Google Workspace account.
Can I map one source user to more than one target user?
No. Each source user maps to one target user, and both addresses are required.
Do I need to turn on IMAP?
No. The import tool uses the Gmail API, so IMAP isn’t needed in either account.
What happens to the access granted during the import?
Authorizing the request gives the import tool domain-wide delegation in the source account, which you can revoke at any time. When you exit the completed import, the tool is removed from the domain-wide delegation settings in your account.
Can I run the import as a reseller for a customer account?
No. A super administrator of the account itself must set up and run the import.
Can Bluehost migrate our email for us?
Bluehost offers a paid Email Migration service, but it covers mailbox content only: your messages and folders. It doesn’t migrate autoresponders, mailing lists, or email rules and filters.
The service is also priced per mailbox, and each service you purchase covers one mailbox. Bulk migration isn’t included, so moving a whole organization means a separate purchase for each user. For an account with several users, the import tool described in this article is usually the better option.
Your Google Workspace plan must have been purchased through Bluehost, and your mailboxes must already exist. For pricing, requirements, and how to order, see Migration Services: Website and Email Migration.
Related Articles
- What Is Google Workspace?
- How to Set Up Google Workspace: Initial Setup Guide
- Bluehost Account Manager: Google Workspace Menu
- Adding Users to Google Workspace
- Add a Domain or Domain Alias to Google Workspace Guide
- Migration Services: Website and Email Migration
- Bluehost Migration: Important Things You Must Know
Summary
Importing email from another Google Workspace account lets your users keep their email history when they move to your Google Workspace account with Bluehost. A super administrator on your account requests authorization, a super administrator on the source account approves it, and you upload a CSV that maps each source user to a target user. After you choose your settings and start the import, you can run a delta import for any mail that arrived later.
If you need further assistance, Bluehost Chat Support is available 24 hours a day, 7days a week while Bluehost Phone Support is available 7 days a week from 7 am-12 midnight EST.
- Chat Support - While on our website, you should see a CHAT bubble in the bottom right-hand corner of the page. Click anywhere on the bubble to begin a chat session.
- Phone Support -
- US: 888-401-4678
- International: +1 801-765-9400
You may also refer to our Knowledge Base articles to help answer common questions and guide you through various setup, configuration, and troubleshooting steps.